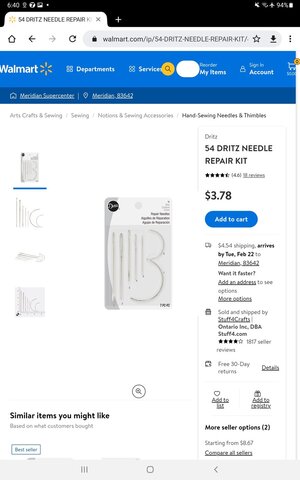
Can anyone recommend sewing needles for sewing sails?
-

Win a Free Custom Engraved Brass Coin!!!
As a way to introduce our brass coins to the community, we will raffle off a free coin during the month of August. Follow link ABOVE for instructions for entering.
You are using an out of date browser. It may not display this or other websites correctly.
You should upgrade or use an alternative browser.
You should upgrade or use an alternative browser.
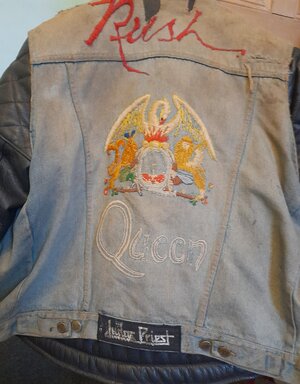
I'm sort of lucky in that the kit I have has pre-sown sails. I'm sort of unlucky that I don't like the standard of the sewing. I'm used to hand-sewing and actually quite enjoy it. I embroidered my cut-off denim bike jacket with a blend of Queen's album covers: A Day At The Races and A Night At The Opera. I also embroidered the Queen II album title and Rush, as it was on the Canadian band's Hemispheres album cover.
Embroidery or any sewing need needles to suit the thickness of silk/thread that you use and the toughness of the material that you are sewing. In my San Francisco kit, the sail material is pretty thin. Any needle will be fine, even very thin needles. If I decide to un-stitch and re-stitch the sails, I'll be using small, fine needles: just big enough to accept the thread I choose to best represent the scale of the model.
Remember that the needle will leave behind a hole that may not close up properly. I'd choose the finest needle you can get away with for the thread that you are going to use. Here's my 30 year old cut-off to show that I at least know the fundamentals of sewing. Remember, it's been to hundreds of 'drunken' bike rallies. The patched black tears are from when I got inadvertantly snagged, upside-down on a barbed wire fence! (I only had a knackered pair of black denims to cut apart to patch it, but I liked the look!) Also, be careful of the tension that you use with each stitch. Too much tension will result in elongated holes. On my bike jacket, this wasn't too much of an issue, but on your sails, it will look unsightly. You need enough tension for it to look tight, but not so much that you 'pinch' the sail material. You'll get the hang of it.
the phoenix wings were much neater and tighter when new. Now they are a bit ragged. I like the look, but this is an example of how threads can change over time. Your ship shouldn't get dragged through hedges or suspended from barbed wire fences, though, so if you get the stitches right now, they ought to last. Remember, small stitching! You're reproducing 1/64 to 1/90. 2mm is 120 to 180mm. That's another reason that I want to re-stitch my sails... the stitches are too loose and too big!

Last edited:
1. JoAnn's (joanns.com) "sewing" materials/tools store is the place to go. They have everything you will ever need in the way of sewing supplies for sails. In particular, they have needles; some in the store and some over the internet. The smallest needle for hand sewing is a number #12 (it comes in various cross sections). The next "larger" size is #10; I forget offhand the actual crossection dimensions. However, the actual crossection areas are "not"the same for all "models" of needles (I have some needle styles where the #12 is larger than the #10s). The only way to handle the problem is to buy one or two size #10s of different models and some #12s of different models (they are not expensive). Buy them over the internet; the stores may not carry every variation of needle made. The smallest size thread for hand sewing is size 70 (about 0.008" in diameter). The normal spool thread you find on the racks is size 50 (about 0.01" in diameter). A good color for the thread is "ecru"; ecru is almost invisible from about 3 feet away which is what you want). I have sewn about a hundred sails using this formula, more or less). They also have some great small scissors (made by Fiskars). The most useful for sails is the model with the "microtip". They sell for about $16 full price. However if you sign up for their newsletter, you will receive discount coupons ( 30, 40, 50%) which means they will only be about 7 to 8 bucks out of pocket (the discount coupons apply to everything in the store).
Hope this helps. I have been buying there for 15 years. Once you get to know the "system", you will save a lot of money.
Hope this helps. I have been buying there for 15 years. Once you get to know the "system", you will save a lot of money.
Thanks everybody.
Now there is a thing of beauty! Worn for years and a ton of love. Having seen all on the back of your Jacket and many other bands, those are hour of my younger life I will never forget including getting to go back stage with "Heart"I'm sort of lucky in that the kit I have has pre-sown sails. I'm sort of unlucky that I don't like the standard of the sewing. I'm used to hand-sewing and actually quite enjoy it. I embroidered my cut-off denim bike jacket with a blend of Queen's album covers: A Day At The Races and A Night At The Opera. I also embroidered the Queen II album title and Rush, as it was on the Canadian band's Hemispheres album cover.
Embroidery or any sewing need needles to suit the thickness of silk/thread that you use and the toughness of the material that you are sewing. In my San Francisco kit, the sail material is pretty thin. Any needle will be fine, even very thin needles. If I decide to un-stitch and re-stitch the sails, I'll be using small, fine needles: just big enough to accept the thread I choose to best represent the scale of the model.
Remember that the needle will leave behind a hole that may not close up properly. I'd choose the finest needle you can get away with for the thread that you are going to use. Here's my 30 year old cut-off to show that I at least know the fundamentals of sewing. Remember, it's been to hundreds of 'drunken' bike rallies. The patched black tears are from when I got inadvertantly snagged, upside-down on a barbed wire fence! (I only had a knackered pair of black denims to cut apart to patch it, but I liked the look!) Also, be careful of the tension that you use with each stitch. Too much tension will result in elongated holes. On my bike jacket, this wasn't too much of an issue, but on your sails, it will look unsightly. You need enough tension for it to look tight, but not so much that you 'pinch' the sail material. You'll get the hang of it.
the phoenix wings were much neater and tighter when new. Now they are a bit ragged. I like the look, but this is an example of how threads can change over time. Your ship shouldn't get dragged through hedges or suspended from barbed wire fences, though, so if you get the stitches right now, they ought to last. Remember, small stitching! You're reproducing 1/64 to 1/90. 2mm is 120 to 180mm. That's another reason that I want to re-stitch my sails... the stitches are too loose and too big!
View attachment 290599
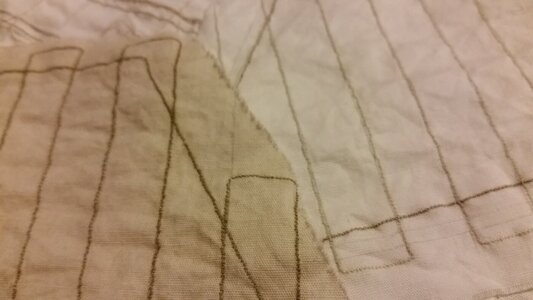
@Sea Burd - I used the smallest stitch that the sewing machine could make for the panel lines and peripheral lines of the sails for a ship at 1:100 scale, which is smaller than average for a model.
Here is the result close up. The sail on the right has already been stained with pine pitch to the desired color. On the left, the pencil marks next to the stitch line can still be seen because the sail has not yet been stained and washed, which removes them.
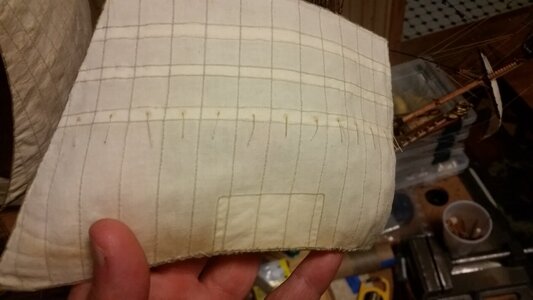
Here is a fore topgallant sail. The bolt rope was glued to the edge of the sail with PVA, soaked wet with starch, stretched on a jig, and allowed to dry. The stretch satin fabric is 97% cotton, 3% spandex so the belly of the sail can be made deep, consistent with early period sail of the 17th century. Later, sails were more flat when filled. The visual effect of using tight stitches can be seen,
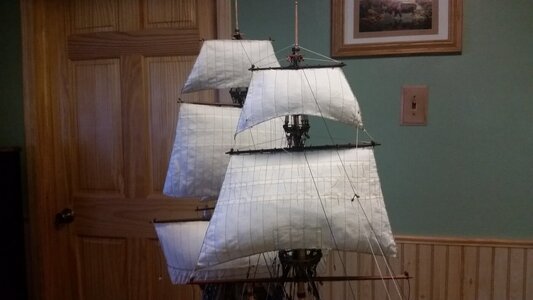
Sails on the model. I usually add sails to the model starting from the top and work down, allowing access to the belaying points down at the deck for as long as possible for tying off clew lines, leech lines, and sheets lines. The lowest sails get installed last.
Here is the result close up. The sail on the right has already been stained with pine pitch to the desired color. On the left, the pencil marks next to the stitch line can still be seen because the sail has not yet been stained and washed, which removes them.

Here is a fore topgallant sail. The bolt rope was glued to the edge of the sail with PVA, soaked wet with starch, stretched on a jig, and allowed to dry. The stretch satin fabric is 97% cotton, 3% spandex so the belly of the sail can be made deep, consistent with early period sail of the 17th century. Later, sails were more flat when filled. The visual effect of using tight stitches can be seen,

Sails on the model. I usually add sails to the model starting from the top and work down, allowing access to the belaying points down at the deck for as long as possible for tying off clew lines, leech lines, and sheets lines. The lowest sails get installed last.

Heart? Ooh. Being in my late teens, I recall Heart as much for the female band members as the music. I'd probably have fainted if I'd got back stage. I was like that with a number of bands in my youth. Pat Benetar I dreamed about. Abba? enough said, though oddly as I grew older I preferred Anni-Frid to Agnetha. Now I purely go on the music.Now there is a thing of beauty! Worn for years and a ton of love. Having seen all on the back of your Jacket and many other bands, those are hour of my younger life I will never forget including getting to go back stage with "Heart"
Thanks for the comment: I'm straying way off topic, though. Back to sewing...
I'm curious, Darius about those strands of rope that dangle from the sails in rows, mainly in the top half. What are they used for?
Kurt Konrath
Kurt Konrath
Those dangling lines are called reefing lines, used to shorten sail in high winds when you don't want full length in the wind, they pull bottom up and tie the material in like a sail is furled when in port.
Thanks Kurt. I guessed that but didn't know. Think I'll add some to my San Francisco sails. I'm adding lower decks and more, so I'd like the sails to look right.
Maybe interesting to read about "reefing"Heart? Ooh. Being in my late teens, I recall Heart as much for the female band members as the music. I'd probably have fainted if I'd got back stage. I was like that with a number of bands in my youth. Pat Benetar I dreamed about. Abba? enough said, though oddly as I grew older I preferred Anni-Frid to Agnetha. Now I purely go on the music.
Thanks for the comment: I'm straying way off topic, though. Back to sewing...
I'm curious, Darius about those strands of rope that dangle from the sails in rows, mainly in the top half. What are they used for?
On figure 504 you can see the reefing lines fixed
Uwek, that is interesting. I've added it to my ever growing list of bookmarks.
How long did it take to construct a real galleon? My model will probably take longer at this rate. One question leads to more of an answer than I bargained for. There are some lovely rigging details in that article that are crying out to be added to my little San Francisco.
Thanks! Much appreciated. "Reef topsails!"... "Aloft topmen! Trice up! Lay out! Take one reef!" I hope they had invented throat pastills in the 16th century, for all the shouting that went on. Maybe they just relied on the odd tot of rum. Looking at my little model growing, I can almost imagine being aboard.
Be aware that an early period galleon will not have all the features of a 19th century vessel, including reefing points, which I believe started showing up in stages, starting with the topsails, in the 17th century. Be careful to filter your late period sources and their contents for use on earlier 16th century vessels. The fastest way to learn about the time period of ship features is to ask members of this forum, which usually have the answers. Books like R.C. Anderson book on rigging do a great job talking about the time period rigging features started appearing and when they went obsolete. Even R.C. Anderson can often only sometimes provide approximate dates and educated guesses but it's better to use educated guesses that wild guesses.Uwek, that is interesting. I've added it to my ever growing list of bookmarks.
How long did it take to construct a real galleon? My model will probably take longer at this rate. One question leads to more of an answer than I bargained for. There are some lovely rigging details in that article that are crying out to be added to my little San Francisco.
Thanks! Much appreciated. "Reef topsails!"... "Aloft topmen! Trice up! Lay out! Take one reef!" I hope they had invented throat pastills in the 16th century, for all the shouting that went on. Maybe they just relied on the odd tot of rum. Looking at my little model growing, I can almost imagine being aboard.
Last edited:


