I have ignored the Caldercraft Mary Rose instructions that suggest fitting the shrouds in pairs with a deadeye on each end
of single lengths of cord. This leaves me free to generate the shrouds and ratlines conveniently on the bench.
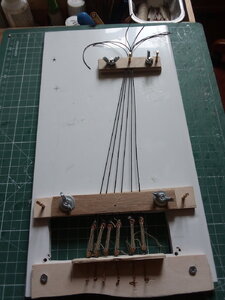
I have modified an existing jig to the following form.
A dummy chain plate has been made from a scrap of ply with holes drilled at intervals matching the chain plate on the model.
This is fixed on the jig. The chains on the lower deadeyes are threaded through the holes and pinned (fairly arbitrarily) to the board underneath
The shrouds, with upper deadeyes attached, are passed through the upper and lower clamps.
The lower clamp is pegged to the board just above its reeving hole.
The central peg in the upper clamp is positioned relative to the chain plate at a point where the crow's nest would be.
The upper deadeyes are placed in their approximate places relative to the chain plate.
The shrouds are drawn tight and the clamp wingnuts tightened.
I now have two rows of deadeyes firmly secured and accessible from front and back, Reeving the lanyards is easy.
(first picture below)
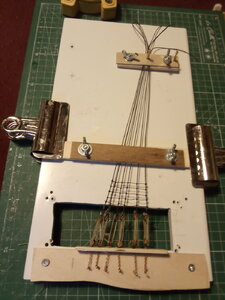
After reeving the lanyards the lower clamp is removed and the upper clamp eased.
The shrouds are pulled straight and the lanyards adjusted to get the preferred separation of upper and lower deadeyes.
The upper clamp is tightened, the lower clamp placed about 15mm above the upper deadeyes and tightened.
Two or three rows of ratlines are attached. The lower clamp is moved up a bit and the process repeated. (second picture below)
This jig clamps the shrouds with spacings appropriate to the height at which ratlines are being attached.
At any point the clamps can be eased teporarily to straighten out and re-tension the shrouds.


I found that a comb is a useful device to align the knots on the current ratline.
Occasionally I find a rather grey, additional ratline that I don't remember applying.
of single lengths of cord. This leaves me free to generate the shrouds and ratlines conveniently on the bench.
I have modified an existing jig to the following form.
A dummy chain plate has been made from a scrap of ply with holes drilled at intervals matching the chain plate on the model.
This is fixed on the jig. The chains on the lower deadeyes are threaded through the holes and pinned (fairly arbitrarily) to the board underneath
The shrouds, with upper deadeyes attached, are passed through the upper and lower clamps.
The lower clamp is pegged to the board just above its reeving hole.
The central peg in the upper clamp is positioned relative to the chain plate at a point where the crow's nest would be.
The upper deadeyes are placed in their approximate places relative to the chain plate.
The shrouds are drawn tight and the clamp wingnuts tightened.
I now have two rows of deadeyes firmly secured and accessible from front and back, Reeving the lanyards is easy.
(first picture below)
After reeving the lanyards the lower clamp is removed and the upper clamp eased.
The shrouds are pulled straight and the lanyards adjusted to get the preferred separation of upper and lower deadeyes.
The upper clamp is tightened, the lower clamp placed about 15mm above the upper deadeyes and tightened.
Two or three rows of ratlines are attached. The lower clamp is moved up a bit and the process repeated. (second picture below)
This jig clamps the shrouds with spacings appropriate to the height at which ratlines are being attached.
At any point the clamps can be eased teporarily to straighten out and re-tension the shrouds.


I found that a comb is a useful device to align the knots on the current ratline.
Occasionally I find a rather grey, additional ratline that I don't remember applying.

