• LUCZORAMA SHIPWRECK SCAVENGER HUNT GIVEAWAY. 4 Weeks of Fun • 1 Legendary Prize ((OcCre’s Fram Ship)) • Global Crew Welcome!
    **VIEW THREAD HERE**

Slanting Ship on a pedestal

Mamoli's Rattlesnake...
I quote Cosair. The Issue is the kind of pedestal you elected, a figure that operate its leverage right on the wooden mahogany strake (I remeber that kit well enough) glued to the bulkhead and reproducing the actual keel. On my last model I drilled deeply two holes right in the plywood of the bulkhead and then I used two mere carbon rods of 3mm as pedestals. A minimalist (I hate whatever element of the presentation interferes with hull's lines), rigid and definitely robust solution. So, my hint is to fix the keel regluing it in place, restore the painting work and then to operate two brand new holes at a certain distance from the damaged areas.
Any screw seriously "biting" could otherwise damage model's inner structure even further... IMHO.
I encountered the same problem on one of my ships. Using a larger screw probably will not work unless the direction of the original hole is changed or a new hole is drilled. I solve my problem by inserting a small wedge (like s split washer) under the appropriate side of the pedestals. Simple and completely unobtrusive. This will work only if the amout of lean is slight.
 
This was my first ship I did 24 years ago. Unfortunately plans and directions always leave out a step to prepare the mounting. It was the last thing for me to attach to the ship. I am planning ahead now that we have the internet. I feel ship mounting is a rarely discussed theme during the process. Be nice if someone out there made a guide or video of these custom changes that need to be made to any ship model during building of the hull.
 
This was my first ship I did 24 years ago. Unfortunately plans and directions always leave out a step to prepare the mounting. It was the last thing for me to attach to the ship. I am planning ahead now that we have the internet. I feel ship mounting is a rarely discussed theme during the process. Be nice if someone out there made a guide or video of these custom changes that need to be made to any ship model during building of the hull.
The subject of how to mount a ship model has come up several times in forums, but a comprehensive guide on the various ways to mount a model is something you don't see in modeling books or forums. Most builders figure out a method for themselves, and a few kits do have instructions in how to mount their model built into the steps of their instructions.

I will try to describe a couple of the ways modelers make ship mountings.

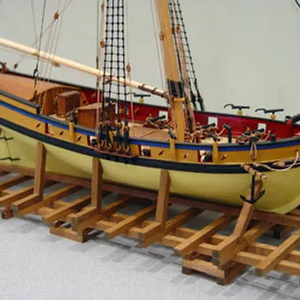
Typically, a model will be supported in four different ways. The first, and least used, is with supports that are similar to supports used in a shipyard, consisting of number of stilts holding up the hull.

The first, and least common, is the use of multiple supports, often simulating those used in a shipyard to support a hull during construction. This is often used in drydock dioramas.
1717352413658.png

The second is using cradles or saddles, either mounted to a baseboard or as part of a stand assembly.
1717352682274.png

The third is using a combination of pedestals and cradle to offer lateral support for the model.
1364 Ship on New Stand.jpg

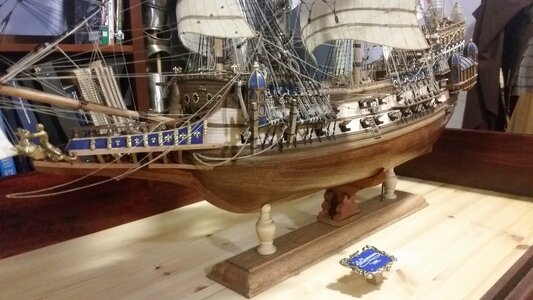
The fourth, and most traditional method, is the use of pedestals. This is the method I will go into some detail on. The pedestals often have notches where the keel resides. These are not sufficient by themselves to hold the model upright. If used without further support, there is great danger snapping off the keel or break off parts of it should the model be bumped from the side, If the model is heavy, the weight of the hull itself may be enough to cause this damage to occur, and it doesn't matter how tight the keel fits in the notches. The model will want to lean over to one side or the other.
1717354414235.png

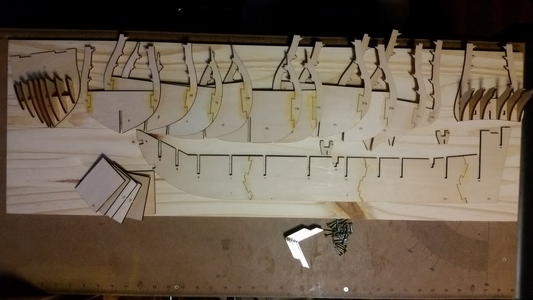
You need to plan how to mount the pedestals right from the beginning, at this stage in construction.
1717353075064.png

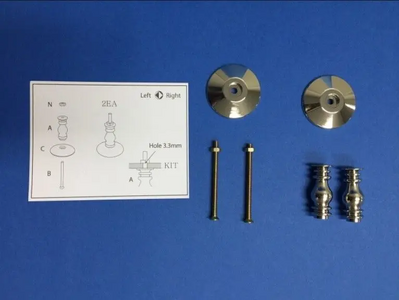
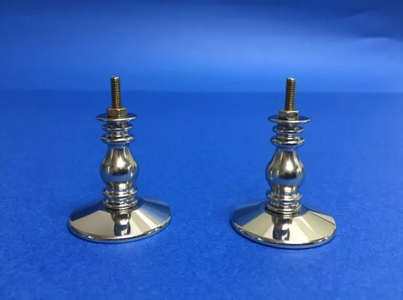
A pedestal assembly usually includes a treaded rod or screw which passes through the pedestal, and up into the hull, where it engages an internally threaded fastener, typically a nut. In the instructions below, the pedestal nut simply rests on the inside surface for a plastic ship model. For a wooden model there is more to be done, as will be explained.
1717353345889.png

1717353540137.png

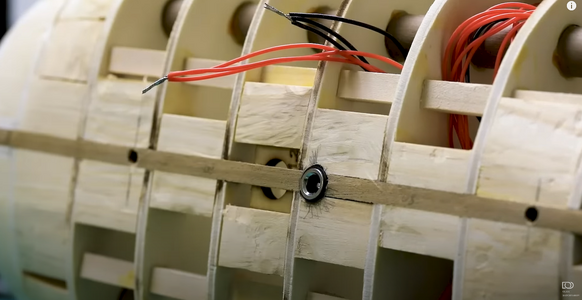
Below is a picture of Ohla Batchvarov's model of a Ragusan carrack. Note all the solid wood around the holes in the keel for strength. You can see two holes in the keel where the threaded rods or screws will pass through the pedestals and into the hull, plus and electrical socket between them which is used to power the internal lights. What you can't see are the two nuts higher up inside the hull which are encapsulated on all sides with solid wood about 3-5 cm above the keel. The higher the nuts are mounted in the hull and the longer the threaded rod, the more support is provided. These metal nuts accept the threaded rod or machine screws. The nuts are glued into solid wood so they cannot come loose or rotate. The threaded rod or screws are inserted through the baseboard, pedestals, and into the model and are tightened from underneath the baseboard.
1717353613310.png

An alternative to using threaded rods or screws is the use of very long rods which are full supported by sold wood and reach high up into the hull. These have the advantage of allowing you to lift the model off the baseplate without having to unscrew any fasteners. Ken3335 on the Model Ship World Forum used this technique on his model of HMS Royal William below. The model relies solely on the rods and the internal blocks firmly attached to the hull structure to support the model.
1717354094736.png

1717355797871.png

Hope this quick little tutorial helps. If your model is too far along to allow for proper internal support blocks and hardware for the use of pedestals, you will have to use cradles or a combination of cradle and pedestals to proper support the model.
 
If life dealt you a full set of cards, you would have to watch for the jokers. They always show their ways. I still cannot get my Garboard plank perfect. Instructions suck. Caught a 120 lb blue fin tuna off Baha yesterday, and I still cannot get the rabbet and Garboard plank correct. Tuna.... bagged. Garboard still in frustration. Is there a woman involved? And God said, I will create woman. He has not slept since.

I Love this sight and all of the people here. Mostly Uweks full hull Granado. I hope he can cook because my next adventure is The Netherlands' and Austria.

Tonight, I Volunteered to look for a young man who jumped off the I-205 bridge into the Columbia River. My Neice knew him. I really have second thoughts of performing my duty. I am just a man with a nice boat. Team up with US Coast Guard and search. I really do not know how to put this in words. I hope I am not the person who locates him. I only hope his family can deal with the consequences. I think life is not that difficult. But then again, who am I? I will trailer 60 miles downriver and launch.

I am happy I found a few of my fishing buds to help.

bye
Searching for a lost man is always heartbreaking. I'm glad you find solace in fishing and have a fine boat. Those are some of the best things in life.
 
The subject of how to mount a ship model has come up several times in forums, but a comprehensive guide on the various ways to mount a model is something you don't see in modeling books or forums. Most builders figure out a method for themselves, and a few kits do have instructions in how to mount their model built into the steps of their instructions.

I will try to describe a couple of the ways modelers make ship mountings.

Typically, a model will be supported in four different ways. The first, and least used, is with supports that are similar to supports used in a shipyard, consisting of number of stilts holding up the hull.

The first, and least common, is the use of multiple supports, often simulating those used in a shipyard to support a hull during construction. This is often used in drydock dioramas.
View attachment 450978

The second is using cradles or saddles, either mounted to a baseboard or as part of a stand assembly.
View attachment 450979

The third is using a combination of pedestals and cradle to offer lateral support for the model.
View attachment 450980

The fourth, and most traditional method, is the use of pedestals. This is the method I will go into some detail on. The pedestals often have notches where the keel resides. These are not sufficient by themselves to hold the model upright. If used without further support, there is great danger snapping off the keel or break off parts of it should the model be bumped from the side, If the model is heavy, the weight of the hull itself may be enough to cause this damage to occur, and it doesn't matter how tight the keel fits in the notches. The model will want to lean over to one side or the other.
View attachment 450986

You need to plan how to mount the pedestals right from the beginning, at this stage in construction.
View attachment 450981

A pedestal assembly usually includes a treaded rod or screw which passes through the pedestal, and up into the hull, where it engages an internally threaded fastener, typically a nut. In the instructions below, the pedestal nut simply rests on the inside surface for a plastic ship model. For a wooden model there is more to be done, as will be explained.
View attachment 450982

View attachment 450983

Below is a picture of Ohla Batchvarov's model of a Ragusan carrack. Note all the solid wood around the holes in the keel for strength. You can see two holes in the keel where the threaded rods or screws will pass through the pedestals and into the hull, plus and electrical socket between them which is used to power the internal lights. What you can't see are the two nuts higher up inside the hull which are encapsulated on all sides with solid wood about 3-5 cm above the keel. The higher the nuts are mounted in the hull and the longer the threaded rod, the more support is provided. These metal nuts accept the threaded rod or machine screws. The nuts are glued into solid wood so they cannot come loose or rotate. The threaded rod or screws are inserted through the baseboard, pedestals, and into the model and are tightened from underneath the baseboard.
View attachment 450984

An alternative to using threaded rods or screws is the use of very long rods which are full supported by sold wood and reach high up into the hull. These have the advantage of allowing you to lift the model off the baseplate without having to unscrew any fasteners. Ken3335 on the Model Ship World Forum used this technique on his model of HMS Royal William below. The model relies solely on the rods and the internal blocks firmly attached to the hull structure to support the model.
View attachment 450985

View attachment 450989

Hope this quick little tutorial helps. If your model is too far along to allow for proper internal support blocks and hardware for the use of pedestals, you will have to use cradles or a combination of cradle and pedestals to proper support the model.
This is really great info! I am going to plan ahead if I do another pedestal mount in the future. Thanks
 
Back
Top