
-

SUBSCRIBE TO SHIPS IN SCALE TODAY!
The beloved Ships in Scale Magazine is back and charting a new course for 2026!
Discover new skills, new techniques, and new inspirations in every issue.
NOTE THAT OUR NEXT ISSUE WILL BE July/August 2026 -

Win a Free Custom Engraved Brass Coin!!!
As a way to introduce our brass coins to the community, we will raffle off a free coin during the month of August. Follow link ABOVE for instructions for entering.
You are using an out of date browser. It may not display this or other websites correctly.
You should upgrade or use an alternative browser.
You should upgrade or use an alternative browser.


Ubjs
There are probably a number of starting points used by modelers, and whatever works best for you is the way to go.
Keep in mind that there is no relationship between the location of the gun ports and the planking of the outside of the hull. The ports follow the sheer of the decks which is different than the sheer line of the outboard planking. For the planking, some folks start with the wales, others start with the garboard strake as its ending point at the forward end of the keel is critical. You get to choose in the end, but maybe consider looking for additional and better information on how to plank a hull. Once the hull is planked you can use the drawings to mark out the ports and cut them. How to do this has been discussed here at SOS a number of times recently and should be helpful.
Allan
There are probably a number of starting points used by modelers, and whatever works best for you is the way to go.
I saw an idea to start with planks at gun ports.
Keep in mind that there is no relationship between the location of the gun ports and the planking of the outside of the hull. The ports follow the sheer of the decks which is different than the sheer line of the outboard planking. For the planking, some folks start with the wales, others start with the garboard strake as its ending point at the forward end of the keel is critical. You get to choose in the end, but maybe consider looking for additional and better information on how to plank a hull. Once the hull is planked you can use the drawings to mark out the ports and cut them. How to do this has been discussed here at SOS a number of times recently and should be helpful.
Allan
This is sound advice and I would add one other consideration. There are often additions to the hull after the planking is on that require measurements off the plans to place correctly. So starting planking with the wales or a plank under the sheer of the gun ports give you a reference point for later measurements.Ubjs
There are probably a number of starting points used by modelers, and whatever works best for you is the way to go.
Keep in mind that there is no relationship between the location of the gun ports and the planking of the outside of the hull. The ports follow the sheer of the decks which is different than the sheer line of the outboard planking. For the planking, some folks start with the wales, others start with the garboard strake as its ending point at the forward end of the keel is critical. You get to choose in the end, but maybe consider looking for additional and better information on how to plank a hull. Once the hull is planked you can use the drawings to mark out the ports and cut them. How to do this has been discussed here at SOS a number of times recently and should be helpful.
Allan

Very true. As well, if the model is fully framed, it is nice to just leave off some of the planking to show off the framing and avoid having to close in the hull with perfect planking which can be difficult.There is a lot to be thankful for in a coppered hull. It can hide a myriad of "faults"
Allan

Getting the second, final planking later to look correct as far as the planking pattern, and not having any defects is a challenge for newer builders, but it does get easier after your first model. If you try to bypass all the tough aspects of model building like planking, carving, or rigging, you won't learn these aspects, and that limits the level of detail and complexity of your models in the long run. On my current project, there are literally hundreds of carvings which are required, and I suck at carving. So, my answer is to make 3-D printed computer models for those parts as an alternative. That will not make my carving skills improve, however, but it will allow the level of detail to be surpassed as far as the decorations go.

Correct--this is what happens when you don't do that--the white spots are putty covering patched gun ports which were incorrectly placed.This is sound advice and I would add one other consideration. There are often additions to the hull after the planking is on that require measurements off the plans to place correctly. So starting planking with the wales or a plank under the sheer of the gun ports give you a reference point for later measurements.
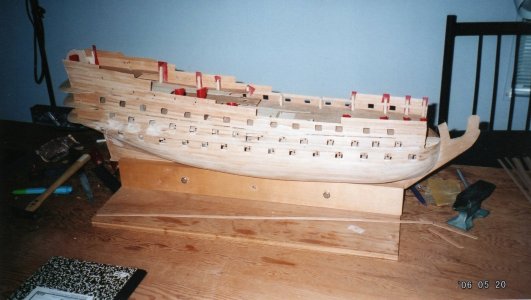
That happens occasionally. Luckily any modifications or corrected to the hull's first layer don't count, because you can correct them and cover over the seams with the second planking layer! The double planked hull has this advantage over the single layer hull.Correct--this is what happens when you don't do that--the white spots are putty covering patched gun ports which were incorrectly placed.
View attachment 510597


i always dis. this even before any decks were inserted. it is nor a dificult operation -el capiStart planking with gun ports, pros and cons?
In Dressel's book Planking technics I saw an idea to start with planks at gun ports.
I think it looks interesting.
i always dis. this even before any decks were inserted. it is nor a dificult operation -el capi


Good morning,Start planking with gun ports, pros and cons?
In Dressel's book Planking technics I saw an idea to start with planks at gun ports.
I think it looks interesting.
Read a book, get an idea. Of all the ideas, try and pick one that works in your shop, then stick with it. Installing the wale first, and in correct position establishes the top frame planks will fill, the keel is the lower frame, stem forward and stern post aft. Keep track of what you are doing, take frequent measurements from the plan and mark gunport locations.
If you are serious about this, don’t bite off more than you can chew. In other words build woodworking skills on simpler projects, if you need a lot of filler something is wrong. Apply filler sparingly, mask along seams, and only fill seams. Avoid applying filler on the plank face. If you are relying on the second planking layer to cover flaws, something is wrong. Figure it out on a small project before taking on your Victory.
Best of luck with it.
-Rich
Ok, the answer is, either way works.
Thank you.
Thank you.
- Joined
- Oct 2, 2025
- Messages
- 484
- Points
- 158

This is an open forum - help with models - not just kits - not just PoB kits
From the answers I am guessing that PoB two layer is the method in question?
Theory only - but I would think a complete layer one planking would be the starting point.
Layer one can start anywhere. It can be diagonal. It just has to be a smooth. What it looks like does not matter as long as it does its job correctly.
The wale is not actually a wale - it is just a thicker layer two plank or planks? It sits on top of layer one as does every other plank?
Regardless - all of the planks key off of the wale. If it is not correct nothing else can be. POF - carved - PoB with a solid wall of filler instead of layer one planking - or two layer PoB - all key off of the wale.
Next comes the holes for the ports.
The decks had camber - the line from stem to sternpost was not horizontal. The ends were higher than the middle - pools of water = bad. The decks also had roundup. The cross section at deck level was a curve so that water would flow from the middle to the sides. The roundup does not matter for gun ports. The fore to aft camber does matter. The gun trucks rode on the deck. The carronades sat on the deck. A deck curving up towards the bow and stern meant that the trucks were not horizontal except midship. The port sills could not be horizontal where the gun barrels pivoted at an angle.
Some of the gun ports were squares or rectangles - but the farther from the middle the more they were a parallelogram - but with 90 degree sides.
To get the sill angle to follow the angle of the floor having a deck or at least a deck beam clamp for a measuring jig to ride on is necessary. The angle of the lintel is best determined by measuring from the sill.
Sliding in preformed 90 degree angle window frames for every gun port is fine if a cartoon ship is your goal.
Holes first - wales second - minor wales third - then build the planking from the wale.
I think that an elegant look would be had if the outer layer of the port lids came from their segment of the planking on either side. When closed, the lid would look like it is part of the run of the planking strake - which it would actually be.
There seems to be a fair bit of assuming with the short question.Start planking with gun ports, pros and cons?
From the answers I am guessing that PoB two layer is the method in question?
Theory only - but I would think a complete layer one planking would be the starting point.
Layer one can start anywhere. It can be diagonal. It just has to be a smooth. What it looks like does not matter as long as it does its job correctly.
The wale is not actually a wale - it is just a thicker layer two plank or planks? It sits on top of layer one as does every other plank?
Regardless - all of the planks key off of the wale. If it is not correct nothing else can be. POF - carved - PoB with a solid wall of filler instead of layer one planking - or two layer PoB - all key off of the wale.
Next comes the holes for the ports.
The decks had camber - the line from stem to sternpost was not horizontal. The ends were higher than the middle - pools of water = bad. The decks also had roundup. The cross section at deck level was a curve so that water would flow from the middle to the sides. The roundup does not matter for gun ports. The fore to aft camber does matter. The gun trucks rode on the deck. The carronades sat on the deck. A deck curving up towards the bow and stern meant that the trucks were not horizontal except midship. The port sills could not be horizontal where the gun barrels pivoted at an angle.
Some of the gun ports were squares or rectangles - but the farther from the middle the more they were a parallelogram - but with 90 degree sides.
To get the sill angle to follow the angle of the floor having a deck or at least a deck beam clamp for a measuring jig to ride on is necessary. The angle of the lintel is best determined by measuring from the sill.
Sliding in preformed 90 degree angle window frames for every gun port is fine if a cartoon ship is your goal.
Holes first - wales second - minor wales third - then build the planking from the wale.
I think that an elegant look would be had if the outer layer of the port lids came from their segment of the planking on either side. When closed, the lid would look like it is part of the run of the planking strake - which it would actually be.
Excellent description of the proper geometry of gun ports and planking.This is an open forum - help with models - not just kits - not just PoB kits
There seems to be a fair bit of assuming with the short question.
From the answers I am guessing that PoB two layer is the method in question?
Theory only - but I would think a complete layer one planking would be the starting point.
Layer one can start anywhere. It can be diagonal. It just has to be a smooth. What it looks like does not matter as long as it does its job correctly.
The wale is not actually a wale - it is just a thicker layer two plank or planks? It sits on top of layer one as does every other plank?
Regardless - all of the planks key off of the wale. If it is not correct nothing else can be. POF - carved - PoB with a solid wall of filler instead of layer one planking - or two layer PoB - all key off of the wale.
Next comes the holes for the ports.
The decks had camber - the line from stem to sternpost was not horizontal. The ends were higher than the middle - pools of water = bad. The decks also had roundup. The cross section at deck level was a curve so that water would flow from the middle to the sides. The roundup does not matter for gun ports. The fore to aft camber does matter. The gun trucks rode on the deck. The carronades sat on the deck. A deck curving up towards the bow and stern meant that the trucks were not horizontal except midship. The port sills could not be horizontal where the gun barrels pivoted at an angle.
Some of the gun ports were squares or rectangles - but the farther from the middle the more they were a parallelogram - but with 90 degree sides.
To get the sill angle to follow the angle of the floor having a deck or at least a deck beam clamp for a measuring jig to ride on is necessary. The angle of the lintel is best determined by measuring from the sill.
Sliding in preformed 90 degree angle window frames for every gun port is fine if a cartoon ship is your goal.
Holes first - wales second - minor wales third - then build the planking from the wale.
I think that an elegant look would be had if the outer layer of the port lids came from their segment of the planking on either side. When closed, the lid would look like it is part of the run of the planking strake - which it would actually be.