Yes, that would make for an interesting effect--you would have to experiment to see how different colours and textures look and also make sure you don't make the windows too opaque. I'm currently working on the Sovereign of the Seas and haven't gotten to the stern windows yet but I will definitely try some new things and let you know! Thanks!Hi Thomas, the plastic office folder is an interesting idea for its transparency and its ability to be bent. Moreover, you glue it behind the inside part of the windows and there are no more viscosity problems (with the frames of the windows). Maybe would it be interesting to enhance his aspect by layering some transparent varnish on the exterior face of the sheet ? Following your idea to have some irregularities (due to the imperfect XVII th century glasses manufacturing), maybe use a full transparent plastic office folder + 1 pale color stain layer + 1 layer of transparent varnish (it helps for a better reflectance) ?
PS : the exact word in French is "lasure" for "stain" ( I hope my translation is correct).

-

SUBSCRIBE TO SHIPS IN SCALE TODAY!
The beloved Ships in Scale Magazine is back and charting a new course for 2026!
Discover new skills, new techniques, and new inspirations in every issue.
NOTE THAT OUR NEXT ISSUE WILL BE July/August 2026 -

Win a Free Custom Engraved Brass Coin!!!
As a way to introduce our brass coins to the community, we will raffle off a free coin during the month of August. Follow link ABOVE for instructions for entering.
You are using an out of date browser. It may not display this or other websites correctly.
You should upgrade or use an alternative browser.
You should upgrade or use an alternative browser.
- Joined
- Jul 9, 2019
- Messages
- 497
- Points
- 323

@Maarten , With the Clear Weld, would you be able to dollop out a bit on glass and then cut the pane for a more even, precise glasswork?Depending on the size of the glass needed you can use different methodes. For small glass panes I use liquid glass called clear weld, it is a milky type of glue drying completely transparent.
View attachment 233846View attachment 233847View attachment 233848
For larger windows microscopic glass if you don t need to bend or shape it.
And when shaping is required use Mica, this was also used on contemporary models.

I have to test it, but guess if you pour it onto some foil it should be possible.@Maarten , With the Clear Weld, would you be able to dollop out a bit on glass and then cut the pane for a more even, precise glasswork?
- Joined
- May 10, 2021
- Messages
- 220
- Points
- 113

I used soda straws cut up and painted inside with a yellow-orange acrylic paint formulation to create lanterns for my gun deck of my President (1800). LEDs inside.


Soda straws is very inventive idea Bluemaxone and I will remember it !
I believe (for SOS) that the ideas we are exchanging in this post are extremely interesting because (in ship model making) it is previously supposed that everyone is able to do a correct planking work, a more or less correct rigging work ... and it appears that the final (appealing) aspect of the ship model will remain in this kind of little details like the (more or less compliant with the scale of the model) transparency and reflectance of the glasses (e.g. of a stern castle).
For the moment, the problem I need to solve is shown in the photo hereunder : 3D curves !
Я бы решил эту проблему вот так. Изготовлена 3д модель фонаря. Затем я бы сделал отливку каркаса фонаря из металла (например, латуни, как на фото). Иногда этого достаточно, но также можно сделать на ЧПУ вставку из акрила или поликарбоната (прозрачного или дымчатого). Для современных эстетов к прозрачной вставке можно добавить желтый светодиод.
I would solve this problem like this. A 3D model of the lantern was made. Then I would cast the frame of the lantern out of metal (for example, brass, as in the photo). Sometimes this is enough, but you can also make an insert of acrylic or polycarbonate (transparent or smoky) on the CNC. For modern aesthetes, a yellow LED can be added to the transparent insert.

I would solve this problem like this. A 3D model of the lantern was made. Then I would cast the frame of the lantern out of metal (for example, brass, as in the photo). Sometimes this is enough, but you can also make an insert of acrylic or polycarbonate (transparent or smoky) on the CNC. For modern aesthetes, a yellow LED can be added to the transparent insert.
Last edited by a moderator:
Aлло Igor ") ! I have been thinking at this kind of solution you are proposing ; but the difficulty is that (in my particular case) there is not any "foundry joint plan". I cannot have this type of lantirn cut in 2 separate casted parts (throught their "foundry joint plan"), insert the polycarbonate and thereafter, fix the upper lid.
! I have been thinking at this kind of solution you are proposing ; but the difficulty is that (in my particular case) there is not any "foundry joint plan". I cannot have this type of lantirn cut in 2 separate casted parts (throught their "foundry joint plan"), insert the polycarbonate and thereafter, fix the upper lid.
! I have been thinking at this kind of solution you are proposing ; but the difficulty is that (in my particular case) there is not any "foundry joint plan". I cannot have this type of lantirn cut in 2 separate casted parts (throught their "foundry joint plan"), insert the polycarbonate and thereafter, fix the upper lid.Then another idea. Print a transparent base on a 3D printer, then print over the frameset from opaque material. I know there is such an opportunity, but you need to consult with the printers.
Or easier. Print transparent base, and then colorize the frame ribs
Or easier. Print transparent base, and then colorize the frame ribs
- Joined
- May 10, 2021
- Messages
- 220
- Points
- 113
Just brainstorming here. I found these dollhouse urns for sale. One is too small, clear glass, but if you could find the correct size you could build up the exterior opaque parts. I like to use "found" objects. I thought about my problem for days before hitting on the soda straw idea. It's just creative thinking. On the LED light, you will have to really tone down the brightness to just a glow. You may be able to do that with voltage or a rheostat, not sure.Soda straws is very inventive idea Bluemaxone and I will remember it !
I believe (for SOS) that the ideas we are exchanging in this post are extremely interesting because (in ship model making) it is previously supposed that everyone is able to do a correct planking work, a more or less correct rigging work ... and it appears that the final (appealing) aspect of the ship model will remain in this kind of little details like the (more or less compliant with the scale of the model) transparency and reflectance of the glasses (e.g. of a stern castle).
For the moment, the problem I need to solve is shown in the photo hereunder : 3D curves !
View attachment 235298


- Joined
- May 10, 2021
- Messages
- 220
- Points
- 113
What IS THAT????!
Please wait a minute Bluemaxone !!!!!!!!!!!!!!
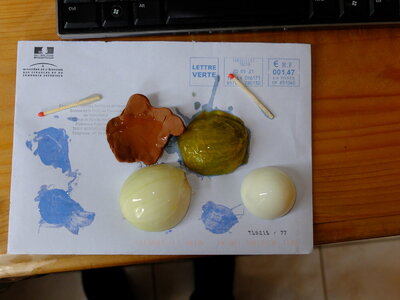
For the first photo, I have spread out some epoxy resin upon : some brown clay (to test a convex shape) - a tomato - an onion - an boiled egg.
1 - The results are not good for the clay, it stays not particularly stuck but really maculated => we cannot recommend this modus operandi ;
2 - for the egg, it's perfect (for the shape), but a white shade is left upon the epoxy glue ;
3 - for the onion, it's perfect (for the shape) + does not let any residual color ;
4 - for the tomato, the shape is not really good (because tomato surface is not a really robust support) but there are no stains.
Attachments

- Joined
- May 10, 2021
- Messages
- 220
- Points
- 113
There is a special artists epoxy made that does not yellow. Just FYI, Empathry.
I guess what you have works fine as long as you can control the shape. I notice your drawing shows the globes flattening pretty severely on the upper end. Any thoughts how you are going to get that shape using your method?
Another method might be to use sculpted clay as the base for your epoxy. I am thinking natural clay and not the hobby synthetic stuff. The latter has too much "spring back" in it. After all, they sculpt all car bodies using clay.
Hi Bluemaxone ; I have asked my young daughter for the clay and I will try further on to get some genuine clay. I tried supports like tomato because I imagined myself that when the tomate is rotten, it permits a natural unmolding. I will try on pealed peaches (fruits) or apricots when it will be summer. As for the color, the egg makes a transfer of albumin. For the onion support, the result is really the best. I have now to make more trials with my own personal crystal clear mixture which is expanded polystyrene melt into Methyl Ethyl Keton ... and I will also have to make trials on (curved) glass supports to check if it is demouldable or not. Anyhow, I know presently how to get transparent spherical shapes !
- Joined
- May 10, 2021
- Messages
- 220
- Points
- 113
Yes I hadn't thought about how one has to be careful transfering colors to the "glass." I previously thought whatever stuck could be rinsed off. Glad you have a good method.
has anyone tried using FILM negatives that were developed without any light exposure.. i mean someone merely takes a roll of expired 35 o 120 format film, and in the darkroom puts it into the processing tank then processes it..
that comes out CLEAR..
that comes out CLEAR..