This is the only way to go in my opinion--it's fast and accurate. I use thin cardboard about the end of the dowel in the drill chuck to prevent marking and wear a glove on the hand holding the sandpaper because it can get warm. Use a variable speed drill and start slow and work up. You can taper spars that way, too. The biggest thing to be careful about is getting the dowel centered in the drill, if it's off-center it will wobble and that can lead to breaking the dowel (don't ask me how I know that). Good luckI just secure an end of a dowel into electric drill chuck. Then I take a drill with my right hand, take a piece of coarse sanding paper into the other hand and apply it onto the dowel. I am measuring the taper diameters once in a while. I change the sandpaper to finer one a few times towards the end of the job. I did all masts and spars this way for my Victory model 1:90 scale.
-

Win a Free Custom Engraved Brass Coin!!!
As a way to introduce our brass coins to the community, we will raffle off a free coin during the month of August. Follow link ABOVE for instructions for entering.
-

PRE-ORDER SHIPS IN SCALE TODAY!
The beloved Ships in Scale Magazine is back and charting a new course for 2026!
Discover new skills, new techniques, and new inspirations in every issue.
NOTE THAT OUR FIRST ISSUE WILL BE JAN/FEB 2026
You are using an out of date browser. It may not display this or other websites correctly.
You should upgrade or use an alternative browser.
You should upgrade or use an alternative browser.
Place one taped end in drill chuck with speed on slow/mid. Then in gloved hand wrap sandpaper around mast and move up and down and apply own pressure with ample checking aginst scale plan. You'll see the mast taper nicely down to whatever you need. Practice on some dowl and get the knack. It's not hard.What's the best way to taper the masts, I've seen videos use planers but that seems a little risky to me. My plan is mark off 1" sections, sand the whole mast then move another inch down and sand again, keep going till its tapered, yes its slower but less risky.
Is there a better way I haven't thought of
DavidY.T., depends on how the dowel lays on the belt sander, laying perpendicular to the belt or lying parallel along the running centerline of the belt.
True statement. I find I get better tapering control w/ the later. (e.g., running parallel with the belt along it's width). It's very much a careful "hand skill thing" requiring constant rate of rotation w/ fingers. The slightest pause or dwell of rotation will put the dowel out of round. That's why I like to combine the 2 methods mentioned and chuck the dowel in my cordless hand drill with belt sander clamped upside down in bench vise. Yields consistant controlled results by far.
I tried putting a mast in a drill - but it wobbled, and one side was sanded more than the other.
But - I've had great success with cutting them down - either from dowel or square.
What you do is make a square, and then an octagon, and then sand off the corners. When you square it, you measure it, making sure the sides of the square are a bit larger than the required mast diameter at that point on the mast. Sanding rounds the octagon down the last half a mm or so - to the exact dimension needed.
I do this same thing. It's about the best way unless you have a wood turning lathe and that's IS the best.I just secure an end of a dowel into electric drill chuck. Then I take a drill with my right hand, take a piece of coarse sanding paper into the other hand and apply it onto the dowel. I am measuring the taper diameters once in a while. I change the sandpaper to finer one a few times towards the end of the job. I did all masts and spars this way for my Victory model 1:90 scale.
The model I'm working on (Model Shipways Niagara) is even pickier. It wants the top of the bowsprit and all yards to be flat with NO taper and the remainder tapered. I finished the bowsprit with a lot of slow filing and sanding. I'm still trying to find an easier way to taper all but the top (i.e., sides and bottom are tapered). I don't consider myself an experienced modeler, so I would easily be missing something in the drawings and instructions.
At the risk of repeating myself and others on the forum, try this for an easier method:The model I'm working on (Model Shipways Niagara) is even pickier. It wants the top of the bowsprit and all yards to be flat with NO taper and the remainder tapered. I finished the bowsprit with a lot of slow filing and sanding. I'm still trying to find an easier way to taper all but the top (i.e., sides and bottom are tapered). I don't consider myself an experienced modeler, so I would easily be missing something in the drawings and instructions.
- Start with a rectangular stick
- Cut it to a square cross section with the grain running nicely along the stick (minimizing runout)
- Cut the taper (or other profile) on the stick using some combination of a saw, finger plane, hobby knife, and sanding block
- On the portions that are to be square leave it alone
- On the portions that are to be octagonal cut of the corners
- On the portions that are to be round cut off the 8 corners and smooth it round
Fair winds!
Can you please post a photo? I am probably missing something here but looking at photos of the kit model, the yards are round and tapered except in the center quarter where they are octagonal.It wants the top of the bowsprit and all yards to be flat with NO taper and the remainder tapered
Thanks
Allan
tapering by hand can be done if you have the patience too. borrowed from one of my Artesiana videos....
You mark the circumference at even intervals along the mast. Then starting at the first mark, plane all the way around. Then move on to the second ring and repeat the planing and so on. Follow up with sanding.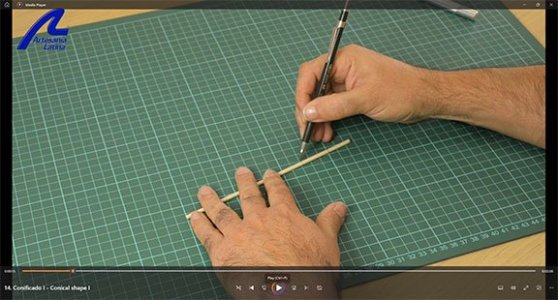
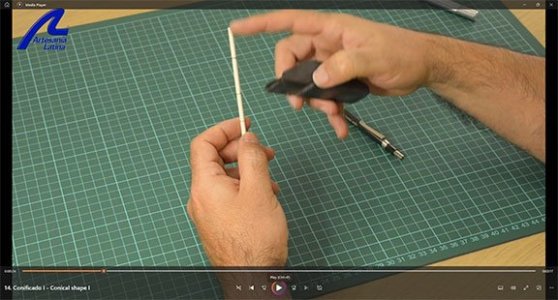
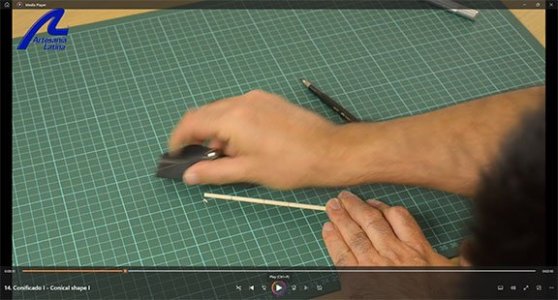
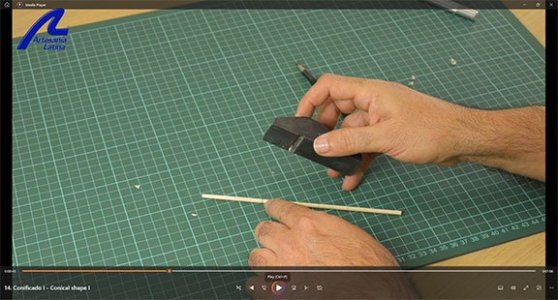
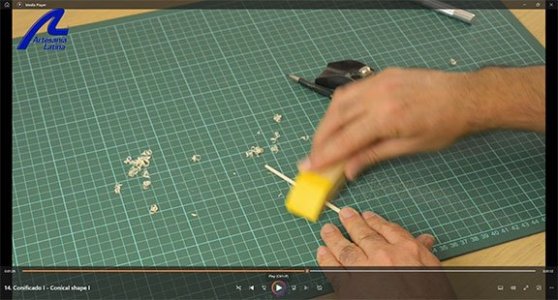
You mark the circumference at even intervals along the mast. Then starting at the first mark, plane all the way around. Then move on to the second ring and repeat the planing and so on. Follow up with sanding.


Yeah - I use that same planer. I also use chisels, blades and sanding tools.tapering by hand can be done if you have the patience too. borrowed from one of my Artesiana videos....
You mark the circumference at even intervals along the mast. Then starting at the first mark, plane all the way around. Then move on to the second ring and repeat the planing and so on. Follow up with sanding.View attachment 511368View attachment 511369View attachment 511370View attachment 511371View attachment 511372


