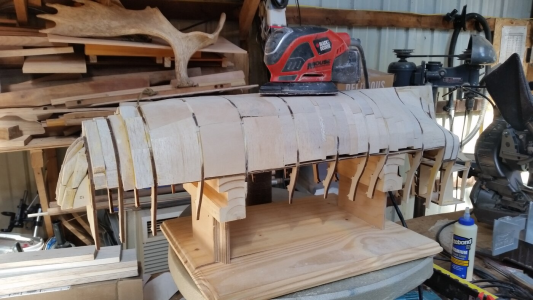
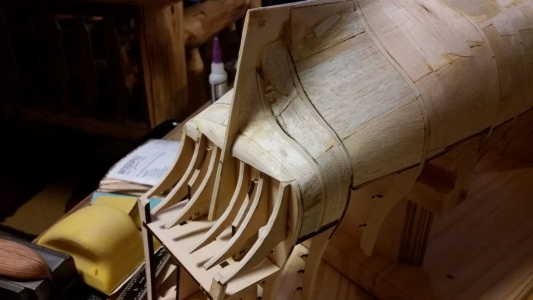
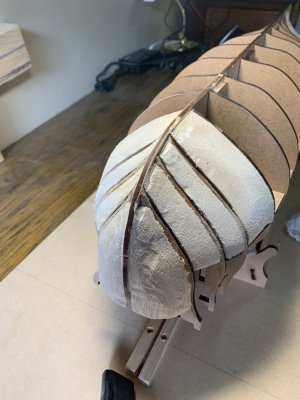
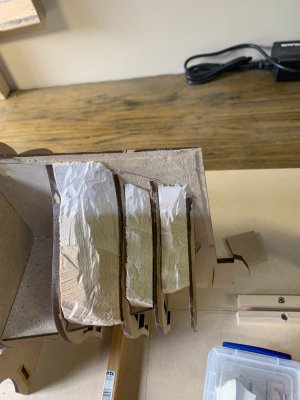
Tips for shaping the contour of ribs before planking?

Joined
Mar 4, 2023
Messages
61
Points
78

Location
SW Ohio
I've searched the threads to see if anyone else has asked this question, and unless I'm using the wrong search terms, I've not found my answer.
I'm sure that there are some good insights from the collective wisdom of this hearty group of old salts.....so here goes:

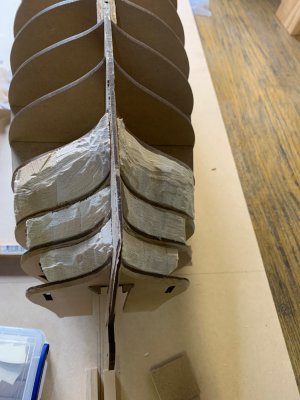
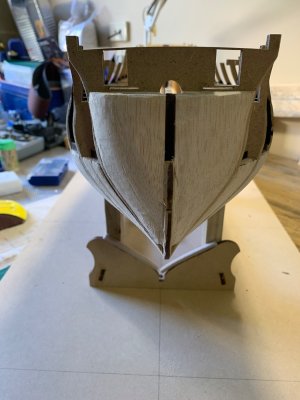
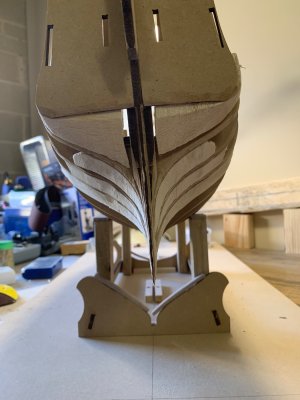
I'm looking for thoughts / tips / tricks for shaping the contour of the ribs in preparation for planking?

At this point, the old "eyeball it" method is a rough start, but I'm looking for continuity and frankly, the old eyeballs don't do that so well anymore (plus, I'm lazy and I'm looking for a shortcut....). So, I thank you in advance for your wisdom.
 
I always like quick and dirty solutions, probably why my staining and painting skills aren't so well developed. Anyway, one technique for quickly fairing the edged of the hull framework is to use a vibrating mouse sander to sand and shape the edges of the frames or bulkheads until the edges are parallel with the lay of the hull planks. Before you pick of the sander and start work, you need to paint or stain the edges of the frames/bulkheads black . As you sand, the black will be worn away, and, depending on the position of the frame, the fore or aft edge each frame will be sanded away. However, the edge opposite this must retain some of the black. It is this edge that preserves the shape of the frame. Sanding too much will remove all the black from the edge of the frame, and remove too much wood after that, changing the shape of the frame. This will create a depression or flat area on your hull after it is fully planked and may significantly alter the left-right symmetry of the hull.

Example of a hull being faired. In this example, balsa blocks were installed between bulkheads to aid in supporting the planking between bulkheads, giving you better control of the curves of the hull surface. A mouse sander with 60 grit (coarse) sandpaper quickly removed wood, so check the surfaces you sand frequently to preserve the shape of the bulkhead or frame. When you don't use filler blocks, check the angle of the bulkhead edge from the bulwark down to the keel often to see if the edge is parallel with lay of the plank.
1737304231423.png


Note how the brown paint on the bulkhead edges near the stern was preserved at the leading or front edge. The rest of the wood was sanded off to create the taper of the hull. If you are not using filler blocks, be extra careful not to sand too much off the edge of a bulkhead or frame. You can always put wood back by gluing strips over a mistake, but that's just more work, and you may not restore the exact profile of the bulkhead edge perfectly when doing such a repair. But, you can get it close.
1737304463851.png
 
Last edited:
As you sand, the black will be worn away, and, depending on the position of the frame, the fore or aft edge each frame will be sanded away. However, the edge opposite this must retain some of the black. It is this edge that preserves the shape of the frame.
This is very helpful. As I think it through, we need to preserve the "leading" edge of each frame (the first frame edge encountered as you go toward the stern/prow from the center). Painting the edge of the frame black is a brilliant idea.
 
Kurt's description is spot on! Most kits that are plank on bulkhead do not have enough of them so the blocks are a very good idea to give something on which to glue the strakes of planking.
Look at a top view of the shape of the hull at each deck level or at the water lines if you have them and you will see the entire edge of the bulkhead needs to follow the curve, not just the leading or trailing edge. The blocks beween the bulkheads tend to prevent over beveling. The example below is not the Harvey, but will give you the idea. You can see that the bevel is dynamic along a given bulkhead or frame.

Looking at your signature, are you building the Harvey? If that is the case, as Harvey was not a real ship, the book on Baltimore clippers by Howard Chapelle has a wealth of information that should be useful to you. The full title is The Baltimore Clipper; Its Origin and Development and there are copies on Amazon for less
than $8.

Allan
1737312137059.png
 
Last edited:
Kurt's description is spot on! Most kits that are plank on bulkhead do not have enough of them so the blocks are a very good idea to give something on which to glue the strakes of planking.
Look at a top view of the shape of the hull at each deck level or at the water lines if you have them and you will see the entire edge of the bulkhead needs to follow the curve, not just the leading or trailing edge. The blocks beween the bulkheads tend to prevent over beveling. The example below is not the Harvey, but will give you the idea. You can see that the bevel is dynamic along a given bulkhead or frame.

Looking at your signature, are you building the Harvey? If that is the case, as Harvey was not a real ship, the book on Baltimore clippers by Howard Chapelle has a wealth of information that should be useful to you. The full title is The Baltimore Clipper; Its Origin and Development and there are copies on Amazon for less
than $8.

Allan
View attachment 496226
@AllanKP69 - thank you for the follow up thoughts/clarity. You are describing what I would term a compound bevel - e.g. multiple angles at once. I'm sure that there is a nautical term that means the same thing. I can see where utilizing wood between the ribs will contribute to a much better finish.

While on this topic of wood filler blocks, can someone provide a supplier source or two for this type of wood?

And yes, I am working on the Harvey. It's my first build, consequently, I am taking my time with it; learning as I go. I am realizing that I should've probably started with something small just to get my bearings. I'll chase down the book that you recommended. Thank you for that recommendation.

Dan
 
IMG_2304.jpegIMG_2305.jpegIMG_2306.jpegIMG_2324.jpegIMG_2326.jpegHi Dan,
The replies to date are correct and helpful. I too have used filler blocks, balsa is one option but other wood will also work, try not to select a hardwood as sanding is more labor intensive.
The blocks are most effective at the bow and stern where the hulls shape changes considerably, so if you have limited filler wood concentrate on these areas.
The other technique not mentioned to assist in working out how much to sand off, involves offering up a sample strake (plank} to the frames and aiming to get it to sit flat with good contact over at least three frames without too much bending. This can be time consuming but well worth the effort to obtain a nicely shaped hull. Avoiding any wood filler is the goal to achieve a nice appearance.
Hope that helps.
 
While on this topic of wood filler blocks, can someone provide a supplier source or two for this type of wood?
I prefer basswood over balsa, but they serve the same purpose. I get basswood at Home Depot and such stores. Basswood and balsa can be found with a Google search as well. Amazon and many other sources are out there.
Allan
 
Sorry, for this question, it is coming from a new builder. But what is a mouse sander? Does it go by another name that I might recognize. I appreciate this post, as it really solves a question in my mind as to how to fair the ribs with the complex and changing angles required as you move for and aft. I realized quickly as I tried sketching a sanding plan, that any small errors in fairing the ribs will be glaringly obvious as the planking goes on. Thanks in advance to whomever responds!
 
@AllanKP69 - thank you for the follow up thoughts/clarity. You are describing what I would term a compound bevel - e.g. multiple angles at once. I'm sure that there is a nautical term that means the same thing. I can see where utilizing wood between the ribs will contribute to a much better finish.

While on this topic of wood filler blocks, can someone provide a supplier source or two for this type of wood?

And yes, I am working on the Harvey. It's my first build, consequently, I am taking my time with it; learning as I go. I am realizing that I should've probably started with something small just to get my bearings. I'll chase down the book that you recommended. Thank you for that recommendation.

Dan
Hi Dan,

I bought my balsa blocks from National Balsa Wood Co. The sizes were based on the gaps measured between the bulkheads on the ship model being constructed. Specifically, for a large model of HMS Sovereign of the Seas shown in my previous post, I bought seven pieces of 1/2"x3"x24", and four pieces of 3/4"x3/4"x24". These sizes were chosen to minimize waste, yet I have plenty left over. A band saw was used to cut the pieces into sections that were glued between the bulkheads along their edges. Excess wood protruding out was sanded away quickly with the mouse *AHEM*, excuse me... PALM sander. Fun but messy work. I prefer balsa over basswood because it shapes much faster, and you really don't need the hardness and strength of basswood to hold the planks in the 3-D shape of the hull that you desire. However, if you find basswood is cheaper and you can source it locally, it may be worth the extra effort and save some money.
 
Thank you, I have just never seen one marked as “mouse”. SO sheepishly, I will just watch now. As I said, a beginner and trying to learn from the Masters of the craft. I am going through Uwe’s Granada build log, and learning so much about cleaning up parts and dry fitting. Of course he is showing me many things need hand fitting via chisel and file, leaving the power tools on the bench…In my mind, if I question and learn before making sawdust, I can do a build of reasonable quality and improve from there.
 
Back
Top