• LUCZORAMA SHIPWRECK SCAVENGER HUNT GIVEAWAY. 4 Weeks of Fun • 1 Legendary Prize ((OcCre’s Fram Ship)) • Global Crew Welcome!
    **VIEW THREAD HERE**

To light or not to light

Joined
Feb 14, 2021
Messages
81
Points
88

Location
Windsor, ON
Good day all,

As I learn and perfect my skills I find myself in a competition with myself to up my game with every new build I undertake. As most of you should know by now - I primarily focus on modern bulk carrier (and their variations, eg. self unloaders) that ply the Great Lakes. My current build (which I have no build log, but will post the final photos when it is done) is my first attempt at a self unloader.

With that being said......I pondered the application of micro LED lights to represent at least some of what would be present on a real ship. Mainly the mast light (front and back), as well as port/starboard, as these would be the basics if I am not mistaken. I was able to accomplish this as an afterthought on my list build (I have to find the right pic(s) and will update this post later) when my build was 90% complete, so had to try to find ways to hide all the wiring as best I could. I will say I think it looks really cool, especially with the room lights off, but there is a mess on my model with the wiring, as I wasn't going to spend a crazy amount of time rebuilding.

I am at a stage now where I can attempt to run the above mentioned lighting, as well as some other lights that would be mostly run at night (interior lighting in the various decks, some exterior lighting) as well as the lights that run along both sides of the spar deck - on a 740 foot long ship this an be quite a lot! However.....having already purchased the lighting I am realizing that it might be a project not worth going forward with. These micro led lights (Evan Design) need to be wired up and thus connected to a power source (I have a 2 AA battery pack with switch) that has to be mounted externally. I would have to solder everything together (red to red green to green) inside my hollow hull and probably have to have a void where the wires would come out of the model to the power source. Would this ruin the model? - of course that side could be the non-viewed side of my display. How would I access the wiring once everything is secured down (I guess I wouldn't be able to?)? I am now thinking that it might not worth the endeavour at all aside from the the P/S and mast lights......

Thought I'd throw this out here and see what you all have to say.
 
When I add lighting I tend to run the wiring through the keel, I also prefer to use a 9v or 12v adapter you would need to add a resister to the lights to reduce the voltage or you will end up blowing them, saves on having to replace batteries, if you want to hide the wire it can be hidden in the stand, and run out through the base
 
I think that if the brightness is to scale, a lit model can be very interesting. By this I mean the lights will appear to someone looking at the model from two feet away to be as bright as the real ones as seen from scale times two feet away. (eg. In the case of a 1/64 scale ship 128 feet away.)

Most that I see online appear too bright, although this may be caused by ‘smart’ cameras.
 
I lit my King of the Mississippi model from Artesania Latina. I used LEDs I bought on Amazon that did not require resistors. I kind of went oveerboard lighting each deck and using two battery power supplies. The top deck was fitted with magnets so that it could be removed just to turn the lights on in it. I wrote a practicum on the entire build and went into great detail with photos as well as step by step instructions. See https://lauckstreetshipyard.com/shop/ols/products/king-of-the-mississippi

Bob
 
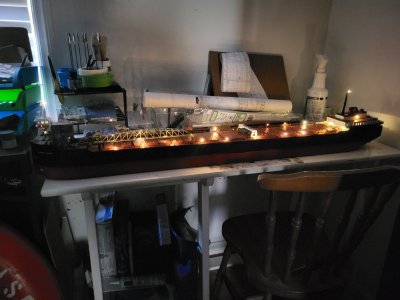
Here is what I ended up with - used super small led lights from Evan's Design. It is a hollow hull, so I ran the wiring for the lighting inside, and have it coming out a small hole in the bottom of the hull.

I still have touch ups to do on this model, as well as build a base for it, and acrylic case too.

I want to find some kind of pre-wired power board to attach the lights, as they are really small wires....28 AWG and 32 AWG. I see a few out there, but they only go down to 26AWG, so I ended up soldering the wires to the switch power supply (which runs off a coin battery) to a length of n scale railroad track and each light is also soldered to the track - which of course is conductive.

CdnCenlitcomp.jpg
 
As far as lights being too bright, I used to ride my bike to work along San Francisco Bay before dawn, and the lights on the ships moored in the bay looked very, very bright against the night sky and the opposite shore. Undoubtedly it was different in the age of oil lamps and spermacetti candles, but incandescent, fluorescent and LED lights look painfully bright at a distance against a dark-ish background. If anything, you Laker looks too yellow, but very effective. Were sodium vapor lamps used on these ships? Those were yellow.
 
As far as lights being too bright, I used to ride my bike to work along San Francisco Bay before dawn, and the lights on the ships moored in the bay looked very, very bright against the night sky and the opposite shore. Undoubtedly it was different in the age of oil lamps and spermacetti candles, but incandescent, fluorescent and LED lights look painfully bright at a distance against a dark-ish background. If anything, you Laker looks too yellow, but very effective. Were sodium vapor lamps used on these ships? Those were yellow.
The new build lakers most likely use LED. This one was built in 1967 (celebrating out centennial, hence the name Canadian Century).
Here is a recent photo of the actual ship in the Welland Canal, with her current paint scheme.

 
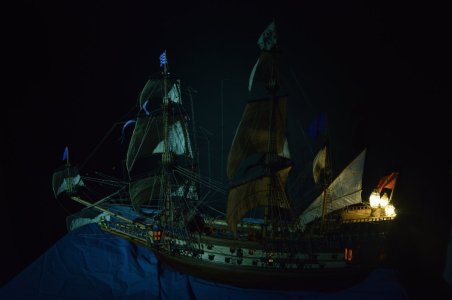
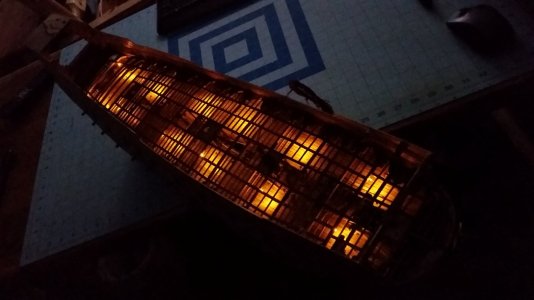
The wiring for lighting needs to be planned when you are assembling the framed and keel. The nano-LED's from Evan's Designs have wires as fine as a hair, and soldering them together at junctions is not difficult. If the lights are not too bright, they add a great deal of realism. The stern lanterns below are too bright, but the deck lights are just right.
D3200 Moonlilght Shot Using an LED Flashlight.JPG

Lighting with nano-LED's
639 Light Test.jpg

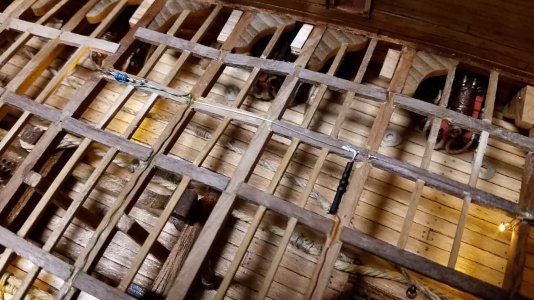
Wiring and resistors hidden by sandwhiching them between beams and carlings and the deck overlaid atop them. The soldering doesn't have to be pretty. It just has to work.
632 Solder LED's With Resistors Between Wires.jpg

Lighting takes thoughtful planning throughout the build. It is worth it? You have to decide that for yourself.
 
Last edited:
I think that if the brightness is to scale, a lit model can be very interesting. By this I mean the lights will appear to someone looking at the model from two feet away to be as bright as the real ones as seen from scale times two feet away. (eg. In the case of a 1/64 scale ship 128 feet away.)

Most that I see online appear too bright, although this may be caused by ‘smart’ cameras.
Evans sells a dimmer/remote
 
Here is what I ended up with - used super small led lights from Evan's Design. It is a hollow hull, so I ran the wiring for the lighting inside, and have it coming out a small hole in the bottom of the hull.

I still have touch ups to do on this model, as well as build a base for it, and acrylic case too.

I want to find some kind of pre-wired power board to attach the lights, as they are really small wires....28 AWG and 32 AWG. I see a few out there, but they only go down to 26AWG, so I ended up soldering the wires to the switch power supply (which runs off a coin battery) to a length of n scale railroad track and each light is also soldered to the track - which of course is conductive.

View attachment 485273
Using N scale track in that long a boat is a good idea.

I model in HO, and using single rails inside a hull instead of running a buss wire would be a great idea for some larger ships.

Kurt
 
I lit my King of the Mississippi model from Artesania Latina. I used LEDs I bought on Amazon that did not require resistors. I kind of went oveerboard lighting each deck and using two battery power supplies. The top deck was fitted with magnets so that it could be removed just to turn the lights on in it. I wrote a practicum on the entire build and went into great detail with photos as well as step by step instructions. See https://lauckstreetshipyard.com/shop/ols/products/king-of-the-mississippi

Bob
Thanks for letting us know about this Bob, I have the King kit as well and was looking into buying your Practicum next time you list a sale. I keep forgetting to do it before your sales run out.
 
As far as lights being too bright, I used to ride my bike to work along San Francisco Bay before dawn, and the lights on the ships moored in the bay looked very, very bright against the night sky and the opposite shore. Undoubtedly it was different in the age of oil lamps and spermacetti candles, but incandescent, fluorescent and LED lights look painfully bright at a distance against a dark-ish background. If anything, you Laker looks too yellow, but very effective. Were sodium vapor lamps used on these ships? Those were yellow.

That’s right. Sodium and other modern lamps are very bright. Im afraid I was thinking of the lanthorns used on the old wooden ships. A candle in a box shining through panels made from animal horn wouldn’t be quite as dazzling.
 
Using N scale track in that long a boat is a good idea.

I model in HO, and using single rails inside a hull instead of running a buss wire would be a great idea for some larger ships.

Kurt
Can you provide a simple diagram of a single wire circuit arrangement? It sounds like a good alternative to the positive and negative two wire buss system that I used.
 
That’s right. Sodium and other modern lamps are very bright. Im afraid I was thinking of the lanthorns used on the old wooden ships. A candle in a box shining through panels made from animal horn wouldn’t be quite as dazzling.
LED's can run at a dim setting with no problems. All you have to di is choose the right resistance level in the parallel lighting circuit. A potentiometer gives you all the brightness options.
 
Once I tried the LED lights as an afterthought on my one laker - mind you it was hard to hide the wires since the ship was already 98% complete - I loved the look of it, even if I don't turn on the lights very often.

Now.....I think I am going to do full LED lights on each build - mast lights (fore and aft), port/starboard, and then the deck lighting (up to 10 or more per side depending on the ship), then I find hiding a light in the accommodations has such a nice look. Hollow hull makes hiding the wires easy for the most part.

The one negative is you have to have the wires coming out of the ship somewhere to the power source, unless you can bury the switch/battery somehow into the model???
There are two ways to do it, using AC power, or batteries hidden inside the hull. I like to have a DC power connector in the keel. The wire running from it isn’t all that noticeable. Some clever people electrify the saddle supports with low voltage DC. And have metal contacts in the keel. With the ship resting in the right place, continuity is maintained. The power switch can be placed anywhere you like. I have mine hidden under the back edge of the display cabinet, where only I know (and the cats, surprisingly) where it is.

I don’t favor using batteries since they are problematic to reach if inside the hull. Rigging and other delicate items get it the way.
 
Back
Top