MY QUESTION CANYOU USE SHELLAC OVER POLY, OR VICE VERSA WHAT KIND OF FINISH DO YOU GET. GOD BLESS STAY SAFE ALL DON

-

SUBSCRIBE TO SHIPS IN SCALE TODAY!
The beloved Ships in Scale Magazine is back and charting a new course for 2026!
Discover new skills, new techniques, and new inspirations in every issue.
NOTE THAT OUR NEXT ISSUE WILL BE MARCH/APRIL 2026 -

Win a Free Custom Engraved Brass Coin!!!
As a way to introduce our brass coins to the community, we will raffle off a free coin during the month of August. Follow link ABOVE for instructions for entering.
You are using an out of date browser. It may not display this or other websites correctly.
You should upgrade or use an alternative browser.
You should upgrade or use an alternative browser.
Hello Don, the real question is why do you want to do that? What do you trying to achieve?MY QUESTION CANYOU USE SHELLAC OVER POLY, OR VICE VERSA WHAT KIND OF FINISH DO YOU GET. GOD BLESS STAY SAFE ALL DON
Simply put, shellac covers all. Working the other direction or when you apply other topcoats over shellac, it is often noted that you should not apply polyurethane over shellac. It is, however, OK to use an oil-based urethane over shellac. The shellac will stick to the poly just fine. The problem is, poly is a rather soft/flexible material, while shellac is hard/inflexible. As the poly moves, the rigid shellac on top can't move as much and will crack over time, IMHO.
I would use one of those not both.
THANKS JIM I WAS JUST CURIOUS, I HAVE NO INTENTION OF USING BOTH AT ONE TIME, THANKS A LOT FOR THIS THREAD. GOD BLESS STAY SAFE ALL DON
- Joined
- Dec 1, 2016
- Messages
- 6,596
- Points
- 728

Danish Oil – What You Should Know About This Amazing Wood Finish
I love a good wood finish that is easy to apply, enriches the appearance of the natural wood, makes the grain stand out, and provides
a decent amount of protection. So, let’s talk about Danish Oil.
danish oil
Oil finishes like tung oil and boiled linseed oil penetrate into the wood. They provide some protection as well as a rich, beautiful appearance.
Film finishes like varnish, lacquer, and poly provide exceptional protection, but much less in the way of color and grain enhancement.
Danish oil, however, provides the best of both worlds.
It’s easy to apply, it’s very forgiving, and you don’t have to worry about dust nibs (all benefits of an oil finish).
So What Is It Exactly?
Danish oil is a popular wood finish, and it’s basically a mixture of an oil, a varnish, and a thinner. Together, these ingredients
really do bring out the natural beauty of the wood, while providing more surface protection than plain oil finishes.
Typically, boiled linseed oil or tung oil is used. These both are drying oils, and they darken and enrich the look of the natural wood.
Related: Basic Overview Of Finishing Types
The varnish component can be an exterior varnish, or polyurethane. This adds more moisture protection, as well as some wear and
chemical protection.
The thinner makes it easy to apply, and helps the finish soak into the wood better, as opposed to a film finish that sits on top of the wood.
This thinner can be mineral spirits (paint thinner), or turpentine.
Other types of oil, varnish, and thinner may be used with comercially produced Danish oil, but the ingredients I listed above are what
I’ve found to be the most common, while researching many different methods of creating your own Danish oil.
How To Make Your Own Danish Oil Regular store-bought Danish oils (like Watco or Tried & True) each have their own special concoctions, and provide a really beautiful finish.
But if you prefer more control, you may want to just make your own to really get the results you want.
While the Danish Oil wiki page claims that most variations use polymerized linseed oil, and lack a thinner, everything I found online
about making your own is a bit different, which I’ll lay out here.
For a simple mixture, using equal parts poly, boiled linseed oil, and mineral spirits (each a third), is all you need to do. Do not use
regular linseed oil, it won’t dry well and makes the finish more difficult.
Pour each ingredient into a glass jar and stir it well. Then it’s ready for use.
If you want better moisture protection, use tung oil instead of boiled linseed oil, and aquatic varnish instead of poly.
Just keep in mind, the tung oil dries slower and you’ll need to allow more time between coats.
If you don’t need quite the protection, use 1/2 oil, 1/4 thinner, and 1/4 poly. This is still more protective than a straight oil finish,
but really produces a rich, deep, natural look because the dominant ingredient is the oil.
If you need extra wear and tear protection, use 1/2 poly, 1/4 oil, and 1/4 thinner. This will still enrich the natural wood like an oil finish,
but provide a tougher and more durable protection, closer to straight polyurethane.
Or, if you just want additional protection on top of the regular Danish oil finish, you can add a layer or 2 of wipe on poly after the oil
has completely dried (give it a few days to a week first).
But with all that said, store bought Danish oil will give you great results for general use. Plus, you can find it in different colors
to add a staining effect. So feel free to shop around.
How Is Danish Oil Applied
The first step is to make sure the wood is sanded nice and smooth. 220 grit is plenty smooth.
Once all the sanding dust is removed, you can apply the finish.
The first coat can go on with a rag if you want, but the raw wood will soak up quite a bit, so it’s a good idea to apply this coat with a brush.
applying danish oil with a brush
Any old cheap brush will work. You will be wiping off the excess so you don’t have to worry about brush marks.
Once the entire surface is coated, look over the surfaces at an angle into the light, and find any areas that have soaked up all the oil
and appear to be drying.
part of the danish oil has soaked in leaving dry wood Rub more oil on these areas. Keep watching and applying more as needed for 10 minutes or so.
Then let the oil sit and continue soaking for another 20 minutes.
Now take a rag and wipe the oil off the wood. Rub it really good until you’re left with a silky sheen. You don’t want any shiny,
sticky oil left on the surface.
oil finish rubbed out
Basically you’re buffing the finish while removing excess, and you’re left only with oil that has fully penetrated the wood.
Over the next half hour, keep an eye on it. Oil may seep back to the surface, and needs to be buffed out again.
Give this coat another hour or 2 to really dry. It should feel completely dry to the touch, and rubbing it with your finger should
not leave a smear.
For the second coat, to really flatten the surface and leave a super-professional look, apply a slurry coat.
To do this, use 600 grit wet/dry sandpaper, dip it in the Danish oil, and rub the oil onto the wood in circular motions.
While applying, if it starts to become tacky just put more oil on the sand paper.
applying a slurry coat of danish oil with sandpaper
What you’re doing is creating a slurry of sanding dust and Danish oil. This slurry fills in the grain and the open pores,
flattening the surface.
Look at the surface at an angle to see any pores that are still open, and sand that area until it fills up.
Once you’ve completed a surface, rub off the excess slurry with a clean rag, going across the grain.
wiping off slurry coat
If you rub with the grain, you’ll pull the slurry out of the pores. And rub softly, pushing too hard will pull out more slurry too.
Going across the grain leaves the slurry in the wood better.
After the second coat has been applied like this, let it dry overnight, possibly a day or 2. But for the first half hour of drying,
keep an eye on it to make sure no oil is seeping back out and pooling on the surface.
Once that coat dries, if you still see any open pores, repeat the process with another slurry coat.
Once the coat has dried and it appears perfectly flat, apply a final thin layer to help seal in the slurry coat, or you can add a coat
of wipe on poly to finish it up.
For extra protection, add a second coat of wipe on poly. But don’t build up much more than that, if any. The more poly you add, the
less it will look like an oil finish, and more like a poly finish which doesn’t quite look like natural wood.
combust and start a fire. Be sure to lay out the rags flat until they can dry, then throw them away..
Additional Tips About Danish Oil
You should not apply this finish over wood that is sealed, because it works by soaking into the wood, and sealed wood won’t absorb the oil.
That means it shouldn’t be put on painted wood, or wood that is sealed with a varnish, lacquer, or poly finish.
If you make your own Danish oil, make sure the main ingredients have dryers in them, like boiled linseed or tung oil. Also, do not
use non-drying oils like mineral oil.
If you use turpentine, get the kind that is made from pine. This smells much better than other kinds of turpentine.
When you mix your own Danish oil, do it in a glass jar with a metal lid. If you use a plastic container, oxygen can get into the mix
and over time can ruin the finish. A glass jar sealed tight with a metal lid will have a longer shelf life.
And if you’re looking for a food safe version of Danish Oil, go with the Tried and True brand. They claim to follow FDA regs that
makes it safe to use on kitchenware and toys.
Beware of Danish Oil
What is Danish Oil?
The term “Danish Oil” used today is a general term for a type of wood finish. Danish oil is typically wiped on, allowed to soak in to
the wood for a while and then excess remaining on the surface is wiped off. Danish oil should contain a high percentage of natural oil
that is classified as a drying oil. A drying oil is very important because the finish will actually cure and not remain “oily” like an
olive or canola oil would. Also, non-drying oils have the potential to become rancid over time.
The “Danish” part of Danish Oil seems to appear in general use sometime after World War II, when Scandinavian manufacturers started to
export their goods around the world. The finish provided a good-looking, low-sheen finish.
What does Danish Oil contain?
The ingredients contained in Danish Oil is extremely varied with each manufacturer having their own proprietary mixtures and percentages.
However, most Danish Oils contain many of the following:
Toxic Waste
Mineral Spirits
Aromatic Petroleum Distillates
Mineral Oil
Stoddard Solvent
Tung Oil
Linseed Oil
Man-made and/or Natural Resins
Man-made and/or Natural Varnishes
Unspecified Vegetable Oil
Dipropylene Glycol Monomethyl Ether
Naptha
Japanese Dryers
Cobalt Dryers
Heavy Metal Dryers
A lesser quality Danish Oil will only have a 10% solids content (the actual drying oil) with the balance being primarily Volatile Organic Compounds (VOCs). Higher quality Danish Oils have more than a 50% solids content. For comparison, Dapwood uses natural oils with 100% solids content.
So what is wrong with Danish Oil?
The problem with today’s Danish Oil is not the “oil” at all but the other toxins that are put into it. In the race to make it cheaper and faster, industrial coating makers have cut back the oil and increased the other ingredients which are toxic. This is particularly troubling for the two different groups of people that are subjected to these harsh chemicals:
Working with Danish Oil
The people who apply Danish Oil need to read the application instructions on the packaging very carefully and plan accordingly. They also need to review and understand the Safety Data Sheet (SDS). Failure to apply the product in a well ventilated room or have appropriate NIOSH respirators will result in a “buzz” from the fumes which can lead to headaches, vomiting and worse.
Effects Of Overexposure – Chronic Hazards: Reports have associated repeated and prolonged occupational overexposure to solvents with permanent brain and nervous system damage.
Danish Oil SDS
Long term exposure to Danish Oil
While the Danish Oil may be cured in a few days, there will be residuals that come off of the finish for the following weeks, months and years. No one should spend 1/3 of their day sleeping and being exposed to off-gassing chemicals. Unfortunately, long-term exposure studies are extremely difficult to study and quantify. Some might like to put their head in the sand and say that since there are no immediate effects, there is nothing to worry about. This flies in the face of the reality of increased cancer rates, mental health issues and chemical sensitivities. Additionally, what about small children who love to put things in their mouths or chew on things they can’t fit? What are they ingesting and to what degree is this “safe”?
There is no definitive answer explaining what exposure will do over time to a person. All indications are that it is not good.
Is Danish Oil really that toxic?
Yes. We couldn’t make this stuff up. The industrial chemical companies knows they produce toxic substances. So much that “Lethal Dose” standards were created to compare toxicity of substances.
Lethal Dosage (LD50) Values
An LD50 is a standard measurement of acute toxicity that is stated in milligrams (mg) of pesticide per kilogram (kg) of body weight. An LD50 represents the individual dose required to kill 50 percent of a population of test animals (e.g., rats, fish, mice, cockroaches). Because LD50 values are standard measurements, it is possible to compare relative toxicities among pesticides. The lower the LD50 dose, the more toxic the pesticide.
A pesticide with an LD50 value of 10 mg/kg is 10 times more toxic than a pesticide with an LD50 of 100 mg/kg.
The toxicity of a pesticide is related to the mode of entry of the chemical into an organism. Oral LD50 values are obtained when test subjects are fed pesticide-treated feed or water. Dermal LD50 values are obtained when the pesticide is applied to the skin of the animal. Inhalation LD50 values are obtained when the animal breathes the pesticide with a mask. Often the inhalation LD50 is lower (more toxic) than the oral LD50, which is in turn lower (more toxic) than the dermal LD50.
LD50 values are not always given on the pesticide label; rather, the relative toxicity of a pesticide product is reflected by one of three signal words: DANGER, WARNING, or CAUTION. The purpose of signal words is to alert the user to the level of toxicity of the product. The signal word is generally assigned based on the pesticide’s inhalation, oral or dermal toxicity, whichever is the most toxic.
US EPA
Note that inhalation is often the most toxic method and is the most likely mode of exposure when sleeping at night.
Another item to note is that LD50 values for one particular American made Danish Oil is “Not Determined”. Unfortunately,
this is probably “not determined” because of the time required to create a testing protocol and the cost associated with
live animal tests. However, we are able to evaluate the individual components of the mixture and draw a reasonable conclusion.
Chemical Name Lethal Dose 50 (LD50)
Mineral Spirits
Aromatic petroleum distillates
Dipropylene Glycol Monomethyl Ether
Stoddard Solvent 4,900 mg/kg (Rat)
Not Established
5,350 mg/kg (Rat)
4,900 mg/kg (Rat)
So, in order to kill one rat in the half of a rat population that died (no explanation on the condition of the surviving 50% of rats)
we can calculate the amount of product required. Since rats weigh about 500 to 700 grams, you would only need 1 to 3.5 grams to do the job.
That is less than a sugar packet!
Let's compare some of the Danish Oil ingredients to toxic substances you can lookup at the National Institute of Health's Toxnet website.
Chemical Name Lethal Dose 50 (LD50) [Source cited]
Benzene
Gasoline 3,306 mg/kg (Rat- oral) [Lewis, R.J. Sr. (ed) Sax's Dangerous Properties of Industrial Materials. 11th Edition.
Wiley-Interscience, Wiley & Sons, Inc. Hoboken, NJ. 2004., p. 360]
14,063 mg/kg (Rat Acute Oral) [DHHS/ATSDR; Toxicological Profile for Automotive Gasoline p.47 (1995)]
By being able to directly compare LD50 values, we can see that chemicals in Danish Oil are not as toxic as benzene but almost 3 times
more toxic than gasoline. There is no doubt that Danish Oil contains some toxic substances.
Danish Oil Summary
Since the term "Danish Oil" is often used as a general term for a wood finish, not all products labeled "Danish Oil" are toxic. Most,
but not all. What we are concerned about are the Danish Oils that contain industrial solvents.
We are concerned that not enough information is provided to consumers to decide for themselves what level of exposure is tolerable.
Opponents will say that toxicology information is too complicated and inconclusive. Why scare consumers? And do customers really care?
What opponents will not say is what company would want to advertise that their product may cause cancer or death?
At Dapwood, we believe their is no reason to chance it with Danish Oil. We care deeply about our employees as well as our customers.
Human health is irreplaceable. Dapwood is committed to using only natural products that are eco friendly and non-toxic.
If you decide to not purchase our products, please find something that does not contain a long list of toxic chemicals.
You and your family's future health may depend on it.
This is a great article, Dave! Thank you for sharing.

Those that said they use poly were fairly specific about using wipe-on poly so my question is whether anyone uses spray poly? I use it quite a bit for "normal" wood-working projects and I would have thought it would be much easier to use with all the delicate detail involved in ship modeling.
Last edited:

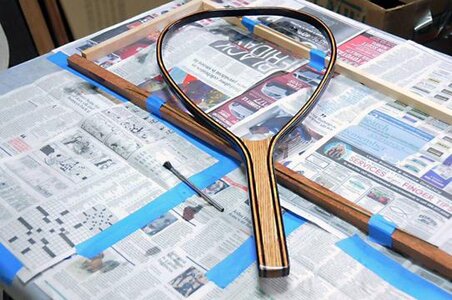
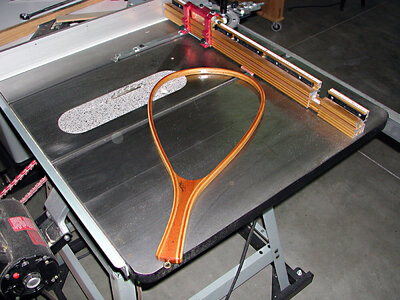
While I have not used Danish oil on a model (as yet), I have a lot of experience using it. Watco makes great Danish oil and provides a somewhat durable finish. A nice thing about it is after allowing it to fully cure (72 hours min. ) other clearcoat finishes can be applied. I make wooden fishing nets and after applying Watco, I follow up with Spar Urethane. It contains UV inhibitors and is waterproof. And it looks good!Danish Oil – What You Should Know About This Amazing Wood Finish
I love a good wood finish that is easy to apply, enriches the appearance of the natural wood, makes the grain stand out, and provides
a decent amount of protection. So, let’s talk about Danish Oil.
danish oil
Oil finishes like tung oil and boiled linseed oil penetrate into the wood. They provide some protection as well as a rich, beautiful appearance.
Film finishes like varnish, lacquer, and poly provide exceptional protection, but much less in the way of color and grain enhancement.
Danish oil, however, provides the best of both worlds.
It’s easy to apply, it’s very forgiving, and you don’t have to worry about dust nibs (all benefits of an oil finish).
So What Is It Exactly?
Danish oil is a popular wood finish, and it’s basically a mixture of an oil, a varnish, and a thinner. Together, these ingredients
really do bring out the natural beauty of the wood, while providing more surface protection than plain oil finishes.
Typically, boiled linseed oil or tung oil is used. These both are drying oils, and they darken and enrich the look of the natural wood.
Related: Basic Overview Of Finishing Types
The varnish component can be an exterior varnish, or polyurethane. This adds more moisture protection, as well as some wear and
chemical protection.
The thinner makes it easy to apply, and helps the finish soak into the wood better, as opposed to a film finish that sits on top of the wood.
This thinner can be mineral spirits (paint thinner), or turpentine.
Other types of oil, varnish, and thinner may be used with comercially produced Danish oil, but the ingredients I listed above are what
I’ve found to be the most common, while researching many different methods of creating your own Danish oil.
How To Make Your Own Danish Oil Regular store-bought Danish oils (like Watco or Tried & True) each have their own special concoctions, and provide a really beautiful finish.
But if you prefer more control, you may want to just make your own to really get the results you want.
While the Danish Oil wiki page claims that most variations use polymerized linseed oil, and lack a thinner, everything I found online
about making your own is a bit different, which I’ll lay out here.
For a simple mixture, using equal parts poly, boiled linseed oil, and mineral spirits (each a third), is all you need to do. Do not use
regular linseed oil, it won’t dry well and makes the finish more difficult.
Pour each ingredient into a glass jar and stir it well. Then it’s ready for use.
If you want better moisture protection, use tung oil instead of boiled linseed oil, and aquatic varnish instead of poly.
Just keep in mind, the tung oil dries slower and you’ll need to allow more time between coats.
If you don’t need quite the protection, use 1/2 oil, 1/4 thinner, and 1/4 poly. This is still more protective than a straight oil finish,
but really produces a rich, deep, natural look because the dominant ingredient is the oil.
If you need extra wear and tear protection, use 1/2 poly, 1/4 oil, and 1/4 thinner. This will still enrich the natural wood like an oil finish,
but provide a tougher and more durable protection, closer to straight polyurethane.
Or, if you just want additional protection on top of the regular Danish oil finish, you can add a layer or 2 of wipe on poly after the oil
has completely dried (give it a few days to a week first).
But with all that said, store bought Danish oil will give you great results for general use. Plus, you can find it in different colors
to add a staining effect. So feel free to shop around.
How Is Danish Oil Applied
The first step is to make sure the wood is sanded nice and smooth. 220 grit is plenty smooth.
Once all the sanding dust is removed, you can apply the finish.
The first coat can go on with a rag if you want, but the raw wood will soak up quite a bit, so it’s a good idea to apply this coat with a brush.
applying danish oil with a brush
Any old cheap brush will work. You will be wiping off the excess so you don’t have to worry about brush marks.
Once the entire surface is coated, look over the surfaces at an angle into the light, and find any areas that have soaked up all the oil
and appear to be drying.
part of the danish oil has soaked in leaving dry wood Rub more oil on these areas. Keep watching and applying more as needed for 10 minutes or so.
Then let the oil sit and continue soaking for another 20 minutes.
Now take a rag and wipe the oil off the wood. Rub it really good until you’re left with a silky sheen. You don’t want any shiny,
sticky oil left on the surface.
oil finish rubbed out
Basically you’re buffing the finish while removing excess, and you’re left only with oil that has fully penetrated the wood.
Over the next half hour, keep an eye on it. Oil may seep back to the surface, and needs to be buffed out again.
Give this coat another hour or 2 to really dry. It should feel completely dry to the touch, and rubbing it with your finger should
not leave a smear.
For the second coat, to really flatten the surface and leave a super-professional look, apply a slurry coat.
To do this, use 600 grit wet/dry sandpaper, dip it in the Danish oil, and rub the oil onto the wood in circular motions.
While applying, if it starts to become tacky just put more oil on the sand paper.
applying a slurry coat of danish oil with sandpaper
What you’re doing is creating a slurry of sanding dust and Danish oil. This slurry fills in the grain and the open pores,
flattening the surface.
Look at the surface at an angle to see any pores that are still open, and sand that area until it fills up.
Once you’ve completed a surface, rub off the excess slurry with a clean rag, going across the grain.
wiping off slurry coat
If you rub with the grain, you’ll pull the slurry out of the pores. And rub softly, pushing too hard will pull out more slurry too.
Going across the grain leaves the slurry in the wood better.
After the second coat has been applied like this, let it dry overnight, possibly a day or 2. But for the first half hour of drying,
keep an eye on it to make sure no oil is seeping back out and pooling on the surface.
Once that coat dries, if you still see any open pores, repeat the process with another slurry coat.
Once the coat has dried and it appears perfectly flat, apply a final thin layer to help seal in the slurry coat, or you can add a coat
of wipe on poly to finish it up.
For extra protection, add a second coat of wipe on poly. But don’t build up much more than that, if any. The more poly you add, the
less it will look like an oil finish, and more like a poly finish which doesn’t quite look like natural wood.
combust and start a fire. Be sure to lay out the rags flat until they can dry, then throw them away..
Additional Tips About Danish Oil
You should not apply this finish over wood that is sealed, because it works by soaking into the wood, and sealed wood won’t absorb the oil.
That means it shouldn’t be put on painted wood, or wood that is sealed with a varnish, lacquer, or poly finish.
If you make your own Danish oil, make sure the main ingredients have dryers in them, like boiled linseed or tung oil. Also, do not
use non-drying oils like mineral oil.
If you use turpentine, get the kind that is made from pine. This smells much better than other kinds of turpentine.
When you mix your own Danish oil, do it in a glass jar with a metal lid. If you use a plastic container, oxygen can get into the mix
and over time can ruin the finish. A glass jar sealed tight with a metal lid will have a longer shelf life.
And if you’re looking for a food safe version of Danish Oil, go with the Tried and True brand. They claim to follow FDA regs that
makes it safe to use on kitchenware and toys.
Beware of Danish Oil
What is Danish Oil?
The term “Danish Oil” used today is a general term for a type of wood finish. Danish oil is typically wiped on, allowed to soak in to
the wood for a while and then excess remaining on the surface is wiped off. Danish oil should contain a high percentage of natural oil
that is classified as a drying oil. A drying oil is very important because the finish will actually cure and not remain “oily” like an
olive or canola oil would. Also, non-drying oils have the potential to become rancid over time.
The “Danish” part of Danish Oil seems to appear in general use sometime after World War II, when Scandinavian manufacturers started to
export their goods around the world. The finish provided a good-looking, low-sheen finish.
What does Danish Oil contain?
The ingredients contained in Danish Oil is extremely varied with each manufacturer having their own proprietary mixtures and percentages.
However, most Danish Oils contain many of the following:
Toxic Waste
Mineral Spirits
Aromatic Petroleum Distillates
Mineral Oil
Stoddard Solvent
Tung Oil
Linseed Oil
Man-made and/or Natural Resins
Man-made and/or Natural Varnishes
Unspecified Vegetable Oil
Dipropylene Glycol Monomethyl Ether
Naptha
Japanese Dryers
Cobalt Dryers
Heavy Metal Dryers
A lesser quality Danish Oil will only have a 10% solids content (the actual drying oil) with the balance being primarily Volatile Organic Compounds (VOCs). Higher quality Danish Oils have more than a 50% solids content. For comparison, Dapwood uses natural oils with 100% solids content.
So what is wrong with Danish Oil?
The problem with today’s Danish Oil is not the “oil” at all but the other toxins that are put into it. In the race to make it cheaper and faster, industrial coating makers have cut back the oil and increased the other ingredients which are toxic. This is particularly troubling for the two different groups of people that are subjected to these harsh chemicals:
Working with Danish Oil
The people who apply Danish Oil need to read the application instructions on the packaging very carefully and plan accordingly. They also need to review and understand the Safety Data Sheet (SDS). Failure to apply the product in a well ventilated room or have appropriate NIOSH respirators will result in a “buzz” from the fumes which can lead to headaches, vomiting and worse.
Effects Of Overexposure – Chronic Hazards: Reports have associated repeated and prolonged occupational overexposure to solvents with permanent brain and nervous system damage.
Danish Oil SDS
Long term exposure to Danish Oil
While the Danish Oil may be cured in a few days, there will be residuals that come off of the finish for the following weeks, months and years. No one should spend 1/3 of their day sleeping and being exposed to off-gassing chemicals. Unfortunately, long-term exposure studies are extremely difficult to study and quantify. Some might like to put their head in the sand and say that since there are no immediate effects, there is nothing to worry about. This flies in the face of the reality of increased cancer rates, mental health issues and chemical sensitivities. Additionally, what about small children who love to put things in their mouths or chew on things they can’t fit? What are they ingesting and to what degree is this “safe”?
There is no definitive answer explaining what exposure will do over time to a person. All indications are that it is not good.
Is Danish Oil really that toxic?
Yes. We couldn’t make this stuff up. The industrial chemical companies knows they produce toxic substances. So much that “Lethal Dose” standards were created to compare toxicity of substances.
Lethal Dosage (LD50) Values
An LD50 is a standard measurement of acute toxicity that is stated in milligrams (mg) of pesticide per kilogram (kg) of body weight. An LD50 represents the individual dose required to kill 50 percent of a population of test animals (e.g., rats, fish, mice, cockroaches). Because LD50 values are standard measurements, it is possible to compare relative toxicities among pesticides. The lower the LD50 dose, the more toxic the pesticide.
A pesticide with an LD50 value of 10 mg/kg is 10 times more toxic than a pesticide with an LD50 of 100 mg/kg.
The toxicity of a pesticide is related to the mode of entry of the chemical into an organism. Oral LD50 values are obtained when test subjects are fed pesticide-treated feed or water. Dermal LD50 values are obtained when the pesticide is applied to the skin of the animal. Inhalation LD50 values are obtained when the animal breathes the pesticide with a mask. Often the inhalation LD50 is lower (more toxic) than the oral LD50, which is in turn lower (more toxic) than the dermal LD50.
LD50 values are not always given on the pesticide label; rather, the relative toxicity of a pesticide product is reflected by one of three signal words: DANGER, WARNING, or CAUTION. The purpose of signal words is to alert the user to the level of toxicity of the product. The signal word is generally assigned based on the pesticide’s inhalation, oral or dermal toxicity, whichever is the most toxic.
US EPA
Note that inhalation is often the most toxic method and is the most likely mode of exposure when sleeping at night.
Another item to note is that LD50 values for one particular American made Danish Oil is “Not Determined”. Unfortunately,
this is probably “not determined” because of the time required to create a testing protocol and the cost associated with
live animal tests. However, we are able to evaluate the individual components of the mixture and draw a reasonable conclusion.
Chemical Name Lethal Dose 50 (LD50)
Mineral Spirits
Aromatic petroleum distillates
Dipropylene Glycol Monomethyl Ether
Stoddard Solvent 4,900 mg/kg (Rat)
Not Established
5,350 mg/kg (Rat)
4,900 mg/kg (Rat)
So, in order to kill one rat in the half of a rat population that died (no explanation on the condition of the surviving 50% of rats)
we can calculate the amount of product required. Since rats weigh about 500 to 700 grams, you would only need 1 to 3.5 grams to do the job.
That is less than a sugar packet!
Let's compare some of the Danish Oil ingredients to toxic substances you can lookup at the National Institute of Health's Toxnet website.
Chemical Name Lethal Dose 50 (LD50) [Source cited]
Benzene
Gasoline 3,306 mg/kg (Rat- oral) [Lewis, R.J. Sr. (ed) Sax's Dangerous Properties of Industrial Materials. 11th Edition.
Wiley-Interscience, Wiley & Sons, Inc. Hoboken, NJ. 2004., p. 360]
14,063 mg/kg (Rat Acute Oral) [DHHS/ATSDR; Toxicological Profile for Automotive Gasoline p.47 (1995)]
By being able to directly compare LD50 values, we can see that chemicals in Danish Oil are not as toxic as benzene but almost 3 times
more toxic than gasoline. There is no doubt that Danish Oil contains some toxic substances.
Danish Oil Summary
Since the term "Danish Oil" is often used as a general term for a wood finish, not all products labeled "Danish Oil" are toxic. Most,
but not all. What we are concerned about are the Danish Oils that contain industrial solvents.
We are concerned that not enough information is provided to consumers to decide for themselves what level of exposure is tolerable.
Opponents will say that toxicology information is too complicated and inconclusive. Why scare consumers? And do customers really care?
What opponents will not say is what company would want to advertise that their product may cause cancer or death?
At Dapwood, we believe their is no reason to chance it with Danish Oil. We care deeply about our employees as well as our customers.
Human health is irreplaceable. Dapwood is committed to using only natural products that are eco friendly and non-toxic.
If you decide to not purchase our products, please find something that does not contain a long list of toxic chemicals.
You and your family's future health may depend on it.
As a reminder, if you use rags to apply Danish oil, soak them in water then spread and allow them to dry OUTSIDE. Do not leave the oily rags in your shop. They can combust!
Attachments

- Joined
- Dec 31, 2017
- Messages
- 298
- Points
- 228

Good article. I’ve always used Danish Oil and it seemed to work fine, but I’ll now switch to linseed oil that has no additives. I didn’t know Danish oil had so much other crap in it, although the models I’ve used it on don’t seem to have had a negative effect over time.
I thought about using pure tung oil, but I don’t want to deal with diluting it.
Does anyone have any opinion about pure linseed oil vs. boiled linseed oil? I see that pure linseed needs more time to cure, but does it matter?
I thought about using pure tung oil, but I don’t want to deal with diluting it.
Does anyone have any opinion about pure linseed oil vs. boiled linseed oil? I see that pure linseed needs more time to cure, but does it matter?
Both have the same effect, boiled Linseed oil dries faster because of metal reagents additions, which means a faster processing time.Does anyone have any opinion about pure linseed oil vs. boiled linseed oil? I see that pure linseed needs more time to cure, but does it matter?
")
Boiled linseed oil. Don't use raw. And linseed oil can take days to dry. Especially in a humid environment. Watco Danish Oil Does contain petroleum distillates primarily as driers to help eliminate the issues you see with straight linseed oil. Another thing I can mention is that you can usually find out a lot about finishes by searching for and reading the MSDS for that product. (Material Safety Data Sheet). I've used Watco for nearly 50 years with no regrets or bad experiences.Good article. I’ve always used Danish Oil and it seemed to work fine, but I’ll now switch to linseed oil that has no additives. I didn’t know Danish oil had so much other crap in it, although the models I’ve used it on don’t seem to have had a negative effect over time.
I thought about using pure tung oil, but I don’t want to deal with diluting it.
Does anyone have any opinion about pure linseed oil vs. boiled linseed oil? I see that pure linseed needs more time to cure, but does it matter?
Why not?Don't use raw
It may take forever to dry.....Why not?
Attachments
It does require extended time to dry, then boiled one. I am using Linseed oil (raw) for most of the projects, for a very long time, and each consecutive coat dries in less than 48 hours, not weeks! Raw oil is also flooded and whipped after 10 ~15 minutes.It may take forever to dry.....
But hey...it is just a matter of personal preference.
The only thing I ever used linseed oil for was rifle stocks. An older Springfield 03 and a Mossberg .22 target rifle.It does require extended time to dry, then boiled one. I am using Linseed oil (raw) for most of the projects, for a very long time, and each consecutive coat dries in less than 48 hours, not weeks! Raw oil is also flooded and whipped after 10 ~15 minutes.
But hey...it is just a matter of personal preference.
- Joined
- Dec 1, 2016
- Messages
- 6,596
- Points
- 728
i have a couple models sitting around that i put no finish on them, nothing at all just to see what if anything would happen. It is now 12 or so years and the Cherry model darkened over the years but it still looks as good as the day i built it. The model with a planked up hull is still tight and right, i would say a finish or no finish seems to have no effect other than the looks.
so what do you say regarding a finish vs no finish to the wood
so what do you say regarding a finish vs no finish to the wood
Cherry naturally darkens and gets redder with age. Its a great wood that shouldn't be left in sunlight - it won't age uniformly.i have a couple models sitting around that i put no finish on them, nothing at all just to see what if anything would happen. It is now 12 or so years and the Cherry model darkened over the years but it still looks as good as the day i built it. The model with a planked up hull is still tight and right, i would say a finish or no finish seems to have no effect other than the looks.
so what do you say regarding a finish vs no finish to the wood