
-

SUBSCRIBE TO SHIPS IN SCALE TODAY!
The beloved Ships in Scale Magazine is back and charting a new course for 2026!
Discover new skills, new techniques, and new inspirations in every issue.
NOTE THAT OUR NEXT ISSUE WILL BE July/August 2026 -

Win a Free Custom Engraved Brass Coin!!!
As a way to introduce our brass coins to the community, we will raffle off a free coin during the month of August. Follow link ABOVE for instructions for entering.
You are using an out of date browser. It may not display this or other websites correctly.
You should upgrade or use an alternative browser.
You should upgrade or use an alternative browser.
Ulises Steam Tugboat, by Occre Scale 1:30


G'day Paul, she is looking really good, starting to shape up nicely, I just love Tugs, I think I said that before,
best regards John,
best regards John,

Looks great, I really like the shape of Tug hulls.
Jan
Jan

Hi John, Tks, I can see why, they could be come my next obsession
Hi Sulaire, sorry no, but ot was once. A Costco cheapie.
Tks Jan.
Tks all.
Hi Sulaire, sorry no, but ot was once. A Costco cheapie.
Tks Jan.
Tks all.
Kurt Konrath
Kurt Konrath
Looking great so far.
At least you have a good use for the model when complete, I build what I like and then give some away if I have no place to keep.
At least you have a good use for the model when complete, I build what I like and then give some away if I have no place to keep.
Tks K. The tug is a distraction away from the Victory, which comes next maybe. This is my first foray into RC & Tugs.
 so next on the list was the completion of the tail & drive shaft entry. I had pre drilled this areas and stick sanded the hole for the shaft, so All I had to do was cover the area with planking and re open.

Be aware that non eof this is sanded or filled yet and has to be covered with Fibre glass.
Fitting of the drive shaft


Readying The fill & seal operations. ( not its NOT hoarded toilet paper!)

0nce I was satisfied with the fitting & placement came the process of sealing the hull interior
A mixture of 10:1 ( PVA glue to water) was maid up and painted across the entire interior.


This was then allowed to dry.
Next was 2 coats of marine varnish with 8 hours between coats.
This is supposed to seal the tug ( and according to Occre all thats needed- Nah I built a 17ft Hartly cabin crusier with my farther and That was marine ply and lots of coats!)
At least the varnish shows up the holes!


Next the decks!
so next on the list was the completion of the tail & drive shaft entry. I had pre drilled this areas and stick sanded the hole for the shaft, so All I had to do was cover the area with planking and re open.Be aware that non eof this is sanded or filled yet and has to be covered with Fibre glass.
Fitting of the drive shaft
Readying The fill & seal operations. ( not its NOT hoarded toilet paper!)
0nce I was satisfied with the fitting & placement came the process of sealing the hull interior
A mixture of 10:1 ( PVA glue to water) was maid up and painted across the entire interior.
This was then allowed to dry.
Next was 2 coats of marine varnish with 8 hours between coats.
This is supposed to seal the tug ( and according to Occre all thats needed- Nah I built a 17ft Hartly cabin crusier with my farther and That was marine ply and lots of coats!)
At least the varnish shows up the holes!
Next the decks!
The fore decking was added next
As I had slightly put the bow deck out of alignment I needed to adjust the holes in the deck section that go over the upper frames.
The deck was then persuaded into position and nailed & glued. The battery was placed to verify it filled, however the cross frames are removed later in the build.

The rear deck was then added in similar fashion

and the completed deck.


As I had slightly put the bow deck out of alignment I needed to adjust the holes in the deck section that go over the upper frames.
The deck was then persuaded into position and nailed & glued. The battery was placed to verify it filled, however the cross frames are removed later in the build.
The rear deck was then added in similar fashion
and the completed deck.
I am a new member, having joined today! I am building the Ulises Tugboat and thoroughly enjoying the experience although I have not done such modelling since the 1970s and am a bit rusty. Having some problems knowing how much to file and sand particularly at the stern section as it is not too clear from the instruction or photo booklet. Also want to have advice on what to use as filler once all the hull planking is complete. Your log above is a great help with much of the construction and has given me renewed confidence but would appreciate help with my comments! Thanks.
Tks Walkers.
If you let mw know which section at the rear top or bot I can tell you. The planks at the rear when laid cross hatch pattern only had small areas of height dif. I sanded back as much as I could .5m then filled gaps with wood filler.
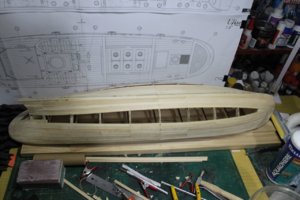
so the basic hull is done.
The instructions had you do the decking before the side whales, but as this is all going to be waterproofed & painted, it made more sense to me to finalise the hull,-sand / fill / waterproof / paint, before laying any exposed decking. In this way the decking is added last and covers any paint on the base ply deck. It leads to a much cleaner finish without risk to the decking timber.
The keel was also not to be added till later. As the gunwales butt up against it, I also added this earlier

The rear sloping area was a fun job and came up nicely. The sections where all from the off cuts of the planking, so almost nothing was wasted.


I still have 2/3 of the planking wood left!
Then gunwales were over length by 5mm, so I used a paper template of the wales to place on hull on get the right length.
As the bending was not huge, no soaking or clamping was needed. The brass nails were sufficient to hold it in place whilst the PVA dried.


Now begins the filling, & the sanding & the smell complaints form the shipward overseser!
Lots of fun so far.
If you let mw know which section at the rear top or bot I can tell you. The planks at the rear when laid cross hatch pattern only had small areas of height dif. I sanded back as much as I could .5m then filled gaps with wood filler.
so the basic hull is done.The instructions had you do the decking before the side whales, but as this is all going to be waterproofed & painted, it made more sense to me to finalise the hull,-sand / fill / waterproof / paint, before laying any exposed decking. In this way the decking is added last and covers any paint on the base ply deck. It leads to a much cleaner finish without risk to the decking timber.
The keel was also not to be added till later. As the gunwales butt up against it, I also added this earlier
The rear sloping area was a fun job and came up nicely. The sections where all from the off cuts of the planking, so almost nothing was wasted.
I still have 2/3 of the planking wood left!
Then gunwales were over length by 5mm, so I used a paper template of the wales to place on hull on get the right length.
As the bending was not huge, no soaking or clamping was needed. The brass nails were sufficient to hold it in place whilst the PVA dried.
Now begins the filling, & the sanding & the smell complaints form the shipward overseser!
Lots of fun so far.
Now begins the filling, & the sanding & the smell complaints form the shipward overseser!
Yup, know all about that. I'm waiting for warm weather so I can sand my tugs hull outdoors.
Jan
Yup, know all about that. I'm waiting for warm weather so I can sand my tugs hull outdoors.
Jan
Many thanks for your help. Looking at your illustrations and reading your text has given me much more confidence and I am making slow but successful progress with the hull planking now I can see how it fits at bow and stern. what type of filler do you recommend? I have seen some suggestions for motor vehicle filler; does that seem a good idea or is there a purpose made product that might be available in the UK? One of the problems is getting anything during the current lockdown! Hey ho - Carry on and keep safe.
Tks Sulaire.
the hull was filled, sanded and had 2 coats of Fibreglass resin applied. No sheets added as additional straighten was not req, its not a speed boat made of balsa.
I then decided on the colors. This was purely based on what I had around in the shed. Gloss black enamel & Eucalyptus Green car touch up paint( never owned a Eucalyptus Green car so no idea where that came from. I believe Holden did that color many years ago).
It turns out that anti fowling comes in many colours. Red, Black, White. Black not commonly used as apparently whales associate them selves with it. As there are no whales in nearby lakes & ponds I should be safe.
In the end I liked the combination. The top will still be white.

After sealing & sanding but before painting. Upper area masked off

The gloss base black coat


The masking removed

The highly technical & superior second masking


Rubbing strakes added


White will be the next to be added above the rubbing strakes after a sand down, and then a coat or two of marine varnish over it all to finally seal it.
I will not add a white watermark line as I have a preference for none ( my line is laible to be very wonky and none is better).
There are some inperfections in the hull shown by the paint") , but as this is supposed to be a working Tug and its not a perfect cast hull i think it adds to the working Tug apperance
, but as this is supposed to be a working Tug and its not a perfect cast hull i think it adds to the working Tug apperance
The strakes will be left natural.

the hull was filled, sanded and had 2 coats of Fibreglass resin applied. No sheets added as additional straighten was not req, its not a speed boat made of balsa.I then decided on the colors. This was purely based on what I had around in the shed. Gloss black enamel & Eucalyptus Green car touch up paint( never owned a Eucalyptus Green car so no idea where that came from. I believe Holden did that color many years ago).
It turns out that anti fowling comes in many colours. Red, Black, White. Black not commonly used as apparently whales associate them selves with it. As there are no whales in nearby lakes & ponds I should be safe.
In the end I liked the combination. The top will still be white.
After sealing & sanding but before painting. Upper area masked off
The gloss base black coat
The masking removed
The highly technical & superior second masking
Rubbing strakes added
White will be the next to be added above the rubbing strakes after a sand down, and then a coat or two of marine varnish over it all to finally seal it.
I will not add a white watermark line as I have a preference for none ( my line is laible to be very wonky and none is better).
There are some inperfections in the hull shown by the paint
, but as this is supposed to be a working Tug and its not a perfect cast hull i think it adds to the working Tug apperanceThe strakes will be left natural.
Hull top painted & inner bulwalk painted white. The hull was then given an additional external marine varnish finish to harden the paint surface.


Deck planking completed and bulwark hull supports added.


Bulwalk railing sanded and laid ready to be added.
The deck is yet to be sealed and vaninshed.
Deck planking completed and bulwark hull supports added.
Bulwalk railing sanded and laid ready to be added.
The deck is yet to be sealed and vaninshed.
That is looking great, very neat planking.
Jan
Jan
Ths Jan.
I will admit that I used the Wrong planking for the deck, it was supposed to be a 8mm wide darker wood, but I didn't like it as it was to dark. I choose to use the walnut planing for the tugs life boats. This will now blend nicely with the Control room
I will workout what to do with those later. I may paint them or go for a darker layer on the veneer. Plenty of wood from other competed kits to use!
Next the gunwale capping was supposed to be added, but as it was longer than needed, I created the rear rudder cover first. This then allowed me to adjust butt the capping up to it.
The cover consisted of three parts, with the upper portion made of a outline and 2x2 batons( not 2x3 as per the parts( no such thing in kit.
I taped the outer ring to some acrylic ( pva does not stick to acrylic) and laid the batons. As the width was 110mm and the batons 2mm, I spaced them 5mm apart with a 3mm gap when centered on 5mm marks. This worked out evenly from a center piece.


The rear, which sits in the rudder gap was then added and later a small lip from left over planking so that the cover cold lock into place and not accidentally fly out. ( The orginal design just has it sitting in the hole)


The gunwale capping was then added; As it is pre shaped in three parts only a curved bend was needed at the bow. This requried no soaking and clamps & med CA were suffice to glue & hold in place.

Next the rudder hole was drilled ( 7mm & sanded NOT 8mm) The steering linkage was also added but not tightened.


The driveshaft & universal joint was also added The bulkhead over the univeral joint had to b cut to allow freedom of movement by the CN


Now comes the fun stuff of all the deck furniture & fit out!
So far its been a relatively enjoyable build.


I will admit that I used the Wrong planking for the deck, it was supposed to be a 8mm wide darker wood, but I didn't like it as it was to dark. I choose to use the walnut planing for the tugs life boats. This will now blend nicely with the Control room
I will workout what to do with those later. I may paint them or go for a darker layer on the veneer. Plenty of wood from other competed kits to use!
Next the gunwale capping was supposed to be added, but as it was longer than needed, I created the rear rudder cover first. This then allowed me to adjust butt the capping up to it.
The cover consisted of three parts, with the upper portion made of a outline and 2x2 batons( not 2x3 as per the parts( no such thing in kit.
I taped the outer ring to some acrylic ( pva does not stick to acrylic) and laid the batons. As the width was 110mm and the batons 2mm, I spaced them 5mm apart with a 3mm gap when centered on 5mm marks. This worked out evenly from a center piece.
The rear, which sits in the rudder gap was then added and later a small lip from left over planking so that the cover cold lock into place and not accidentally fly out. ( The orginal design just has it sitting in the hole)
The gunwale capping was then added; As it is pre shaped in three parts only a curved bend was needed at the bow. This requried no soaking and clamps & med CA were suffice to glue & hold in place.
Next the rudder hole was drilled ( 7mm & sanded NOT 8mm) The steering linkage was also added but not tightened.
The driveshaft & universal joint was also added The bulkhead over the univeral joint had to b cut to allow freedom of movement by the CN
Now comes the fun stuff of all the deck furniture & fit out!
So far its been a relatively enjoyable build.
Last edited:
Hull fittings:
Working from the stern of the boat
Capstan, Capstan Stand / Grate & Bollards.
The bollards were cast meta and had to be top joined to woo dowel. The dowel was 1mm larger than the capstans so had to be tapered down. Both were pained Tamiya x2 Black, then x63 metal & finally x19 smoke which gives it a grimey clear finish
The Captsan was wood turend but Occre suggested for indentations to just use black paint. I used a Dremel to carve out the large indents.
This was then painted Tamiya Metal grey xf56, x63x & x19 to give it a greased metal look. I may yet rust it slightly with brown wash.


Next was the construction of a small storage area, which served to fill the area for the motor drive shaft & universal joint access.

The central bits were then added. These were cast metal and painted in the same fashion as the bollards.

Next came the ovehead supports. These consisted of precut ply with a wood capping. The capping required exteme bending but being a soft wood only needed 15 min in hot weter and a lot of praying & clamping.


Next was the steam winch. It consisted of cast metal ( pewter?) and gold chain. Occre suggestion was to paint it thus:

Err no!
A search of the net showed this was NOT the corrct colour and was more a Briggs & Stratton Geen / Red
The basic winch was 4 parts 1 centre, two sides & two selector controls

It was first streated with Tamiya Grey Metal grey xf56 and then Tamyia Green gloss x5

Red was added, as was smoke on the internal drives to give it a greasy look. The chain was also Casey Backed.

The final item was then fitted to the hull and chain was rapped and fitted.

The hull deck has ow been sealed and is awaiting further assemblies.

Working from the stern of the boat
Capstan, Capstan Stand / Grate & Bollards.
The bollards were cast meta and had to be top joined to woo dowel. The dowel was 1mm larger than the capstans so had to be tapered down. Both were pained Tamiya x2 Black, then x63 metal & finally x19 smoke which gives it a grimey clear finish
The Captsan was wood turend but Occre suggested for indentations to just use black paint. I used a Dremel to carve out the large indents.
This was then painted Tamiya Metal grey xf56, x63x & x19 to give it a greased metal look. I may yet rust it slightly with brown wash.
Next was the construction of a small storage area, which served to fill the area for the motor drive shaft & universal joint access.
The central bits were then added. These were cast metal and painted in the same fashion as the bollards.
Next came the ovehead supports. These consisted of precut ply with a wood capping. The capping required exteme bending but being a soft wood only needed 15 min in hot weter and a lot of praying & clamping.
Next was the steam winch. It consisted of cast metal ( pewter?) and gold chain. Occre suggestion was to paint it thus:
Err no!
A search of the net showed this was NOT the corrct colour and was more a Briggs & Stratton Geen / Red
The basic winch was 4 parts 1 centre, two sides & two selector controls
It was first streated with Tamiya Grey Metal grey xf56 and then Tamyia Green gloss x5
Red was added, as was smoke on the internal drives to give it a greasy look. The chain was also Casey Backed.
The final item was then fitted to the hull and chain was rapped and fitted.
The hull deck has ow been sealed and is awaiting further assemblies.