Upgrade of the CNC 3018 wood router machine, from 3Axis to 4 Axis

Joined
Apr 20, 2020
Messages
5,650
Points
738

good evening dear friends
I would like to share with you this upgrade project that I have been working on for the last 3 month with a lot of help from an experienced friend in the field of milling/cnc machines.
As some of you probably remember, I purchased the machine about a year and a half ago, see details in the following link
The main reason why I started the upgrade project was the desire to carry out projects in the field of 3D milling/carving. For example, I would like to carve the lion figure that I created last year by hand carving also using the machine, as well as ship decorations and other things.
The first step in implementing the plan was the purchase of a new control board suitable for 4 Asix - New GRBL 4-Axis Stepper Motor Control Board With 300W Spindle With Isolation USB Driver Board For CNC Laser and mount it on the machine and make sure that the three existing trowels are indeed working and synchronized.

Screenshot_20221022-232433_Chrome.jpg20221022_205139.jpg
Engraved
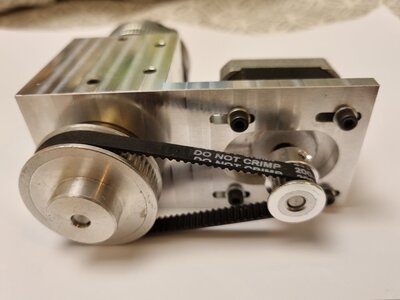
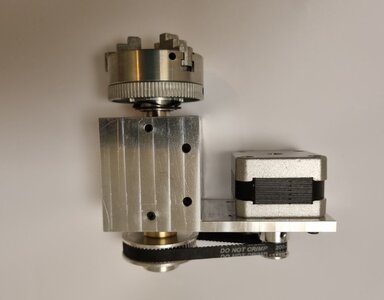
After that we proceeded to plan the entire assembly of the 4th axis, purchase the parts and even produce some of them ourselves and assemble them :

Z011 Mini Drill Chuck Zinc Alloy Manual Self-Centering Metal 3-Jaw Lathe Chuck Clamp With 2 Chuck Key For CNC Lathe Machine Tool

GT2 Synchronous Wheel 20&60 Teeth 5mm Bore Aluminum Timing Pulley with 2pcs Length 200mm Width 6mm Belt

17 Stepper Motor
( attaching a picture of an
intermediate state).
20221020_211202.jpg20221020_211212.jpg
20221020_211221.jpg20221020_211307.jpg20221020_211331.jpg we still have to do is design and manufacture the plate that will connect the entire assembly of the fourth axis to the body of the machine, perform the settings and synchronization in the existing software with all the axes and tests. It may be sounds short and perhaps quick, but we still have a lot of work ahead of us.
No significant progress is expected in the coming weeks because I'm going on vacation, but I thought it was time to update you on the project.
Also, if any of you have created files for milling parts for ships that are suitable for 4 Asix, then I would appreciate it if you would share with me so that we have something to try the machine on, I am not yet familiar with design and operation software in the field, you are also welcome to recommend such software.
thank you and good night
 
Last edited:
So...you end up,with X, Y, Z and Theta?
dear Philski
A basic 3 Asix cnc machine is having 3 linear axes enable moving a spindle in 3 dimensions, which are X, Y, and Z, respectively. the cutting tool can move back to front, side to side, and up and down. An advanced CNC center has an A-axis (is not a linear movement but a rotational one).
It enables the rotation of a workpiece about the X-axis. As a result, it is possible to remove material not only from the front of a workpiece but from any part of its surface and at any angle. The 4th axis requires additional programming.
I hope I understood your question correctly and the answer was accordingly.
good night my friend :)
I must emphasize that I am not the expert in the field and I learn a lot from my friend who helps me in this project and he is the expert from whom I learn a lot.:)
 
dear Philski
A basic 3 Asix cnc machine is having 3 linear axes enable moving a spindle in 3 dimensions, which are X, Y, and Z, respectively. the cutting tool can move back to front, side to side, and up and down. An advanced CNC center has an A-axis (is not a linear movement but a rotational one).
It enables the rotation of a workpiece about the X-axis. As a result, it is possible to remove material not only from the front of a workpiece but from any part of its surface and at any angle. The 4th axis requires additional programming.
I hope I understood your question correctly and the answer was accordingly.
good night my friend :)
As an engineer, I've worked with lot of robotics that were 4-axis and more. I have extensive experience with large scanning electron microscopes with internal cartesian stages too. And while I have a lot of machining experience (Bridgeports, Hardinge, DoAll), I don't have any CNC experience. Thats why I asked - to get an idea of capabilities of a CNC mill.
 
Last edited:
good evening dear friends
I would like to share with you this upgrade project that I have been working on for the last 3 month with a lot of help from an experienced friend in the field of milling/cnc machines.
As some of you probably remember, I purchased the machine about a year and a half ago, see details in the following link
The main reason why I started the upgrade project was the desire to carry out projects in the field of 3D milling/carving. For example, I would like to carve the lion figure that I created last year by hand carving also using the machine, as well as ship decorations and other things.
The first step in implementing the plan was the purchase of a new control board suitable for 4 Asix - New GRBL 4-Axis Stepper Motor Control Board With 300W Spindle With Isolation USB Driver Board For CNC Laser and mount it on the machine and make sure that the three existing trowels are indeed working and synchronized.

View attachment 335966View attachment 335967
Engraved
After that we proceeded to plan the entire assembly of the 4th axis, purchase the parts and even produce some of them ourselves and assemble them :

Z011 Mini Drill Chuck Zinc Alloy Manual Self-Centering Metal 3-Jaw Lathe Chuck Clamp With 2 Chuck Key For CNC Lathe Machine Tool

GT2 Synchronous Wheel 20&60 Teeth 5mm Bore Aluminum Timing Pulley with 2pcs Length 200mm Width 6mm Belt

17 Stepper Motor
( attaching a picture of an
intermediate state).
View attachment 335969View attachment 335970
View attachment 335971View attachment 335972View attachment 335973 we still have to do is design and manufacture the plate that will connect the entire assembly of the fourth axis to the body of the machine, perform the settings and synchronization in the existing software with all the axes and tests. It may be sounds short and perhaps quick, but we still have a lot of work ahead of us.
No significant progress is expected in the coming weeks because I'm going on vacation, but I thought it was time to update you on the project.
Also, if any of you have created files for milling parts for ships that are suitable for 4 Asix, then I would appreciate it if you would share with me so that we have something to try the machine on, I am not yet familiar with design and operation software in the field, you are also welcome to recommend such software.
thank you and good night
Other than generating complex CNC-machined parts I don't have any experience whatsoever in the field of CNC-programming.
As far as software goes, the high-end design- and CNC programming tool I'm familiar with is CATIA from Dassault Systémes, which also has a rather high price tag. Fortunately there are also free software package, like Sketchup. Obviously there is a lot more software floating around, with varying capabilites. Please be aware, most 3D design and manufacturing software has a steep learning curve, so be prepared to invest quite a bit of spare time learning the software to use and that's just learning to use the software...
 
good evening dear friends
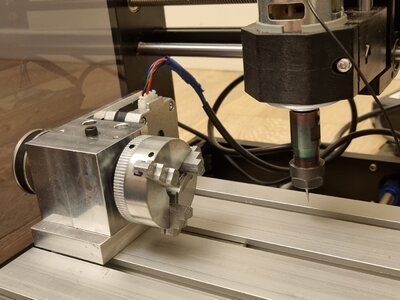
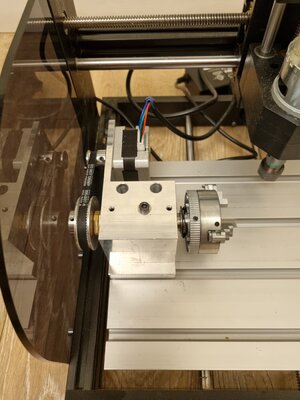
Today we finished another step in upgrading my cnc machine from 3Axis to 4 Axis.
We manufactured the surface/board that connects the motor and the axis assembly with the putter to the work surface of the machine.
The board is made of this aluminum in the shape of the central block where the axis passes over the putter, with a square bar underneath that is adapted to the groove in the work surface and allows for changing/moving of the position of the fourth spindle according to the milling plans that will be designed.
In the coming weeks, we will carry out serviceability and synchronization tests of all four axes and only after that a squat test on a rounded wooden bar of relatively simple shapes, to ensure full serviceability of the machine.
I will continue to update the results :)
20221120_220634.jpg20221120_220738.jpg20221120_220649.jpg20221120_220655.jpg20221120_220923.jpg20221120_220640.jpg20221120_220719.jpg
 
Last edited:
I was just wondering if you had gotten anything more done on the 4 axis setup. I'm in the process of doing the same modification with mine. I got the 4th axis to function properly but crashed several test projects because of not understanding how Fusion 360 does the toolpath for 3+1 axis machining. When It rotated to a different side it tried to push the spindle to the opposite side of the wood. I finally decided I needed more Z axis travel to make it practical. With the smallest 4th axis I could buy on the table that put the center of the wood at 44mm above the table which only gives me about 26mm of travel above the axis. The tool takes up part of that as well. It's hard to keep everything that close to the workpiece. I have all of the parts to extend my Z axis to 85mm of movement now so hoping to get this up and running this weekend. I'll post the results.

I debated on weather to reply to this thread or start a new one. I didn't really want to do a whole thread, mostly just wanted to point out that the machines are getting better all the time. I also have been having success with doing actual carvings. I have a 3018 Pro Max and have been doing some relief carving with it. Overall I'm very happy with the results. I haven't yet done any major upgrades to my machine but they are coming soon. Not just the extended Z axis but ball screws are in the near future.

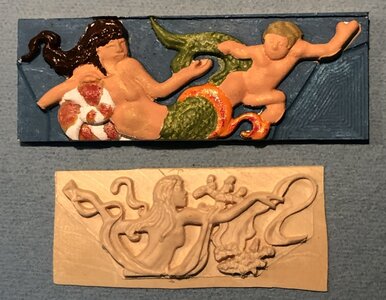
Here are a couple carvings I created with the standard setup. The video is carving in Hard Maple, it took about 2 1/2 hours to create the painted peice. The one below it is Alaskan Yellow Cedar. Not a great photo with the cell phone the colors are pretty off.


Carving.jpg
 
I was just wondering if you had gotten anything more done on the 4 axis setup. I'm in the process of doing the same modification with mine. I got the 4th axis to function properly but crashed several test projects because of not understanding how Fusion 360 does the toolpath for 3+1 axis machining. When It rotated to a different side it tried to push the spindle to the opposite side of the wood. I finally decided I needed more Z axis travel to make it practical. With the smallest 4th axis I could buy on the table that put the center of the wood at 44mm above the table which only gives me about 26mm of travel above the axis. The tool takes up part of that as well. It's hard to keep everything that close to the workpiece. I have all of the parts to extend my Z axis to 85mm of movement now so hoping to get this up and running this weekend. I'll post the results.

I debated on weather to reply to this thread or start a new one. I didn't really want to do a whole thread, mostly just wanted to point out that the machines are getting better all the time. I also have been having success with doing actual carvings. I have a 3018 Pro Max and have been doing some relief carving with it. Overall I'm very happy with the results. I haven't yet done any major upgrades to my machine but they are coming soon. Not just the extended Z axis but ball screws are in the near future.

Here are a couple carvings I created with the standard setup. The video is carving in Hard Maple, it took about 2 1/2 hours to create the painted peice. The one below it is Alaskan Yellow Cedar. Not a great photo with the cell phone the colors are pretty off.


View attachment 360531
I admit that you achieved a very impressive feat!!! Well done
my project has been stuck for about two months at the stage of connecting the 4 axes to the software and we have not yet reached the stage you faced. The information you provided will help me a lot.
The friend who is helping me has not been available yet for personal reasons. I hope that next month he will be available
 
Hello dear friends
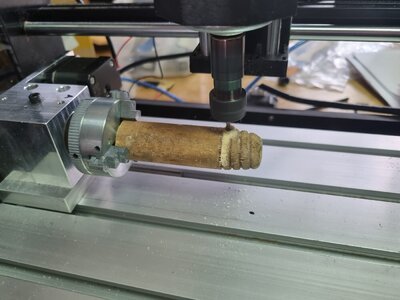
Today we finally made progress in my project, the 4 axis were synchronized to the Grbl software and we did a very simple initial experiment on a wooden cylinder.Until we succeeded, it took us three hours to deal with technical challenges.
I will ordered microswitches and routers, and in the next step we will install them and start playing/learning the Fusion 360 software.
Make no mistake, several weeks will pass until the next update, until then enjoy the pictures and the video.

View attachment 20230408_174531.mp420230408_174422.jpg20230408_174622.jpg20230408_175148.jpg
 
Awesome job! I'm amazed you've pulled that off on an almost stock machine. I started with a 3018 Pro Max and have upgraded it to the point I can't hardly claim it's even in the same class anymore.

What software are you using to control it? I've been using Universal G Code Sender but haven't been all that happy with it. Your screen looks different than mine. If it's Candle how are you controlling the rotary axis? All G Code input.

I just got mine up and running this last weekend as well, but I've got like $600 in it now. It doesn't even look like a 3018 anymore. Technically it still is but other than some screws, there are only 11 parts remaining from the original machine.
 
Hello dear friends
After many delays, I am happy to share with you that the machine works and is able to produce a figurehead (with the help of a friend who knows the field)
the software is
DeskProto 7.1
I'm so excited I'll let the pictures speak for themselves
Screenshot_20240214_173236_Gallery.jpgIMG-20240214-WA0020.jpgIMG-20240214-WA0019.jpgIMG-20240214-WA0018.jpgIMG-20240214-WA0017.jpgIMG-20240214-WA0016.jpgIMG-20240214-WA0015.jpg
 
Back
Top