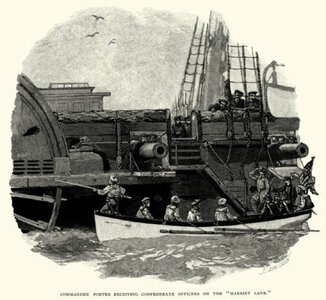
I sent him a couple of spare 9s and howitzers, just in case.Apparently, the historic record goes with the Howitzers. Love the figures and the track layouts, which make sense.
She's gorgeous! I'm envious!
-

Win a Free Custom Engraved Brass Coin!!!
As a way to introduce our brass coins to the community, we will raffle off a free coin during the month of August. Follow link ABOVE for instructions for entering.
-

PRE-ORDER SHIPS IN SCALE TODAY!
The beloved Ships in Scale Magazine is back and charting a new course for 2026!
Discover new skills, new techniques, and new inspirations in every issue.
NOTE THAT OUR FIRST ISSUE WILL BE JAN/FEB 2026
You are using an out of date browser. It may not display this or other websites correctly.
You should upgrade or use an alternative browser.
You should upgrade or use an alternative browser.
USRC Harriet Lane Model Shipways 1:96 scale circa 1863 COMPLETED
Good morning Chuck. Awesome. I think hopefully perfect… cheers GrantYou're the best, Pete! Thank you! Hopefully something like this?
View attachment 438212
I love it Chuck. A serious paddle steamer with some large firepower. In the pervious photo of the guns, it looks like some of the 3D support tags are still there? I did zoom in but may be mistaken…. Maybe just file these off with needle file? Your work is stunning. Cheers GrantNow for the good stuff! The first image in the last post showed the placement, rigging and tracks for pivot guns. When I looked at those wonderful curves, I thought: "My Harriet Lane needed something sexy like that!" It took me a whole day of cutting tracks from black artist paper until I was satisfied. The hardest part was making the circular track for the pivot mounted IX inch Dahlgren. That's what all those holes in the second picture are about. Then to make a representation of the "bullseye" plate for pivoting, I invested $40 in a complicated hole punch that allowed me to make 1/16 wide circles! Worth every penny! I know that the tracks didn't look like what my artistic eye created. But they're so COOL!!! IMHO that is
View attachment 438329
View attachment 438331View attachment 438332View attachment 438333
- Joined
- May 25, 2020
- Messages
- 1,131
- Points
- 443

Grant! Thank you! I'm respectfully content with how she's coming along.Good morning Chuck. Awesome. I think hopefully perfect… cheers Grant
- Joined
- May 25, 2020
- Messages
- 1,131
- Points
- 443

Thank you, Grant! I'll take "stunning" every day and twice on SundaysI love it Chuck. A serious paddle steamer with some large firepower. In the pervious photo of the guns, it looks like some of the 3D support tags are still there? I did zoom in but may be mistaken…. Maybe just file these off with needle file? Your work is stunning. Cheers Grant
Aren't Jerry's guns awesome! They really take the ship to another level in terms of detail and muscle! And that means I have to up my game as well. This may sound strange, but what is a 3D support tag? I know nothing about 3D printing
Blessings.
Chuck
- Joined
- May 25, 2020
- Messages
- 1,131
- Points
- 443

Pete! Good morning, shipmate! I agree. In the plus column for the howitzers is the historical record and some pertinent commentary by Jerry about the contemporary practice of having multiple calibers on the same deck right next to each other. However, as we know from earlier discussion and key input from Jerry, the likelihood that the main deck pivot was a X inch Dahlgren seems remote. Moreover, to the degree that the model is close in dimension to the ship, the experiment I did makes it hard to imagine that monster gun on HL's deck. It just makes so much more sense that all of the main deck guns were IX inch Dahlgrens. I remain on the fence - happily Jerry sent 4 IX inch Dahlgrens on Marsilly carriages AND 4 24lbr howitzers! I am leaning slightly towards the howitzers because of the tracks which will balance, visually, the tracks forward. I need to keep in mind the companions and skylights the kit calls for aft of the mainmast. It is going to get crowded back there. We'll see. Just in case, I'll make up the tracks for the howitzers and see how it looksApparently, the historic record goes with the Howitzers. Love the figures and the track layouts, which make sense.
She's gorgeous! I'm envious!
As to envy - you can't be serious! What you did 25% smaller in scale becomes more amazing and magical the farther I get into my build. Again, hat's off to your Harriet Lane, Pete!
Blessings.
Chuck
Aren't Jerry's guns awesome! They really take the ship to another level in terms of detail and muscle! And that means I have to up my game as well. This may sound strange, but what is a 3D support tag? I know nothing about 3D printing
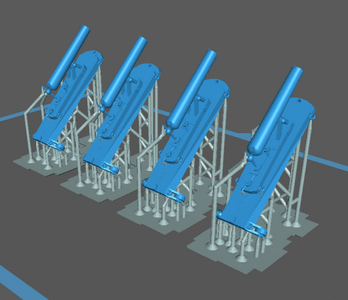
I may be reading this wrong, but "supports" in 3D printing are what connects the part to the printer's base or lifting-plate while it's printing one layer at a time.
Everything, in each slice of the part, must be connected the the slice before it, or its an "island" and the printer has nothing to lay the next layer on, or way to lift that bit out of the resin. Supports make that connection. They also bolster parts that would be too weak to withstand the tugging and pulling involved in resin printing, like fingers on a figure's hand and the like.
- Joined
- May 25, 2020
- Messages
- 1,131
- Points
- 443

Good to know, Jerry! Thank you!I may be reading this wrong, but "supports" in 3D printing are what connects the part to the printer's base or lifting-plate while it's printing one layer at a time.
Everything, in each slice of the part, must be connected the the slice before it, or its an "island" and the printer has nothing to lay the next layer on, or way to lift that bit out of the resin. Supports make that connection. They also bolster parts that would be too weak to withstand the tugging and pulling involved in resin printing, like fingers on a figure's hand and the like.
View attachment 438419
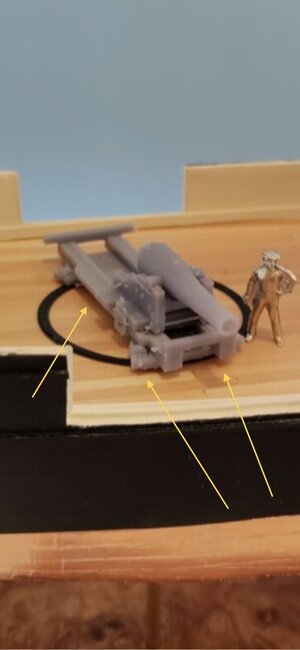
Good evening. Yep agreed. Jerrys cannons are brilliant. I’m just learning 3D printing and at this stage have more failures than successes. Jerry’s explanation of supports is 100%. I wish I could print as he does. My decorations have had many breakages and even my “good stuff” I can’t get like your cannons. When you remove the print from the supports they leave a little “tag” if not cleanly removed. As I said it may be the photo - indicated what appears to be tags by arrows. They come off easily with a chisel blade or safer option a needle file.Thank you, Grant! I'll take "stunning" every day and twice on Sundays
Aren't Jerry's guns awesome! They really take the ship to another level in terms of detail and muscle! And that means I have to up my game as well. This may sound strange, but what is a 3D support tag? I know nothing about 3D printing
Blessings.
Chuck
Cheers Grant
- Joined
- May 25, 2020
- Messages
- 1,131
- Points
- 443

Grant! Thanks for the pointers! Even with Jerry's description I might not have gotten this right.Good evening. Yep agreed. Jerrys cannons are brilliant. I’m just learning 3D printing and at this stage have more failures than successes. Jerry’s explanation of supports is 100%. I wish I could print as he does. My decorations have had many breakages and even my “good stuff” I can’t get like your cannons. When you remove the print from the supports they leave a little “tag” if not cleanly removed. As I said it may be the photo - indicated what appears to be tags by arrows. They come off easily with a chisel blade or safer option a needle file.
View attachment 438494
Cheers Grant
- Joined
- Jun 17, 2021
- Messages
- 3,198
- Points
- 588

Thanks again for the appreciation.Pete! Good morning, shipmate! I agree. In the plus column for the howitzers is the historical record and some pertinent commentary by Jerry about the contemporary practice of having multiple calibers on the same deck right next to each other. However, as we know from earlier discussion and key input from Jerry, the likelihood that the main deck pivot was a X inch Dahlgren seems remote. Moreover, to the degree that the model is close in dimension to the ship, the experiment I did makes it hard to imagine that monster gun on HL's deck. It just makes so much more sense that all of the main deck guns were IX inch Dahlgrens. I remain on the fence - happily Jerry sent 4 IX inch Dahlgrens on Marsilly carriages AND 4 24lbr howitzers! I am leaning slightly towards the howitzers because of the tracks which will balance, visually, the tracks forward. I need to keep in mind the companions and skylights the kit calls for aft of the mainmast. It is going to get crowded back there. We'll see. Just in case, I'll make up the tracks for the howitzers and see how it looks
As to envy - you can't be serious! What you did 25% smaller in scale becomes more amazing and magical the farther I get into my build. Again, hat's off to your Harriet Lane, Pete!
Blessings.
Chuck

Besides, I never let the "facts" deter me from taking artistic license or taking the "Bosuns' prerogative" when fitting out my own models. My own "HL" is a case in point (like what to do with the anchors or how to rig the gaff tops'l), as is my "John W. Canon" which began life in a box labeled "Robt. E. Lee".
Last edited:
Well, I couldn't do everything for him.Good evening. Yep agreed. Jerrys cannons are brilliant. I’m just learning 3D printing and at this stage have more failures than successes. Jerry’s explanation of supports is 100%. I wish I could print as he does. My decorations have had many breakages and even my “good stuff” I can’t get like your cannons. When you remove the print from the supports they leave a little “tag” if not cleanly removed. As I said it may be the photo - indicated what appears to be tags by arrows. They come off easily with a chisel blade or safer option a needle file.
Cheers Grant
- Joined
- May 25, 2020
- Messages
- 1,131
- Points
- 443

But just about, Jerry!Well, I couldn't do everything for him.
- Joined
- May 25, 2020
- Messages
- 1,131
- Points
- 443

Good evening, shipmates!
The day got away from me, so I won't post at length. In brief - scale. Please understand, I am enjoying this build very much. The kit has a lot of things going for it including being very unique - not a lot of side wheeler kits out there. Krick's Gulnara in 1:48 scale (I can't wait to get this one) and Mamoli's L'Orenoque in 1:100 scale. BUT - the kit is much more complicated than it should be because the contents of the box don't match the plans AND several important part are way out of scale. Remember the problem of the size of the guns versus the height of the bulwarks and my effort to raise the bulwarks enough to have the guns square in their ports? As to parts - perhaps you'll agree with me that its the smallest things that stick out for better or worse when you're working at scale. Are the cleats the right size for the bulwarks versus deck cleats, are the belaying pins the right size, are the eyebolts too big or just right? At 1:96 scale I've found that things need to be small and delicate. This extends to the anchor chain, the chain bobstays and the chains running through the kings posts that help support the weight of the paddlewheel assemblies. Finally, my personal horror - how big are the blocks relative to the guns, the spars, the other blocks?
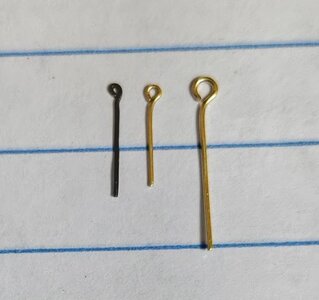
Here are 3 eyebolts. From left to right: I made the first one with 28 gauge annealed steel wire, the second two came with the kit. Of the second two, the smallest is probably about as big as the eyebolts on this ship should get IMHO. I don't know what one is supposed to do with those giant hoops at the end other than to save them for my next 1:48 scale build.
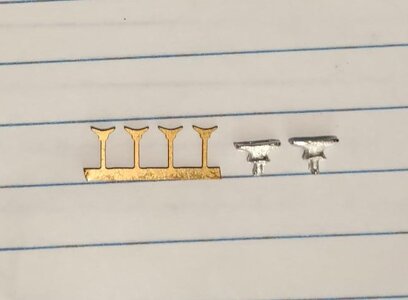
Cleats. The instructions and plans show a number of cleats mounted to the bulwarks. In fact, I am planning to add more so the port lid ropes have some place to tie off. This pic shows the kit supplied Britannia metal cleat next to some lovely PE brass darlings sourced from Blue Jacket Shipcrafters. The kit supplied cleats are a scale 2 foot long and 9 inches wide. The brass cleats are a scale foot by about 3 inches. Granted that ships can have cleats of different sizes - but a uniform 2 feet simply wouldn't do.
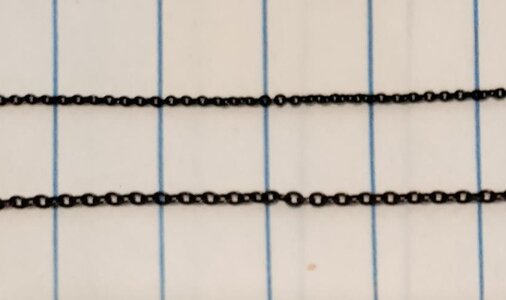
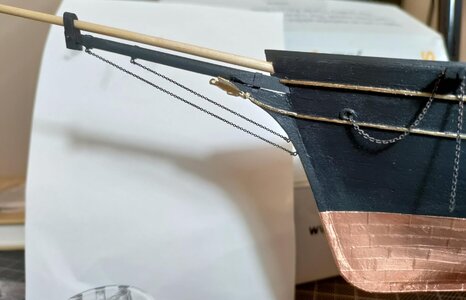
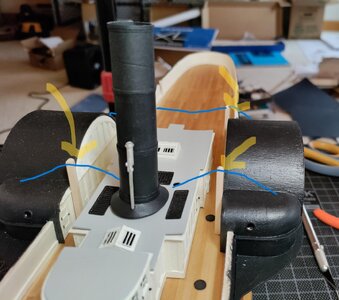
Chain. As it turns out, Harriet Lane almost features chain. The anchor chain. Chain bobstays and chain trusses to help support the weight of the paddle wheel assemblies. Now, I ask you, does it make sense that the size of the anchor chain is the same as the bobstays and the truss chains? I had to answer that for myself with a resounding NO!. Happily, way back in December, I sourced some finer chain because I thought it might come in handy. It did. The kit supplies a "heavy" anchor chain in copper. It blackened-up nicely after a short dip in Caseys Brass Black. Big chain and small chain. And finally, you can see that I used my small eye bolts and the small chain for the bobstays with the anchor chain in the pic for comparison. In person, it looks good. The final image in this post shows the king posts and the line of the chain truss support system. I think the heavier chain is probably what, I'll do given the weight being supported.
The day got away from me, so I won't post at length. In brief - scale. Please understand, I am enjoying this build very much. The kit has a lot of things going for it including being very unique - not a lot of side wheeler kits out there. Krick's Gulnara in 1:48 scale (I can't wait to get this one) and Mamoli's L'Orenoque in 1:100 scale. BUT - the kit is much more complicated than it should be because the contents of the box don't match the plans AND several important part are way out of scale. Remember the problem of the size of the guns versus the height of the bulwarks and my effort to raise the bulwarks enough to have the guns square in their ports? As to parts - perhaps you'll agree with me that its the smallest things that stick out for better or worse when you're working at scale. Are the cleats the right size for the bulwarks versus deck cleats, are the belaying pins the right size, are the eyebolts too big or just right? At 1:96 scale I've found that things need to be small and delicate. This extends to the anchor chain, the chain bobstays and the chains running through the kings posts that help support the weight of the paddlewheel assemblies. Finally, my personal horror - how big are the blocks relative to the guns, the spars, the other blocks?
Here are 3 eyebolts. From left to right: I made the first one with 28 gauge annealed steel wire, the second two came with the kit. Of the second two, the smallest is probably about as big as the eyebolts on this ship should get IMHO. I don't know what one is supposed to do with those giant hoops at the end other than to save them for my next 1:48 scale build.

Cleats. The instructions and plans show a number of cleats mounted to the bulwarks. In fact, I am planning to add more so the port lid ropes have some place to tie off. This pic shows the kit supplied Britannia metal cleat next to some lovely PE brass darlings sourced from Blue Jacket Shipcrafters. The kit supplied cleats are a scale 2 foot long and 9 inches wide. The brass cleats are a scale foot by about 3 inches. Granted that ships can have cleats of different sizes - but a uniform 2 feet simply wouldn't do.

Chain. As it turns out, Harriet Lane almost features chain. The anchor chain. Chain bobstays and chain trusses to help support the weight of the paddle wheel assemblies. Now, I ask you, does it make sense that the size of the anchor chain is the same as the bobstays and the truss chains? I had to answer that for myself with a resounding NO!. Happily, way back in December, I sourced some finer chain because I thought it might come in handy. It did. The kit supplies a "heavy" anchor chain in copper. It blackened-up nicely after a short dip in Caseys Brass Black. Big chain and small chain. And finally, you can see that I used my small eye bolts and the small chain for the bobstays with the anchor chain in the pic for comparison. In person, it looks good. The final image in this post shows the king posts and the line of the chain truss support system. I think the heavier chain is probably what, I'll do given the weight being supported.


Good morning Chuck. You are doing a fine job with getting this kit accurate and parts to scale etc. Your hawes hole and anchor chain has come out superbly. Cheers GrantGood evening, shipmates!
The day got away from me, so I won't post at length. In brief - scale. Please understand, I am enjoying this build very much. The kit has a lot of things going for it including being very unique - not a lot of side wheeler kits out there. Krick's Gulnara in 1:48 scale (I can't wait to get this one) and Mamoli's L'Orenoque in 1:100 scale. BUT - the kit is much more complicated than it should be because the contents of the box don't match the plans AND several important part are way out of scale. Remember the problem of the size of the guns versus the height of the bulwarks and my effort to raise the bulwarks enough to have the guns square in their ports? As to parts - perhaps you'll agree with me that its the smallest things that stick out for better or worse when you're working at scale. Are the cleats the right size for the bulwarks versus deck cleats, are the belaying pins the right size, are the eyebolts too big or just right? At 1:96 scale I've found that things need to be small and delicate. This extends to the anchor chain, the chain bobstays and the chains running through the kings posts that help support the weight of the paddlewheel assemblies. Finally, my personal horror - how big are the blocks relative to the guns, the spars, the other blocks?
Here are 3 eyebolts. From left to right: I made the first one with 28 gauge annealed steel wire, the second two came with the kit. Of the second two, the smallest is probably about as big as the eyebolts on this ship should get IMHO. I don't know what one is supposed to do with those giant hoops at the end other than to save them for my next 1:48 scale build.
View attachment 438588
Cleats. The instructions and plans show a number of cleats mounted to the bulwarks. In fact, I am planning to add more so the port lid ropes have some place to tie off. This pic shows the kit supplied Britannia metal cleat next to some lovely PE brass darlings sourced from Blue Jacket Shipcrafters. The kit supplied cleats are a scale 2 foot long and 9 inches wide. The brass cleats are a scale foot by about 3 inches. Granted that ships can have cleats of different sizes - but a uniform 2 feet simply wouldn't do.
View attachment 438589
Chain. As it turns out, Harriet Lane almost features chain. The anchor chain. Chain bobstays and chain trusses to help support the weight of the paddle wheel assemblies. Now, I ask you, does it make sense that the size of the anchor chain is the same as the bobstays and the truss chains? I had to answer that for myself with a resounding NO!. Happily, way back in December, I sourced some finer chain because I thought it might come in handy. It did. The kit supplies a "heavy" anchor chain in copper. It blackened-up nicely after a short dip in Caseys Brass Black. Big chain and small chain. And finally, you can see that I used my small eye bolts and the small chain for the bobstays with the anchor chain in the pic for comparison. In person, it looks good. The final image in this post shows the king posts and the line of the chain truss support system. I think the heavier chain is probably what, I'll do given the weight being supported.
View attachment 438593
View attachment 438594
View attachment 438595
- Joined
- May 25, 2020
- Messages
- 1,131
- Points
- 443

Good morning, shipmates and Happy Easter!
Here's how the build stands today: Bowsprit stepped and partially rigged. Figurehead attached. Jibboom milled and finished but not attached. Sampson post and windlass attached. chain aboard. King posts milled and placed but not yet painted or permanently attached. I have completed all of the major parts of the deckhouse complex. The lower paddlewheel assemblies are permanently attached to the hull. Next steps for me include drilling holes for eyebolts for gun tackle and cleats. I want to get all the holes and some of the eyebolts and cleats aboard before permanently attaching the upper paddle wheel assembly and the deckhouse complex. I will also make the gun port lids for attachment near the end of the build - they need to be formed to the curve of the bulwarks - and drill holes for the lines that raise the ports. Inboard I will also attach the lines and secure them to cleats on the bulwarks. Then on to working on the guns including adding eyebolts where necessary, painting and rigging the gun tackle.
Yesterday I finished the funnel. It was an interesting process mainly because I couldn't accept the information in the instructions. Here they are:
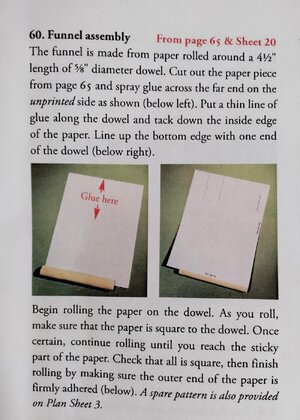
I couldn't accept the idea that the dowel was not just a form, but also a permanent part. I came to this conclusion because the paper provided for the the funnel is super thin inexpensive stuff that I was sure would crinkle under handling. So the paper must attach to the dowel permanently so that the eyebolts for the steam relief valve and the whistle and the funnel guys had a firm landing place. I also rejected all of this information because someone was bound to notice the dowel even though recessed in the funnel about an inch or so. It's called cognitive dissonance: the instructions made no sense to me so I replaced them with my own idea of how this should be done because I wanted the funnel to appear as a hollow tube all the way down.
So, I used the dowel, but I decided to go with my black artists paper which I thought I could roll and glue without any crinkles and that once wrapped around twice would be quite sturdy enough for the eyebolts. And I thought I could avoid painting it since it was already black. What I assumed was that the color would look the same as it does when I am using very narrow strips to simulate iron bands. This process worked well - mainly
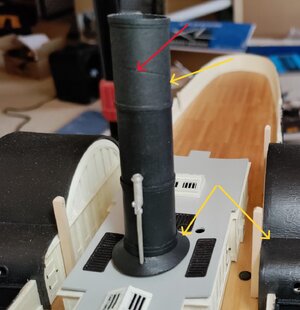
The red arrow points out a pressure mark in the paper I used. I went ahead with it anyway. You'll also notice that the paper did not have the same sheen as the black paint. I painted using the same ModelExpo hull spar black that I used throughout the ship. The yellow arrows point out the similarity to the sheen on the paddlewheel assembly. You can see the whistle - a nice touch and the detail is quite good. I tried to blacken it with Jax pewter black, but I couldn't get it or the steam escape valve on the aft side of the funnel dark enough. (Any instructions on the best way to blacken Brittania white metal parts?) I wound up painting these parts with Testors flat black enamel without destroying the detail.
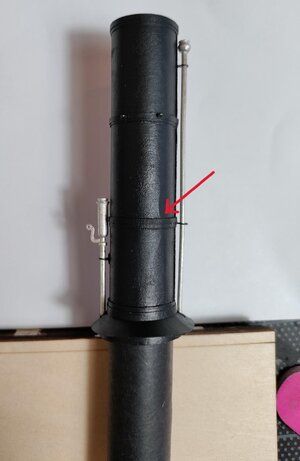
See the crinkle I was avoiding? I put a red arrow pointing to it just in case you missed it.
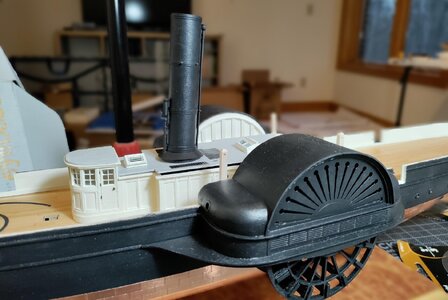
And the finished funnel assembly resting in place for this photo op. "I'm ready for my close-up Mr. DeMille."
Here's how the build stands today: Bowsprit stepped and partially rigged. Figurehead attached. Jibboom milled and finished but not attached. Sampson post and windlass attached.
 chain aboard. King posts milled and placed but not yet painted or permanently attached. I have completed all of the major parts of the deckhouse complex. The lower paddlewheel assemblies are permanently attached to the hull. Next steps for me include drilling holes for eyebolts for gun tackle and cleats. I want to get all the holes and some of the eyebolts and cleats aboard before permanently attaching the upper paddle wheel assembly and the deckhouse complex. I will also make the gun port lids for attachment near the end of the build - they need to be formed to the curve of the bulwarks - and drill holes for the lines that raise the ports. Inboard I will also attach the lines and secure them to cleats on the bulwarks. Then on to working on the guns including adding eyebolts where necessary, painting and rigging the gun tackle.
Yesterday I finished the funnel. It was an interesting process mainly because I couldn't accept the information in the instructions. Here they are:

I couldn't accept the idea that the dowel was not just a form, but also a permanent part. I came to this conclusion because the paper provided for the the funnel is super thin inexpensive stuff that I was sure would crinkle under handling. So the paper must attach to the dowel permanently so that the eyebolts for the steam relief valve and the whistle and the funnel guys had a firm landing place. I also rejected all of this information because someone was bound to notice the dowel even though recessed in the funnel about an inch or so. It's called cognitive dissonance: the instructions made no sense to me so I replaced them with my own idea of how this should be done because I wanted the funnel to appear as a hollow tube all the way down.
So, I used the dowel, but I decided to go with my black artists paper which I thought I could roll and glue without any crinkles and that once wrapped around twice would be quite sturdy enough for the eyebolts. And I thought I could avoid painting it since it was already black. What I assumed was that the color would look the same as it does when I am using very narrow strips to simulate iron bands. This process worked well - mainly
The red arrow points out a pressure mark in the paper I used. I went ahead with it anyway. You'll also notice that the paper did not have the same sheen as the black paint. I painted using the same ModelExpo hull spar black that I used throughout the ship. The yellow arrows point out the similarity to the sheen on the paddlewheel assembly. You can see the whistle - a nice touch and the detail is quite good. I tried to blacken it with Jax pewter black, but I couldn't get it or the steam escape valve on the aft side of the funnel dark enough. (Any instructions on the best way to blacken Brittania white metal parts?) I wound up painting these parts with Testors flat black enamel without destroying the detail.

See the crinkle I was avoiding? I put a red arrow pointing to it just in case you missed it.

And the finished funnel assembly resting in place for this photo op. "I'm ready for my close-up Mr. DeMille."

Looks convincing to me!
- Joined
- Jun 17, 2021
- Messages
- 3,198
- Points
- 588

Me too. The 3/32" scale MS kit of yore, that must have been one of the last when I purchased mine, came with a nice cast white metal funnel and base ring,
The instructions for making the one that came with your kit read like a 1940s Popular Science scratch build project!
Yours came out really well!
The instructions for making the one that came with your kit read like a 1940s Popular Science scratch build project!
Yours came out really well!
- Joined
- May 25, 2020
- Messages
- 1,131
- Points
- 443

Thank you, Pete! I still can't get over what you made happen in 3/32" scale with your Harriet Lane. I don't think I have the right stuff (mainly tools and know howMe too. The 3/32" scale MS kit of yore, that must have been one of the last when I purchased mine, came with a nice cast white metal funnel and base ring,
The instructions for making the one that came with your kit read like a 1940s Popular Science scratch build project!
Yours came out really well!
 but also skill and patience) to go much below 1/8 scale.


