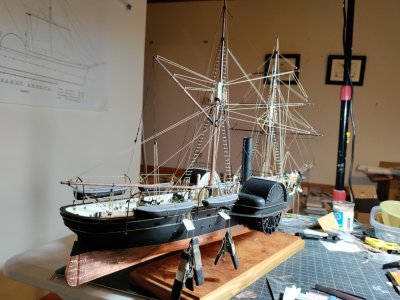
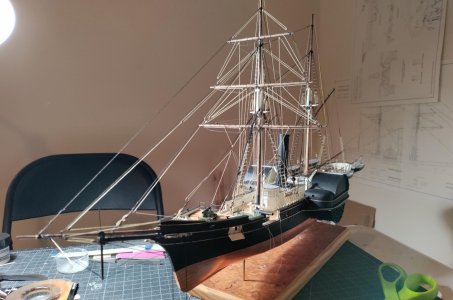
USRC Harriet Lane Model Shipways 1:96 scale circa 1863

Chuck,

I looked up your chain cable question in Harland’s Seamanship in the Age of Sail. I find Harland’s book to be frustrating as ge goes to great lengths on topics except those for which you are seeking an answer.

Anyhow. Here’s what I was able to glean about anchors and cables. He says, “The anchor rings used with hemp proved to be quite unsuitable when used with chain and had to be replaced by a much smaller and stouter shackle better able to resist the concentration of strain at one point.

An engineer’s understanding of this. An advantage of hemp cable was its elasticity. Under load, the cable’s twist would tighten and the cable would stretch. Chain cable is much stronger than hemp so rather than stretch elastically the load would be transferred along the cable to its weakest point. This would be the ring attached to the anchor.

Roger
Even today, many boats use a chain "leader" between the anchor and anchor rode (which is normally nylon) because the chain's weight lays on the bottom helping the anchor dig in. By the 1850s, metal was all the rage, wire rope was coming into use, chain everything; sheets, bobstays, anchor rode, warships and many clippers had rigging-screws (turnbuckles) instead of dead-eyes and lanyards, even chain armor.
If the Lane didn't have a full chain anchor rode, it was likely because of weight. A half-mile of chain for 4 anchors is a LOT of weight compared to rope, in a sharp-bowed boat with two cannons already mounted forward. Each would likely have a few fathoms of chain leader.
The rope rode would probably have a thimbled eye shackled to the chain, and the anchor ring itself would be a bow shackle. The chain link at the anchor was larger so the end of the shackle would fit through it, or another, smaller shackle connected the chain to the anchor shackle.
With the anchors catted and stowed, you probably would only see their chains, and not the rope rodes.

View attachment 508717

Roger! Jerry! Perfect! Thank you both for coming through with the straight poop! I knew you would. I was so sure that I had no problem holding my breath until you did!

Roger, I really appreciate the explanation of why the "ring" should be different to account for the properties of hemp versus chain.

Jerry, you treasure chest, helpful as always. Based on your prior input to my build I understood the rage for metal as you proposed that Harriet Lane likely had rigging screws rather than deadeyes and lanyards. Your scale image, thank you, is also helpful understanding the proportions of the anchor including the thickness of the shank. A while back I posted my concern that the kit supplied anchor seemed a bit anemic relative to the size of the ship. I have a little sailor to compare it with and can make my decisions based on what my eye tells me. Looks like the anchor is "two sailors tall" from the bottom of the crown to the top of the shank. And the shank is something less that 1 sailor thick.

Thank you both for sharing your store of resources and knowledge!

Blessings. Peace. Gratitude.
Chuck
 
What ho, shipmates!

This is just a "short one" about the port lids. I had their ropes aboard long ago. As I got ready to make the lids after a helpful discussion with Roger and Pete about the right angle (get it 90 degrees? ROTF ) to set the lids, it dawned on me that I might have trouble getting the ropes to reflect that they were carrying the weight of the port lids. Well, I thought, I'm sure it will work out. And it did!
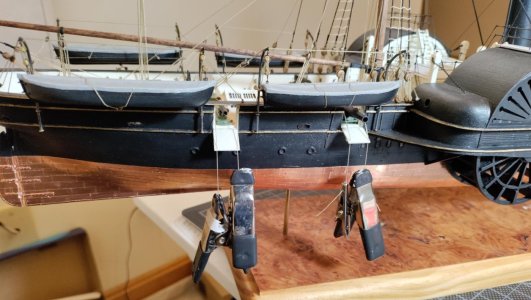
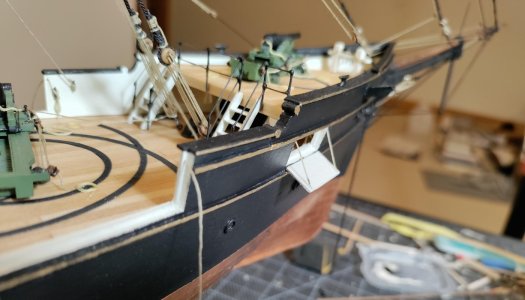
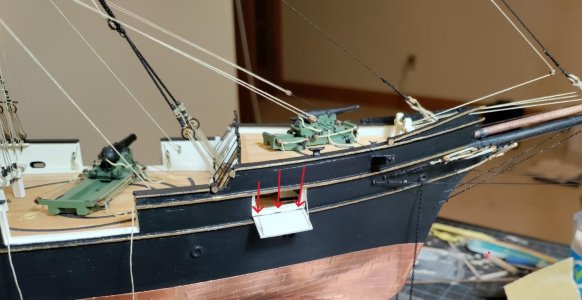
I made the lids from the 1/32" thick scrap, which is plentiful in this kit. I drilled tiny holes to pass the lines through. At first I was worried that I would not be able to use a needle threader to get the line through the holes. Test. Success. So I threaded the ropes through the holes on my prototype lid and set it in position. I found that with a little weight on the ropes they pulled down sufficiently to show they were weight bearing. Things when smoothly from there. I learned that the port lids could not be let all the way down because of the rub rail and the ports closest to the paddle wheels opened a lot less because the sponson decking got in the way.

Some pics. In the first you see the rope through the port lids aft. After threading the ropes through the lids, I attached the inboard ends with CA. This way I could set the angle and use the weighted ropes to press the port lid towards the hull. Once the CA set I fixed the outer ends of the ropes to the lids with acrylic matte medium. Once that dried I gave the whole rope a coat and an extra little dab to the end that passes through the hole. Once the acrylic matte medium dried, it cut the dangling ends off flush with the hidden side of the lid with a fresh #11 blade. Pic 3 shows my effort to signify hinges - tiny bits of 28 gauge annealed steel wire. Yes, all of the lids got this treatment.

The rest of the pics are just for fun - playing with the lighting. Besides, I know you guys like pictures. :)

I still have the big port openings to make forward and then the anchors, rope coils, flags. Getting real close mates. Real close. I think I can get the port lid project done tonight. Either way, this is all she wrote until the Admiral is happy with my work on the house which I hope doesn't take all of my spring break!

Many many thanks shipmates!

Blessings. Peace. Gratitude.
Chuck

Portlids 1.jpgPortlids 2.jpgPortlids 3 hinges.jpgPortlids 4.jpgFun 2.jpgFun 3.jpgFun1.jpg
 
I just wanted to share my appreciation for the exchange happening on this thread (and also on Peter G's current project). These types of ships don't captivate my interest - but the sincerity of contribution from several of you guys is just so wonderful. You speak with authority and passion without some of the dogma that often imposes itself on other threads (everyone knows this is how it was done and you're a loser if you think otherwise). How refreshing it is to see substantive contributions from people who hold what they 'know' gently and respectfully.

With genuine humility I acknowledge that I have hand-skills that might exceed those of some others - but you guys are the true stars of this forum. I can play the notes pretty well - but you are the men who make the music happen.

Whew, that was a little bit over the top! I'll crawl back under my rock now :rolleyes:.
 
Last edited:
Self talk can be a healthy alternative to therapy... ROTF.
True story- I do it all the time
What ho, shipmates!

This is just a "short one" about the port lids. I had their ropes aboard long ago. As I got ready to make the lids after a helpful discussion with Roger and Pete about the right angle (get it 90 degrees? ROTF ) to set the lids, it dawned on me that I might have trouble getting the ropes to reflect that they were carrying the weight of the port lids. Well, I thought, I'm sure it will work out. And it did!

I made the lids from the 1/32" thick scrap, which is plentiful in this kit. I drilled tiny holes to pass the lines through. At first I was worried that I would not be able to use a needle threader to get the line through the holes. Test. Success. So I threaded the ropes through the holes on my prototype lid and set it in position. I found that with a little weight on the ropes they pulled down sufficiently to show they were weight bearing. Things when smoothly from there. I learned that the port lids could not be let all the way down because of the rub rail and the ports closest to the paddle wheels opened a lot less because the sponson decking got in the way.

Some pics. In the first you see the rope through the port lids aft. After threading the ropes through the lids, I attached the inboard ends with CA. This way I could set the angle and use the weighted ropes to press the port lid towards the hull. Once the CA set I fixed the outer ends of the ropes to the lids with acrylic matte medium. Once that dried I gave the whole rope a coat and an extra little dab to the end that passes through the hole. Once the acrylic matte medium dried, it cut the dangling ends off flush with the hidden side of the lid with a fresh #11 blade. Pic 3 shows my effort to signify hinges - tiny bits of 28 gauge annealed steel wire. Yes, all of the lids got this treatment.

The rest of the pics are just for fun - playing with the lighting. Besides, I know you guys like pictures. :)

I still have the big port openings to make forward and then the anchors, rope coils, flags. Getting real close mates. Real close. I think I can get the port lid project done tonight. Either way, this is all she wrote until the Admiral is happy with my work on the house which I hope doesn't take all of my spring break!

Many many thanks shipmates!

Blessings. Peace. Gratitude.
Chuck

View attachment 508757View attachment 508756View attachment 508755View attachment 508754View attachment 508759View attachment 508758View attachment 508760
Such a cool model. Way to go Chuck.
Cheers Grant
 
I just wanted to share my appreciation for the exchange happening on this thread (and also on Peter G's current project). These types of ships don't captivate my interest - but the sincerity of contribution from several of you guys is just so wonderful. You speak with authority and passion without some of the dogma that often imposes itself on other threads (everyone knows this is how it was done and you're a loser if you think otherwise). How refreshing it is to see substantive contributions from people who hold what they 'know' gently and respectfully.

With genuine humility I acknowledge that I have hand-skills that might exceed those of some others - but you guys are the true stars of this forum. I can play the notes pretty well - but you are the men who make the music happen.

Whew, that was a little bit over the top! I'll crawl back under my rock now :rolleyes:.
What kind, inspiring and motivating words, Doc! I hope there's room under that "rock" for the likes of me!
I too like the "music" in this ensemble! :D ThumbsupThumbsup
Where everybody gets to play harmoniously together and play a little improvised solo riff here and there. I like the synergy!
As they say in the music biz, you've got some pretty impressive chops there yourself, Paul!

Pete
 
Last edited:
Chuck,

I’ve given some thought to the anchors for Harriett Lane. I Imagine that the kit manufacturers did not cast special anchors for your kit, so I decided to see if there is anything about Mid Nineteenth Century US Navy anchors and how did they differ from standard pattern Eighteenth Royal Navy ones.

I found a gold mine of information! It’s Steven B. Luce’s Seamanship. I have a copy of the Sixth Edition from 1877. The photo below shows the pattern issued from the Washington Navy Yard. Anchors were classed by weight, and the weight issued was based on the vessel’s tonnage. I believe that this is register (volumetric) tonnage, not displacement. Once the weight has even determined, the book provides formulae for calculating the anchor’s proportions.
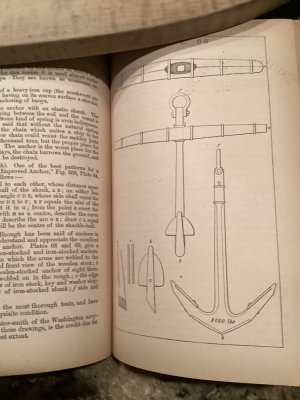
According to the book, the drawing was provided by the blacksmith at the NavyYard.

A later edition of the book is available on line.

Roger

image.jpg
 
Chuck,

I’ve given some thought to the anchors for Harriett Lane. I Imagine that the kit manufacturers did not cast special anchors for your kit, so I decided to see if there is anything about Mid Nineteenth Century US Navy anchors and how did they differ from standard pattern Eighteenth Royal Navy ones.

I found a gold mine of information! It’s Steven B. Luce’s Seamanship. I have a copy of the Sixth Edition from 1877. The photo below shows the pattern issued from the Washington Navy Yard. Anchors were classed by weight, and the weight issued was based on the vessel’s tonnage. I believe that this is register (volumetric) tonnage, not displacement. Once the weight has even determined, the book provides formulae for calculating the anchor’s proportions.

According to the book, the drawing was provided by the blacksmith at the NavyYard.

A later edition of the book is available on line.

Roger

View attachment 508970
Roger! Brilliant! Thank you!

I was hoping that one of my shipmates would give me a better way to determine the correct proportions for my anchors than my estimate of approximatley two sailors long and almost a whole sailor wide. ROTF

I really think I will produce a thread that consolidates the wisdom you and others have shared. We'll see!

Blessings.
Chuck
 
I just wanted to share my appreciation for the exchange happening on this thread (and also on Peter G's current project). These types of ships don't captivate my interest - but the sincerity of contribution from several of you guys is just so wonderful. You speak with authority and passion without some of the dogma that often imposes itself on other threads (everyone knows this is how it was done and you're a loser if you think otherwise). How refreshing it is to see substantive contributions from people who hold what they 'know' gently and respectfully.

With genuine humility I acknowledge that I have hand-skills that might exceed those of some others - but you guys are the true stars of this forum. I can play the notes pretty well - but you are the men who make the music happen.

Whew, that was a little bit over the top! I'll crawl back under my rock now :rolleyes:.
Often, when an unexpected present of recognition comes my way, I am so overwhelmed that I need time to take it in. I'm not sure that I have taken enough time to settle, Paul, but I want to celebrate the poetry of your gift in a timely fashion.

Your message represents the kind of fellowship, I think, that we all desire. Kindness, encouragement, constructive correction among friends all given with an eye toward making someone else's work better. What a blessing to receive and to give.

If that's what comes from life under a rock, make room for one more!

With a full heart.

Blessings. Peace. Gratitude.
Chuck
 
What kind, inspiring and motivating words, Doc! I hope there's room under that "rock" for the likes of me!
I too like the "music" in this ensemble! :D ThumbsupThumbsup
Where everybody gets to play harmoniously together and play a little improvised solo riff here and there. I like the synergy!
As they say in the music biz, you've got some pretty impressive chops there yourself, Paul!

Pete
Pete! Something tells me there's plenty of room under Paul's rock!

I hope that you and our other shipmates remember that the muse for my Harriet Lane was your Harriet Lane! Music being handed forward:D

Blessings.
Chuck
 
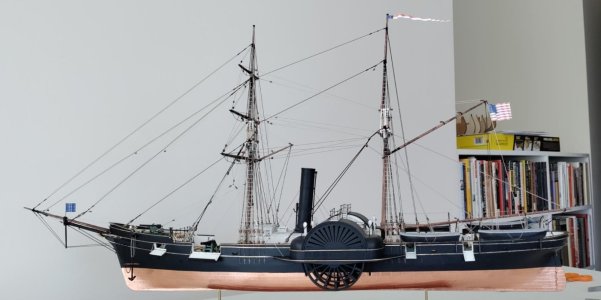
It’s all in the details, Chuck! And what a bit of sunlight can do to a model. For sure it highlighted her rigging.
Regards, Peter
If you would just describe it, this would be a strange sailing vehicle. But in its full glory she's a wonderful sleek ship! And beautiful craftsmanship. Hat off!
We are in the same boat so to speak, but I agree, this model and similar ones are a joy to see and the builds a joy to follow. Well done Chuck!
Allan

Peter! I couldn't agree with you more! I can only hope that I can develop some skills taking better pictures. I'm glad you liked my lighting experiment!

Marco! Thank you for the compliment! I agree with you! Almost impossible to imagine what a sidewheel ocean going warship might look like. Now we know - sleek and deadly:cool: accentuated naturally by the angle and the lighting - all in the cinematographyROTF

Allan! Thank you for the kind words! You know, I think I was in that boat with you and Paul and others. I only got the kit as part of my home museum of warship development from the galleys at Lepanto to the age of fighting sail to the transition from sail to steam, paddle wheel to rear screw. I had no particular interest in a sidewheel warship. Being a huge fan of Forester and an even bigger fan of Patrick O'Brien, my world was exclusively the world of the the age of fighting sail. Now, I've become almost obsessed with the development of mechanical propulsion between 1830 and 1850. Happily, Krick's Gulnara and Mamoli's L'Orenoque are available. I've asked our friends @Model Shipways about producing a USS Susquehanna kit. In 48 or 96 scale that ship would be a handsome model. On the other hand, Gilbert McArdle scratch built a beautiful model of her and published plans! - see where this is headed? I've gone on too long!
Thank you for your support through this build, Allan!

To you all:

Blessings. Peace. Gratitude.
 
What ho, shipmates!

Well, I got leave from my Admiral to finish the port lidsROTF. And I did. I'll post some pics later. I'm a little surprised that I'm almost finished. With Roger's @Roger Pellett input, I may be able to produce suitable anchors, but all that's left is the anchors, the rope coils and the flags!

For now, however, I have put on my wingtips for more home remodelingROTF Shangri-la Shipyard, a division of Henson Heavy Industries, is closed (for the week).

Blessings.
Chuck
 
Back
Top