• Ships of Scale has incorportated an extra level of security when you log In. Please follow on-screen prompts to acknowledge that you are not a robot via a "Check Box" or a "Pictorial Check Box Puzzle". This is needed due to higher level of AI Activity Security.
  • SUBSCRIBE TO SHIPS IN SCALE TODAY!

    The beloved Ships in Scale Magazine is back and charting a new course for 2026!
    Discover new skills, new techniques, and new inspirations in every issue.

    NOTE THAT OUR NEXT ISSUE WILL BE July/August 2026
  • Win a Free Custom Engraved Brass Coin!!!
    As a way to introduce our brass coins to the community, we will raffle off a free coin during the month of August. Follow link ABOVE for instructions for entering.

YQ Bluenose Ted R Redux

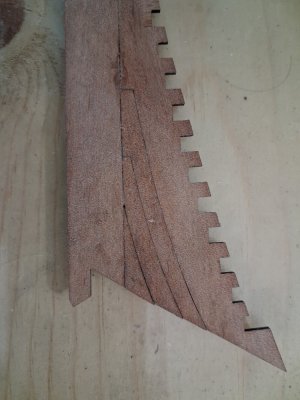
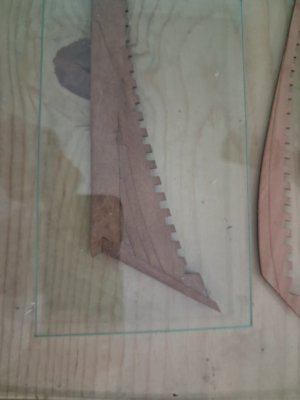
Thank you. Your arrow is pointing to the area is was thinking needed adjustment.
I just did a poor job explaining.
The only power tools I have is a dremel and a small battery held drill.
 
Let's see if others agree.
I agree with Paul. Sand the inside of the joint at Paul’s blue arrow step by step. Keep the line of the notches for the frames in the upwards line.
About the sanding: Glue some sandpaper onto small wooden strips of varying widths. This will allow you to sand ‘surfaces flat’.
Regards, Peter
 
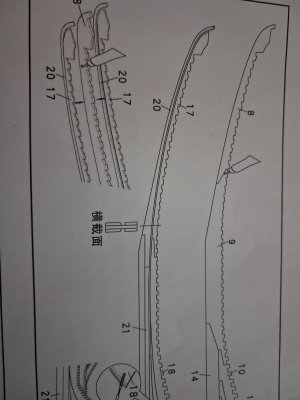
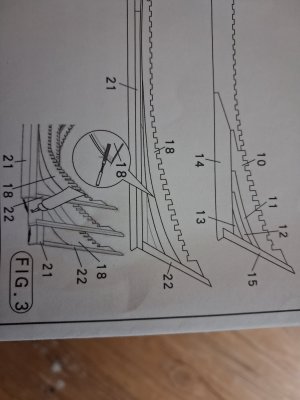
Ive been studying the Yq plans, Eisnor's and Model Expo regarding the rabbet in the keel. Initially I was more confused as they are slightly different or only show the rabbet or the bearding line.
Having never carved a rabbet line on previous models I'm hesitant to n screw things up this early in the build.
This is my thinking so far.
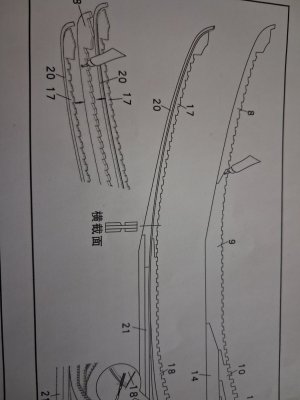
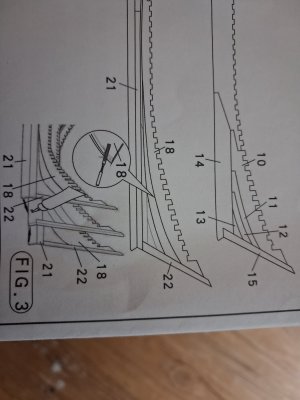
1) I completely understand the bearding line on part 18 at the stern above the deadwood. The rabbet seems to already be formed by parts 21 and 22. This
tapering at the bearding line seems strait forward and could be done prior to gluing 18 in place.
2) The bearding line going forward seems to follow the bottom of parts 17 and according to the cross section no shaping needs to be done at the bearding line.
The tops of parts might need to be shaped to form the bottom of the rabbet.
My conclusion, am I making a mistake.
I shape the bottom of 18 by tapering to nothing from the bearding line. I leave the forward parts.as.they are. The port side, without planking will appear finished. And i haven't risked botching it up this being my first attempt. On the starboard side I can taper the planks to fit. Any mistakes could be corrected with filler as this side gets painted. The same goes if I make my first attempt at carving a rabbet, I could use filler.
20261022_154321.jpg20261022_154239.jpg
 
Ive been studying the Yq plans, Eisnor's and Model Expo regarding the rabbet in the keel. Initially I was more confused as they are slightly different or only show the rabbet or the bearding line.
Having never carved a rabbet line on previous models I'm hesitant to n screw things up this early in the build.
This is my thinking so far.
1) I completely understand the bearding line on part 18 at the stern above the deadwood. The rabbet seems to already be formed by parts 21 and 22. This
tapering at the bearding line seems strait forward and could be done prior to gluing 18 in place. I understand the tapering at the deadwood at.the stern.
2 the bearding lines and ra et location seem to be defined by parts 17 and 20 going forward.

20261022_154321.jpg20261022_154239.jpg

If i taper parts 18 to the stern post and to the rabbet at part.21 that would work for either side. Forward of this at parts.17 and 20 just leave it alone.
Why take a n chance of pitching the rabbet first.time around and on the Starboard side I could taper the planks using filler to cover mistakes as it will be painted. For that matter I could attempt the rabbet and cover any botched areas on the starboard side.
Any feedback is appreciated.
 
Hi Ted. There is already written a lot about the rabbet in relation to the YQ drawings and manual. Basically the space between the parts 17 and 20 is enough to function as a rabbet. About Eisnor I wrote this in one of the threads in the Main Support area:
“But I see the same in "The Practicum" from Gene Bodnar, also building conform Eisnor.
On his page 31 you can see it in his 'step 3' on this picture 022 and 023 and page 32, pictures 025 and 026.
Also page 50, picture 058. But Bodnar has not planked his model till the keel and over the deadwood.”

I don’t know if you have already downloaded that practicum. In a quick search I found —> this site <—.
And in my build-log there was the discussion in the posts #47 till #60. But beware of my build: it’s a combination from YQ / MS-Lankford / Eisnor / Jenson.
To make it not complicated: leave the rabbet between the parts 17 and 20, or sand the bottom of part 17 a little bit.
The principle of the rabbet is based on this:
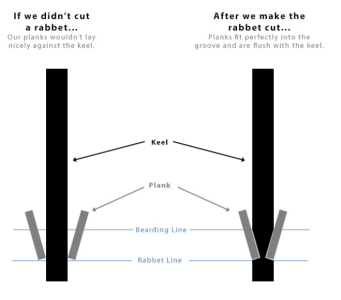
IMG_5050.png
The lowest plank, the Garboard Strake, must fit nicely. It depends also on the thickness of that plank.
Hopefully this will help you to make your choice.
Regards, Peter

 
Back
Top