
I use a slightly different version for small scales treenails. I insert the sharp point of the black pencil into a hole (lightly turn both ways) and use wood putty to close the hole. Then scrape the excess.A great way to do small plank nails (especially in small scale) is to just drill the holes and then lightly sand the deck. The sawdust will fill the holes quite well, and a light brush of oil or finish will darken them, making a crisp but quite small nail without a huge effort. Yours are looking great, but just offering one more option to consider.

-

SUBSCRIBE TO SHIPS IN SCALE TODAY!
The beloved Ships in Scale Magazine is back and charting a new course for 2026!
Discover new skills, new techniques, and new inspirations in every issue.
NOTE THAT OUR NEXT ISSUE WILL BE July/August 2026 -

Win a Free Custom Engraved Brass Coin!!!
As a way to introduce our brass coins to the community, we will raffle off a free coin during the month of August. Follow link ABOVE for instructions for entering.
You are using an out of date browser. It may not display this or other websites correctly.
You should upgrade or use an alternative browser.
You should upgrade or use an alternative browser.
ZHL Soleil Royal - with some additions
- Thread starter BrentonVV
- Start date
- Watchers 23
-
- Tags
- le soleil royal zhl

Thanks for all the tips and different ways on how to achieve the treenails!
I've tried a couple of different approaches this week and think I have found one that I am happy with, so more on that in another update.
@Thomas, I finally found the thread with the details on the black paint and glue methods. Got to say I spent way too long trying to remember what build it was from haha. Does anyone else find themselves coming on here for just a few mins and then realise its over an hour later and you have looked at over a dozen logs, or is it just me? It's just like the youtube spiral you can go in, one video links to the next and suddenly you are there watching a video on how to talk to giraffes and no idea on how you got to that video!
Anyways, here is the link to the log by Dicas with the details for you:
Dicas also posted a bit later on how he achieves such perfect spacing with his treenails. He doesn't use a jig as such, but could be an option for you:
It's a nice wet Saturday morning here in Melbourne, so hopefully will be a productive building day!
I've tried a couple of different approaches this week and think I have found one that I am happy with, so more on that in another update.
@Thomas, I finally found the thread with the details on the black paint and glue methods. Got to say I spent way too long trying to remember what build it was from haha. Does anyone else find themselves coming on here for just a few mins and then realise its over an hour later and you have looked at over a dozen logs, or is it just me? It's just like the youtube spiral you can go in, one video links to the next and suddenly you are there watching a video on how to talk to giraffes and no idea on how you got to that video!
Anyways, here is the link to the log by Dicas with the details for you:
OCCRE Nuestra Señora del Pilar de Zaragoza - Manila Galleon at 1/46
Once I had a small model boat... Then I got myself another small model boat and started scratch building yet another small model boat.;) My first small model boat was a Viking ship (Amati) that I changed substantially in order to get a passable model of a Viking ship (maybe a build log...
shipsofscale.com
Dicas also posted a bit later on how he achieves such perfect spacing with his treenails. He doesn't use a jig as such, but could be an option for you:
OCCRE Nuestra Señora del Pilar de Zaragoza - Manila Galleon at 1/46
The deck looks great! I really like this look. Do you thin your PVA acrylic mixture? Excellent explanation JL.
shipsofscale.com
It's a nice wet Saturday morning here in Melbourne, so hopefully will be a productive building day!
Last edited:

Nothing better on a cold wet Melbourne day to have a nice project like that.
It is the Winter there, what do you expect?Nothing better on a cold wet Melbourne day to have a nice project like that.

Thanks for all the tips and different ways on how to achieve the treenails!
I've tried a couple of different approaches this week and think I have found one that I am happy with, so more on that in another update.
@Thomas, I finally found the thread with the details on the black paint and glue methods. Got to say I spent way too long trying to remember what build it was from haha. Does anyone else find themselves coming on here for just a few mins and then realise its over an hour later and you have looked at over a dozen logs, or is it just me? It's just like the youtube spiral you can go in, one video links to the next and suddenly you are there watching a video on how to talk to giraffes and no idea on how you got to that video!
Anyways, here is the link to the log by Dicas with the details for you:
OCCRE Nuestra Señora del Pilar de Zaragoza - Manila Galleon at 1/46
Once I had a small model boat... Then I got myself another small model boat and started scratch building yet another small model boat.;) My first small model boat was a Viking ship (Amati) that I changed substantially in order to get a passable model of a Viking ship (maybe a build log...shipsofscale.com
Dicas also posted a bit later on how he achieves such perfect spacing with his treenails. He doesn't use a jig as such, but could be an option for you:
OCCRE Nuestra Señora del Pilar de Zaragoza - Manila Galleon at 1/46
The deck looks great! I really like this look. Do you thin your PVA acrylic mixture? Excellent explanation JL.shipsofscale.com
It's a nice wet Saturday morning here in Melbourne, so hopefully will be a productive building day!
Hi Brenton--Thanks so much for digging out the links--sorry it took so long but I really appreciate you doing it! You are correct--a quick visit here can turn into an hour or so, but at least you pick up some good ideas and insights! Hope you got a lot done today! Thanks again!
So after some suggestions on here I decided to do another test lot of deck planking before moving onto the real thing. I liked the end result that @Brewbrarian suggested as a technique for the treenails the best so did that as a larger test piece. Here are the planks laid, drilled and then sanded. I also used a black pencil rubbed against the sides of the planks to simulate the caulking, which is hidden slightly on these planks due to the sanding.

First coat of oil went on and left to seep into the timber and dry. I put a piece of masking tape over part of the planks just to see how much oil would seep underneath it. I am used to painting plastic models where if you mask something off there is usually little to no seepage underneath, so was interested to see how much it would change with timber.

The image below is after 3 coats of tung oil (letting it dry in between coats) and I am really liking the finish on it, not only the colour and depth it brings out of the teak, but also by how nice and smooth it it to touch. Also turns out that the oil does seep under the masking tape and into the wood quite a bit. Good bit of info to know! I also don’t think I sanded enough off to create enough dust in the holes to fill them, but looking at the effect by eye and not magnified by a camera it looks good.

It was now time to mark up the main deck and decide what pattern to use for the deck planking. I know that this ship build isn’t going to be 100% historically accurate (I haven’t set out to build it that way), so I decided to go with the pattern I liked the look of the most, rather than researching which one would have been completely accurate for that period or this ship. Also from the reading I did do, it seems as though some of the time the patterns or lack thereof was determined by what timber was available when building the real ship and where the bulkheads happened to line up too. Without having exact plans from the original Soleil Royal or pictures to go by (not that photographs existed back then), we may never know what is 100% accurate or not. I guess that is also part of the joy of building these historic ships, some of it is completely up to your own interpretation.
I decided on the 5 plank pattern as the staggering effect of the joins was the one that was most appealing to me. I have left the plank length at 120mm for the main deck. This is the length that the teak strips come in with the kit. For the other 4 decks on the kit I am going to cut the planks in half so they are only 60mm long, which I think will look better on the smaller decks and allow for the pattern to still show.
I took a while to make sure everything was marked up properly as I didn’t want to make any mistakes or have anything at wonky angles.

All the time spent making up paid off as once I got started, laying the planks was relatively easy. I ended up just using wood glue to secure them down. Working a small section at a time so as the glue didn't dry out before I got a plank down onto it.


After the larger area was completed, I measured and ruled up the area heading towards the stern that still needed planking and then continued laying planks. The longest part of the process was measuring and cutting all of the part planks that go between the bulkheads and holes in the decks. I wanted to ensure that the pattern still matched up.

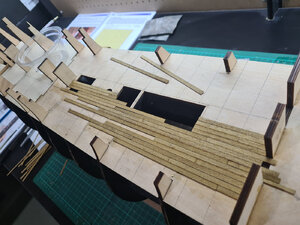
With the main deck now planked as far as I can (leaving room to cut away the extruding bulkheads at a later time) I am really happy with the way it turned out.

I was surprised at how even the thickness of the planks were. This is without any sanding as yet and there are really only a couple of places where the thickness varies on individual planks.

And a final look going from bow to stern. Really happy with the decision to go with the 5 plank pattern.

I am going to leave the deck at this stage of completion until I can lay the rest of the planks at a later stage. After that ill then do all of the drilling etc.
Time now to do some more reading and start to prepare the bulkheads for some planking and gunports.
First coat of oil went on and left to seep into the timber and dry. I put a piece of masking tape over part of the planks just to see how much oil would seep underneath it. I am used to painting plastic models where if you mask something off there is usually little to no seepage underneath, so was interested to see how much it would change with timber.
The image below is after 3 coats of tung oil (letting it dry in between coats) and I am really liking the finish on it, not only the colour and depth it brings out of the teak, but also by how nice and smooth it it to touch. Also turns out that the oil does seep under the masking tape and into the wood quite a bit. Good bit of info to know! I also don’t think I sanded enough off to create enough dust in the holes to fill them, but looking at the effect by eye and not magnified by a camera it looks good.
It was now time to mark up the main deck and decide what pattern to use for the deck planking. I know that this ship build isn’t going to be 100% historically accurate (I haven’t set out to build it that way), so I decided to go with the pattern I liked the look of the most, rather than researching which one would have been completely accurate for that period or this ship. Also from the reading I did do, it seems as though some of the time the patterns or lack thereof was determined by what timber was available when building the real ship and where the bulkheads happened to line up too. Without having exact plans from the original Soleil Royal or pictures to go by (not that photographs existed back then), we may never know what is 100% accurate or not. I guess that is also part of the joy of building these historic ships, some of it is completely up to your own interpretation.
I decided on the 5 plank pattern as the staggering effect of the joins was the one that was most appealing to me. I have left the plank length at 120mm for the main deck. This is the length that the teak strips come in with the kit. For the other 4 decks on the kit I am going to cut the planks in half so they are only 60mm long, which I think will look better on the smaller decks and allow for the pattern to still show.
I took a while to make sure everything was marked up properly as I didn’t want to make any mistakes or have anything at wonky angles.
All the time spent making up paid off as once I got started, laying the planks was relatively easy. I ended up just using wood glue to secure them down. Working a small section at a time so as the glue didn't dry out before I got a plank down onto it.
After the larger area was completed, I measured and ruled up the area heading towards the stern that still needed planking and then continued laying planks. The longest part of the process was measuring and cutting all of the part planks that go between the bulkheads and holes in the decks. I wanted to ensure that the pattern still matched up.
With the main deck now planked as far as I can (leaving room to cut away the extruding bulkheads at a later time) I am really happy with the way it turned out.
I was surprised at how even the thickness of the planks were. This is without any sanding as yet and there are really only a couple of places where the thickness varies on individual planks.
And a final look going from bow to stern. Really happy with the decision to go with the 5 plank pattern.
I am going to leave the deck at this stage of completion until I can lay the rest of the planks at a later stage. After that ill then do all of the drilling etc.
Time now to do some more reading and start to prepare the bulkheads for some planking and gunports.
Attachments
- Joined
- Jul 9, 2019
- Messages
- 497
- Points
- 323

That teak in your sample test looks fantastic! That wood quality under the tung oil is deep and rich, and the caulking looks really great. As for the nailholes not quite filling with the sanding dust, try making the hole more shallow, more like a deep dimple than a drilled hole. Glad you're getting results you're pleased with, and things are coming along very nicely.
Depending on your level of patience, there is always this method of making trenails. You strike me the kind of builder that would do this quite well.
From CAF Le Coureur:

Depending on your level of patience, there is always this method of making trenails.
You strike me the kind of builder that would do this quite well.From CAF Le Coureur:
Last edited:
>SORRY, wrong message in the wrong place and I cann´t find how to delete it....................................
~I was refering to a good wood to simulate the treenails and the deck planks
I reckon that not all the woods are good for the look not seem overpowered. Till now I tried with exit pear, mukalia and manzonia.
Regards
JL
~I was refering to a good wood to simulate the treenails and the deck planks
I reckon that not all the woods are good for the look not seem overpowered. Till now I tried with exit pear, mukalia and manzonia.
Regards
JL
Last edited:
Been a little while since my last update. Transitioning back to onsite work and training up someone to take over part of my role has left me exhausted at end of the day, so my modeling time has been very sporadic. The work below is a culmination of about a fortnight of modelling time.
Time to prep the gunport rails. Simple joins with some timber across the join for support then set aside to dry.

While they were drying I installed some of the planking for the various walls and supports that would be seen on the decks. After gluing and laying the planks in place I clamped some spare timber against them to make sure I got a nice flat finish and so they didn’t peel off as they were drying.


After a nice trim and the 2 doors test fitted in place it looks quite good. I am toying with the idea of running a few led bulbs inside the model so that I could give a sense of life inside the ship. Of course the 3 main lanterns on the rear of the ship will be lit, but it might be nice to light up the other windows and doors around the ship too. If I do go down this route I’ll glue some roughed up plastic to the backs of all the openings to give them a frosted look.

It was now time to install the front bulkhead on the ship. After looking at a couple of other builds on here as well as the French museum model I decided to put a bend in it. The museum model has one and it looks quite nice. So after multiple soaks in hot water, I gently persuaded it to fit. I held it there for a few days with a multitude of clamps and some brass rod to help it keep its shape while it dried. Once it was dry I removed it as I had some other work to do around the bow before it was to be glued in place.


Next was time fair the bow and stern bulkheads. ZHL had provided some laser cut lines as a reference on some of the bulkheads to show how far to sand, but I found that only sanding to these points did not do enough, so I kept sanding and test fitting a piece of the planking until I was happy with it.

While I was fairing the stern, it was also a good time to take care of the deadwood area. After looking at a few builds on here, as well as some other instructions on the process of sanding down the deadwood area I decided that I would notch out a section of the keel to allow the first planking to sit in. The great thing about the 5mm plywood that was used for the keel is that it was 3 layers thick (which can be clearly seen on the sanded bulkheads), so I was able to remove one layer from each side. I know that it is normally standard to only remove about half the thickness of the keel timber, but it was easier for me to remove 2/3 of it, and it will also mean that the first planking will not need to be sanded down as thin.


I also installed some balsa wood blocks at the bow of the ship to help keep form when bending planks over it.
Here is one of them roughly carved to shape.

And here's a nice smooth finish and curve too.

The last thing to do before installing the front bulkhead was to rework the front gun ports. If I had left the bulkhead flat as per the instructions then the supplied gun port boxes supposedly would have fit behind it but as I decided to bend the piece I had to come up with my own solution. Some scrap 2mm timber marked up, drilled and glued in was my fix! It was then time to glue the bulkhead in place.


The last thing I got up to was applying some more black paint to the deck areas that I now knew would not be seen.

Hopefully it won't be too long before my next update. Hope everyone is keeping safe!
Time to prep the gunport rails. Simple joins with some timber across the join for support then set aside to dry.
While they were drying I installed some of the planking for the various walls and supports that would be seen on the decks. After gluing and laying the planks in place I clamped some spare timber against them to make sure I got a nice flat finish and so they didn’t peel off as they were drying.
After a nice trim and the 2 doors test fitted in place it looks quite good. I am toying with the idea of running a few led bulbs inside the model so that I could give a sense of life inside the ship. Of course the 3 main lanterns on the rear of the ship will be lit, but it might be nice to light up the other windows and doors around the ship too. If I do go down this route I’ll glue some roughed up plastic to the backs of all the openings to give them a frosted look.
It was now time to install the front bulkhead on the ship. After looking at a couple of other builds on here as well as the French museum model I decided to put a bend in it. The museum model has one and it looks quite nice. So after multiple soaks in hot water, I gently persuaded it to fit. I held it there for a few days with a multitude of clamps and some brass rod to help it keep its shape while it dried. Once it was dry I removed it as I had some other work to do around the bow before it was to be glued in place.
Next was time fair the bow and stern bulkheads. ZHL had provided some laser cut lines as a reference on some of the bulkheads to show how far to sand, but I found that only sanding to these points did not do enough, so I kept sanding and test fitting a piece of the planking until I was happy with it.
While I was fairing the stern, it was also a good time to take care of the deadwood area. After looking at a few builds on here, as well as some other instructions on the process of sanding down the deadwood area I decided that I would notch out a section of the keel to allow the first planking to sit in. The great thing about the 5mm plywood that was used for the keel is that it was 3 layers thick (which can be clearly seen on the sanded bulkheads), so I was able to remove one layer from each side. I know that it is normally standard to only remove about half the thickness of the keel timber, but it was easier for me to remove 2/3 of it, and it will also mean that the first planking will not need to be sanded down as thin.
I also installed some balsa wood blocks at the bow of the ship to help keep form when bending planks over it.
Here is one of them roughly carved to shape.
And here's a nice smooth finish and curve too.
The last thing to do before installing the front bulkhead was to rework the front gun ports. If I had left the bulkhead flat as per the instructions then the supplied gun port boxes supposedly would have fit behind it but as I decided to bend the piece I had to come up with my own solution. Some scrap 2mm timber marked up, drilled and glued in was my fix! It was then time to glue the bulkhead in place.
The last thing I got up to was applying some more black paint to the deck areas that I now knew would not be seen.
Hopefully it won't be too long before my next update. Hope everyone is keeping safe!

Hello Brenton
I have just started the Soleil Royal and would be interested in seeing your progress.
So you have any update?
I have just started the Soleil Royal and would be interested in seeing your progress.
So you have any update?
Hi all, thought I would give a quick update.
Unfortunately I have developed RSI in my dominant hand which has meant that I have had to take longer breaks between modelling sessions and also reduce the time that I am gripping tools which has meant there has not been much progress on the model.
Hopefully I will have progressed enough on the build to make an update in the next few weeks!
Get well soon, Brenton!!
also from my side wish you a fast recovery - it is terrible to be handicapped and not being able to work

Get well soon!

Where you been?
Hallo @BrentonVVYes that’s right, its another ZHL Soleil Royal Build Log!
Hi all, and welcome to my first build log here on SOS.
Time for a little backstory.
I’m primarily a plastic model builder, more specifically a sci-fi model builder but I bought the ZHL Black Pearl early last year to add to my stash of kits to build at some point in the future as I really like the ship (both from the movies and from the Kingdom Hearts video games) and really want to make a statement piece out of it.
Fast forward to this year and being in lockdown, I’ve had a bit more time to model but due to a few setbacks, I lost my drive for the couple of plastic kits I had been working on so they have gone back in their boxes for another day. I looked through my stash to see what else I could dedicate my time to and I saw the Black Pearl sitting there, but I knew that having not ever built a wooden ship model before, I didn’t want the Pearl to be my first. So I started looking at other wooden kits I could buy to be my ‘first’ build.
Knowing what I can be like, I had to make sure that the ship in question was one that I was drawn to and was of some interest to me. So this is where I stumbled upon the Soleil Royal. I know it is technically nowhere near a beginners kit, but if I’m honest, none of the beginner kits I looked at appealed to me. I just like the look and shape of the Soleil, along with its colours and decorations, and I like a challenge.
So I took the plunge and bought it. Max was great to deal with and the kit eventually arrived earlier this week.
View attachment 174372
Looks like Australian customs decided to inspect inside the box, but thankfully they didn’t have to confiscate anything.
View attachment 174373
View attachment 174374
After a quick inventory, everything was accounted for apart from the Instruction CD appearing blank when put into my PC. Sent an email to Max and haven’t heard anything back as yet, but luckily paulb was able to help me out and email me a copy of the instructions from his build. Thanks again Paul!
So after sitting down with the instructions and looking through the parts, I’ve decided that along with building the ship (which is a mammoth task in itself), I am also going to look into the possibility of replacing the metal decorations that come with the kit. Whilst the ones that come with the kit are not horrible by any means at all, I am guessing that over time the molds used to cast them have worn down a little so they have lost some definition. I recently bought a 3D printer to be able to create custom parts for other model kits and thought I could put it to use on this kit too. Now whilst I have some experience in creating things in a 3D software program, usually they are very boxy and are not carved or sculpted as such. Venturing into this new avenue of sculpting and carving things in 3D should be a bit of fun, and if it fails, then at least I still have the original metal ones to use!
If you want to see a full breakdown of box contents head over to the thread from Dematosdg linked below who has done a great unboxing of the kit.
ZHL- LE SOLEIL ROYAL 1:90 - Box Content
Anyways, I’ve already made a small start on sanding and gluing some pieces, so I’ll be posting again soon with my build updates.
I know I have a lot to learn (both about ship building and also all of the correct terminology) and will no doubt make mistakes along the way, but that is half the fun of it.
Hope you enjoy the build and my journey!
we wish you all the BEST and a HAPPY BIRTHDAY
BTW: How is your work on the Soleil Royal going?