
I just ordered the Terror kit. Where did you end up hiding the battery? And what size / number of batteries did you plan for?I do like the look of St Roch in schooner rig. I had not realized how major the refit was in Halifax. A great job. As to the comments about my led lights, I just used a string of 25 battery powered LED lights that I found at a dollar store. The greatest challenge is finding a way to hide the battery pack. I have now placed lighting in three vessels.
My current build is HMS Terror. The lighting on this one did not work out well. I developed a short circuit somewhere after the ship was closed in and I abandoned the idea.

-

SUBSCRIBE TO SHIPS IN SCALE TODAY!
The beloved Ships in Scale Magazine is back and charting a new course for 2026!
Discover new skills, new techniques, and new inspirations in every issue.
NOTE THAT OUR NEXT ISSUE WILL BE July/August 2026 -

Win a Free Custom Engraved Brass Coin!!!
As a way to introduce our brass coins to the community, we will raffle off a free coin during the month of August. Follow link ABOVE for instructions for entering.
You are using an out of date browser. It may not display this or other websites correctly.
You should upgrade or use an alternative browser.
You should upgrade or use an alternative browser.
MV St. Roch - Billing Boats 605 1:72 [COMPLETED BUILD]

I placed the batteries aft of the Main Mast and under the capstan and hatchway. I placed these two items on a platform and cut the exact platform shape out of the deck. The battery pack was for two AA batteries so you have to make sure to cut deep enough into the keel so the battery box clears the platform. I also removed the switch from the battery box and placed it on the platform to prevent lifting the platform each time I wanted to turn on the lights. All worked fine until I developed a shot circuit somewhere in the wiring under the deck. Make sure all wiring and lights are secure before closing in the hull. I did not, so i had to abandon the lighting and clip off all above lighting and switch so I am not able to attach pics of what I did.
When it is installed right it works well so it is worth the effort.
When it is installed right it works well so it is worth the effort.

I did a similar thing on my Bluenose, made the main cabin top removable and fit the battery pack in there. Problem was it became very difficult to remove cabin top once all the booms and rigging were in place. I moved the battery pack out of the hull and drilled a hole through the rudder hole and fed the wires through. Now it’s much easier to turn the light on and off.I placed the batteries aft of the Main Mast and under the capstan and hatchway. I placed these two items on a platform and cut the exact platform shape out of the deck. The battery pack was for two AA batteries so you have to make sure to cut deep enough into the keel so the battery box clears the platform. I also removed the switch from the battery box and placed it on the platform to prevent lifting the platform each time I wanted to turn on the lights. All worked fine until I developed a shot circuit somewhere in the wiring under the deck. Make sure all wiring and lights are secure before closing in the hull. I did not, so i had to abandon the lighting and clip off all above lighting and switch so I am not able to attach pics of what I did.
When it is installed right it works well so it is worth the effort.
Thanks! Some options to think about. I am fairly competent soldering copper pipe but have not had good luck soldering fine wires. I will have to educate myself and practice! The vision of the ship sitting there with warm lantern light flickering inside on a dark winter night is very alluring. And from my living room window on a winter night there is a whole lake of ice in view.
Here’s some shots of the lights on my Bluenose.


It kind of brings it to life.
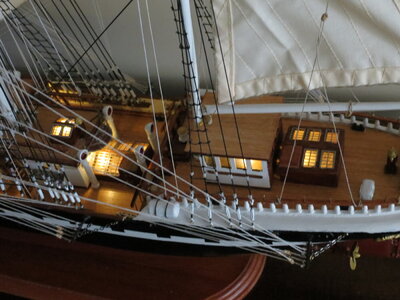
Wow, that looks great. I will need to find some thin, frosted translucent plastic for the cabin windows. For the decklights, which look basically like brass portholes with no clear insert, I read that one modeler used a hot glue gun to make a plastic lens moulded into each one. I think he just cut the top surface flat afterwards.
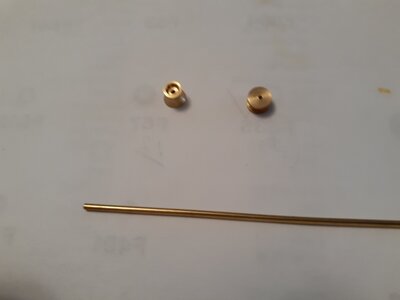
Am currently building the St. Roch Billings model and have run into a problem. Relates to the building of the winch for the anchor. It calls for using part F409 ( metal rod ) which forms the axle for the winch - it has to be pushed through some small metal gears ( F53) but the holes in the metal gears are TOO SMALL for the metal rod. Do you have a solution for this? Any help is appreciated!

It is hard to give you suggestions without familiarity with the kit. But if you provide some images, we might be able to help you.
In my build I drilled ot the hole in the gears and drums to match the rod. That worked fine for me.Am currently building the St. Roch Billings model and have run into a problem. Relates to the building of the winch for the anchor. It calls for using part F409 ( metal rod ) which forms the axle for the winch - it has to be pushed through some small metal gears ( F53) but the holes in the metal gears are TOO SMALL for the metal rod. Do you have a solution for this? Any help is appreciated!
...or to enlarge the holes in the gears to match the rod's diameterPicture of small gears and axle rod. Rod is too big to fit in the gear hole. Only solution I can think of is to find a smaller rod!
Very small drill bit, and be careful.Am currently building the St. Roch Billings model and have run into a problem. Relates to the building of the winch for the anchor. It calls for using part F409 ( metal rod ) which forms the axle for the winch - it has to be pushed through some small metal gears ( F53) but the holes in the metal gears are TOO SMALL for the metal rod. Do you have a solution for this? Any help is appreciated!
")
Hallo @AnchormanWelcome to my build log for the St. Roch. I am working from the Billing Boats kit (#605) in 1:72 scale.
Designed and built for Arctic service and launched on May 7th of 1928 the St. Roch at 104 feet in length and with a beam of 27 feet was a strong vessel constructed with Douglass fir planking and an Australian ironbark outer hull. The rounded design allowed the ship to withstand the pressure of crushing ice. However, with a draft of 12 feet 9 inches, in heavy weather the ship was uncomfortable as it bucked and heaved considerably.
The ship, constructed as a Merchant Vessel, was schooner rigged with a 150hp diesel engine. It underwent significant modifications during its 22 years of operational duty with The Royal Canadian Mounted Police. The ship served to supply remote police detachments along the coast and serve as a floating detachment and patrol (dogsled) base when frozen in over winter.
From 1928-29, the ship completed three patrol and supply missions in the Canadian Arctic. In 1930, the ship began a 4-year patrol of the north and, from 1935 to 1937 served out of Cambridge Bay.
In 1940, before the ship left Vancouver, an upgrade saw the addition of an auxiliary engine for battery charging and a steel “shoe” for the bow to aid in ice breaking. On June 21st, the ship sailed to make the first west to east transit of the Northwest Passage. She arrived in Halifax on October 11 1942. In January 1944 the ship underwent a major retrofit in Dartmouth NS including upgrade of the main engine to 300hp, removal of the wheelhouse and extensive modification to the superstructure, removal and relocation of masts and rigging.
From July 23 1944 to October 16 1944 the ship made an east to west transit of the Northwest Passage becoming the first ship to sail the route in both directions. She completed the 7,300 miles in 86 days. In 1950 the ship left Vancouver for Halifax via the Panama Canal and became the first ship to circumnavigate North America.
In 1951, the ship was retired from duty and laid up in Halifax until installation in Vancouver in 1954 where she is now a National Historic Site and a permanent display.
If this summary has been of interest there is much more information available online. The full account of the ships exploits is truly remarkable as are the photographs taken during the voyages.
The Billing Boats kit shows the vessel in the post 1944 configuration however, I want to depict the ship as it was during the 1940 voyage. Using historic photographs and a plan of the contemporary schooner Idaho I have drawn a rough schematic that will serve as a scale reference for the build. The most noticeable differences are the bow shoe (not sure how I am going to build that yet), the main superstructure and the masts/rigging.
Opening the Billing Boats kit we find seven very well defined laser cut sheets of parts, planking, plastic parts including lifeboats, mast materials (no sail cloth), an assortment of very well made brass components, one sheet of plans (two sided) and, an instruction manual that contains literally five paragraphs of directions. The instructions should not be a problem as the plan drawings are highly detailed. Overall, the quality of the parts is excellent.
View attachment 83183
View attachment 83184
View attachment 83185
we wish you all the BEST and a HAPPY BIRTHDAY
Enjoy your special day

Are you working on a new project? Would be interesting to see.....

Many thanks. I will be starting the BlueJacket "Seguin" tug soon.Hallo @Anchorman
we wish you all the BEST and a HAPPY BIRTHDAY
Enjoy your special day
Are you working on a new project? Would be interesting to see.....