
Nice planking Graham!!

-

SUBSCRIBE TO SHIPS IN SCALE TODAY!
The beloved Ships in Scale Magazine is back and charting a new course for 2026!
Discover new skills, new techniques, and new inspirations in every issue.
NOTE THAT OUR NEXT ISSUE WILL BE July/August 2026 -

Win a Free Custom Engraved Brass Coin!!!
As a way to introduce our brass coins to the community, we will raffle off a free coin during the month of August. Follow link ABOVE for instructions for entering.
You are using an out of date browser. It may not display this or other websites correctly.
You should upgrade or use an alternative browser.
You should upgrade or use an alternative browser.
Armed Pinnace 1800 - Panart 1:16
- Thread starter Graham
- Start date
- Watchers 25
-
- Tags
- armed pinnace panart

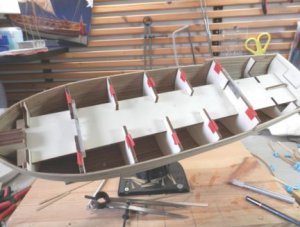
Thanks guys; thanks John for the information on brass blackening, much appreciated. As noted earlier in this log, frames 2 to 6 are removed when planking is complete and what you are left with is effectively an open boat. The reason for the triple planking is, therefore, to give the hull some integral strength in the absence of those frames.
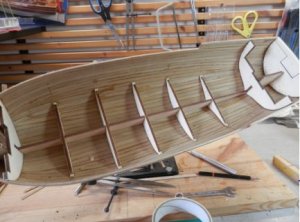
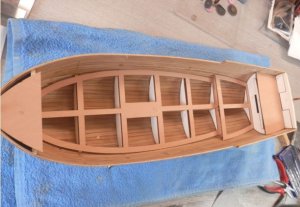
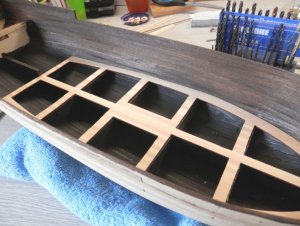
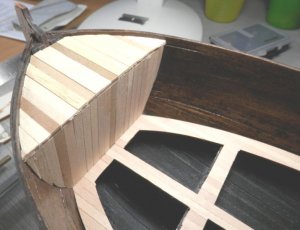
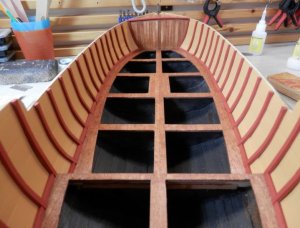
In fact it is time to turn her over and see what the inside looks like. This is as it was at the completion of hull planking –
....... and with the temporary formers removed. Those frames which I part cut through (see start of this log) snapped out very easily, so I guess that idea worked out (for a change). Also, applying candle wax to the frame edges did the trick and stopped the planking adhering to them.
As you can see, the CA has leeched a little as I expected –
........but it cleaned up pretty good, so we’ll see how it takes a stain - still pondering colours on that.
Attachments
I did a trial fit of the decking today -
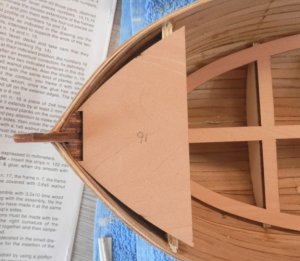
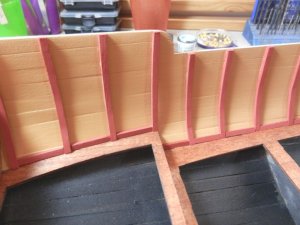
You know when you get that feeling that things are going just a bit too well? Have a look at this –
This is the fore deck and it is a country mile off. It sits on frame 1 and all that needs to be done to the frames is to obviously chamfer them to take the lay of the planking, not take a bandsaw to them! This bit of deck gets planked over anyway, so I’ll cut another one.
Similarly the main deck profile is off at the front end. The instructions do not say to plank this deck, but I was going to anyway, so I will plank longer than the template and shape as necessary.
...... and the rear deck is out, too. Ah well, all fixable with a bit of fettling, but still disappointing. Think I’ll write a blues slide guitar number for Donnie and myself called ‘Them Low Down Panart Model Builder Blues’.
Attachments

The older kits that were modified before 2000, seem to have been done right and were modified when they first started doing laser cutting with photo etched parts. The newer ones that got modified seem to have not been assembled by the company to see if the changes worked. Thus, the problems you and Donnie have seem to be a result of the new people that now run Mantua and do not check for correctness. The ones that have been revised with the step by step instruction and pictures of each step, like the Sovereign are the only ones that seem to be correct.
Interesting, Gary, thanks. There was a debate on SoS a little while ago regarding kits and my input to it was that manufacturers should give a few examples to forums like ours and look for feedback. However, that would inevitably result in additional cost to them (drawing updates, CNC programming updates, material changes etc) so it is a lot cheaper to let poor sods like us work it out for ourselves. As the saying goes - 'You pays your money and takes your choice'. Or probably more appropriately - 'If you can't take a joke you shouldn't have joined'.
I Agree with you Graham, have tried to get some manufacturers to join our group and here sugestions, NO LUCK, ONLY DAVE STEVENS FROM THE LUMBERYARD HAS COMENTED MANY TIME explaing things that maufacturers can and can not do. THANKS Don
Here are the official facebook page for Mantua and the mantua facebook group,on eitherr of them you leave a comment,suggestion or feedback.Personally I am really disappointed of the quality of the Mantua kits.
https://www.facebook.com/mantuamodelmodellismo/
https://www.facebook.com/groups/134599681255/
https://www.facebook.com/mantuamodelmodellismo/
https://www.facebook.com/groups/134599681255/
Thanks for taking the time to post those links, Zoltan.
Call me old fashioned, but I don't want to join Facebook (again) and get bombarded with all that junk maiI; I doubt Mantua would take any notice anyway. Rather I will keep what I hope is a good build log here on SoS for the benefit of future builders as I think most people do tend to check if anyone has built that particular model before they buy it. Maybe Mantua will read this log! Yeah, right. Cheers.
Call me old fashioned, but I don't want to join Facebook (again) and get bombarded with all that junk maiI; I doubt Mantua would take any notice anyway. Rather I will keep what I hope is a good build log here on SoS for the benefit of future builders as I think most people do tend to check if anyone has built that particular model before they buy it. Maybe Mantua will read this log! Yeah, right. Cheers.
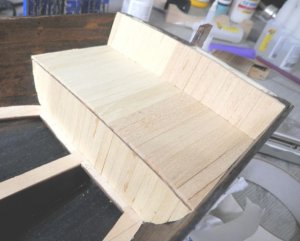
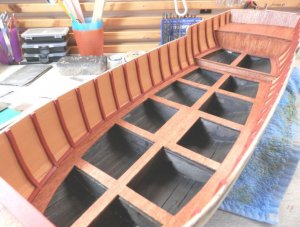
On with the decking. This is the main deck -
I have planked longer at the front end in order to take up the gap shown in earlier shots and glued pieces along the edge to support it so that it will take some sanding. This is the underside -
Sanded and fitted-
Upstand at the end in place -
You will note that the interior of the hull is now stained (dark oak oil based stain) and I will get a few coats of lacquer on it to protect it from any future blobs of glue and dust. If you plank the main deck (it's not supposed to be) you will run out of planks (as I have), but luckily the local model shop had something similar which I can use to finish the decking.
Attachments

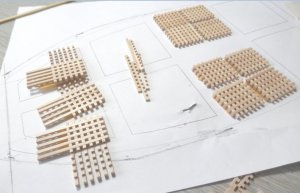
Taking a break from the hull, so I'll do some hatch covers. Tackling the gratings first the English(?) instructions advise 'From the four grill-elements by using the indispensable number of milled bars'. Yes, I had to read it a few times, too; sometimes Google Translate isn't all it is cracked up to be, I guess!
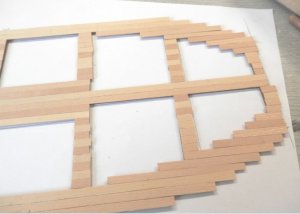
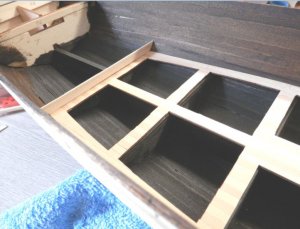
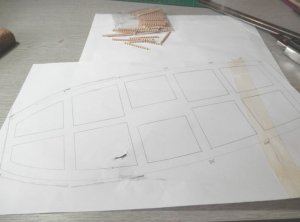
Before I fitted the decks I made paper templates of the hatch holes to help with the shaping -
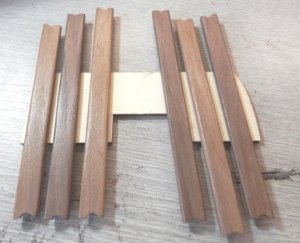
In building the gratings I found that there was not enough lengths of the 'indispensable number of milled bars'. This is as far as I got with four small gratings still to build -
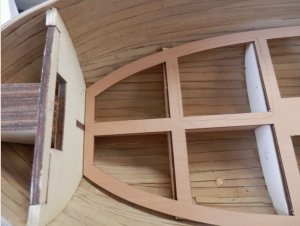
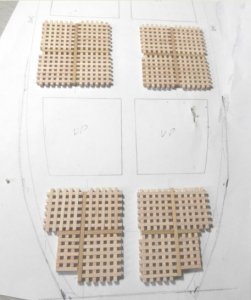
So I had to pull apart some of the gratings I had already built (luckily I had not yet used any glue) and replace the pieces with off-cuts from the longer edges, the joint being on the underside so it is not seen. Anyway, we got there in the end -
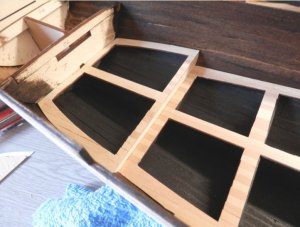
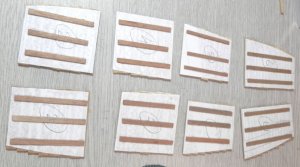
The remaining hatches are planked and I stuck the planking directly onto the paper templates for the appropriate hatch. In order to give some strength for sanding/shaping I stuck some battens on the underside as shown -
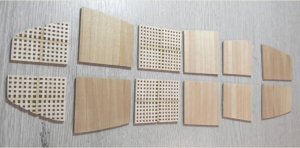
Shaped and ready to stain. Note that the hatches are planked in a port/stbd direction, not stem to stern as a deck is, so it should give an interesting contrast -
Before I fitted the decks I made paper templates of the hatch holes to help with the shaping -
In building the gratings I found that there was not enough lengths of the 'indispensable number of milled bars'. This is as far as I got with four small gratings still to build -
So I had to pull apart some of the gratings I had already built (luckily I had not yet used any glue) and replace the pieces with off-cuts from the longer edges, the joint being on the underside so it is not seen. Anyway, we got there in the end -
The remaining hatches are planked and I stuck the planking directly onto the paper templates for the appropriate hatch. In order to give some strength for sanding/shaping I stuck some battens on the underside as shown -
Shaped and ready to stain. Note that the hatches are planked in a port/stbd direction, not stem to stern as a deck is, so it should give an interesting contrast -
Attachments
Very nicely done. I know that you are very proud of your work. Its gonna look fantastic when done.
Donnie
Donnie
looking good.
Thanks guys, much appreciated.
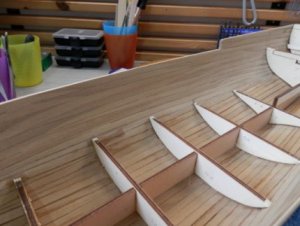
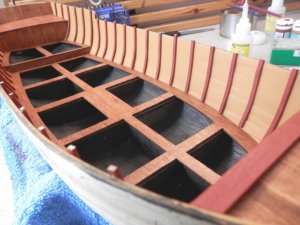
Now that I have finally finished HMS Snake I can get back on this build. The next step is to glue in the internal ribs which are 3mm x 2mm strip. You might note that I have painted the interior of the hull; it was stained and lacquered and it came up OK, but the more I looked at it the more I didn't like it. It looks a bit bright at the moment and I will weather it down later. Back to the ribs which I pre-painted. They need shaping with the heated bender to pick up the hull profile and the paint on the concave surface does get a bit singed but it's an easy job to flash them over with a fresh coat. With one exception the ribs are evenly spaced so I made a spacer from some scrap -
...and on we go -
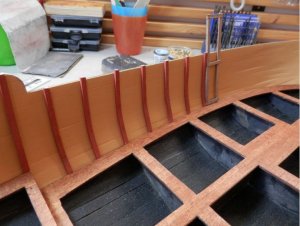
At deck level small pieces of the same strip are used to fill between the ribs. Since the angle between the deck and the hull is obtuse the back edge of the strips needs to be shaved away for it to seat properly, giving ample opportunity to cut yourself. Luckily blood stopped play only once for me -
In-fill pieces done and rib tops sanded level -
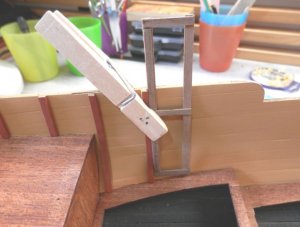
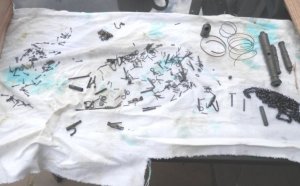
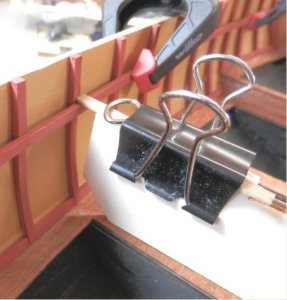
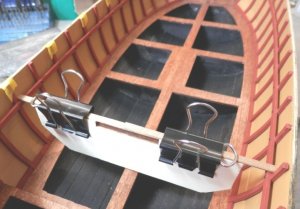
Next job is to fit the stringers which run bow to stern over the ribs. These are fixed to the ribs with pins, so time to sort the brassware out. I used the ammonia/copper carbonate method to blacken the brass as posted by John (Neptune) and it worked great, so cheers John.
First stringer going in. In order to get the height right I made up a gauge by cutting down one of the temporary formers (removed earlier) and clipping a bit of scrap on top
Now that I have finally finished HMS Snake I can get back on this build. The next step is to glue in the internal ribs which are 3mm x 2mm strip. You might note that I have painted the interior of the hull; it was stained and lacquered and it came up OK, but the more I looked at it the more I didn't like it. It looks a bit bright at the moment and I will weather it down later. Back to the ribs which I pre-painted. They need shaping with the heated bender to pick up the hull profile and the paint on the concave surface does get a bit singed but it's an easy job to flash them over with a fresh coat. With one exception the ribs are evenly spaced so I made a spacer from some scrap -
...and on we go -
At deck level small pieces of the same strip are used to fill between the ribs. Since the angle between the deck and the hull is obtuse the back edge of the strips needs to be shaved away for it to seat properly, giving ample opportunity to cut yourself. Luckily blood stopped play only once for me -
In-fill pieces done and rib tops sanded level -
Next job is to fit the stringers which run bow to stern over the ribs. These are fixed to the ribs with pins, so time to sort the brassware out. I used the ammonia/copper carbonate method to blacken the brass as posted by John (Neptune) and it worked great, so cheers John.
First stringer going in. In order to get the height right I made up a gauge by cutting down one of the temporary formers (removed earlier) and clipping a bit of scrap on top
Attachments
-
 P8080148.JPG53.9 KB · Views: 292
 -
 P8100150.JPG67.5 KB · Views: 290
 -
 P8100151.JPG71.3 KB · Views: 290
 -
 P8100152.JPG28.3 KB · Views: 295
 -
 P8110165.JPG61.9 KB · Views: 299
 -
 P8110166.JPG61.8 KB · Views: 296
 -
 P8110167.JPG79.3 KB · Views: 305
 -
 P8120168.JPG56.5 KB · Views: 305
 -
 P8120169.JPG39.9 KB · Views: 298

G'day Graham, what a lovely job you are making of her, and I also like the little hints and tips about the spacers etc, that is a great pic looking along the length of the boat f.JPG (84.11 KiB).
Your blackening looks a lot better than mine, did you just mix the two parts together or did you add or use another combination, I can get the small parts looking OK but my cannon do not look as black as yours, maybe you prepped yours a better way.
I reckon this is one of the best small boat kits on the market, I built one aways back and really enjoyed, it is great value for the money and you get a good few hours out of the build, plus she makes a real good looking model and not too big to display, anyway you keep enjoying the build and giving us the enjoyment of watching,
best regards John.
G'day John and thanks for your comments. Regarding the blackening I used clear ammonia (I know you use cloudy but I couldn't get any) and the copper carbonate (heaped dessert spoon), nothing else added and no prep done on the brass. I did it in a tall jar (one of those that hot dogs come in) so that everything was fully submerged and every 5 minutes or so turned it upside-down and gave it a gentle rattle to re-mix the solution because, as you will know, the copper powder settles out quite quickly. It all went OK (total time was 30 minutes) but a spool of spare brass wire I also chucked in did not blacken at all, so it's obviously not brass as I thought and probably has a high lead content (or similar) because it is very bendy. I guess that is the answer to why some goes better than others - all that looks like brass is probably not.
I am enjoying this build. The downside for me is that the instructions do not correspond with the build sequence - the notes are in four sections and each section fully describes what is on one of the four plan sheets which themselves are a bit of a mish-mash. Hence there is a bit of pondering involved, but it is not a complicated ship and as long as I keep my sense of humour I reckon I'll get there! Regards.
I am enjoying this build. The downside for me is that the instructions do not correspond with the build sequence - the notes are in four sections and each section fully describes what is on one of the four plan sheets which themselves are a bit of a mish-mash. Hence there is a bit of pondering involved, but it is not a complicated ship and as long as I keep my sense of humour I reckon I'll get there! Regards.
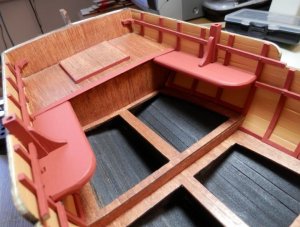
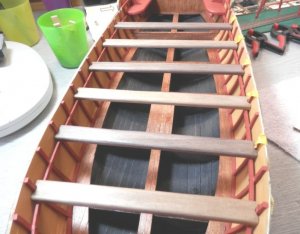
Stringer fitted and pinned -
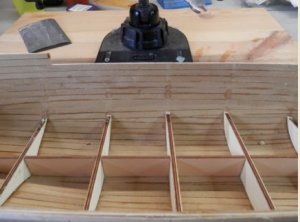
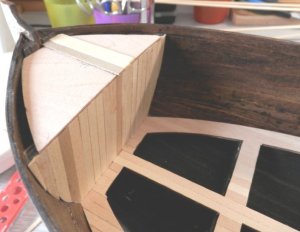
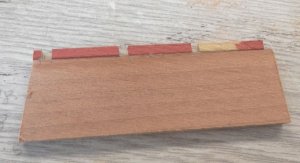
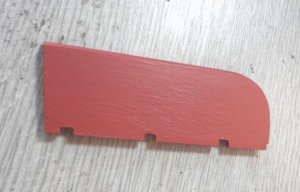
There are a couple of benches to be installed at the back of the boat. They need to fit flush to the hull, but the ribs are in the way and so rebates need to be cut in the back edge. In case it all went wrong I decided instead to build up the back edge with scrap -
Then shape it, a good sanding flat to lose the joint and ended up here -
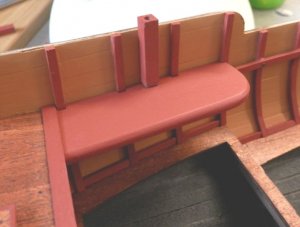
Bench fitted and cannon support post in place -
Second stringer in place, brackets fitted, hatch in place -
There are a couple of benches to be installed at the back of the boat. They need to fit flush to the hull, but the ribs are in the way and so rebates need to be cut in the back edge. In case it all went wrong I decided instead to build up the back edge with scrap -
Then shape it, a good sanding flat to lose the joint and ended up here -
Bench fitted and cannon support post in place -
Second stringer in place, brackets fitted, hatch in place -
Attachments


hi Graham,
I'm only just catching up on your marvellous build log now. Its a really neat and wonderful job you are doing so far. Well done.
I'm only just catching up on your marvellous build log now. Its a really neat and wonderful job you are doing so far. Well done.

Thanks Denis and Brian, I greatly appreciate your comments.
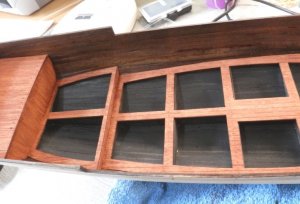
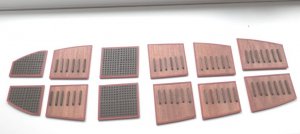
The hatches are now all finished -
The hatches (as opposed to the gratings) have pieces of 2mm x 2mm strip glued on which I pre-stained with dark oak colour and then a coat of matt lacquer. I assume these strips were for the rowers to brace their feet against.
Time to fit the bench seats. My calipers and dividers were not long enough to measure between the hull sides, so back to the gauge I used to fit the stringers -
Benches shaped and lacquered. I was going to paint them black, but the natural colour looks OK (a little darker than the photo shows) so I'll leave them at that -
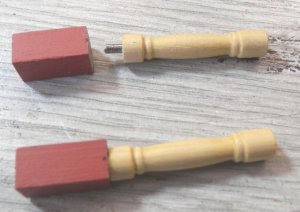
A turned post sits on top of a small block and will support the benches underneath at mid-point - five in all. The turned posts were well made -
Trial fit of the benches -
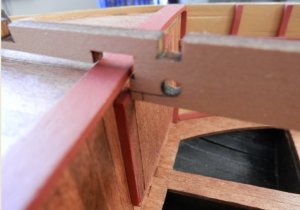
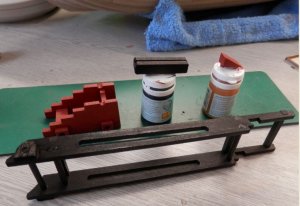
I needed to do the benches in order to line up the cannon slide assembly because it sits on top of them. A problem is that I have glued the hatch too high up on the fwd bulkhead and it's on with CA, so there it will stay. As such, the carriage slide frame will not drop into the slot as required -
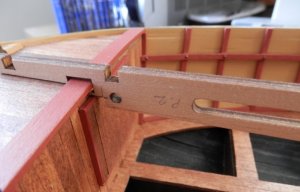
Some fettling later -
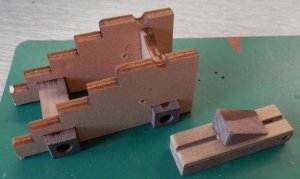
On to the cannon carriage. There are no dimensions given for the 10mm x 10mm lengths at the bottom of the carriage, so I 'guesstimated' it. Also shown is the slider block and elevation wedge -
Slide frame now built and you will have figured out that the red carriage sits inside the black slide frame; first coat of paint on all -
The hatches are now all finished -
The hatches (as opposed to the gratings) have pieces of 2mm x 2mm strip glued on which I pre-stained with dark oak colour and then a coat of matt lacquer. I assume these strips were for the rowers to brace their feet against.
Time to fit the bench seats. My calipers and dividers were not long enough to measure between the hull sides, so back to the gauge I used to fit the stringers -
Benches shaped and lacquered. I was going to paint them black, but the natural colour looks OK (a little darker than the photo shows) so I'll leave them at that -
A turned post sits on top of a small block and will support the benches underneath at mid-point - five in all. The turned posts were well made -
Trial fit of the benches -
I needed to do the benches in order to line up the cannon slide assembly because it sits on top of them. A problem is that I have glued the hatch too high up on the fwd bulkhead and it's on with CA, so there it will stay. As such, the carriage slide frame will not drop into the slot as required -
Some fettling later -
On to the cannon carriage. There are no dimensions given for the 10mm x 10mm lengths at the bottom of the carriage, so I 'guesstimated' it. Also shown is the slider block and elevation wedge -
Slide frame now built and you will have figured out that the red carriage sits inside the black slide frame; first coat of paint on all -
Attachments
-
 P8190154.JPG34.3 KB · Views: 327
 -
 P8190155.JPG57.4 KB · Views: 329
 -
 P8190156.JPG61.1 KB · Views: 315
 -
 P8190157.JPG62.5 KB · Views: 309
 -
 P8190158.JPG52.9 KB · Views: 305
 -
 P8190159.JPG64.9 KB · Views: 310
 -
 P8210161.JPG37 KB · Views: 317
 -
 P8210162.JPG42.7 KB · Views: 317
 -
 P8210163.JPG47.2 KB · Views: 318
 -
 P8210164.JPG59.4 KB · Views: 317