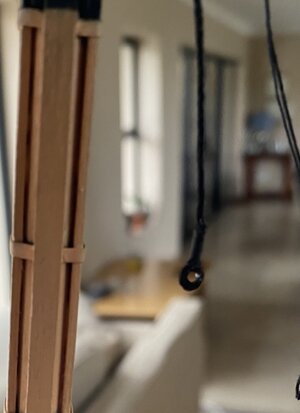
Amazing view Grant , you play golf ?While the African sun was setting in the village of Melkbosstrand, I took a starboard and port picture of the chain plates (paper clips as Justin my son calls them
View attachment 277187
View attachment 277188
View attachment 277189
-

Win a Free Custom Engraved Brass Coin!!!
As a way to introduce our brass coins to the community, we will raffle off a free coin during the month of August. Follow link ABOVE for instructions for entering.
-

PRE-ORDER SHIPS IN SCALE TODAY!
The beloved Ships in Scale Magazine is back and charting a new course for 2026!
Discover new skills, new techniques, and new inspirations in every issue.
NOTE THAT OUR FIRST ISSUE WILL BE JAN/FEB 2026
You are using an out of date browser. It may not display this or other websites correctly.
You should upgrade or use an alternative browser.
You should upgrade or use an alternative browser.
HMS Victory Mantua 1:78 (first build) by Grant Tyler [COMPLETED BUILD]
- Thread starter GrantTyler
- Start date
- Watchers 102
Amazing view Grant , you play golf ?
Hello Robert. Thanks. I live in a golf estate however I do not play golf. Both my children do tho.
Hello Robert. Thanks. I live in a golf estate however I do not play golf. Both my children do tho.
Good afternoon. I decided not to include sails on my Victory (well kit did not include these so will stick with this) however I will include some of the running rigging for the sails. My standing rigging will be black and running rigging the beige(tan....who knows) color of the kit thread. The kit rigging plans are rather sad and many additional lines and rigging details will be added to get something more authentic.It was Rather enjoyable doing some reading and researching while on holiday.
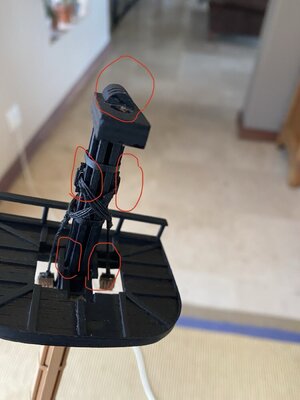
This morning I made More details and started some rigging for my lower mizzen mast. I made these parts not included in kit and rigging plan which are Circled in red.
I have added a bolster with 2 grooves in to my cap. Used a 6mm dowel cut in half and a saw to cut the grooves. The grooves are to support the top blocks and a sling for the stay which will be added later.
I used 2x2 birch and some needle files to make the lashing supports for the main blocks of the yard and 0.5mm thread for the lashing. The lashing line had to be rigged in an up and under pattern through the support.
A 3x1.5mm walnut wood was sanded And shaped for the vertical battens. These prevent the rubbing of the shroud lines against the square part of the mast and cap supports.
I seized the blocks to the lashing with 0.25mm thread.

- Joined
- Jan 9, 2020
- Messages
- 10,569
- Points
- 938

Hello Grant. I assume you are back in the Cape and trust that you enjoyed your week in what I'm sure was a hot and humid KZN.  These scratch-build add-ons look great and blend so seamlessly with the work already done, that it looks like part of the kit. It is great to see you back at the bench.
Thanks Heinrich. Having fun finding out all these new parts and understanding how the rigging On the Victory works. Yes was really good to spend time with my Mom and family for her 80th. Was super hot but that Indian Ocean is beautiful and warm ( not like our freezing Atlantic) and did some surfing- magic. Cheers Grant.
I’ve never seen those mast details on any other models. Is this something you only find on the Victory?Good afternoon. I decided not to include sails on my Victory (well kit did not include these so will stick with this) however I will include some of the running rigging for the sails. My standing rigging will be black and running rigging the beige(tan....who knows) color of the kit thread. The kit rigging plans are rather sad and many additional lines and rigging details will be added to get something more authentic.It was Rather enjoyable doing some reading and researching while on holiday.
This morning I made More details and started some rigging for my lower mizzen mast. I made these parts not included in kit and rigging plan which are Circled in red.
I have added a bolster with 2 grooves in to my cap. Used a 6mm dowel cut in half and a saw to cut the grooves. The grooves are to support the top blocks and a sling for the stay which will be added later.
I used 2x2 birch and some needle files to make the lashing supports for the main blocks of the yard and 0.5mm thread for the lashing. The lashing line had to be rigged in an up and under pattern through the support.
A 3x1.5mm walnut wood was sanded And shaped for the vertical battens. These prevent the rubbing of the shroud lines against the square part of the mast and cap supports.
I seized the blocks to the lashing with 0.25mm thread.
View attachment 281555
Hi Vic. I’m glad Jimsky answered that question as I would not have known the answer. Thanks Jimsky. CheersI’ve never seen those mast details on any other models. Is this something you only find on the Victory?
Some more rigging on the lower mizzen mast.
I served the Burton pendants where they fit around the mast. (still have no idea what and why these are there- seem to just hang there but I am researching- if anyone knows please let me know). There are two on the mizzen and four on the other 2 masts).
I did the seizing by hand however I need to make a machine somehow- take so long to do-they don’t look too complicated. To get one here is so expensive and a mission.
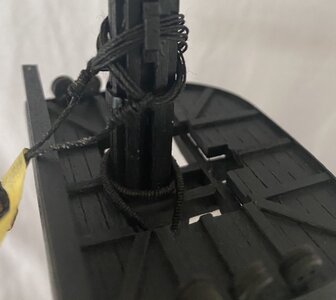
I also added the blocks for the running lines to the yard and boom and the dead eyes are fitted using 0.5mm thread. Even after using beeswax mix (still a little showing on the main yard line) the Mantua thread is sad and blocks not too great either. I have decided that I bought this kit and I am going to make the best Mantua (Sergal) Victory I can.
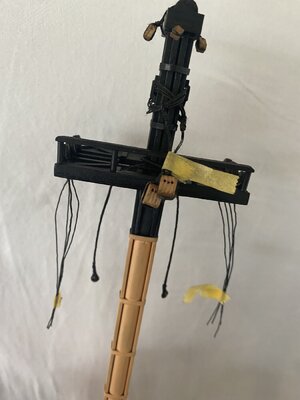
Here you can see the 2 Burton pendants. I used a small black flat bead to simulate the pendants and seized with 0.25mm thread. Used PVA glue to secure just in case.
I served the Burton pendants where they fit around the mast. (still have no idea what and why these are there- seem to just hang there but I am researching- if anyone knows please let me know). There are two on the mizzen and four on the other 2 masts).
I did the seizing by hand however I need to make a machine somehow- take so long to do-they don’t look too complicated. To get one here is so expensive and a mission.

I also added the blocks for the running lines to the yard and boom and the dead eyes are fitted using 0.5mm thread. Even after using beeswax mix (still a little showing on the main yard line) the Mantua thread is sad and blocks not too great either. I have decided that I bought this kit and I am going to make the best Mantua (Sergal) Victory I can.

Here you can see the 2 Burton pendants. I used a small black flat bead to simulate the pendants and seized with 0.25mm thread. Used PVA glue to secure just in case.
Very meticulous!
You've got skills Grant. Nicely done. On my ship the pendants become tackles (used for lifting things). They are the line I just rigged on my build log. I suspect they would serve a similar purpose on your english ship.
Ha! Rookies helping each other. Imagine the collective eye-roll from experienced members!
Ha! Rookies helping each other. Imagine the collective eye-roll from experienced members!

Hi Paul... true story . That makes sense re the pendants. ThanksYou've got skills Grant. Nicely done. On my ship the pendants become tackles (used for lifting things). They are the line I just rigged on my build log. I suspect they would serve a similar purpose on your english ship.
Ha! Rookies helping each other. Imagine the collective eye-roll from experienced members!
Thank you VicVery meticulous!

Well Grant, I'm still playing in the proverbial sand box here, and you just taught me what a pendant is. @PeterG mentioned the term 'pendant' in our discussion about violin blocks and I did not understand what he was talking about so thanks for the picture! Now I just have to figure out how it goes with a violin block.Close up view of the pendant.
View attachment 281679
Your rigging so far is outstanding!!!
Agreed. Grant, we either look at the ship or we look at the scenery, you can't have it both waysBeautiful pictures Grant! I think your chain plates look superb. On this occasion though, to a nostalgic and homesick Capetonian, the picture of a summer' sunset along the South African West Coast, supersedes all!
Please forgive me ...

Great work Grant, I am really enjoying following your build and how you go about it, well done! BTW my Mom also lives in KZN, South Coast. I have managed to get down there quite frequently over the years although the pandemic has put a bit of a spoke in that wheel for now. We are hoping to make it over for her 90th later this year. I agree with your and Heinrich's observations of the east coast, warm, humid, surfing. Somehow it always feels like you're on holiday thereSome more rigging on the lower mizzen mast.
I served the Burton pendants where they fit around the mast. (still have no idea what and why these are there- seem to just hang there but I am researching- if anyone knows please let me know). There are two on the mizzen and four on the other 2 masts).
I did the seizing by hand however I need to make a machine somehow- take so long to do-they don’t look too complicated. To get one here is so expensive and a mission.
View attachment 281673
I also added the blocks for the running lines to the yard and boom and the dead eyes are fitted using 0.5mm thread. Even after using beeswax mix (still a little showing on the main yard line) the Mantua thread is sad and blocks not too great either. I have decided that I bought this kit and I am going to make the best Mantua (Sergal) Victory I can.
View attachment 281674
Here you can see the 2 Burton pendants. I used a small black flat bead to simulate the pendants and seized with 0.25mm thread. Used PVA glue to secure just in case.
- Mark
Good morning. I refer @Philski excellent serving machine he made on Marks @Nomad bluenose log. I will attempt to copy this once I have sourced the parts locally here in Capetown.
I’m mean time I made a “jury rigg” or a “Macgygerism” from LEGO I found in cupboard. No laughing guys....
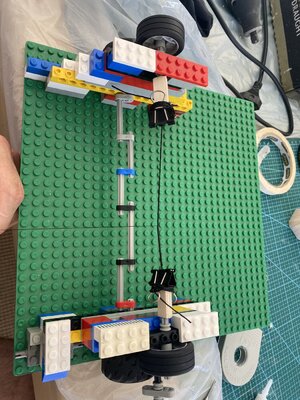
My first shrouds on the Mizzen mast where served using this incredible machine. I used a measurement of 7mm length being the served portion so that it will be served down to the lower end of the Bibb. As each shroud is added this measurement will increase accordingly so all the shroud served sections fall equally at the lower end of the Bibb.
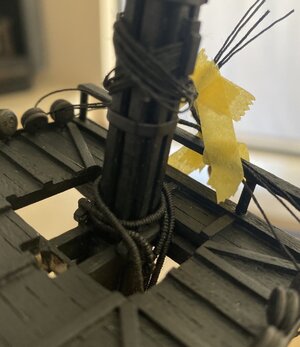
1mm thread was served with 0.25mm. All the tread is stained black with Indian ink. I then run the line through a flame on a candle quickly to try and remove the fuzz. I have not lashed the shroud to the mast yet as I am not sure at which point the lashings are done. The pattern of how the shrouds fit as they are layered on one each other means the placement of the lashing needs to be accurate from the first one. This I will find out.
The result:
I’m mean time I made a “jury rigg” or a “Macgygerism” from LEGO I found in cupboard. No laughing guys....


My first shrouds on the Mizzen mast where served using this incredible machine.
1mm thread was served with 0.25mm. All the tread is stained black with Indian ink. I then run the line through a flame on a candle quickly to try and remove the fuzz. I have not lashed the shroud to the mast yet as I am not sure at which point the lashings are done. The pattern of how the shrouds fit as they are layered on one each other means the placement of the lashing needs to be accurate from the first one. This I will find out.
The result:

Oops- 7mm is 7cm. Measurements Eish not my strong pointGood morning. I refer @Philski excellent serving machine he made on Marks @Nomad bluenose log. I will attempt to copy this once I have sourced the parts locally here in Capetown.
I’m mean time I made a “jury rigg” or a “Macgygerism” from LEGO I found in cupboard. No laughing guys....
View attachment 282132
My first shrouds on the Mizzen mast where served using this incredible machine.I used a measurement of 7mm length being the served portion so that it will be served down to the lower end of the Bibb. As each shroud is added this measurement will increase accordingly so all the shroud served sections fall equally at the lower end of the Bibb.
1mm thread was served with 0.25mm. All the tread is stained black with Indian ink. I then run the line through a flame on a candle quickly to try and remove the fuzz. I have not lashed the shroud to the mast yet as I am not sure at which point the lashings are done. The pattern of how the shrouds fit as they are layered on one each other means the placement of the lashing needs to be accurate from the first one. This I will find out.
The result:
View attachment 282136


