• LUCZORAMA SHIPWRECK SCAVENGER HUNT GIVEAWAY. 4 Weeks of Fun • 1 Legendary Prize ((OcCre’s Fram Ship)) • Global Crew Welcome!
    **VIEW THREAD HERE**

HIGH HOPES, WILD MEN AND THE DEVIL’S JAW - Willem Barentsz Kolderstok 1:50

Dear Friends

Here is tonight's update.
微信图片_20220915224146.jpg
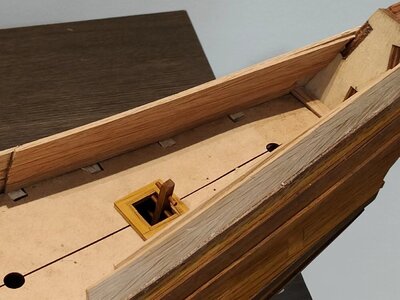
The inner planking on the starboard side has been completed and the ladder has been added to the hatch. Both sides will now be left for 24 hours for the glue to dry properly, before it is sanded and cut to size. In any case, I cannot cut the excess off the top until my new knives have arrived.

And then came the moment that I had been looking forward to for a long time.
微信图片_20220915224539.jpg
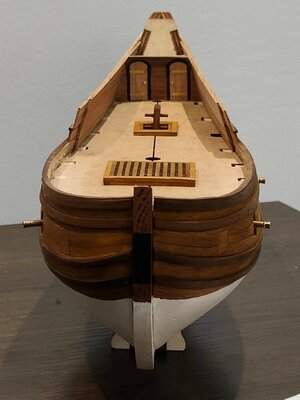
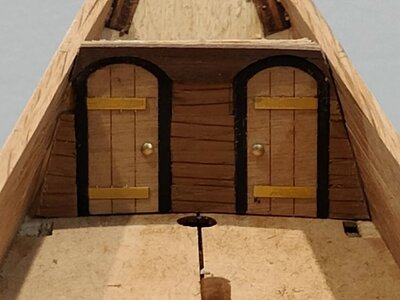
The test-fitting the captain's cabin.
微信图片_20220915223556.jpg

To me the dry fit is a success. Obviously, it will have to be lifted by 0.7mm to make provision for the deck planking and then sanded nice and even with the top of the bulwarks, but that was to be expected. Unfortunately, a small piece of wood that forms part of the wall in the upper left-hand corner (as you look at it) has splintered off with the filing, but I am not going to worry myself about that. Bear in mind that the whole front wall will be covered by the center canopy (boevennet) and will hardly be visible. This is a scratch-build item and is the first time that a captain's cabin will be fitted to a @Kolderstok model.
 
Very nice cabin doors Heinrich, well done!

Makes you want to open one to see what's going on inside :)
Thank you, Mark! Both Barentsz and Van Heemskerck were deeply religious men, so I do not suppose there was anything untoward happening in the captain's cabin. We do know that each day was started and concluded with prayers and, presumably, scripture.
 
Dear Friends

Here is tonight's update.

View attachment 328538
The inner planking on the starboard side has been completed and the ladder has been added to the hatch. Both sides will now be left for 24 hours for the glue to dry properly, before it is sanded and cut to size. In any case, I cannot cut the excess off the top until my new knives have arrived.

And then came the moment that I had been looking forward to for a long time.

View attachment 328539
The test-fitting the captain's cabin.

View attachment 328540

To me the dry fit is a success. Obviously, it will have to be lifted by 0.7mm to make provision for the deck planking and then sanded nice and even with the top of the bulwarks, but that was to be expected. Unfortunately, a small piece of wood that forms part of the wall in the upper left-hand corner (as you look at it) has splintered off with the filing, but I am not going to worry myself about that. Bear in mind that the whole front wall will be covered by the center canopy (boevennet) and will hardly be visible. This is a scratch-build item and is the first time that a captain's cabin will be fitted to a @Kolderstok model.
Bravo.
 
Plum Blossom did you well my friend, the wall of the captain's cabin is looking great.
Thank you. my friend. I have had to work so much on the wall tonight, that I may still decide to build another one that I hope will fit better! I am still undecided on that - I will make a final call tomorrow.
 
Dear Friends

Tonight, I do not have an update per se that I can show you, but I would like to show you what I need to achieve.

Hoving.png
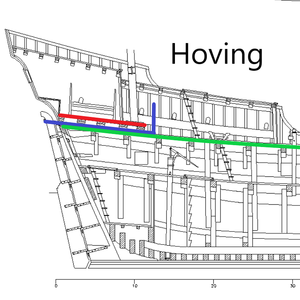
If you look at the above picture, in which the deck is indicated by the green line, you will notice that the captain's cabin is built on a raised platform (indicated by the red line) which also has a surround for the mizzen mast. The whipstaff is indicated in blue and is positioned just in front of the raised platform. When we want to see this visually presented, have a squizz at the picture below.

CW8.png
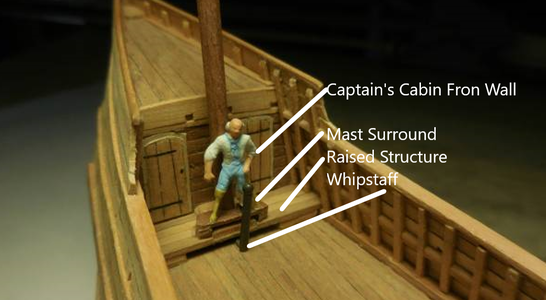
Photograph: Constant Willems. Here you can see the raised platform in front of the captain's cabin. The figurine is standing atop the mast surround while the mizzen is visible directly behind him. The whipstaff is right in front of the raised platform. What you see here is thus a perfectly executed rendition of the Hoving plans.

The problem that I have is that I do not have the height available to raise my platform as substantially as the one in the picture. If I were to do this, I would have to file away so much of the height of the front wall that the doors would look like it could be used by pygmies only. Therefore, I have to simulate the raised platform, without actually raising it (I am only raising it by 2mm.) Currently the platform has been glued and is held in place by my biggest clamps. It will be left overnight before any further construction can take place.

My knives have arrived so tomorrow i should also be able to start the deck planking.
 
Ok
Dear Friends

Tonight, I do not have an update per se that I can show you, but I would like to show you what I need to achieve.

View attachment 328672
If you look at the above picture, in which the deck is indicated by the green line, you will notice that the captain's cabin is built on a raised platform (indicated by the red line) which also has a surround for the mizzen mast. The whipstaff is indicated in blue and is positioned just in front of the raised platform. When we want to see this visually presented, have a squizz at the picture below.

View attachment 328673
Photograph: Constant Willems. Here you can see the raised platform in front of the captain's cabin. The figurine is standing atop the mast surround while the mizzen is visible directly behind him. The whipstaff is right in front of the raised platform. What you see here is thus a perfectly executed rendition of the Hoving plans.

The problem that I have is that I do not have the height available to raise my platform as substantially as the one in the picture. If I were to do this, I would have to file away so much of the height of the front wall that the doors would look like it could be used by pygmies only. Therefore, I have to simulate the raised platform, without actually raising it (I am only raising it by 2mm.) Currently the platform has been glued and is held in place by my biggest clamps. It will be left overnight before any further construction can take place.

My knives have arrived so tomorrow i should also be able to start the deck planking.
Good, here we go...
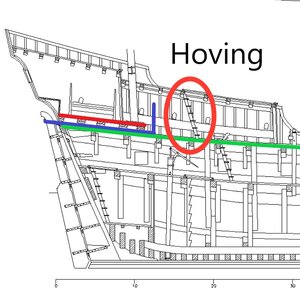
When you look at the stairs in Ab Hooving's picture you see roughly six and a half steps, close to 1.80m, if you take 0.3m/step.
If you compare the height of the stairs to the height of the captain's cabin, they appear to be about similar. This in turn means that the doors to either side of the mizzen should/could be around 1,6m high. Not much, definitely not by today's standards, but not uncommon for the period.
Well, if you can't have the platform raised 2mm to accommodate the whipstaff, than I think something dies not add up.
Did you measure the heights of the various decks to compare those to the sketch you have, just to make sure they are similar?

E9FD0783-14E3-4C2B-B786-F165339B505E.jpeg
 
Heinrich, is it normal for the bottom of the mizzen mast to be anchored only at a depth just the thickness of the mast surround material? I know the whip staff
connector has to pass under the mizzen mast. Not a lot of purchase at the mast bottom??
 
Ok

Good, here we go...
When you look at the stairs in Ab Hooving's picture you see roughly six and a half steps, close to 1.80m, if you take 0.3m/step.
If you compare the height of the stairs to the height of the captain's cabin, they appear to be about similar. This in turn means that the doors to either side of the mizzen should/could be around 1,6m high. Not much, definitely not by today's standards, but not uncommon for the period.
Well, if you can't have the platform raised 2mm to accommodate the whipstaff, than I think something dies not add up.
Did you measure the heights of the various decks to compare those to the sketch you have, just to make sure they are similar?

View attachment 328719
Hello Johan. Bear in mind that I am not building a scratch model based on Ab's plans - therefore deck heights are not determined by me but by the kit supplied bulkheads. If I had done this the correct way, I would first have placed the deck planking and then the raised platform. Depending on whether I use Abachi (0.7mm thick) or Pear Wood (1.5mm thick) to which I have to add the thickness of the platform (2mm) means that I have a construction which increases the height of the front wall by either 2.7mm or 3.5mm.

If you then consider that the kit was never designed to feature a captain's cabin or front wall, you will understand why I said I will do a simulation. When the work is done, you will hopefully be able to get the impression that the cabin sits on a slightly raised structure while the height of the front wall still matches the roof height of the center canopy. If I don't do it this way the next deck and side planking will be a complete mismatch.
 
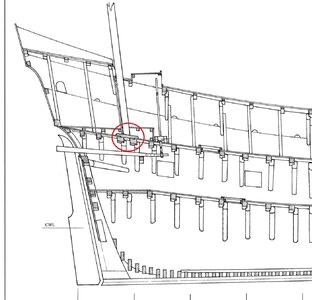
Heinrich, is it normal for the bottom of the mizzen mast to be anchored only at a depth just the thickness of the mast surround material? I know the whip staff
connector has to pass under the mizzen mast. Not a lot of purchase at the mast bottom??
Hello Daniel. I can honestly not tell you if this was normal procedure - only that this was the way that it was presumably done on the small ships of the era. From what we know of De Zwaan, was that she was a reliable ship that had extremely good sailing characteristics. Bearing in mind that she completed two Northern Voyages without a glitch, the purchase must have been sufficient.

WLangs.jpg
You can also see the exact same configuration on Gerald de Weerdt's interpretation.
 
Good day Dear Friends

This part of the build, I have come to realize, is all about sequence. In some cases, it is very difficult to know the best sequence - pretty much a case of which came first, the chicken or the egg!

In any case, this is the sequence so far.

微信图片_20220917154146.jpg
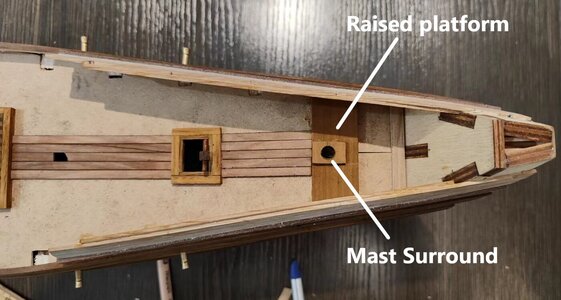
The "raised" platform and the mast surround have been installed. This was important to have a definitive point from which to start the deck planking. With the next picture, I will explain why this part of the deck planking had to be done now, but let's first consider the actual deck planking per se. Those of you familiar with my builds of the past, will immediately spot two major differences - firstly, this is not the Abachi wood that I normally use, and secondly, there is chalking between the planks. Well, I did start with the Abachi and after laying down 6 planks, gave it one look and ripped it up. In the past, the Abachi had a nice, rich creamy yellow color to it, but this selection of wood was very "white": with almost no noticeable grain. That just wouldn't do. So, I did something I had been contemplating for a while - I used the Pear Wood hull planking strips from my YuanQing Bluenose. Now if you have watched some of the Bluenose builds (e.g, @Peter Voogt, @Dean62 and @RDN1954, you will know that removing laser char from the wood is one of the time-consuming aspects of the Bluenose build. In this case, it worked in my favor as I just left the char and voila - I have natural-looking caulking!

This decision will probably come back to haunt me later on, but I just could not get myself to use the Abachi this time. So, @Jimsky, just because you love Pear wood so much, and I love you so much, this is for you!

So let me explain why the deck planking was necessary at this point.

微信图片_20220917155123.jpg
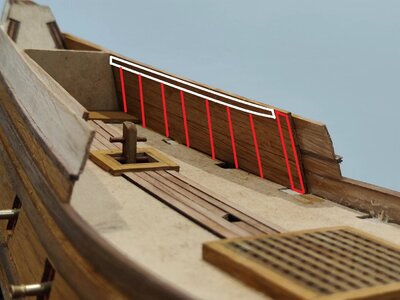
The deck beams for the center canopy are mounted via a row of stanchion "notches" (White Lines). Their position is vitally important - not only for the beams, but also for the exact position of the cabin front wall. The last stanchion notch (towards the stern) will butt up against the front wall. In other words, the last deck beam will go directly against the upper part of the front wall, without any gaps. Therefore, the stanchion notches need to be placed before the front wall can go up. The red lines indicate the stanchion posts which support the notches and also serve as another means of strengthening the bulwarks. The posts, however, are mounted on the planked deck - hence planking this part of the deck now.

I hope that all makes sense!
 
Good day Dear Friends

This part of the build, I have come to realize, is all about sequence. In some cases, it is very difficult to know the best sequence - pretty much a case of which came first, the chicken or the egg!

In any case, this is the sequence so far.

View attachment 328785
The "raised" platform and the mast surround have been installed. This was important to have a definitive point from which to start the deck planking. With the next picture, I will explain why this part of the deck planking had to be done now, but let's first consider the actual deck planking per se. Those of you familiar with my builds of the past, will immediately spot two major differences - firstly, this is not the Abachi wood that I normally use, and secondly, there is chalking between the planks. Well, I did start with the Abachi and after laying down 6 planks, gave it one look and ripped it up. In the past, the Abachi had a nice, rich creamy yellow color to it, but this selection of wood was very "white": with almost no noticeable grain. That just wouldn't do. So, I did something I had been contemplating for a while - I used the Pear Wood hull planking strips from my YuanQing Bluenose. Now if you have watched some of the Bluenose builds (e.g, @Peter Voogt, @Dean62 and @RDN1954, you will know that removing laser char from the wood is one of the time-consuming aspects of the Bluenose build. In this case, it worked in my favor as I just left the char and voila - I have natural-looking caulking!

This decision will probably come back to haunt me later on, but I just could not get myself to use the Abachi this time. So, @Jimsky, just because you love Pear wood so much, and I love you so much, this is for you!

So let me explain why the deck planking was necessary at this point.

View attachment 328786
The deck beams for the center canopy are mounted via a row of stanchion "notches" (White Lines). Their position is vitally important - not only for the beams, but also for the exact position of the cabin front wall. The last stanchion notch (towards the stern) will butt up against the front wall. In other words, the last deck beam will go directly against the upper part of the front wall, without any gaps. Therefore, the stanchion notches need to be placed before the front wall can go up. The red lines indicate the stanchion posts which support the notches and also serve as another means of strengthening the bulwarks. The posts, however, are mounted on the planked deck - hence planking this part of the deck now.

I hope that all makes sense!
Always nice to see another (YQ-)Pear Wood deck, Heinrich. No matter on what ship ….. :) You can sand and polish it as smooth as …… whatever you like.
Regards, Peter

 
Back
Top