• LUCZORAMA SHIPWRECK SCAVENGER HUNT GIVEAWAY. 4 Weeks of Fun • 1 Legendary Prize ((OcCre’s Fram Ship)) • Global Crew Welcome!
    **VIEW THREAD HERE**

AMATI 1/60 HMS BOUNTY

Joined
Dec 30, 2021
Messages
278
Points
278

Well its time for a new build now that ENDEAVOUR is ostensibly complete.
My next choice of kit still had to have an Australian flavour so I chose the BOUNTY. Choosing which BOUNTY to buld came down to what I could afford and what was available. I considered the Artesania version but was not keen paying for a single sided planking and open side with interior. I also stumbled upon a sale for Amarti BOUNTY's through Premier Models in the UK so I ordered one and it arrived safe and sound.
I was surprised on opening the box at the difference in quality between the Artesania and Amarti kits. The Amarti materials appear and feel much better quality and the use of timber rather than ply for the keel, stem and stern posts, channels etc means one don't have t find a way to mask exposed ply ends. The ply stock itself also appears better quality with far les tear-our/delamination that the artesania material did. I also like the Amarti rigging (blocks, deadheyes, hearts, and parrels parts as these too are timber and not laser cut ply. I also like the Amarti threads even though I would prefer scale rope but it appears that this build may be a commission and will be an out of the box build.
So lets get to work:

FRAMING:
Thank heavens for DAVOSHIPMODELLER on YouTube. He has a playlist for the construction of the Amarti BOUNTY and the identification of kit issues starts at the pre-framing stage.
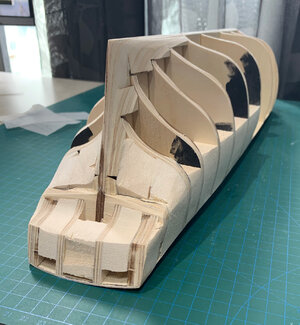
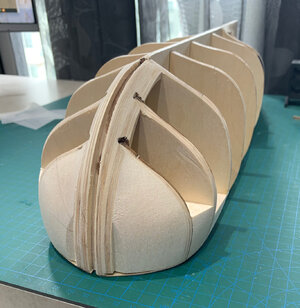
The first big is the location of the Mizzen and the implication that notching the false keel has with the location of Frame 13. The most effective solution is to notch out Fame 13 and then adjust the length of the Mizzen mast down the track. The other main issue is the shape of the false keel stem support and the reinforcing parts on either side. They do not match the plan nor the shape of the laser cut timber stem. Best to fix now before any assembly take place.
Other changes made also follow the DAVOSHIPMODLLER experience including cutting out sections in the frames between Frame 11 and 13 and also Frame 14 and 16 to permit planked decks to be installed should one wish to have open hatched on the main deck.
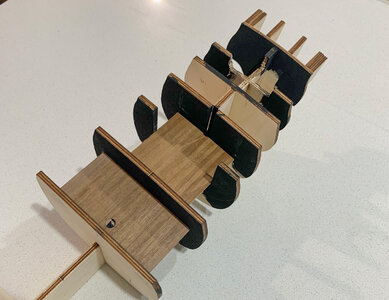
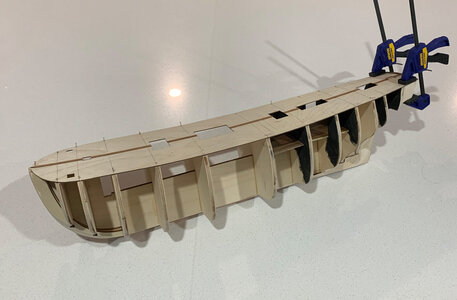
IMG_0405.jpg
 
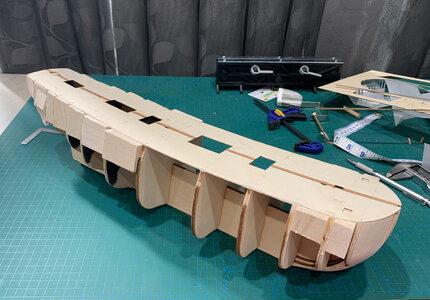
Team, Today was a continuation of the initial framing. The lower deck between frames 14-16 had to be lowered as it was too shallow to be realistic so I did that with a 5mm chisel and followed up with a 25mm sanding disk before fitting the lower deck.

Before fitting the main deck, its necessary to fair the top of the frames. There is a little bit of work forward but a lot of sanding between frames 12 and 16 due to the slope of the aft deck and Frame 16 and the square cut nature of the frames themselves. I did the initial work with a mini wood plane before getting to fairing by hand with a sanding block.

Now its time to fit the main deck. Relatively simple task of applying glue to all top surfaces, aligning the deck then drilling and nailing. I would be using trenails but my 0.7mm drill broken the materials too hard for the bamboo in a 0.6mm hole. I have ordered replacement 0.7mm bits so will remove nailsandreplace with trenails when the glues has dried.

Also visible is the preliminary hull fairing and the king plank (wanted to make sure I didn't forget it this time).

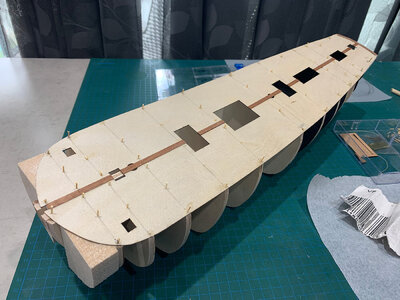
IMG_0407.jpg
 
Team, Today was a continuation of the initial framing. The lower deck between frames 14-16 had to be lowered as it was too shallow to be realistic so I did that with a 5mm chisel and followed up with a 25mm sanding disk before fitting the lower deck.

Before fitting the main deck, its necessary to fair the top of the frames. There is a little bit of work forward but a lot of sanding between frames 12 and 16 due to the slope of the aft deck and Frame 16 and the square cut nature of the frames themselves. I did the initial work with a mini wood plane before getting to fairing by hand with a sanding block.

Now its time to fit the main deck. Relatively simple task of applying glue to all top surfaces, aligning the deck then drilling and nailing. I would be using trenails but my 0.7mm drill broken the materials too hard for the bamboo in a 0.6mm hole. I have ordered replacement 0.7mm bits so will remove nailsandreplace with trenails when the glues has dried.

Also visible is the preliminary hull fairing and the king plank (wanted to make sure I didn't forget it this time).

View attachment 329410
Good morning Peter. I will pull up a chair and watch this build. Cheers Grant
 
Well I have spent the day making 0.7mm, 0.9mm and 1.0mm trenails and then fitting to the deck of BOUNTY to secure it win place.

I would love to make smaller trenails however Jim from Byrnes Model Machines has not responded to my order or emails of more than 2 weeks ago.... Hope he is ok.

IMG_0408.jpg

IMG_0409.jpg
 
Can’t wait to see how things go. I completed this same model earlier this year and “yes”, pay close attention to DAVOSHIPMODELLER. As nice as the materials are there are several issues you will have to work thru. For me the toughest was the stern-castle. All the parts seem to be almost the wrong scale, just a little bit too big.

Good luck,
Yes the stern is wrong and I think DAVOSHIPMODELLER followed the instructions instead of the prototype. I plan to fill the stern and the gaps between frame 11 thru 16 with balsa, cut the bottom curve off frame 16 then re-fair the sides particularly around the deadwood. I then plan to fit bulwark stanchions per the AOS Bounty drawings and plank the bulwark rather than use the ply supplied. I am also milling all the 6x1.5mm pear planks to 3mm: I only want to single plank the model and not use the 3x0.5mm veneer. I also plan to plank the transom then cut the openings for the stern windows before building/fitting the 'decorations'
 
My build of Billings Bounty has turned into a 'scratch' build using AOS drawings since I realised Billings based their plans on 'Berthia', Bounty's previous name. The plastic (yuk!) cannons are too big - no room for recoil/reloading - so I made wooden carriages to correct scale & purchased new barrels. Now that I've arrived at the masting I've found that the tops are way out of scale - too small, & they are 1 pr. of topmast shroud deadeyes short, - 3 instead of 4. I've started remakng the tops as per Bounty's unique grating decked tops. I would NOT recommend this kit. The good side is that I bought at a low price in a sale. I also double planked the hull.
 
Hum. I have AOS and the AL Bounty version. I hope that it will be more easy... or it will a unique chance to start some scratch. Now I hesitate between my HMS Fly or the HMAV Bounty to begin with for the next project.
 
Yes team, there are few kits that closely match the prototype they depict but then again, what was the prototype based on.... I found in my build of ENDEAVOUR that a lot of the AL kit was based upon the replica which in itself took some shortcuts in its build due to funding issues and also modern code requirements. BOUNTY is no different but the main issue revolves around the details rather than the hull. Kt manufacturers only have a couple of variations in capstan, ships boats, anchors etc and therefore supply what they believe is the closest representation for each hull. Same goes of rigging; as each ships rigging will vary depending on its country of origin, displacement (size) etc. Manufacturers do not have the diverse range of blocks or rope sizes so compromises are made here too.
I ditched all the rigging from my AL ENDEAVOUR kit and purchased aftermarket blocks, deadeyes, cleats and scale ropes. I plan to do the same with BOUNTY as the rigging supplied by Amati (while functional) is not up to the standard I want in my ships.
 
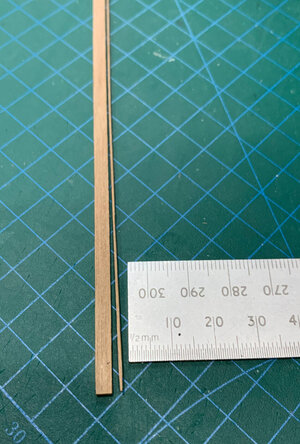
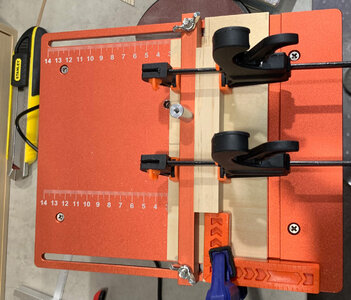
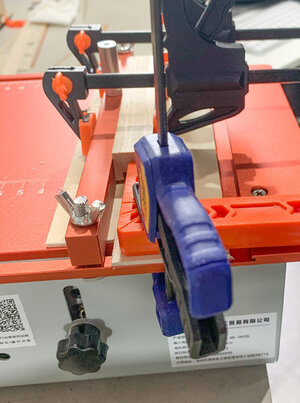
Well I had to burn two planks but got the rig right to cut a 3.5mm plank with the 0.6mm offset on my cheap Chinese mini table saw. These 3.5mm planks bend far better than the original 6mm planks and of course are more prototypical as BOUNTY had 3 x 6in planks, 5.5 x 12in Wales, and a single 4.5 x 24in strake immediately above the Wales. So the main planks should be 2.54mm in 1/60 but that's probably getting a little too thin for my current modelling/planking skill.

IMG_0410.jpg

IMG_0411.jpg

IMG_0412.jpg
 
Last edited:
Yes team, there are few kits that closely match the prototype they depict but then again, what was the prototype based on.... I found in my build of ENDEAVOUR that a lot of the AL kit was based upon the replica which in itself took some shortcuts in its build due to funding issues and also modern code requirements. BOUNTY is no different but the main issue revolves around the details rather than the hull. Kt manufacturers only have a couple of variations in capstan, ships boats, anchors etc and therefore supply what they believe is the closest representation for each hull. Same goes of rigging; as each ships rigging will vary depending on its country of origin, displacement (size) etc. Manufacturers do not have the diverse range of blocks or rope sizes so compromises are made here too.
I ditched all the rigging from my AL ENDEAVOUR kit and purchased aftermarket blocks, deadeyes, cleats and scale ropes. I plan to do the same with BOUNTY as the rigging supplied by Amati (while functional) is not up to the standard I want in my ships.
I changed all the blocks from AL to purchased better ones, more diversified in size to respect AAMM plans. I want to do the same for AL Bounty according to AoS. It is a great price to pay to learn and acquire modeling skills, But, yes I am a bit jaleous about somes of you, which are great modellers here. You are inspiring. Thanks for your comment.
 
Last edited:
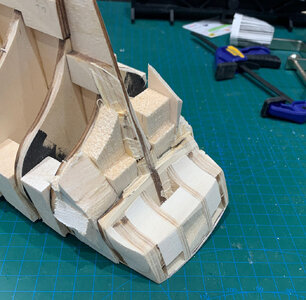
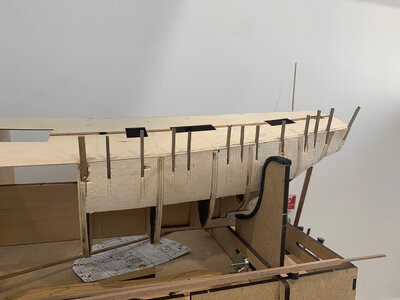
Finished blocking in the stern and changing the shape of frame16 (would have been easier before installation but one doesn't always pick up these issues early). I have also blocked in where the bulwark stanchions are going to be installed

IMG_0414.jpg

IMG_0415.jpg
 
Hi Peter, greetings from another Australian ship modeller.
Your modelling journey has some similarities to my own.
I started about 15 years ago with the Port Jackson schooner then progressed to the Amati Bounty kit which I bought second hand from a builder who had progressed beyond kit construction.
I enjoyed building Bounty although it was a pretty steep learning curve after the comparative simplicity of the PJ schooner.
Part way into the Bounty build I bought John McKay's book "The Armed Transport BOUNTY" which I found very helpful.
The book showed some discrepancies with the kit. I don't know if it still relevant to the kit you bought as changes may have been made to the kit in the intervening years.
The most significant discrepancies relate to the routing of the anchor hawser and the gun ports for the 4 cannons.
My version of the kit showed an odd route for the hawses, they disappeared down holes in deck to reappear at the hawser holes at the bow. The book shows a much simpler route, along the deck from the windlass then out the hawse holes. I modified the bow construction to achieve what I think is the correct route.
My kit included metal gun port surrounds. The book detail showed simple cut outs in the bulwark so this is what I built. Also, the guns that came in my kit would have clashed with the supplied gun port surrounds as they placed the port openings too low.
My kit included a single cast metal ships boat which did not match either of the two boats carried. I scratch built the ships boats from the drawings in the book.
The second part of my Bounty build log is on the Model Ship World blog as Bounty by Navis Factorem. The first part of my log vanished with the loss of the MSW content some years ago.
Like the modeller that I bought the Bounty kit from I have also moved on from kits to scratch builds. I have completed the frigate HMS Surprise of Master and Commander fame and am building the 74 gun ship of the line HMS Bellona which is also in Parick O'Brians books. The Bellona hull is almost complete and soon I will start the rig.
I still have the McKay Bounty book. I would be happy to give it to you if you would like. Depending on your location we could meet up or I could post to you.
Cheers, David Lendrum. (Location is Naremburn NSW)
 
Initial fairing of the fill has been done but I am still not sure I am happy with the shape of the stern. I think I will have to fit some cutwater planks to see how the hull planks flow from the deadwood to the cutwater.

I have to say that those Dremel sanding disk wheels certainly cut down the work on shaping/fairing. I used them on my Ryobi R18RT; just forgot to wear a face mask.....

I won't be fitting any bulwark stanchions until I get the stern shape right...

IMG_0418.jpg

IMG_0417.jpg
 
Last edited:
Hi Peter, greetings from another Australian ship modeller.
Your modelling journey has some similarities to my own.
I started about 15 years ago with the Port Jackson schooner then progressed to the Amati Bounty kit which I bought second hand from a builder who had progressed beyond kit construction.
I enjoyed building Bounty although it was a pretty steep learning curve after the comparative simplicity of the PJ schooner.
Part way into the Bounty build I bought John McKay's book "The Armed Transport BOUNTY" which I found very helpful.
The book showed some discrepancies with the kit. I don't know if it still relevant to the kit you bought as changes may have been made to the kit in the intervening years.
The most significant discrepancies relate to the routing of the anchor hawser and the gun ports for the 4 cannons.
My version of the kit showed an odd route for the hawses, they disappeared down holes in deck to reappear at the hawser holes at the bow. The book shows a much simpler route, along the deck from the windlass then out the hawse holes. I modified the bow construction to achieve what I think is the correct route.
My kit included metal gun port surrounds. The book detail showed simple cut outs in the bulwark so this is what I built. Also, the guns that came in my kit would have clashed with the supplied gun port surrounds as they placed the port openings too low.
My kit included a single cast metal ships boat which did not match either of the two boats carried. I scratch built the ships boats from the drawings in the book.
The second part of my Bounty build log is on the Model Ship World blog as Bounty by Navis Factorem. The first part of my log vanished with the loss of the MSW content some years ago.
Like the modeller that I bought the Bounty kit from I have also moved on from kits to scratch builds. I have completed the frigate HMS Surprise of Master and Commander fame and am building the 74 gun ship of the line HMS Bellona which is also in Parick O'Brians books. The Bellona hull is almost complete and soon I will start the rig.
I still have the McKay Bounty book. I would be happy to give it to you if you would like. Depending on your location we could meet up or I could post to you.
Cheers, David Lendrum. (Location is Naremburn NSW)
David, Nice to meet you . Looks like your journey to scratch was a lot faster than mine. I plan following BOUNTY with a scratch built POB 1/64 sloop NORFOLK based on the replica in Tasmania. Its a small model especially at 1/64 but I think I can cope with that having build a couple of1/72 scale POF ships boats for ENDEAVOUR.
I think my Amati BOUNTY will be the same as yours; doubt any changes have ever been made which is why there are still so many design issues (let alone prototype issues) with the kit.
I would love to borrow the McKay book and would be happy to pay for the postage to Canberra (and return to you). Please email me at peter6172@gmail.com.
 
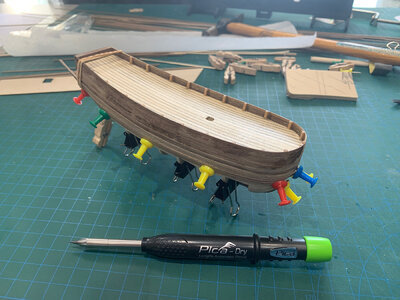
Finally got back to BOUNTY after spending some time on a 1/64 scratch build of NORFOLK (the colonial sloop that Bass and Flinders explored/mapped the SE coast of Australia and circumnavigated Tasmania on). I wanted to test the fitting of Bulwark stanchions then planking instead of using thin ply and second planking per the Amati kit.

This also permitted me to utilise the off cuts from cutting down the 6mm to 3.5mm planks to plank NORFOLK

IMG_0434.jpg

IMG_0435.jpg
 
Mmm, having some difficulties trying to fit stanchions etc. The Amati kit says 1:60 but comparing it to the AOS- BOUNTY, its actually on 1:60 in beam. Length and height are 1:52 while the transom etched decorations scale around 1:45 which is probably why the finished models I have seen have such a 'fat arse" appearance. I may have to completely scratch build the transom to get the proportions correct. A little disappointing that such details are so far out of scale as the book has been found for some time (or have the AOS authors got it wrong?)
 
Mmm, having some difficulties trying to fit stanchions etc. The Amati kit says 1:60 but comparing it to the AOS- BOUNTY, its actually on 1:60 in beam. Length and height are 1:52 while the transom etched decorations scale around 1:45 which is probably why the finished models I have seen have such a 'fat arse" appearance. I may have to completely scratch build the transom to get the proportions correct. A little disappointing that such details are so far out of scale as the book has been found for some time (or have the AOS authors got it wrong?)
I've had the same problems with Billings Boats Bounty & wouldn't mind betting I'm not the only one. What's more, is I cannot make sense of the rigging as it's all on one full scale drawing, almost impossible to race each rope, also no sizes of block. At present she's just a hull (completed) model. This kit has been harder to build than OcCre's Montañes. AOS does not give enough rigging info., & Anderson's is for warships. I'm thinking of using OcCre's Beagle rigging plan or buying Amati's plans. In the meantime I'm back to Columbo's fleet of 1492.
Any advice would be much appreciated, thanks in advance, guys.
 
Back
Top