• LUCZORAMA SHIPWRECK SCAVENGER HUNT GIVEAWAY. 4 Weeks of Fun • 1 Legendary Prize ((OcCre’s Fram Ship)) • Global Crew Welcome!
    **VIEW THREAD HERE**

help with trimming planks to bow

Joined
Jan 25, 2015
Messages
44
Points
48

Hello there
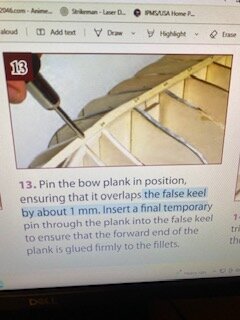
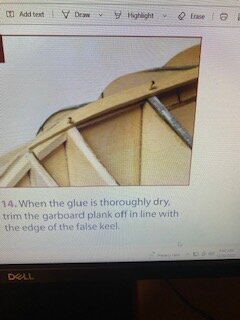
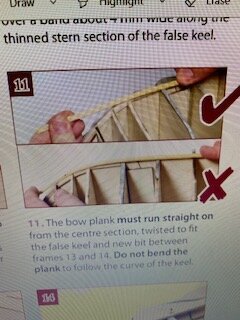
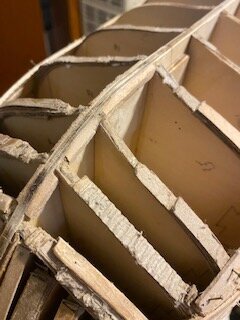
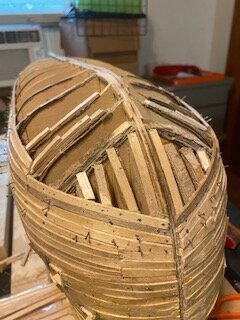
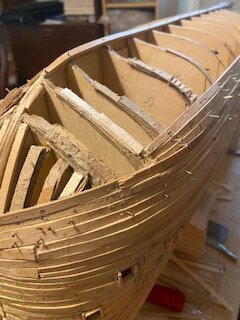
I'm working on the model space 1/84 Victory and I am the point of adding the forward planks to the false keel and trimming the garboard planks but the planks are not touching the bits at the turn photos wiIMG_2141 model ship build 1.jpgIMG_2142 (1) model ship build 2.jpgIMG_2144 (1) model ship build 3.jpgIMG_2145 photo 11 .jpgIMG_2146 bow section .jpg
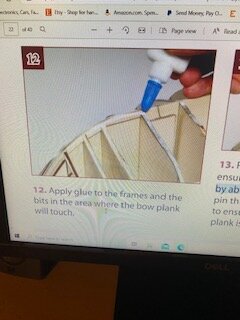
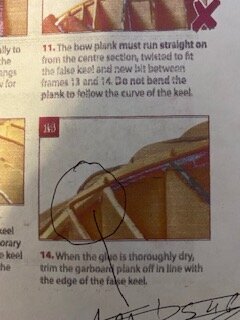
ll explain I had asked members on Model ship world, but no one wants to help the first three photos are from the model space instructions pack 4 stage 36 page 146 and the last photo is of my build it's not pretty but gives you an idea where I am at the planks are supposed to touch the false keel by 1mm and trimmed at the first turn of the garboard, if anyone has built this kit or building now I would appreciate any suggestions, thank you
Ronald
 
does anyone know if I'm supposed to bend the planks a little shown in the photo below but the instructions says other wise but if I don't bend to touch the garboard I can't glue and trim it

IMG_2147 part 14 page 146 .jpg
 
Ronald.
Model Space is not an accepted manufacturer according to Model Ship World. They have a strict code regarding manufacturers who copy reputable companies model kits; hence the reason for no response.
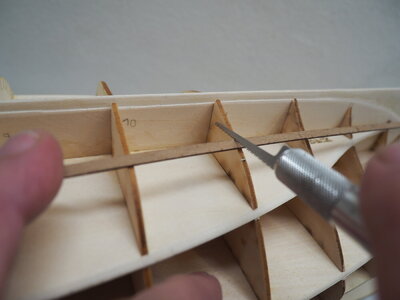
It appears that you have completed the framing and have some planks already laid around the turn of the bilge. I see however that you appear to have altered the intended profile of the hull by adding shims to bulkhead edges. Is this because you have taken off too much material in fairing the hull prior to planking?
It's important that you fair the entire hull before you start planking (despite what the instructions might say). Fairing will give you the maximum surface area onto which the planks will be glued (and pinned if required).

As for the Garboard plank: it is a straight plank on one side (the side that does NOT run along the keel, however this is not always practical in a kit model as planks are a fixed width. In your case, the garboard plank does run straight along the keel and at the end of the keel will have a curve cut in to align with the stem. There will be a slight bend in the end of the plank to follow the line of the keel and stem along the longitudinal axis only as shown in diagram 14. The next row of planks will then follow this line, but there may be some tapering of planks
 
There will be a slight bend in the end of the plank to follow the line of the keel and stem along the longitudinal axis only as shown in diagram 14. The next row of planks will then follow this line, but there may be some tapering of planks
I am in complete agreement with Peter. The garboard plank should just follow the curve of the keel at the bow but not go too far. If you follow it too far into the 'upcurve' of the stem you will run into problems. But there is reason to be concerned about the flow of your bulkheads. They should create a smooth and uniform flow both horizontally and vertically - but what I see in your photo is irregular and 'stepped'. This was not part of the plan. How can we help?
 
Thanks, gentlemen, for your knowledge of this build
the stern area is fine its the bow area how can I fix it I thought I faired it properly should use pieces of planks instead of paper shims to fix the bow area issue as both of you can see it's not pretty even though it will get covered, I don't like it plus wood sands easier PS I was unaware that model space is not an accepted manufacture regarding model ship world but what about ship of scale do they feel the same way also I would like add but forgot to mentioned it is that the Admin of model space forum would not let Alan one of the members and the gentleman who does the build video help me any further and left me out to dry I understand the kit is a copy the artesian kit but this kit has very nice instructions
Ronald
 
Hi Ronald,

I can't quite see what the bulkheads look like. It seems you have glued on strips of wood. Why did you do that? Did you sand (fair) the bulkheads but went too far and you wanted to build that area back up again? Or were you just trying to provide material to sand without sanding down the bulkheads themselves?

I'm not judging - I'm just trying to understand what you have done thus far and then maybe we can advise you with regard to next steps. One thing I can say for sure - you should not be planking yet based on what I see...

We CAN figure this out!
 
yes, you have that right Paul I believe I faired to much off and trying to build up the bulk heads I messed up, I was thinking possible use balsa in between the last good bulkhead all the way to the bow what you think and refair the forward end all over again because it's hard to re sand the wood strips on top the bulk ways
Ronald

IMG_2163 (3)  bow section 1.jpg

IMG_2164 bow section 3.jpg
 
yes, you have that right Paul I believe I faired to much off and trying to build up the bulk heads I messed up, I was thinking possible use balsa in between the last good bulkhead all the way to the bow what you think and refair the forward end all over again because it's hard to re sand the wood strips on top the bulk ways
Ronald

View attachment 350296

View attachment 350298
How about this...

Do you have the panel the bulkheads were removed from (they appear to have been laser cut)? If so, perhaps you could use the cutout from that panel to trace from in order to make some replacement bulkheads - not the whole bulkhead, just the portion you still have exposed. You could then glue those replacement sections to the existing bulkheads (on the side of the existing bulkhead, essentially sistering the replacement sections to the existing bulkheads). Allow that to dry overnight and then re-fair the bulkheads using more caution...

If successful, that will give you smoother contours that the glued-on wood strips are providing. You could still add in balsa but at least the bulkhead forms would provide some guidance when it comes to sanding the balsa chunks into shape. Without the bulkheads I think you will struggle to get things the same on each side of the ship...
Clever idea Paul,
I always throw away (or burn in the fireplace) the cutout of the bulkheads once I have removed them. I'll definitely remember your suggestion in the future
 
How about this...

Do you have the panel the bulkheads were removed from (they appear to have been laser cut)? If so, perhaps you could use the cutout from that panel to trace from in order to make some replacement bulkheads - not the whole bulkhead, just the portion you still have exposed. You could then glue those replacement sections to the existing bulkheads (on the side of the existing bulkhead, essentially sistering the replacement sections to the existing bulkheads). Allow that to dry overnight and then re-fair the bulkheads using more caution...

If successful, that will give you smoother contours that the glued-on wood strips are providing. You could still add in balsa but at least the bulkhead forms would provide some guidance when it comes to sanding the balsa chunks into shape. Without the bulkheads I think you will struggle to get things the same on each side of the ship...
Great idea and possible solution!
 
How about this...

Do you have the panel the bulkheads were removed from (they appear to have been laser cut)? If so, perhaps you could use the cutout from that panel to trace from in order to make some replacement bulkheads - not the whole bulkhead, just the portion you still have exposed. You could then glue those replacement sections to the existing bulkheads (on the side of the existing bulkhead, essentially sistering the replacement sections to the existing bulkheads). Allow that to dry overnight and then re-fair the bulkheads using more caution...

If successful, that will give you smoother contours that the glued-on wood strips are providing. You could still add in balsa but at least the bulkhead forms would provide some guidance when it comes to sanding the balsa chunks into shape. Without the bulkheads I think you will struggle to get things the same on each side of the ship...
That’s absolutely true. I always keep these parts until planking (deck and hull) are finished. I find the deck outline great for bending cap rails and for marking out margin boards.
 
Hi ronald 305!

Your problem is the application of the planking stripes.

P1090495.JPG

P1090496.JPG
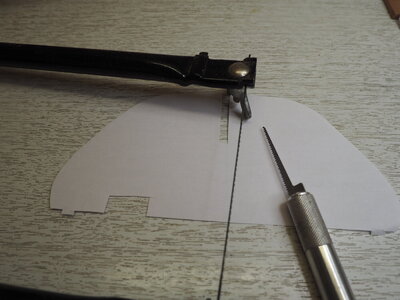
Remove the already glued planking strips from the filled bulkheads with a fretsaw or saw file. Then remove all filled material from the bulkheads to their original shape using water, solvent or by grinding.

And then the planking is put on again. And here you have to ask again if you do not know how.

Once the first planking is applied it is sanded, even it creates holes, the main thing is that you have the hull shape for the first time. It is then covered with the second planking, which is easier to apply.

Take your time, the corrections are not done in one evening. If you have a question about a step in the progress, just ask. At the moment the hull looks confusing, but it can be corrected.

Best regards
Thomas
 
Last edited:
forgive me for asking but I don't fully understand what you are suggesting me to do also forgive for correcting you but I'm working on a model ship not a airplane and what application ?
 
if I had copies of the original bulkheads at least the first 4 I could trace them to a piece of thin wood in to build up that area as Paul mentioned copies of the stern bulkheads wouldn't hurt either
 
if I had copies of the original bulkheads at least the first 4 I could trace them to a piece of thin wood in to build up that area as Paul mentioned copies of the stern bulkheads wouldn't hurt either
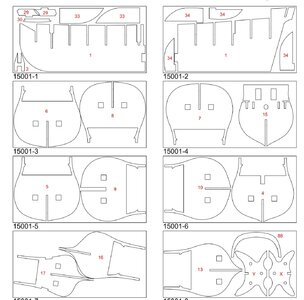
Are you able to download build instructional drawings that might show bulkhead layouts? Just wondering what might help you regain the shapes pre-fairing. Something that might look like this drawingScreenshot_20230109-150939_Fast PDF Reader.jpg
 
forgive me for asking but I don't fully understand what you are suggesting me to do also forgive for correcting you but I'm working on a model ship not a airplane and what application ?
When Thomas refers to 'fuselage' he is referring to the hull. It may be that he wrote his message in German and it was translated so sometimes words get weird.
 
Back
Top