Kingfisher 1770 1:48 POF

Thank you, friends, for walking me through this puzzle. I truly love the idea of building the hawse timber assembly OFF the ship. The challenge I face is the first cant frame on a swan class ship is not perpendicular (90 degrees) to the stem (as in the examples seen above) - the first cant frame is set at an angle (maybe 40 degrees) that I would have to replicate with precision.

img_9526-jpg.372015


I'm ready to tackle this today and tomorrow. I'll make some measurements and see what I can come up with.
 
Thank you, Nigel. Why is that better than using the bottom drawing? (I'm sorry for not understanding all this.)

Because the timbering set out does not show the position fore and aft of the timbers at the top. Without this, you are taking a guess.The problem area is the timber positions at the top, the mating to the cant frames at the bottom is the easy bit;)
 
When we last spoke, I was frozen by my own inexperience (incompetence? ignorance?). How to get the bollard and hawse timbers in the right place?

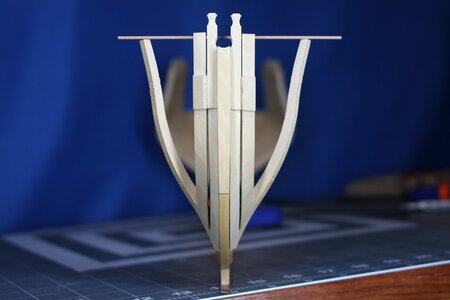
Nigel and Maarten (and others) to the rescue! I basically did exactly what they suggested (not building OFF the ship - but creating templates taken from the plans I purchased from SeaWatch). I won't say it all came together easily (indeed, I needed to remake hawse timber #3) but I ended up with something that looks like the bow of a swan class ship.

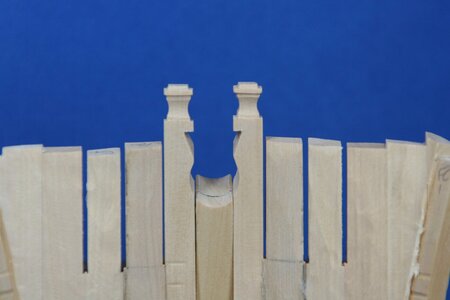
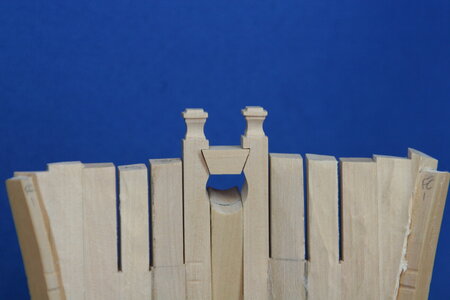
With the forward cant frame in place, I fit the bollard timber to the bearding line - and then using these fixed reference points set my templates. Here you can see the bollard timbers and the first of the hawse timbers in place (templates were removed for the photo):

IMG_9554.JPG

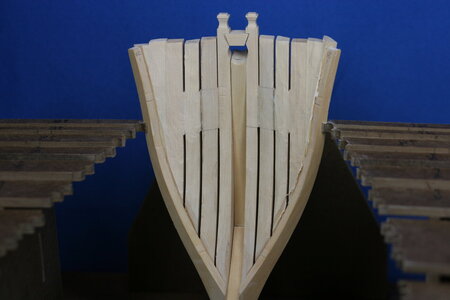
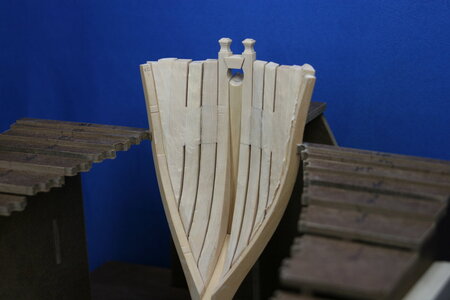
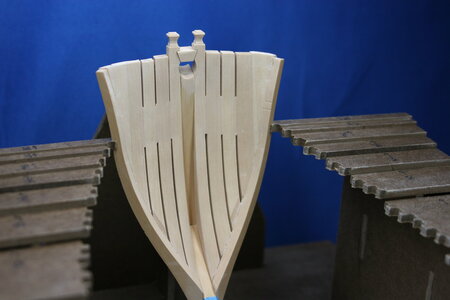
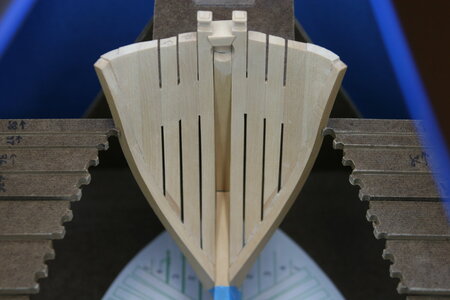
Next, I added the remaining hawse timbers and some filler pieces. Here is where I was this morning after using a rotary tool to roughly fair the inside of the bow:

IMG_9564.JPG

IMG_9565.JPG

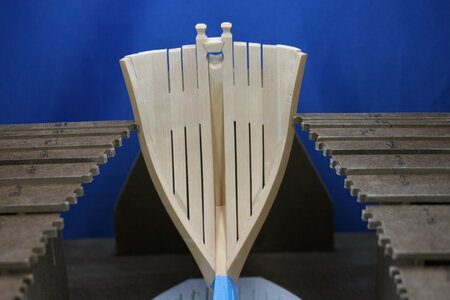
And about four hours later I have roughly shaped and roughly sanded (120 grit) the inside of the bow:

IMG_9566.JPG

IMG_9567.JPG

IMG_9568.JPG

There is still a lot to do here (refine airspaces, refine joinery, more shaping and sanding) but I'm in the right neighborhood. Nothing was faired on the outside (there is no issue with access there and I want to wait until the rest of the forward cant frames are installed before tackling that).

As you might have noticed I also roughed in the chock for the bowsprit:

IMG_9557.JPG

IMG_9562.JPG

I'll finish shaping the chock - and then start adding the forward cant frames.

What a blessing it is to share this journey with all of you friends on our forum. This is the second time I was completely befuddled on a build and was saved by members of the community. My humble thanks!
 
Last edited:
When we last spoke, I was frozen by my own inexperience (incompetence? ignorance?). How to get the bollard and hawse timbers in the right place?

Nigel and Maarten (and others) to the rescue! I basically did exactly what they suggested (not building OFF the ship - but creating templates taken from the plans I purchased from SeaWatch). I won't say it all came together easily (indeed, I needed to remake hawse timber #3) but I ended up with something that looks like the bow of a swan class ship.

With the forward cant frame in place, I fit the bollard timber to the bearding line - and then using these fixed reference points set my templates. Here you can see the bollard timbers and the first of the hawse timbers in place (templates were removed for the photo):

View attachment 373785

Next, I added the remaining hawse timbers and some filler pieces. Here is where I was this morning after using a rotary tool to roughly fair the inside of the bow:

View attachment 373788

View attachment 373789

And about four hours later I have roughly shaped and roughly sanded (120 grit) the inside of the bow:

View attachment 373790

View attachment 373791

View attachment 373792

There is still a lot to do here (refine airspaces, refine joinery, more shaping and sanding) but I'm in the right neighborhood. Nothing was faired on the outside (there is no issue with access there and I want to wait until the rest of the forward cant frames are installed before tackling that).

As you might have noticed I also roughed in the chock for the bowsprit:

View attachment 373786

View attachment 373787

I'll finish shaping the chock - and then start adding the forward cant frames.

What a blessing it is to share this journey with all of you friends on forum. This is the second time I was completely befuddled on a build and was saved by members of the community. My humble thanks!
That is looking very very nice, Paul. Just a WOW.
Regards, Peter
 
When we last spoke, I was frozen by my own inexperience (incompetence? ignorance?). How to get the bollard and hawse timbers in the right place?

Nigel and Maarten (and others) to the rescue! I basically did exactly what they suggested (not building OFF the ship - but creating templates taken from the plans I purchased from SeaWatch). I won't say it all came together easily (indeed, I needed to remake hawse timber #3) but I ended up with something that looks like the bow of a swan class ship.

With the forward cant frame in place, I fit the bollard timber to the bearding line - and then using these fixed reference points set my templates. Here you can see the bollard timbers and the first of the hawse timbers in place (templates were removed for the photo):

View attachment 373785

Next, I added the remaining hawse timbers and some filler pieces. Here is where I was this morning after using a rotary tool to roughly fair the inside of the bow:

View attachment 373788

View attachment 373789

And about four hours later I have roughly shaped and roughly sanded (120 grit) the inside of the bow:

View attachment 373790

View attachment 373791

View attachment 373792

There is still a lot to do here (refine airspaces, refine joinery, more shaping and sanding) but I'm in the right neighborhood. Nothing was faired on the outside (there is no issue with access there and I want to wait until the rest of the forward cant frames are installed before tackling that).

As you might have noticed I also roughed in the chock for the bowsprit:

View attachment 373786

View attachment 373787

I'll finish shaping the chock - and then start adding the forward cant frames.

What a blessing it is to share this journey with all of you friends on forum. This is the second time I was completely befuddled on a build and was saved by members of the community. My humble thanks!
looks fantastic Thumbsup :)
 
When we last spoke, I was frozen by my own inexperience (incompetence? ignorance?). How to get the bollard and hawse timbers in the right place?

Nigel and Maarten (and others) to the rescue! I basically did exactly what they suggested (not building OFF the ship - but creating templates taken from the plans I purchased from SeaWatch). I won't say it all came together easily (indeed, I needed to remake hawse timber #3) but I ended up with something that looks like the bow of a swan class ship.

With the forward cant frame in place, I fit the bollard timber to the bearding line - and then using these fixed reference points set my templates. Here you can see the bollard timbers and the first of the hawse timbers in place (templates were removed for the photo):

View attachment 373785

Next, I added the remaining hawse timbers and some filler pieces. Here is where I was this morning after using a rotary tool to roughly fair the inside of the bow:

View attachment 373788

View attachment 373789

And about four hours later I have roughly shaped and roughly sanded (120 grit) the inside of the bow:

View attachment 373790

View attachment 373791

View attachment 373792

There is still a lot to do here (refine airspaces, refine joinery, more shaping and sanding) but I'm in the right neighborhood. Nothing was faired on the outside (there is no issue with access there and I want to wait until the rest of the forward cant frames are installed before tackling that).

As you might have noticed I also roughed in the chock for the bowsprit:

View attachment 373786

View attachment 373787

I'll finish shaping the chock - and then start adding the forward cant frames.

What a blessing it is to share this journey with all of you friends on our forum. This is the second time I was completely befuddled on a build and was saved by members of the community. My humble thanks!
Good morning Paul. Not too shabby at all:D. I do love your “roughly sanded and shaped” for 4 hours….Your perseverance and patience is admirable. I guess it’s one of the reasons you produce work like this. Cheers Grant
 
I could only imagine the time and patience it takes to work and rework to get this done so correctly.

As you said, the best thing I like about this SoS forum is the help and friendships from around the globe.
 
Your KingFisher has made leaps and bounds of progress since I was last here. It is all looking spectacular, Paul!
I was actually thinking the opposite. The whole thing seems to be dragging and I have to keep reminding myself that this (the framing) IS the build on a POF model. A couple of my favorite swan class builds all took years to finish so I'll just enjoy the journey.
 
Back
Top