• LUCZORAMA SHIPWRECK SCAVENGER HUNT GIVEAWAY. 4 Weeks of Fun • 1 Legendary Prize ((OcCre’s Fram Ship)) • Global Crew Welcome!
    **VIEW THREAD HERE**

Pins for First Planking

Joined
Dec 23, 2024
Messages
104
Points
78

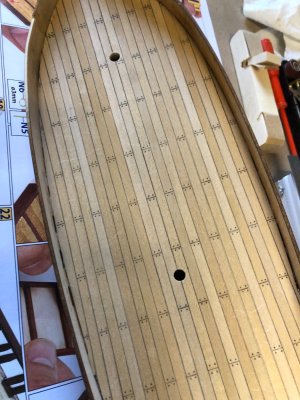
Hi, I am new to this wonderful hobby and am building my first model, Polaris by OcCre, I have received several helpful emails from members but a thought has occurred while sanding the first planking layer. The OcCre videos and other vids show the pins in place and consequently you have to file them flat to get a flat surface for the next layer of planks.
My question is when I was carrying out the first planking I inserted the nails as shown on the plans, which is a lot of nails, but could I nail the pins in to say three quarter of their length rather than the whole way and when the glue has dried remove the nails. When the nails are hammered in flat it is difficult to remove them without damaging the planks.
 
Hi @DennisP ,
This is exactly how I do it. I often find that sanding the pins is cumbersome and does not always give good results.
Sometimes you sand away the wood around the pins leaving an unequal surface.
I never had issues with planks coming loose afterwards.
 
Fantastic, thats the answer I was hoping for. I will do that on my next model which is a long way off yet.
I have made a few mistakes which I have to rectify before adding the outer planks.
Thank you Leysend
 
My question is when I was carrying out the first planking I inserted the nails as shown on the plans, which is a lot of nails, but could I nail the pins in to say three quarter of their length rather than the whole way and when the glue has dried remove the nails.
I agree with Leysand, there is no need to hammer in the nails all the way. You would likely benefit from studying some planking tutorials on how a hull was actually planked. With a double planked hull, this is more important for the second layer. Several are mentioned here at SoS including the four part video on line by Chuck Passaro and the article by Dirk Debakker, https://mvsv.nl/wp-content/uploads/2021/04/Planking_hull.pdf.
Allan
 
Yes definitely take them out. Many people don't use pins for the first planks. They just use clamps to hold the plank in place until the wood dries.
Thank you Allan & Jeff, I will now read the tutorials on planking, but in my limited knowledge I am struggling to understand how you can clamp the first layer of planks in place as there are many curved surfaces which do not lend themselves to clamping. I have three types of clamp but only one is extendable, but even then I cannot work out how to clamp them.
 
Hello Dennis....
I did not use the brass pins to secure the 1st planking on my Polaris project. I made some of these modified binder clips and map pins.
...henry

 
I use a binder clip clamped to the bulkhead with a small piece of wood under the binder clip back to hold down the plank. One of the nice things about this is that you can adjust the angle of the pressure placed on the plank. Some of the binder clips they sell now, you can't use the handles inserted into the clip like they do in the above article.
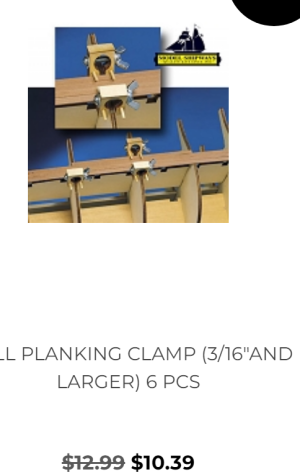
Another option is these clamps that are available from Model Expo. They are pretty narrow so they don't need the available space of the binder clamp. And they are even on sale right now ! :) No, I don't get paid by ME. :)
1738081478437.png
 
Dennis,

Experienced modelers learn how to adapt everyday things for building ship models. Binder clip clamps are an excellent example. Often these work better than the more expensive “hobby tools.”

The Womens’ cosmetic counters can be a surprisingly good place to look for useful tools. Emery boards, nail clippers, clear fingernail polish and even some hair clips can be used.

Roger
 
Last edited:
I am struggling to understand how you can clamp the first layer of planks in place as there are many curved surfaces which do not lend themselves to clamping
No clamping is needed if the planks are pre-shaped in both taper of the breadth and the "bend" as shown in the tutorials mentioned above. There is also spiling but not all kits provide spiled planks. Spiled planks are easy enough to make but that means buying flat stock and cutting your own planks which, understandably, most folks do not want to do. Either way, with the planks tapered and pre-bent against the edge, finger pressure is all that is needed. Less than a minute for PVA and a few seconds if using CA. A key to remember is that, with the exception of drop strake, the end of every strake should land in the rabbet at the stem.
Allan
 
Last edited:
I use Amati FINE pins. The shanks are very thin, so they won't split any wood. The heads are shallow domed and if they protrude above the surface, they sand down flush easily. You don't need to pry the pins out of the hull after the first planking layer, and even if you mar the surface a little with pliers pulling them out, it makes no difference since you will be putting the final planking over it anyway.
 
Dennis,

Experienced modelers learn how to adapt everyday things for building ship models. Binder clip clamps are an excellent example. Often these work better than the more expensive “hobby tools.”

The Womens’ cosmetic counters can be a surprisingly good place to look for useful tools. Emery boards, nail clippers, clear fingernail polish and even some hair clips can be used.

Roger
Your first word reply is the clue “Experienced”, I obviously am not experienced and my simple brain does rely on experts like yourself for your knowledge and skills.
I like Henrys idea ( binder clamps ), would never have thought of that plus I can get some of the clamps mentioned by Corsair from Aliexpress but there is a long delivery period.
Thank you everyone, such a helpful forum, I have also read quite a bit and now know what stealers are. So many new terms to get used to.
 
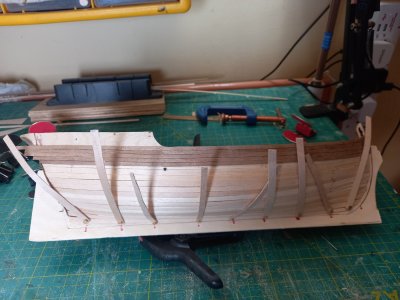
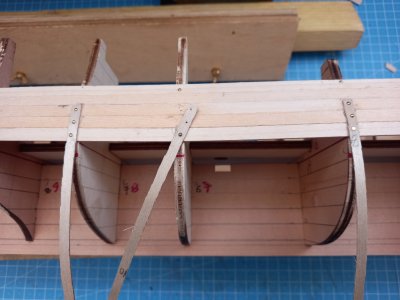
I tend to use straps cut from 1mm plywood to hold the planking until the glue sets. There are various options. In the first photo the straps are screwed to the bulkheads near the keel; the top ends are clipped th the gunwale after adding a plank.
In the second picture the first stage planks are nailed through the straps and the nails progressively removed by prising up the strap: no damage to the planking.
Another option, for the second layer, is to nail through the strap close to, but not through, the plank being added.
2ndplank1.jpg nailing.jpg
 
I tend to use straps cut from 1mm plywood to hold the planking until the glue sets. There are various options. In the first photo the straps are screwed to the bulkheads near the keel; the top ends are clipped th the gunwale after adding a plank.
In the second picture the first stage planks are nailed through the straps and the nails progressively removed by prising up the strap: no damage to the planking.
Another option, for the second layer, is to nail through the strap close to, but not through, the plank being added.
View attachment 498158 View attachment 498159
Oh wow, yet another solution. It’s what I said in the last post “Your experience”. That comes to the fore, I can see that you appear to have built at least 11 models, so experience abounds and thus your ability to think laterally.
Hopefully one day I will be experienced enough to give advice.
So thank you, I just love this forum
 
Your first word reply is the clue “Experienced”, I obviously am not experienced and my simple brain does rely on experts like yourself for your knowledge and skills.
I think the term "Experienced" also means the experiences one gains from simply doing rather than one that has been modeling for years and years. I'm not trying to split hairs, but even after working on one model a builder becomes experienced. You take the lessons (and failures) you learned and apply them to your next build and so on.
One of the things I like to do is visit areas of a craft shop to find nifty little things that I could find a use for. As an example, touring the sewing notions area can be a treasure trove of little gadgets. The same goes for the beading (jewelry) area. I've found some great some tools there. Most folks use gadgets that were never intended for ship building (i.e. the binder clips). I find that one needs to think outside the box to solve many problems.
Good luck with your build. I'm currently getting ready to install the masts in my Polaris build. If I can help you with anything up to that point, I'll be very happy to do so.

...henry
 
Hi Henry & Everyone who has helped me,
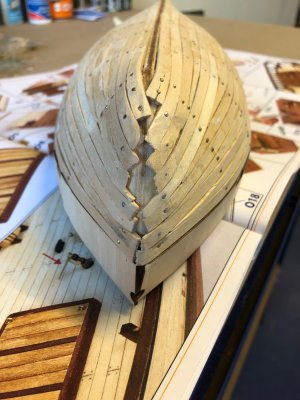
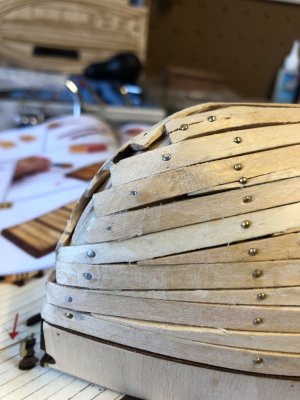
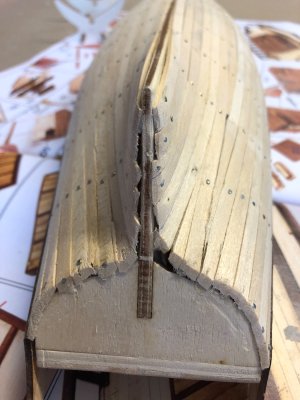
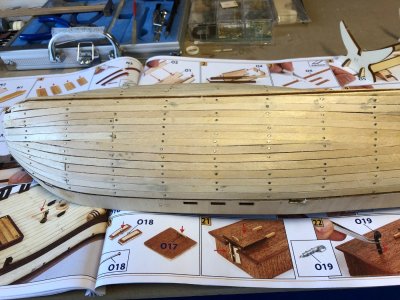
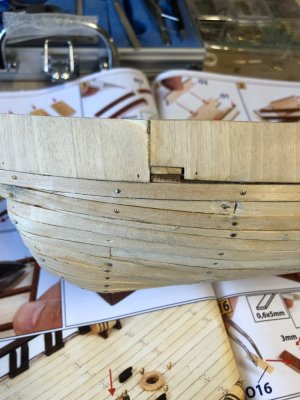
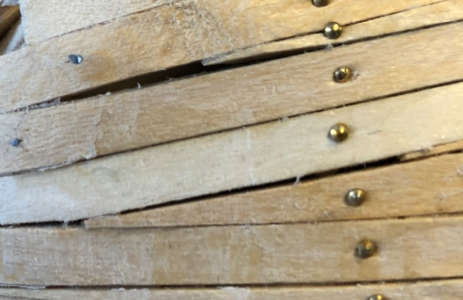
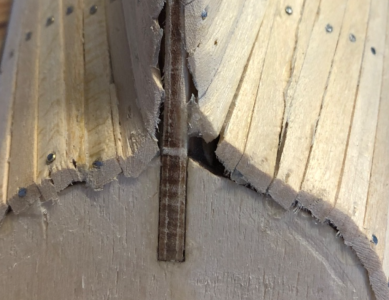
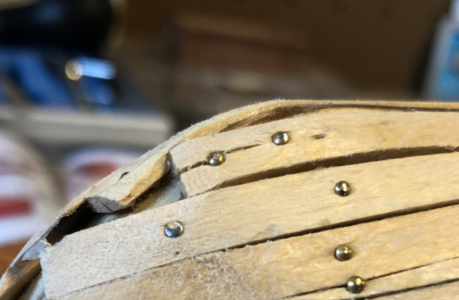
I am hopefully attaching some photos of my build so far so you guys can see the glaring errors I have made and need to sort before I progress to the next step. I believe I never sanded the internal structure back enough ( sorry do not know the names as yet of the parts ), the net result is that each plank has a sharp bend at the bow, similar issues at the stern. The only thing I can think of doing to rectify at the bow is to fill the gaps with filler and sand it to make it right. Plus just sand it flat at the stern. There is a front section that needs to be glued at the front after the second planking has been done so I need to sand the bow to make sure the front piece fits and similarly at the back.
I know its a mess, but it is my first build and I know where I went wrong plus I have got better at bending planks with the bending iron and also at fitting planks.
As someone said, you have to make mistakes to get better.

IMG_3782.jpeg

IMG_3783.jpeg

IMG_3784.jpeg

IMG_3785.jpeg

IMG_3786.jpeg

IMG_3787.jpeg
 
That actually looks pretty good for a first build. .

You will have sharp bends at the bow and stern on every ship model. You can pre-curve the planks to follow the bend before you attach it to the frames. It should already be in the shape needed before you attach it to the hull. There are many ways to bend planks. I soak the plank in water for a few minutes and shape it with the heat from a pencil style soldering iron. I clamp the iron in a vise and press thw wet wood on the hot iron while holding it in the shape I want while sliding the wood back and forth on the iron. You want to keep the wood wet (not dripping) so you may have to put more water on the wood. I usually cut the bow end of the plank to match the angle where it meets the keel. Also, you want to glue the planks not only to the frames, but also to the adjoining plank. I believe the kit you’re working in gets a second “finish” planking that goes over the first layer, so any mistakes can be covered up other than the shape.

There are many different ways to plank.a hull and all of them are correct. This is the method that works for me. You will probably get a few additional responses with other methods and they may work better for you.

The Important thing right now is to make sure it is a smooth surface that is the right shape (assuming there is a second layer). You can certainly use a filler and sand it. If you do that, use a spackle compound that is used to fill holes in drywall rather than a wood filler. You will find the spackle muncher easier to sand to shape. Please note, you will want to do this outside with the house windows closed. You don’t want the fine white dust from sanding getting on everything in the house.
 
1) fill the gaps with slivers of wood and individually cut puzzle pieces, using PVA glue to hold them in place at the stem of the hull.
2) Don't just lay planks at full width over a hull and expect them to cover the complex curves of the hull form. It won't work. You have to fit EACH and EVERY plank, especially at the bow. This is the area you need to improve more IMHO. Soaking and pending a plank is tjust the FIRST step in fitment. Cut, shape and sand each plank and dry fit until they are almost seamless. IT TAKES TIME. That include lightly sanding ONE long edge of EACH plank so that when it abuts the ones below and above it, the seam at the surface is TIGHT. It gets better with practice, lots better.
3) Each plank needs to be glued along its edge to the plank above and plank below it. If fitted properly, the amount of PVA glue should not be much. Wipe off excess before it dries.

Fill gaps with slivers and glue. The first layer of planking is where you can make mistakes, because they can be corrected. The second (final) later is not.
1738266083397.png

Because of poor fitment, the two planks on the port side, where the counter meets the deadwood, need to be redone.
1738266846482.png

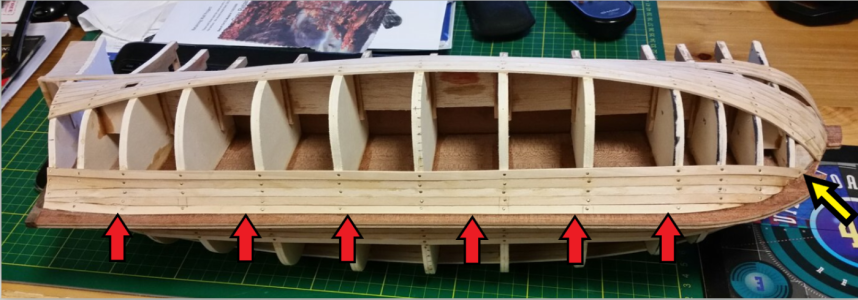
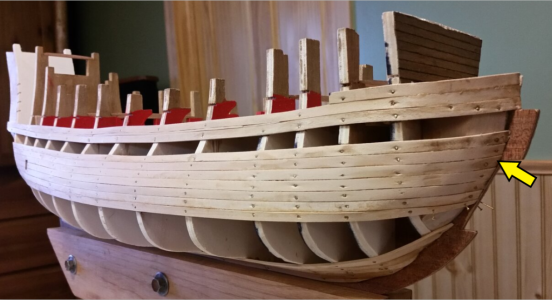
The ends at the bow should be narrowed, and shaped (yellow arrow) and the long edge of the plank that meets the keel (red arrows) needs to be beveled using a sanding block to make the joint at the keel seamless. Please read a book on model planking, and learn how and where to taper planks, and where stealer planks or drop planks should be made. See attachments below.
1738266373417.png

1738267194309.png

The ends of planks need to be angled AND beveled to make the seam at the stem tight. Taking time in dry fitting is the only way to achieve this.
1738267623380.png

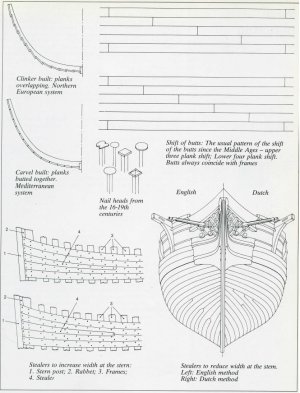
Some really good pictures to serve as guides:
Hull Planking Styles.JPG

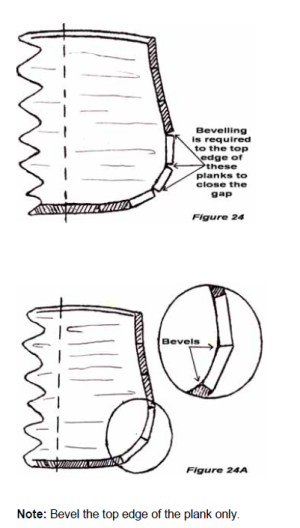
Edge beveling of one long edge is necessary to make seams tight, especially at the turn of the bilge.
Hull Planking - Edge bevelling.png

Replanking this because of the fitment problems at the stem and stern may be an option, but you will need to obtain more plank wood. I suggest Midwest Basswood, because the wood is cheap, pliable after soaking, and available on eBay also. <-- Links in text
 

Attachments

That actually looks pretty good for a first build. .

You will have sharp bends at the bow and stern on every ship model. You can pre-curve the planks to follow the bend before you attach it to the frames. It should already be in the shape needed before you attach it to the hull. There are many ways to bend planks. I soak the plank in water for a few minutes and shape it with the heat from a pencil style soldering iron. I clamp the iron in a vise and press thw wet wood on the hot iron while holding it in the shape I want while sliding the wood back and forth on the iron. You want to keep the wood wet (not dripping) so you may have to put more water on the wood. I usually cut the bow end of the plank to match the angle where it meets the keel. Also, you want to glue the planks not only to the frames, but also to the adjoining plank. I believe the kit you’re working in gets a second “finish” planking that goes over the first layer, so any mistakes can be covered up other than the shape.

There are many different ways to plank.a hull and all of them are correct. This is the method that works for me. You will probably get a few additional responses with other methods and they may work better for you.

The Important thing right now is to make sure it is a smooth surface that is the right shape (assuming there is a second layer). You can certainly use a filler and sand it. If you do that, use a spackle compound that is used to fill holes in drywall rather than a wood filler. You will find the spackle muncher easier to sand to shape. Please note, you will want to do this outside with the house windows closed. You don’t want the fine white dust from sanding getting on everything in the house.
Hi Jeff, Thanks for your comprehensive reply, I have found it easier to plank the hull the more I do, a bit more experience with each plank and yes I apply glue to the already fitted previous plank as well as the frame. I have practiced bending on the odds and ends of planks that I have finished with and can now get a tight curve easier than when I started.
Spackle, thats a term I have not come across before and when I google it, the answer that comes up in the UK is Polyfilla. I was going to use wood filler but now I am changing that to Polyfilla based on your recommendation. I am used to using that in my home. I am building my model in the garage so do not worry about dust. Oh, just thought the boat does have a second plank layer to go over the first and those planks are very thin, so yes the first layer needs to be flat and smooth.
Many thanks for your valuable help. I ave added a photo of the finished boat.

IMG_3721.jpeg
 
1) fill the gaps with slivers of wood and individually cut puzzle pieces, using PVA glue to hold them in place at the stem of the hull.
2) Don't just lay planks at full width over a hull and expect them to cover the complex curves of the hull form. It won't work. You have to fit EACH and EVERY plank, especially at the bow. This is the area you need to improve more IMHO. Soaking and pending a plank is tjust the FIRST step in fitment. Cut, shape and sand each plank and dry fit until they are almost seamless. IT TAKES TIME. That include lightly sanding ONE long edge of EACH plank so that when it abuts the ones below and above it, the seam at the surface is TIGHT. It gets better with practice, lots better.
3) Each plank needs to be glued along its edge to the plank above and plank below it. If fitted properly, the amount of PVA glue should not be much. Wipe off excess before it dries.

Fill gaps with slivers and glue. The first layer of planking is where you can make mistakes, because they can be corrected. The second (final) later is not.
View attachment 498489

Because of poor fitment, the two planks on the port side, where the counter meets the deadwood, need to be redone.
View attachment 498495

The ends at the bow should be narrowed, and shaped (yellow arrow) and the long edge of the plank that meets the keel (red arrows) needs to be beveled using a sanding block to make the joint at the keel seamless. Please read a book on model planking, and learn how and where to taper planks, and where stealer planks or drop planks should be made. See attachments below.
View attachment 498490

View attachment 498496

The ends of planks need to be angled AND beveled to make the seam at the stem tight. Taking time in dry fitting is the only way to achieve this.
View attachment 498497

Some really good pictures to serve as guides:
View attachment 498494

Edge beveling of one long edge is necessary to make seams tight, especially at the turn of the bilge.
View attachment 498491

Replanking this because of the fitment problems at the stem and stern may be an option, but you will need to obtain more plank wood. I suggest Midwest Basswood, because the wood is cheap, pliable after soaking, and available on eBay also. <-- Links in text
Crikey Kurt,
Thank you so much for taking the time and effort to put this comprehensive analysis of my mistakes and the route to take to rectify them.
There is a lot of reading to do, which I will do and then try to amend my model.
I wish I had researched and read before I started the build. All I did was follow the Manufacturers visual and written instructions which come with the model. But they do not cover the many pitfalls you experience when building.
I am sure I am not the only one to have made so many errors, but I am learning and grateful to you ALL for your wonderful contributions. Now for some reading.
Thank you, I will keep you posted.
Dennis
 
Back
Top