Kingfisher 1770 1:48 POF

Well, it's time for something new.

Ship modeling asks a lot of us: learning how to read plans, learning a new lexicon, working in wood / metal / textiles / plastic, working at drastically reduced scales... on and on it goes. In the case of the two models I have built/am building (Vasa and Kingfisher) there are also decorative elements (wood carvings). On the Vasa at 1:64 scale I was happy to use the metal castings and paint them in a color scheme I took from the 1:10 model at the Vasa Museum.

On the Kingfisher there are many fewer carvings (over-against the Vasa), but the swan class ships were still rather ornate given their small size and utilitarian function. I chose to try my hand at carving - others might choose 3D modeling with subsequent printing or CNC milling. I suspect with adequate training and experience the best results would come about with the 3D modeling approach. But working with my hands (not my computer) is the part of the hobby I am drawn to.

Anyway, this is my first attempt at wood carving. Of course, I searched far and wide on our forum (and elsewhere) trying to pick up whatever I could learn from others. Some prefer chisel/gouge carving, others prefer handpiece carving. Some use both. Notably (here on our forum) I found the work of @Maarten, @Ptèr, and @Steef66 to be quite helpful. Of course, Ivan has set the standard, but he only shows the finished result (when you have a museum dedicated to your work you get to do whatever you want :)). In addition, Bill Short has written an excellent tutorial on handpiece carving that I would commend to you (a link can be found with the advertiser's banners).

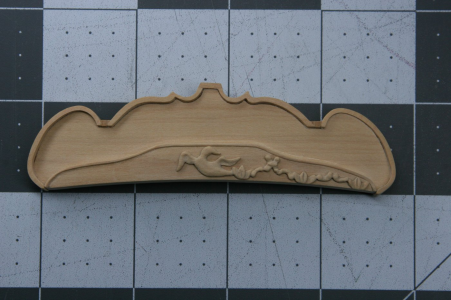
After a bit of practice on scrap pieces I took a shot at the decoration on the lower portion of the tafferel. It is a relief carving of a bird (presumably a Kingfisher bird) and some leaves and other swirly-gigs.

View attachment 507091

View attachment 507092

View attachment 507093

The current state of things under different lightings:

View attachment 507094

View attachment 507095

View attachment 507096

View attachment 507097

I'll need to get better ROTF...

But it was fun to work on this piece, so I think I keep at it for a while longer and see if I can learn this new skill.

Thanks for stopping by!
Good evening Paul. Kudos on your first carving. I am in no position to comment as I do not have your fine art skills and carving will never be on my agenda. If your first attempt is this good, I am sure with a few more hours you will get to that Dockattner standard.
And Novocaine not required required
Hi Ron. If I ever had to present a carving plenty Novocaine would be required ROTF
Cheers Grant
 
Well, it's time for something new.

Ship modeling asks a lot of us: learning how to read plans, learning a new lexicon, working in wood / metal / textiles / plastic, working at drastically reduced scales... on and on it goes. In the case of the two models I have built/am building (Vasa and Kingfisher) there are also decorative elements (wood carvings). On the Vasa at 1:64 scale I was happy to use the metal castings and paint them in a color scheme I took from the 1:10 model at the Vasa Museum.

On the Kingfisher there are many fewer carvings (over-against the Vasa), but the swan class ships were still rather ornate given their small size and utilitarian function. I chose to try my hand at carving - others might choose 3D modeling with subsequent printing or CNC milling. I suspect with adequate training and experience the best results would come about with the 3D modeling approach. But working with my hands (not my computer) is the part of the hobby I am drawn to.

Anyway, this is my first attempt at wood carving. Of course, I searched far and wide on our forum (and elsewhere) trying to pick up whatever I could learn from others. Some prefer chisel/gouge carving, others prefer handpiece carving. Some use both. Notably (here on our forum) I found the work of @Maarten, @Ptèr, and @Steef66 to be quite helpful. Of course, Ivan has set the standard, but he only shows the finished result (when you have a museum dedicated to your work you get to do whatever you want :)). In addition, Bill Short has written an excellent tutorial on handpiece carving that I would commend to you (a link can be found with the advertiser's banners).

After a bit of practice on scrap pieces I took a shot at the decoration on the lower portion of the tafferel. It is a relief carving of a bird (presumably a Kingfisher bird) and some leaves and other swirly-gigs.

View attachment 507091

View attachment 507092

View attachment 507093

The current state of things under different lightings:

View attachment 507094

View attachment 507095

View attachment 507096

View attachment 507097

I'll need to get better ROTF...

But it was fun to work on this piece, so I think I keep at it for a while longer and see if I can learn this new skill.

Thanks for stopping by!
It's looking great for a first time carving Doc. I'm sure by looking at the quality of your crafstmanship, and with a little practice you'll get great results.
 
Peter G, Stephan, Russ, Peter V, Ron, Tobias, Grant, Daniel, Dean, and Miguel - I thank you all for the nice posts - and to all the others for the likes.

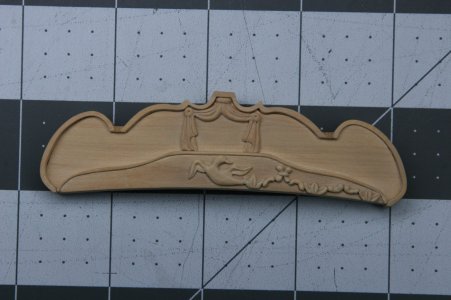
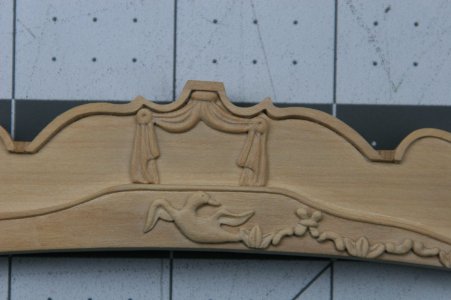
I have continued to work on the lower tafferel decoration (and have now added some curtains to the upper portion of the tafferel).

BEFORE:

1741995098431.png

AFTER:

IMG_0884.JPG

IMG_0885.JPG

Improving...but still...

This wood carving is exhausting business. The smallest lapse of concentration ruins the piece...
 
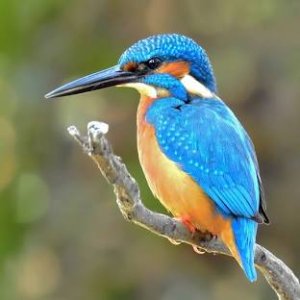
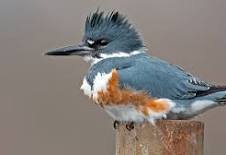
Just in case you decide to go Technicolor, the brown head is Europe's version of a Kingfisher. The more beautiful one here in the U.S. is my favorite bird and I think the better looking of the two. Notice the very long, stout, and pointed beak.

These birds have a very distinctive call as they fly a quite low and bouncy trajectory along stream courses.

Roy
Halcyon_smyrnensis_in_India-VikramdeepSidhu-2000px.jpgUnknown.jpeg
 
Peter G, Stephan, Russ, Peter V, Ron, Tobias, Grant, Daniel, Dean, and Miguel - I thank you all for the nice posts - and to all the others for the likes.

I have continued to work on the lower tafferel decoration (and have now added some curtains to the upper portion of the tafferel).

BEFORE:

View attachment 507281

AFTER:

View attachment 507278

View attachment 507279

Improving...but still...

This wood carving is exhausting business. The smallest lapse of concentration ruins the piece...
I knew you would be good with dental bits, and you have good 3D perception, along with artistic craftsmanship. So you will be amazing all of us soon. It’s in your DNA! ROTF
 
Great first effort Paul, you can add detail in the wings and leafs with an xacto knife, rifler file, or a tiny v gouge. practice on a scrap piece first. ;)
Agreed! Micro Jewler's files can add deep details that are difficult to achieve with rotary tools. The added bonus is they do not cause deep gouges when they slip, like a rotary bit can do so quickly! Your carvings are exceptional and show your comfort with rotary tools!! Thanks for sharing such detailed photos.
 
Peter G, Stephan, Russ, Peter V, Ron, Tobias, Grant, Daniel, Dean, and Miguel - I thank you all for the nice posts - and to all the others for the likes.

I have continued to work on the lower tafferel decoration (and have now added some curtains to the upper portion of the tafferel).

BEFORE:

View attachment 507281

AFTER:

View attachment 507278

View attachment 507279

Improving...but still...

This wood carving is exhausting business. The smallest lapse of concentration ruins the piece...
You are doing a great job on this carving.

I agree it is exhausting; During my first carving i used magnifying glasses. To keep the carving in focus is much too strenuous and gave me a stiff neck. I now have a table model; a considerable improvement.

When you are carving do you fix the piece to be carved to the surface with double sided tape or perhaps glue it down (with a layer of paper in between to make it easier to remove)?
 
Witj
Jesteś bardzo uniwersalnym człowiekiem Pawle ,potrafisz wiele wyczarować z drzewa płaskorzeźby są świetne . Pozdrawiam Mirek
 
Just in case you decide to go Technicolor, the brown head is Europe's version of a Kingfisher. The more beautiful one here in the U.S. is my favorite bird and I think the better looking of the two. Notice the very long, stout, and pointed beak.

These birds have a very distinctive call as they fly a quite low and bouncy trajectory along stream courses.

Roy
View attachment 507291View attachment 507290
Hello. I'm afraid I have to disappoint you. The kingfisher you find more beautiful is the European kingfisher. Here's the link to the report.
 
You went deeper in the bird's wings and flowers too. Nice...
And your curtains look good too. You're quick learner.

This wood carving is exhausting business. The smallest lapse of concentration ruins the piece...
Yep. "True story" would Grant say. Watch your neck too, like Herman said. I use the winebox to get the work piece higher and close to the eyes. Pause your work to keep concentrated. More I can't say about that point.

Is it not a lot of fun to do?
 
Improving...but still...

One becomes so accustomed to the sharpness of your carpentry that the softer organic shapes of the duck and drapery stand out rather. Perhaps it runs against the grain of your profession to carve sharp ridges and valleys, like an old geezer’s teeth. ;)

However, I still think it’s very classy and will probably look brilliant under paint. Thinking about the figureheads on display at Portsmouth Museum, eighteenth century British naval carving was much cruder than the north German work I’ve seen in cathedrals. You know, the wonderful arty stuff that a craftsman worked on for years. I bet the real kingfisher was chipped out in a week.

I believe your work here is already at least as fine as the real thing.
 
Tobias: Hello. I'm afraid I have to disappoint you. The kingfisher you find more beautiful is the European kingfisher. Here's the link to the report.

I checked your link, yep you are correct, this is the US version I grew up with on the creek". I have to agree with you, that aqua colored head on the European version is a bit more dignified than the US punk hair (feather) cut bird.
Thanks for getting me straightened out.

Unknown-1.jpeg
 
Agreed! Micro Jewler's files can add deep details that are difficult to achieve with rotary tools. The added bonus is they do not cause deep gouges when they slip, like a rotary bit can do so quickly! Your carvings are exceptional and show your comfort with rotary tools!! Thanks for sharing such detailed photos.
Thanks, Brad. As I'm still in 'figuring it out' mode I can't yet speak to technique. I have a full set of Pferd jewelers file - is there a more 'micro' set out there?
 
You are doing a great job on this carving.

I agree it is exhausting; During my first carving i used magnifying glasses. To keep the carving in focus is much too strenuous and gave me a stiff neck. I now have a table model; a considerable improvement.

When you are carving do you fix the piece to be carved to the surface with double sided tape or perhaps glue it down (with a layer of paper in between to make it easier to remove)?
Hi Herman. I'm using a magnifying light like you have. The issue I am having with the magnifying light is that it 'flattens' the contours because the light is directly over the workpiece. A low angled light would cast some shadows and help me see depth better. I'm not sure of the solution because the workpiece needs to be brightly lit for these old eyes.

And yes, I have been using double-sided tape to hold the workpiece to a piece of cardstock. As you know the carving can't be done if you can't move the piece around.
 
Back
Top