• LUCZORAMA SHIPWRECK SCAVENGER HUNT GIVEAWAY. 4 Weeks of Fun • 1 Legendary Prize ((OcCre’s Fram Ship)) • Global Crew Welcome!
    **VIEW THREAD HERE**

MSW USS Constitution

I have used a combination of ammonia, vinegar and salt to achieve a verdigris finish on larger pieces, but that might be too aggressive for this without diluting.
I saw that one on the internet. I assume the ammonia is used to neutralize the vinegar solution?
 
Not sure of the exact chemistry, but it was all mixed together as a single solution. My assumption was that the acid and base produced some sort of salt compound
Here is what I found in regards to using miracle grow and water:
"The verdigris that Miracle-Gro fertilizer produces on copper is a result of the chemical reaction between copper and the fertilizer. The Miracle-Gro solution contains ammonia, which reacts with the copper to create a patina. This reaction produces a blue-green color, which is the same color as verdigris, one of the original sources of green pigment used in painting. The verdigris formed on the copper is a natural result of the copper's exposure to the Miracle-Gro solution, which mimics the aging process of copper exposed to the elements".
 
Last edited:
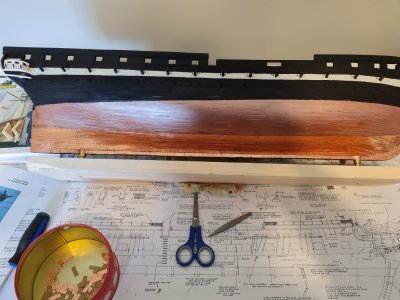
I decided to break up the coppering of the hull in two bands. Band 1 is rows 1 to 7 and band 2 will be row 8 to end. The reason for this is because I don't want any crowding at the bow, amongst other things. So what I did is at row 7, I used some pinstriping tape to get a straight line between row 7 at bow and row 7 at stern. I still used rectangle tiles just made more overlapping.

One thing I noticed is that when I rub the copper plates with the handle of a screwdriver, some of the shininess goes away. I still want to simulate verdigris, but I found this little bit interesting.

Here is a photo of my progress

copper.jpg
 
I decided to break up the coppering of the hull in two bands. Band 1 is rows 1 to 7 and band 2 will be row 8 to end. The reason for this is because I don't want any crowding at the bow, amongst other things. So what I did is at row 7, I used some pinstriping tape to get a straight line between row 7 at bow and row 7 at stern. I still used rectangle tiles just made more overlapping.

One thing I noticed is that when I rub the copper plates with the handle of a screwdriver, some of the shininess goes away. I still want to simulate verdigris, but I found this little bit interesting.

Here is a photo of my progress

View attachment 519693
It looks great! I know Namabiiru suggested burnishing the copper with a spoon. I just finished coppering my Constitution cross section and I used a large gum eraser to burnish the tape with. It worked well and did not harm the "nail" marks I made with a ponce wheel.

Rob
 
It looks great! I know Namabiiru suggested burnishing the copper with a spoon. I just finished coppering my Constitution cross section and I used a large gum eraser to burnish the tape with. It worked well and did not harm the "nail" marks I made with a ponce wheel.

Rob
good idea. I just took what I had available but i may try sandpaper too. Not so much to burnish the surface, but more to dull the copper. Or I may not and simply stick to my plan of creating an artificial verdigris effect.

Ok ok I can`t do it all, so I`ll have to make a decision.
 
good idea. I just took what I had available but i may try sandpaper too. Not so much to burnish the surface, but more to dull the copper. Or I may not and simply stick to my plan of creating an artificial verdigris effect.

Ok ok I can`t do it all, so I`ll have to make a decision.
I found the gum eraser did dull the copper a bit. I would be very careful with sandpaper, this copper tape is a very thin foil. Try it on a test piece first. I know there have been a few logs here about "aging the copper" that may be of help.

Rob
 
I found the gum eraser did dull the copper a bit. I would be very careful with sandpaper, this copper tape is a very thin foil. Try it on a test piece first. I know there have been a few logs here about "aging the copper" that may be of help.

Rob
thank you. appreciate the feedback
 
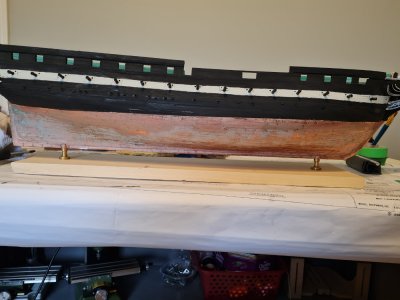
So after some testing with salt water and vinegar, I decided that I wouldn't dilute the vinegar. I put one teaspoon of salt in some vinegar and used that as my solution.

I then applied the vinegar solution to the copper plates on the hull using a paintbrush.

Over a period of 24 hours, I applied several coats of the vinegar solution. I am going to let in react for another few hours, and I may need to add more of the vinegar solution to the copper. I noticed that there are some copper plates that need to be replaced because I think the liquid got behind the plates and dissolved some of the glue. No big deal I have tonnes of tape and patience.

Once I am done the patina stage, I'll go ahead and apply a coat of clearcoat, matte finish, to lock in the colors of the patina.

I will add that the nail pattern on the tiles is completely overshadowed by the patina. That's ok with me as I didn't like it anyways.

patina.jpg
 
Last edited:
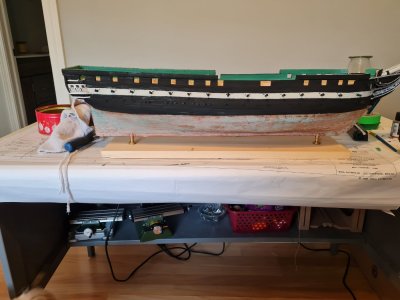
One thing I am not sure of is the uniformity of the verdigris. I mean on a real ship, can one expect the entire coppered hull to be uniformly rusted? I don't want to do this for days and days. I applied more of the vinaigre/salt solution and I think that will be the last. Next once it is all dried I'll apply some poly to protect the look.
 
One thing I am not sure of is the uniformity of the verdigris. I mean on a real ship, can one expect the entire coppered hull to be uniformly rusted? I don't want to do this for days and days. I applied more of the vinaigre/salt solution and I think that will be the last. Next once it is all dried I'll apply some poly to protect the look.
A natural patina is going to have quite a bit of variation to it, but at scale. Yours looks quite good. If you wanted to even it out you could try a gentle wipe with a soft dry cloth.
 
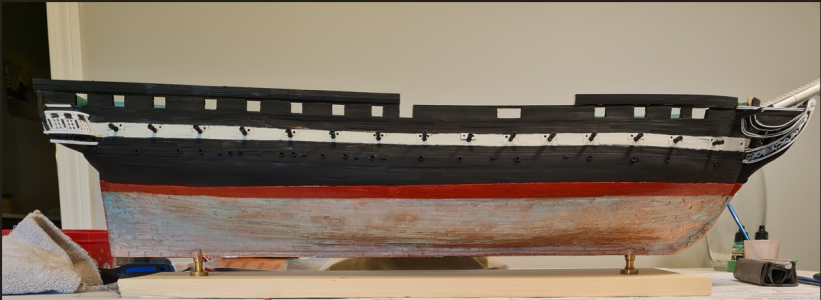
Just have the fenders left to install on the starboard side. The red stripe shown is 1/2 inch wide. I know that it looks crooked but that's an optical illusion. I checked the width many places and it's 1/2 inch. It's a little annoying that the photos come out this way. It doesn't show the complete picture of what is actually going on.

Screenshot 2025-05-23 130504.png
 
Last edited:
Just have the fenders left to install on the starboard side. The red stripe shown is 1/2 inch wide. I know that it looks crooked but that's an optical illusion. I checked the width many places and it's 1/2 inch. It's a little annoying that the photos come out this way. It doesn't show the complete picture of what is actually going on.

View attachment 521443
It is said photos don't lie. They do all the time. I can relate to the frustration of "Why don't these photos show what I see?"
She's looking good. Forge ahead.
 
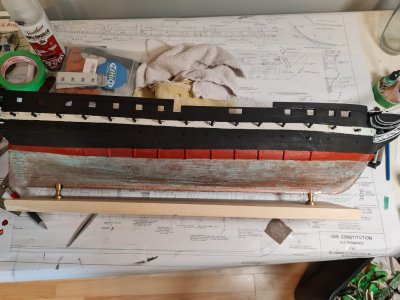
Here we are. The fenders have been installed on the starboard side and painted. I will put some poly on when the paint has dried so as to protect the patina.
As you can see the reaction has gone further. I am pleasantly surprised that it turned out like this. I thought it was going to be "blotchy". I guess properly cleaning the surface before applying the vinegar/ salt solution helped. I took some liberty with the width of the red stripe and the fenders. The fenders are 5/8 and the stripe was 1/2. I decided to make the stripe the same width as the fenders. I find it looks better. Also, I painted the fenders red.

So because the fenders had to be glued to the hull, I had to shape the backsides so that they sit flat on the hull. To do that, I put a piece of sandpaper on the hull and sanded the fenders until they took shape of the hull.

starboard.jpg
 
Last edited:
It is said photos don't lie. They do all the time. I can relate to the frustration of "Why don't these photos show what I see?"
She's looking good. Forge ahead.
For a vivid demonstration of that, try taking a picture of the moon on the horizon. It is shocking how different the camera see what your eye perceives.
 
Well, as expected, the poly reduced the amount of verdigris on the hull. I like the look better than just verdigris because it shows the copper as a brown with a little bit of verdigris. Now onto the port side. I must say that I am not really enjoying this step. It's boring

Screenshot 2025-05-27 082053.png
 
Last edited:
Back
Top