• LUCZORAMA SHIPWRECK SCAVENGER HUNT GIVEAWAY. 4 Weeks of Fun • 1 Legendary Prize ((OcCre’s Fram Ship)) • Global Crew Welcome!
    **VIEW THREAD HERE**

Gallic fishing boat St Gildas

I follow (watch) your build log... and, I love small fishing and trading boats!
I have it on watch too but it didn't show up in my notifications. Thought it had been quiet. But it is nice to see all the updates I missed! Very good progress. The fishing booms are so cool!!

((Is it bad I want the gruesome details of how to get a ship in the stand? lol -- debating on when to make a stand for the Oro Jackson ))
DD, thank you for your interest and your kind words.

Turns out that the best time to get the ship in its permanent stand is as soon as you discover the kit stand is rubbish with parts that don’t match the plans. But if you miss that point, then as soon as possible after the hull is complete and before you start adding deck furniture, masts, and the like. Once you’ve added anything that sticks above the rails, it becomes exponentially harder to turn the boat upside down to fit or otherwise attach pedestals.

And since you asked….

In this case, because this boat has so much deadrise (the angle between keel and the waterline), it needed to be secured to the pedestals to prevent it slipping out the back. I had some very long, narrow screws for that, but the heads were to big to fit through the threaded inserts needed to screw the pedestals to the base. But getting the holes on the keel spaced perfectly for the small screws to exactly match the holes drilled in the base exactly aligned without being able to screw anything together turned out to be a wicked pissah. I couldn’t simply measure equal distances along the keel and base because of the deadrise angle, and since I already had masts and sails on her, the precision measurement involved—particularly of drilling holes at just the right angle—once the trigonometry was done proved near impossible. But once I got all that just right, the threaded inserts had managed to worry the holes in the pedestals loose enough as to no longer hold the pedestals securely to the base once screwed down.

All that is a long way to say that had I planned ahead better, I would have saved myself much frustration…
 
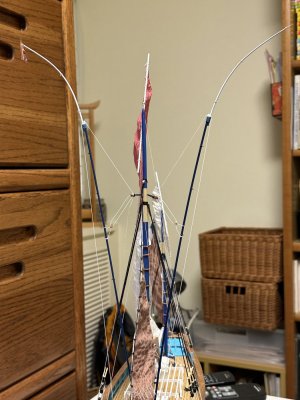
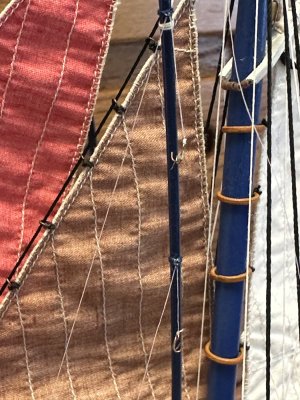
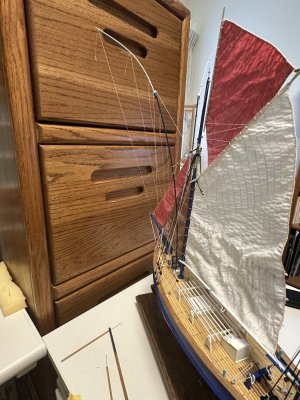
Preliminary rigging of the fishing booms is done, but everything still needs to be snugged down.
IMG_5825.jpeg
I was 100% right in not securing the staysail yet. I’ve moved that thing constantly while working on the other rigging.

Not so obvious in the photo, but the booms really have an amazing visual effect. Can’t wait to get the hooks and lines on, although I still haven’t answered the question of where to tie them off.

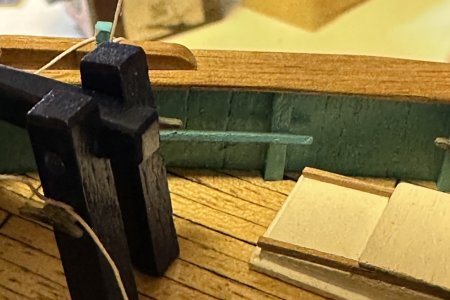
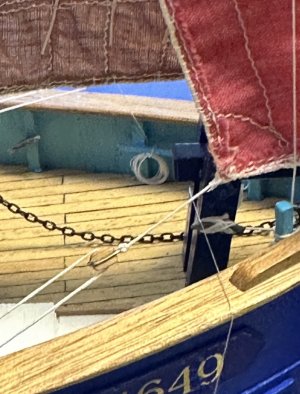
There is a rail on the bulwarks that would seem to be a logical place, but I don’t think it’s got the structural integrity.
IMG_5826.jpeg
The plans don’t show this being used for anything so it’s only glued on, but the kit wood is so soft and splintery, I don’t know if it will hold up to having seven fishing lines belayed to it.

I’m considering adding a brass bar to the top of the rail cap as a belay for the fishing lines.
 
((Is it bad I want the gruesome details of how to get a ship in the stand? lol -- debating on when to make a stand for the Oro Jackson ))
Not bad at all. Wanting the gruesome details is part of the fun. Getting a ship into its stand can feel like performing surgery on a sleeping dragon — tense, delicate, and with a real risk of knocking something off.

Here’s the general approach:
• Make the stand before the rigging jungle begins. Trying to wrestle a fully rigged ship into a cradle is a shortcut to heartbreak.
• Test-fit the hull early, even before final planking if possible. That way, you can shape the stand to match the keel or hull curve.
• Line the stand with felt, cork, or foam. Something that grips gently but won’t scratch.
• Once you're happy with the fit, mark the position, remove the ship, glue the supports, and let it set before bringing the ship back in.
• And finally, do not do it when you're tired. Ships can smell fear. ;)

If it goes smoothly, you’ll feel like a master shipwright. If not, at least you’ll have a story to tell.
 
Someone please tell me half the fun of this hobby is figuring out creative solutions to fixing your mistakes (try to sound convincing…)
Hahaahahahaha........ Yes. LOL
Turns out that the best tine to get the ship in the stand... But if you miss that point, then as soon as possible after the hull is complete and before you start adding deck furniture, masts, and the like.
Getting a ship into its stand can feel like performing surgery on a sleeping dragon —
**Vigorously taking notes** I'm about to the point where I have finished the base and all the decks (("about" is probably more than generous)) so I appreciate all the advice and lessons learned to pick up this task sooner rather than later!

Preliminary rigging of the fishing booms is done, but everything still needs to be snugged down.
The fishing booms look super cool!!!
 
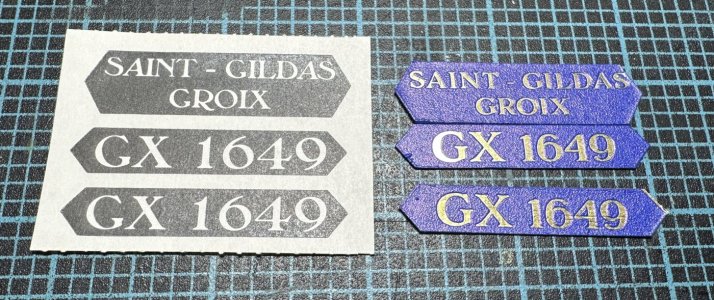
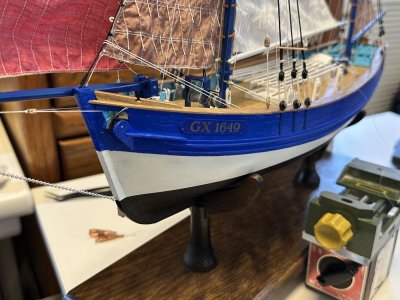
The kit provides stickers for the ID plates. I had the local print shop UV print them on small brass plates.
IMG_5830.jpeg
The one on the bottom came out a bit wonky, but if I can’t touch it up I’ll just put it on the starboard side facing the wall.
 
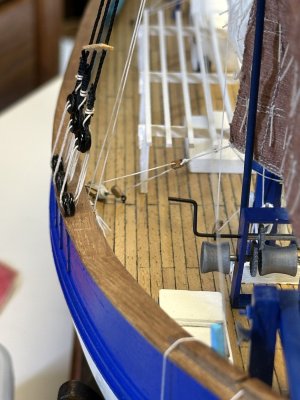
Staysail has been sheeted home at last.
IMG_5831.jpeg
The plans appear to have the standing end of the sheets going over the rail and through a hole in the bulwarks. I didn’t like that at all, so after considerable thought, I drilled a hole through the pinrails and secured the sheets to that.
 
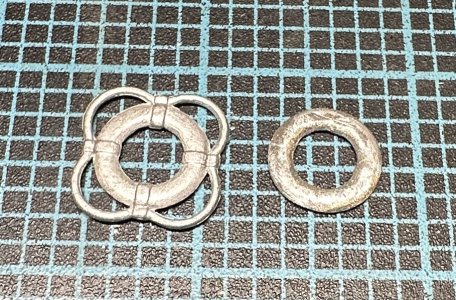
Nearly finished rigging everything except the fishing lines. One of the last details will be life rings. The brittania rings in the kit were decent, but I think I can kick them up a notch.
IMG_5832.jpeg
The ring on the left is original. The one on the right has had all the detail filed off. This will be replaced next.
 
Last edited:
Hey Nambirio,

You've built a really nice little boat. I'd take it straight away. Simply great and designed with a lot of love. It's great.

I would have sanded down the lifebuoy too. You could use real rope where the plastic was. Then the lifebuoy will come to life.

Best regards

Günther Ship-1
 
Hey Nambirio,

You've built a really nice little boat. I'd take it straight away. Simply great and designed with a lot of love. It's great.

I would have sanded down the lifebuoy too. You could use real rope where the plastic was. Then the lifebuoy will come to life.

Best regards

Günther Ship-1
Thank you for your kind words, Günther. That is what I am hoping for!
 
I have begun the laborious and delicate task of rigging the 14 fishing lines. Here are the first two hooks
IMG_5833.jpeg
Each line has to be belayed and dressed up with a tiny hank of fishing line
IMG_5834.jpeg
The latter task is like the worst game of Operation ever. To get at the rails on the inside of the bulwark, I have to work from the opposite side if the ship while threading the tools through all the other rigging. Maddening!
 
Last edited:
Oh, and here is one of the ID plates installed. I can’t manage carved and gilt letters and numbers, but this is a reasonable enough facsimile for me.
IMG_5835.jpeg
 
Last edited:
Hey Namabiiru,

That looks really great. It even looks like it was made for it and included. It couldn't be better. really nice. :DThumbsup

Best regards

Günther Ship-1
 
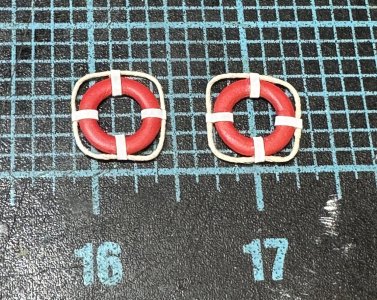
Here are the re-made life bouys.
IMG_5836.jpeg
Far from perfect, but an improvement over OOB. I throw myself on the mercy of the court to render verdict on which will go better on the viewable side of the ship. The other will be mostly obscured be sails and rigging. Voting starts now.
 
Last edited:
Hey Namabiiru,
Once again you can see how nice it is to realise your ideas by hand. Really beautifully realised. Great lifebuoys.

Cheers
Günther Ship-1
 
Thank you, Günther!

Fishing lines on the port side are done
IMG_5837.jpeg
Not quite as tight-looking as I wanted, but the boom has got so much flex to it that a small adjustment on anything has an impact on the geometry of everything else
 
Back
Top