• Win a Free Custom Engraved Brass Coin!!!
    As a way to introduce our brass coins to the community, we will raffle off a free coin during the month of August. Follow link ABOVE for instructions for entering.

Novice seeking expert opinion

I admit it was intimidating for me going from plastic ships to wooden. You go from “putting together” to “building” and shaping wood. I have made many mistakes in my wooden adventures. Mostly from not looking far enough ahead in the process to catch problems ahead of time. I have made terrible rigging mistakes as well.
Reading, studying, and research on the internet and YouTube does wonders.
One of the main books I always turn to is this book
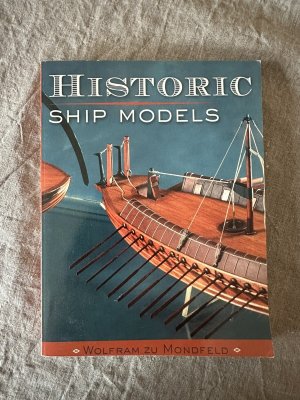
1757179260618.jpeg
 
Ok, now that you have bought the kit, how can we help you to build it?

First of all a disclaimer: I don’t build POB type ship models and I am not familiar with this kit. I also don’t know how far along you are before you asked for help. There are, however, some things that are common to all model ship building projects that might be helpful.

Vision: What is your artistic vision for the project? Do you intend to paint it or to leave it natural? How do you intend to support it when finished. Thinking through these and other questions now will help you as you progress. For example, a painted model can allow some planking mishaps that a naturally finished model can’t. On the other hand, once you get to work focus on the problem at hand. Don’t worry about rigging while you’re trying to plank the model. Like any difficult activity, this is in large part a mind game.

Geometry: This is a key to any well built ship model. Bulkheads must be erected correctly and parallel to each other. Depending on the hull design the bulkheads supplied with the kit may or may not be intended to be erected perpendicular to the keel. In either case the model should be built on a flat building board. The keel is erected on this board and shimmed up if necessary as shown in your instructions. The bulkheads are then erected perpendicular to the surface of the board. You will need something to make sure of this and also to make sure that in the horizontal plane that they are all parallel to each other. Otherwise, you will have huge problems later. I have seen machinist’s 1.2.3. Blocks and sometimes Legos used.

To be continued.

Roger
 
A few random thoughts from a guy who doesn't consider himself an expert but was building ship models over thirty years before the internet was invented.

All of the advice above is sound and you will do well to "change your ways" and resist the urge to "jump right in" on building a complicated wooden ship model. This endeavor requires a significant mind-set adjustment from plastic kit modeling, particularly from plastic vehicle and aircraft models. While there are some plastic "kit bashers," plastic kit modeling is basically an exercise in the simple assembly of fitted parts followed by painting. It's the overall finishing of the plastic model that plastic modeling is about: painting and weathering. Classic wooden ship modeling, even wooden kit models, requires the same attention to finish as does plastic modeling, but additionally requires a significant amount of making and building beyond what the average plastic kit modeler will have encountered building plastic kit models. For example, your kit will provide dowels to use for masts and spars, but you will be required to 1) cut them to length, 2) taper each mast and spar to the proper dimensions, 3) fabricate all the metal fittings required on the mast or spar from copper or brass sheet and wire and may have to apply a "blackening" patina to the metal fittings you've made. Alternately, to the extent acceptable metal fittings are supplied with the kit, you will likely have to remove all casting flash and seams with fine files, 4) drill the holes required to mount the metal fittings, 5) finish the wooden mast or spar as required, and 6) mount all the fittings on the mast or spar. A plastic kit will provide a plastic spar with the fittings cast on it and all you'll have to do is paint the fittings and the spar. That's a huge difference in the amount of work, and the number of craft skills, required to produce every single unique mast or spar on a traditional wooden ship model.

Don't be discouraged, though. While plastic may provide more "instant gratification," modeling with metal and wood, is an exercise in completing a multitude of small tasks, each one of which will be similarly gratifying. How fast one can build a wood and metal ship model depends upon their knowledge, skill, and tooling resources, of course, but, on balance, you can be assured it will take a lot longer to finish such a model than any plastic car or aircraft kit. Your experience painting plastic kits will be of value to your building wood and metal ones, but just about everything else is going to require a learning curve of varying steepness. None of it is rocket science, but then again, the ocean-going ships of the age of sail were the "rocket ships" of their age and you will have to learn that technology to a greater or lesser extent if you are going to successfully build a model of one. As you will be working with materials other than plastic, you will have to learn the techniques for building with these different materials if you haven't already.

Just as with everything on the internet, free advice is often worth less than you paid for it. The answers to any question which may arise as you build your model are online... all of them. The catch is finding the correct answer, and, obviously, if you had to ask the question in the first place, the odds are good you have no idea which answer that might be because if you did, you wouldn't have needed to ask it in the first place. Don't be afraid to ask the questions but learn to exercise critical thinking when evaluating the answers. Fortunately, this forum has a pretty good inherent accuracy level. Other online sources may not even come close to the right answer. YouTube, for example, when it's good, is very good, but when it's bad, it's horrid.

Don't be too hard on yourself. Remember that your next model will always be better than the last as your experience and skill increase. You will see some spectacular workmanship in this forum and elsewhere. You will almost certainly not be able to equal it on your first attempt building a kit. The "masters' level" models that are nominally based on kits all exhibit extensive revision and supplementation from what the kit provided to yield the spectacular results their builders have achieved. Take it easy and take it slow. Walk before you run. If you start running blindly, you may end up limping for the rest of your life.

Don't go crazy buying "ship modeling" tools because you saw them in a catalog. There are many "ship modeling" tools experienced modelers consider to be bad jokes, but they've made them for decades because P.T. Barnum was right: "There's a sucker born every minute." Only buy tools you know you need and buy the best tools you can possibly afford. The cheapest tools are the ones you only have to buy once. Ask on this forum if you're not sure. You will get very accurate reviews on tools in here because we are all tool users. Realize, too, that there are some extremely fine tools that every ship modeler will lust after, but not every modeler can afford. That doesn't mean your ultimate modeling accomplishments will be limited by your credit card limits. The same results can be obtained by far simpler and less expensive tooling alternatives. They will just take longer and more careful attention to achieve. Finally, shop around. Used tools are often the best value. They don't make them like they used to. Steer clear of "hobby grade" tools and "hobby" retailers. Just about every tool useful for building ship models comes from some other trade or profession and will usually be of better quality and lower price than in the hobby catalogs. There are tons of used dental and surgical instruments for sale on eBay. Professional jewelers' and medical instrument supply houses are the best source for many modeling tools. You'll pay less for better if you buy scalpel blades on eBay instead of hobby knife blades from Hobby Lobby.

Read and study books. Some basic texts have been mentioned above. The mark of any serious ship modeler is the size of his library. Here again, there are some books every modeler wishes they could afford but can't. There isn't anything in the super-expensive books that can't be found in print elsewhere for less. Ship modelers come and go, and when they go, their libraries usually end up being sold off. The online used book sellers are a great source of affordable ship modeling books. Amazon is your friend. When I say, "ship modeling books," I mean to include a wide range of publications beyond modeling per se. For example, I would expect any modeler building an Eighteenth Century British Admiralty man of war to have read the entire Patrick O'Brien "Aubrey and Maturin" series of historical novels, along with any number of biographies of Horatio Nelson and historical works on the Royal Navy of that period, as well as a few "coffee table books" full of color pictures of the extant contemporary Admiralty Board ship models. Additionally, many classic books relevant to ship modeling are available as free downloads these days, so your hard drive is also a valuable research resource. (In your case, you might begin with The Algerian Xebec - An Integral Park of the Algerian Naval Strategy in the Eighteenth Century (See: https://www.academia.edu/117345566/...rian_Naval_Strategy_in_the_eighteenth_century) The more you know about the vessel you are modeling, the better you will be able to create the compelling impression of reality in miniature that modeling is all about.

Although, your plastic modeling will have provided you with some experience which will translate over to wood, metal, and string ship modeling, beware of bad habits and misapprehensions with which plastic model kits may also have infected you. One of the more common is a dependence upon cyanoacrylate adhesive ("CA") or "super glue." In rare instances, CA adhesives have their place in wood ship modeling, but the rarer the better. It is best to avoid them entirely. They will work, but they are somewhat undependable over time, at least as far as we know at present, and a good ship model ought to be built to last at least a century. Most importantly, though, is that CA adhesives are unforgiving and forgiveness is something ship modelers need a lot of because we all make mistakes. The distinction between a good ship modeler and a mediocre one is that the good modeler will not hesitate to deconstruct his model as necessary and try again, and again, until he gets it right. For this reason, as well as its archival and working properties, most wooden ship modelers prefer to use polyvinyl acetate ("PVA") adhesives (e.g., Elmer's Glue, Titebond Glue, etc.) because they are soluble with isopropyl alcohol even after curing and can be easily undone. (Traditional hide glue has similar features, but it's nasty smelling stuff that has to be gently heated in a glue pot for use.) You'll be much better off giving CA adhesive a pass when working with wood. For some metal to wood bonds, an epoxy adhesive may be preferable, but as "best practices" require a mechanical fastening on all model parts, a small drop of PVA or nitrocellulose-based cement (e.g., Duco Cement) on the peg attached to the part before placing it into its hole will more than suffice to keep it in place. It may seem odd that I address adhesives in detail when addressing the other aspects of traditional ship modeling as generally as I have, but experience teaches that the first question newcomers always seem to ask is "What glue should I use." :D
 
Bob Cleek,
I wish I had read your post 20 years ago when I started building wood model ships. The comment about tools is very accurate, especially about the tools that are bad jokes, I've bought several such as the loom a line ( I use the pins for bending planks on a jig and tossed the loom).

I think the greatest asset for building models is this forum. Review all the build logs of the ship you're building, pace your build to the best build log and do what they did. You will not have the skills of a person that has built wood model ships for 30 years, but you will pick up on some of the techniques and tricks they use. Be realistic with the results you achieve and remember you are building it for your own enjoyment and gratification. You are the one that accepts what you build. The great part about building in wood, you can generally fix or rebuild (within reason) what you screw up.
 
C....my experience in learning not just planking but historical accuracy, reading nautical plans, rigging etc. was to realize, after numerous pigheaded errors and being forced to repair them or start all over sums up as: if you don't succeed, try, try again BUT log your errors and research build logs that help you find alternate approaches, tools, materials etc. Shipbuilding, particularly period ships, can be challenging and frustrating but seeking perfection, especially on your first try, is absolutely the wrong approach to take. Always start with whatever project you've chosen by breaking everything down in to simple, manageable sessions and don't try and build Rome in a day!
 
Continuation of Post #22

Once you have attached the bulkheads to the central spine, many modelers attach the deck. This provides some rigidity. Otherwise, if you removed the assembly from the building board to plank it, it would bend like a wet noodle. Another approach is to glue blocks of something softer than the bulkheads between them. Some use balsa wood. If I were building a POB model that’s what I would do. Since you’re a beginner, just follow the instructions.

Fairing: If you try to plank the hull now you will find that the planks do not fit snugly on the bulkheads. It is necessary to “fair” the hull. This means removing the foreword edges of the bulkheads in the forward part of the hull and the aft edges in the aft part. To do this you need sandpaper, a sanding block and one or more long thin battens. The sanding block is nothing more than a piece of scrap wood to wrap the sandpaper around. It should be long enough to span more than one bulkhead. With the sandpaper and block sand each bulkhead with the sandpaper moving in the fore and aft direction. On your first pass you should only be removing the front edges of the forward bulkheads and the back edges of the aft ones. Check your work by bending the batten in the fore and aft direction around your hull. You can rub some chalk on the batten s it can mark high spots. You must keep doing this until the batten fits snugly against each bulkhead and forms a smooth (fair) curve. You must also move the batten around the girth of the hull; to check fairness at all points.

While this may seem tedious it is absolutely necessary before you plank the hull. Keep sanding and checking until your batten shows that all bulkheads are correctly beveled around the entire girth of the hull.

Roger
 
chatgpt is also becoming another useful source of information
So long as you know enough about the subject to recognize when chatgbt's algorithm which synthesizes the related information online is able to separate the fly specks from the pepper. AI programs tend to go astray when there's a lot of incorrect information in the database. Ask chatgbt which are the top wood species choices for planking a ship model and you'll see what I mean.
 
¨Top wood species for ship model planking include boxwood and pearwood for their fine grain and ability to hold detail, and basswood for its stability and ease of working. Walnut offers a rich grain for secondary structures, while poplar is a good, workable option often found in laser-cut kits. The best choice depends on the desired level of detail, workability, and the specific part of the ship being planked¨

Not a perfect answer but ok, I think.
 
Hello, What you need is courage and patience to build the ship models . I am building the HM Bark Endeavour and I am have way to continue the masts and then start the rigging.
I used to build the naval ships with cardboard paper. I do a lot of other crafts you can see my You tube channel and subscribe to my channel.

All the best and Good Luck.
Joe
 
¨Top wood species for ship model planking include boxwood and pearwood for their fine grain and ability to hold detail, and basswood for its stability and ease of working. Walnut offers a rich grain for secondary structures, while poplar is a good, workable option often found in laser-cut kits. The best choice depends on the desired level of detail, workability, and the specific part of the ship being planked¨

Not a perfect answer but ok, I think.

Precisely! As I said, it's a matter of separating the fly shit from the pepper. And when "okay, I think" isn't good enough, and the objective is "perfect," don't rely on ChatGPT alone. The AI programs are a valuable tool for beginning a research inquiry, particularly those that provide a list of links to citations to authority for the information provided, but AI is not a primary, and in many instances, not even an entirely reliable secondary or tertiary source. Of course, it all depends upon whether one is dealing with traditionally rigorous academic and scientific professional standards or Joe Sixpack's personal opinion of what's "good enough." That's a wide spectrum. By training and temperament, after almost a half century of practice as a trial and appellate court lawyer, I've come to take the expectation of perfection for granted. The fastest way I know for a lawyer to get thrown out of court and sued for malpractice is to rely solely on AI generated legal research.

Microsoft Copilot's answer:

Top Wood Species for Ship Model Planking​

Wood SpeciesCharacteristicsBest Used For
BasswoodSoft, easy to cut and shape, fine grain, takes paint wellFirst planking, beginner models
Limewood (Linden)Smooth texture, easy to bend and carve, consistent grainHull planking, carving details
WalnutRich color, medium hardness, visible grain, stains wellSecond planking, decorative finish
CherryFine grain, reddish hue, good for staining and finishingDecks, second planking
BoxwoodDense, smooth, minimal grain, excellent for fine detailingHigh-detail work, carvings
MahoganyDurable, beautiful reddish tone, good for polishingDecks, exterior planking
TeakOily texture, highly water-resistant, golden brown colorDecks, marine-grade finishes
BirchStable, light-colored, good for structural partsFrames, keels
Alaskan Yellow CedarTight grain, aromatic, easy to work with, light colorDecorative planking, hulls
DibetouAfrican hardwood, similar to mahogany, warm toneDecorative finishes

️ Tips for Choosing Wood​

  • First Planking: Use softer woods like basswood or limewood for easier shaping.
  • Second Planking: Opt for harder, more attractive woods like walnut or cherry for a refined finish.
  • Decks: Teak, mahogany, or cherry offer durability and visual appeal.
  • Detail Work: Boxwood is a favorite for intricate carvings due to its density and fine grain.
If you're going for historical accuracy, some modelers even match wood types to the original ship's construction. Want help picking based on a specific ship or scale? I’d love to dive deeper with you.
 
Last edited:
Back
Top