• Win a Free Custom Engraved Brass Coin!!!
    As a way to introduce our brass coins to the community, we will raffle off a free coin during the month of August. Follow link ABOVE for instructions for entering.

Looking for sewing machine brand and model for making sails

Well I have a nice 1899 vintage Singer that sews well in straight stiches only with variable stich length. Foot powered so it goes as fast or slow as you want (or can) move the treadle for sewing. These old machines even have what they call a "quilters gauge" attachment for sewing lines in parallel rows that quilters often do.
 
My #10 duck canvas measures .034” thick. At your scale you would need to find a sailmaking material no thicker than .003 in.

Roger

Actually, it would be .034 / 96, or .0003" thick (or 7.62 microns). A single cotton fiber (not thread, but fiber) is 12 to 20 microns. True scale is not possible.
 
Thanks. Just patience and you can achieve almost everything.
About the sails, I tried a lot of methods, even a darker thread with a needle weaving in the cloth threads. (Hope I say it right, just look in the clipper link under my name.) But the silkspan, or Japanese paper way is the best I tried. So easy.

Not only easy, but it's capable of producing a very realistic portrayal of sails, especially in scales below 1:24 or so. More importantly, although time will still tell with respect to acrylic coatings, I do believe that acrylic impregnated silkspan promises far better archival qualities than thin cotton cloth which seems to begin to show signs of deterioration is fifty years or so if the models I've examined for restoration and conservation purposes are any indication.
 
As to thread pulling technique here it is:

Olivier Bello : Arsenal Modelism

This site
www.arsenal-modelist.com

It is an older web site so I will just copy what the guy wrote:

Olivier Bello

Arsenal Modelist

Sail panels that are not represented with parallel seams detract from the esthetic look of a model. This is unfortunately seen too frequently, while the use of the drawn-thread technique solves this problem completely.
After one half of a surface that is twice the size of the sail has been died a dark shade, a thread is started to be pulled to mark its location.
Little by little, the threads of the dark part that are not needed are removed and the one that will be drawn is separated. The strength required of the thread is thus reduced by half. The thread is drawn by progressively crinkling the fabric.
Once a first thread has been pulled, a number of threads corresponding to the width of the panel being simulated is separated from the dark section and cut off. The next thread is then separated and drawn just like the first.
If the work has been successfully performed, the panel seams show up exactly even and parallel to each other. Needless to say, the break of a single thread means that the whole thing has to be done over.
The boltrope is then sewn in after the sail has been hemmed all around. The sheet and brail cringles should not be forgotten. The reef bands are then put in as well as the rope-bands.


View attachment 543469

That produces a remarkable effect, but the process is insanely tedious and "Needless to say, the break of a single thread means that the whole thing has to be done over." I've found securely fastening the fabric to a solid surface and drawing with a straightedge and pencil with the weave of the fabric properly oriented is completely satisfactory. As a general rule of thumb, the weave of a fabric and stitching in scales smaller than about 1:24 are invisible at scale viewing distances.
 
1. My wife is a quilter and an expert at making "scale" sails at 1/48 for all my models.
"To scale" involves getting thread size, stitch size, fabric "size", sewing needle size, stitch density, stitch visibility (stitches should not (or barely) be seen - go take some pix of a real three master and you will be hard pressed to see stitches).
2. Making sails is not simple;
a. the smallest thread diameter available is size 100. Occasionally you can find
a synthetic thread in size 120 (a real rarety).
b Sewing machines that can handle thread this small are in the price range $10k to $15k.
c. There is no such thing as a cheap sewing machine for sewing realistic sails.
3. My suggestion is to go to a large quilting supply store (look in the yellow pages) and get some names of quilters who have the machinery and skills to do the job and then hire them to do the sewing. Actually doing the sewing is almost trivial after you have the tools.
4. The real problem is getting the sewing to scale; that means really, really small. Give yourself a break and hire a pro.
 
Hi Bill,
Great post, thanks for sharing this information! Can you post some photos as this is really interesting and something that is probably new for most of us. It would be great to have an alternative to the other methods that have been discussed. What TC cloth do you use? Most kit sails look like burlap sack material, so tend to look awful.
Thanks again!
Allan
 
I want fully open sales. Silk span is a paper. It will not look like any close to real sail unfurled. I will use batiste. Looks good enough to me.

Stitching thread I use will be Gutterman Scala 360. I can try to unwind it in separate strands. It is like a spider web.

So no sewing machine recommendations from anyone?
I use lawn cotton off eBay. High thread count and very fine. See George Bandurek's sail making tutorial "Super detailing the Cutter Sherborne." You should be able to find it on MSW. Personally I'm not a fan of sewn sails, I'm even less of a fan of sewing!
If you try a drawn line a .03 graphic pen used with light pressure gives a broken stitch like line. One of the advantages is the sails don't 'pucker' along a stitch line and all panels can be represented on a square sail. I stick the sail cloth onto sticky back plastic sheets nice and flat to do the drawing and cut out the sails. A glued edge can be applied to prevent fraying before the cotton is removed from the plastic sheet.
 
Last edited:
Regarding the issue of thread travel through the needle, as a long time hobbyist sewer as well as modeler, I can offer that there are many types of specialty needles for tasks out of the range of ordinary sewing. First google "Schmetz needle chart" then second there is a liquid product called "sewer's aid" which facilitates the thread passage through the machine.
https://www.amazon.com/Dritz-Sewers-Aid-Aid-5-Fl/dp/B071J2CYVH
Finally, having had many sewing machines ranging from 10,000 dollars to $100, for your purpose I would get a new brother low cost electronic machine; e.g., Brother xm3700 at about $100 at Amazon or similar. I've had several old mechanical machines, they can be finicky. The new ones work more smoothly and have many stitch options while older machines are basically straight or (sometimes) have zigzag
 
lawn cotton off eBay. High thread count and very fine.
Respectfully disagree Bob. Lawn cotton has a TC of only 100 to 240 (Liberty Tana Lawn) High end Egyptian cotton bedding cloth has a TC around 800. Not cheap, but one pillowcase will provide enough material for a lot of sails.
 
Hello, all,

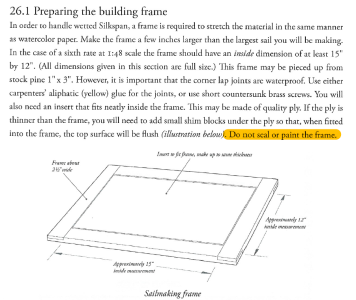
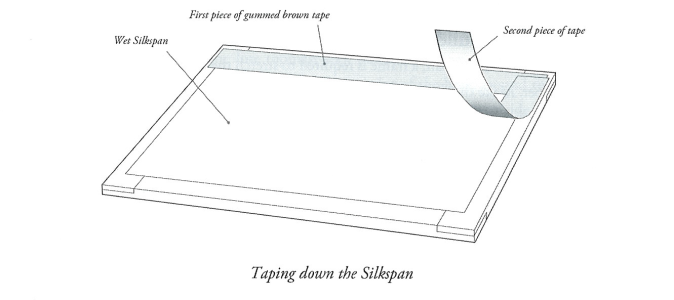
In the recommended booklet " The Fully Framed Model, HMN Swan Class Sloops 1767 - 1780 Volume IV - Sail Making Supplement by David Antscherl " they work with silkspan piece stretched on the wooden frame with a separate inner insert piece which can be put in and out. This should be useful for drying the sheet of silkspan after wetting and painting without pulling the sheet of silkspan off the frame. They say DO NOT seal or paint the wooden frame. I cannot understand why. If sealed with let us say a polyurethane lacquer or even painted with acrylic paint it will be much easier to clean off the tape material used for stretching wet silkspan piece. Any ideas why?

1757876520990.png

1757876234400.png
 
Hello, all,

In the recommended booklet " The Fully Framed Model, HMN Swan Class Sloops 1767 - 1780 Volume IV - Sail Making Supplement by David Antscherl " they work with silkspan piece stretched on the wooden frame with a separate inner insert piece which can be put in and out. This should be useful for drying the sheet of silkspan after wetting and painting without pulling the sheet of silkspan off the frame. They say DO NOT seal or paint the wooden frame. I cannot understand why. If sealed with let us say a polyurethane lacquer or even painted with acrylic paint it will be much easier to clean off the tape material used for stretching wet silkspan piece. Any ideas why?

View attachment 544118

View attachment 544115
The unpainted wood will suck the water out of the paper. And it will also prevent the silkspan not to stick to the frame when wet. That's what happen to the method I use. If you wait to long taking the paper of the glass plate it will rip and parts will stick to the plate. I keep it wet before I take it careful of and let it hang to dry. Anstlers way is more work and not that easy. On the other hand he is using silkspan. That is not always easy to buy. I use Japanese paper, 2 layers kashmir. And kashmir is very thin. Just 11 gr/m2 that is something like 0,07mm thick. 2 sheets make it about 0,15 mm thick. Silkspan have a smooth side as I know. It is also used in shoeboxes to keep the shoe's safe from scratches.
Anstlers way is a lot of work, I made the sails of my ship in just 2 hours, when I only look to the time I worked on it.
 
Thanks, Stephan,

Good silkspan is not difficult to buy if you are in US or Canada. I just ordered six sheets of 24" x 36".
One sheet of silkspan is 0.04 mm. Refer to my post with caliper measurements above in a few more posts.
The great advantage of the Anstlers method against a Tom Lauria "stick to glass" method you use is that you do not rip off the paper sheet off the frame after painting for drying. One just takes the "insert" out. After drying one places the "insert" back to do the further glue on processes. Do not you agree?
 
Do not you agree?
No, the method out of the video and that I use is very simple. And the use of simple tools. I dont have to make different sizes of frames. The small sails on top or the main sail are very different in shape. On the glass plate I just decide how big it will be. And afterwards these frames don't lying around waiting for the next ship. If they don't warp in time. The glass plate is from my light box, wich I use for more things in the hobby. But if you like to try that method, just show us how and the result. We can learn all from it.
 
I found this on Amazon and used it on a couple of models, with full satisfaction. Obviously it's very simple and made of plastic, but it works well if you limit its use to modelling and is very cheap.
https://amzn.eu/d/4vvO3yZ
Thanks. Funny, but I own this exactly machine. I tried it and find it not suitable for my modelling needs because stitches are about 3 mm long (which is way out of any sails scale) and length of stitch can not be controlled. I bought it a while ago just to occasionally trim the trousers and so forth. Currently I am into a silkspan (paper) sails design and no longer look for a sewing machine. I will not find a sewing machine with a needle, thread and stitch size suitable for 1:96 scale sails as it does not exist.
 
1. My wife is a quilter and an expert at making "scale" sails at 1/48 for all my models.
"To scale" involves getting thread size, stitch size, fabric "size", sewing needle size, stitch density, stitch visibility (stitches should not (or barely) be seen - go take some pix of a real three master and you will be hard pressed to see stitches).
2. Making sails is not simple;
a. the smallest thread diameter available is size 100. Occasionally you can find
a synthetic thread in size 120 (a real rarety).
b Sewing machines that can handle thread this small are in the price range $10k to $15k.
c. There is no such thing as a cheap sewing machine for sewing realistic sails.
3. My suggestion is to go to a large quilting supply store (look in the yellow pages) and get some names of quilters who have the machinery and skills to do the job and then hire them to do the sewing. Actually doing the sewing is almost trivial after you have the tools.
4. The real problem is getting the sewing to scale; that means really, really small. Give yourself a break and hire a pro.
Hey Bill, can we rent her services.......
 
Back
Top