• SUBSCRIBE TO SHIPS IN SCALE TODAY!

    The beloved Ships in Scale Magazine is back and charting a new course for 2026!
    Discover new skills, new techniques, and new inspirations in every issue.

    NOTE THAT OUR NEXT ISSUE WILL BE July/August 2026
  • Win a Free Custom Engraved Brass Coin!!!
    As a way to introduce our brass coins to the community, we will raffle off a free coin during the month of August. Follow link ABOVE for instructions for entering.

first planks

Joined
Jun 30, 2026
Messages
4
Points
3
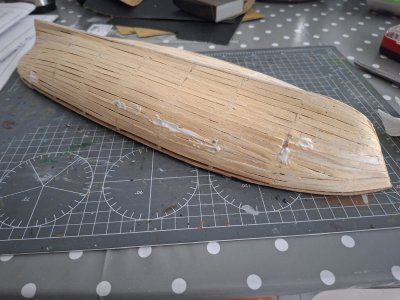
this is my first layer of planks, I started to sand it (overdid) before using some putty and more sanding. I'm not sure I'll get an smooth enough surface for the second layer of planks. any advice, thx!!
15077.jpg

20260714_131125.jpg
 
The planking you used is a pretty typical kit system and as long as you wind up with a smooth finish the second layer can be done very nicely. You asked for advice so here goes. If you are going to copper or paint over the hull, you can ignore all the following, but it makes for good practice for the future depending on your goals.

Do you want the second layer of planking to look like a real ship or are you okay with the fantasy kit version?
Keep in mind that with the exception of one or maybe two drop planks forward and a stealer aft, the end of every strake of planking ends at the rabbet. (Look at some outboard planking expansion drawings and you will see this. Link is below.)
If you want the planking to look like a real ship you need to reduce the breadth of the planks as they go forward. Going aft it varies as you can see from the planking expansion drawings.
You cannot edge bend a plank out of the box without lifting when applying to the hull. The best way many have found is to study the four part video on lining off and pre-bending the planks so they are the right breadth and shape. If they are right there is little or no need for clamps or nails and such. Part one of four of the videos is at

Planking expansion drawings

PRACTICE, PRACTICE, PRACTICE

Hope this helps!!

Allan
 
Instead of putty you may want to consider the use of wood filler. Some people even mix PVA glue with the sawdust they have generated while making the kit as a filler. Let the filler dry and sand. You can repeat this to get a smoother and smoother hull.


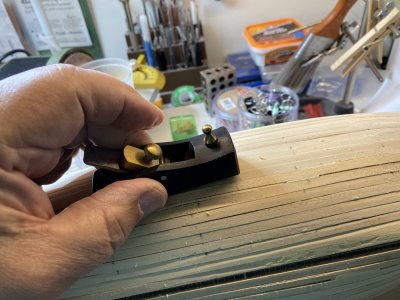
I have also used a small plane to help even out the planks first. I found this to save a lot of work on rough sanding.

IMG_2181 2.jpeg

Start with a coarser grit sandpaper, (say 100 or so) and work you way up to finer grit.

Rob
 
Last edited:
this is my first layer of planks, I started to sand it (overdid) before using some putty and more sanding. I'm not sure I'll get an smooth enough surface for the second layer of planks. any advice, thx!!

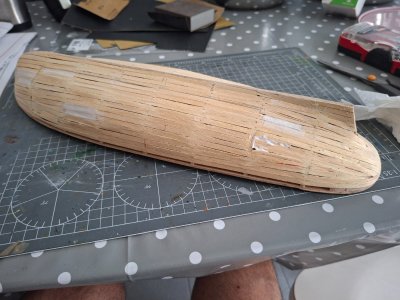
As Allen posted at this point what are your final plans for the hull because that will make a difference in how you go forward. I would use a wood filler or putty and coat the entire hull with a thin layer then sand the hull as best you can. you need a smooth surface in order for the second planking to look good. You may need to add putty if you get a low spot.
both actual ship builders and model ship builders take a lot of pride in the hull planking. The run of the planks should produce smooth flowing curves from the stem to the stern post.
Do you want the second layer of planking to look like a real ship or are you okay with the fantasy kit version?
to expand on what Allen is saying kits come with hull planking all the same width making planking impossible like real ships were planked because planks are shaped and cut to fit the hull so you need wide planks of different widths. You cannot just taper all the planks because the run of the planking will come to a point, you need to also add width at midship.

Keep in mind that with the exception of one or maybe two drop planks forward and a stealer aft, the end of every strake of planking ends at the rabbet.

an example of what Allen is saying


b03c_edited-7.jpg

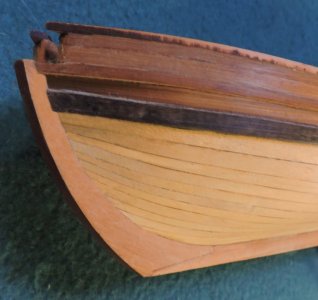
in this photo the two planks under the wale get wider as they approach midship. With kit planking it would require 4 planks to fill midship and they would either stop short of the stem or taper to a point.


L005.jpg


So what is your final goal in planking the hull either a fantasy kit version or how a hull is really planked or covering the hull with paint or sheeting.
 
Fernando,

I am breaking a promise by posting in here but
It looks to me like you have done a very good job of sheathing over the molds -given what you had to work with.
You were betrayed / sabotaged from the start:
You needed at least twice the number of molds than this kit provided.
You needed for layer one: a wood species that has more spring - is stiffer - a species that does not dip between the too far apart molds.
You needed planks that are thick enough to be shaved thinner in places.

You also needed first layer wood planking that is wide enough to spill (OK -spile - Cockney for spoil -i.e. wasting wood from wide plank to make it more narrow so as to fit.) But NO kit provides this.

For the dips - you need wood scabs. If you are a woodworker this is easy, A wood curl from a Pine plank done by an "air molecule splitting sharp" plane blade. A thin veneer of wood that costs nothing - if you have the tools. If you are a kitchen table kit builder without a woodworkers garage full of tools, you may have to find someone who does.
PVA bonding scabs of veneer over the dips can get you the needed smooth run.
Thin gaps between layer one planks are OK. Open or filled - this has no effect on layer two planking.

I advise that you get angry and determined to see this thru. The kit design may be far from adequate but "Illegitimi non carborundum." Joe Stilwell
 
i do not know if this is true or not but i heard when sanding the first layer use an 80 grit sandpaper the reason i heard is you want score marks and a sort of rough surface this gives the glue for the second layer a surface to grab on to.
 
i do not know if this is true or not but i heard when sanding the first layer use an 80 grit sandpaper the reason i heard is you want score marks and a sort of rough surface this gives the glue for the second layer a surface to grab on to.
PVA bonds by snaking chains around and between surface irregularities on the bonding surfaces. The smoother the surface -the weaker the bond. I think that 220 grit is right at the OK edge of being too smooth. From 320 grit on up it becomes like bonding glass to glass. This needs Van der Waals forces (CA) instead of mechanical (PVA).
Too coarse is a caution also. Irregularities that are too few - this is the definition of end grain and the cut edge of plywood.
 
Back
Top