• Ships of Scale has incorportated an extra level of security when you log In. Please follow on-screen prompts to acknowledge that you are not a robot via a "Check Box" or a "Pictorial Check Box Puzzle". This is needed due to higher level of AI Activity Security.
  • SUBSCRIBE TO SHIPS IN SCALE TODAY!

    The beloved Ships in Scale Magazine is back and charting a new course for 2026!
    Discover new skills, new techniques, and new inspirations in every issue.

    NOTE THAT OUR NEXT ISSUE WILL BE July/August 2026
  • Win a Free Custom Engraved Brass Coin!!!
    As a way to introduce our brass coins to the community, we will raffle off a free coin during the month of August. Follow link ABOVE for instructions for entering.

HMS Beagle - Steve's Occre Kit

getting cold feet about planking the hull?
If your kit is like others from OcCre, you may want to study some planking tutorials on how the ship was actually planked. rather than the way they propose, which no shipyard ever used. It can be done very nicely with a little study and patience. If you are going to paint the hull in the end, it will not be as noticeable. but if you are interested in how a hull is actually planked there are videos, drawings and articles mentioned many times here at SoS that will help if planking the hull correctly is something that matters to you.
Allan
 
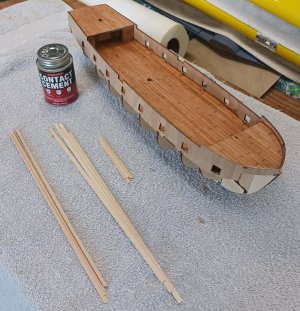
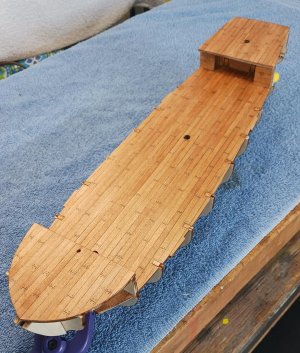
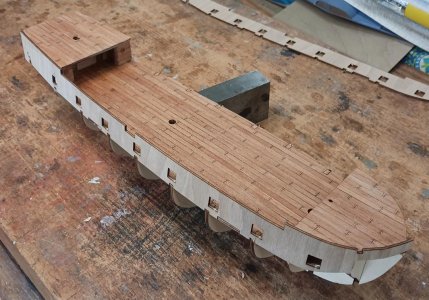
Both upper decks are now finished and glued in place.

View attachment 630485
Working on the Occre black Swan I can second Allan's wise comments. These you tube videos may be of help. There are in addition many other you tube videos and a lot of information here on this site! First fairing the bulkheads to make sure the planking curves along the hull is critical.

Rob


Last edited:
I stagger my deck planking, using lengths that in real life were 10 - 12 feet in length. In my Montanes build I believe that the deck planking was from 60mm to 80mm averaging about 70mm each, using the 1:70 scale that model is, (I used the 5 stagger or 4 stagger depening on how it looks on the particular project I am working on). Not all trees used for planking were of the same length, there could be several planks that they were able to cut the same length but eventually, if using as much of the usable wood that they could there would be some smaller and longer lengths. Not to mention the final strakes at the stern, bow and amidships would take some tapering and etc. to match the rabbet. I usually don't paint the hull planking below the waterline anyway and try to match the paint colors found during researching the particular vessel the above the waterline.

I have been wondering about using the same type technique for the 2nd hull planking in my models. After all smaller length planks would be easier to match the curvature of the hull. Making the sailing vessals that I am interested in staggering hull planking could also help with the numerous gunports needed for say, the Royal William, Royal Louis I think. IMHO of coarse.
 
If your kit is like others from OcCre, you may want to study some planking tutorials on how the ship was actually planked. rather than the way they propose, which no shipyard ever used. It can be done very nicely with a little study and patience. If you are going to paint the hull in the end, it will not be as noticeable. but if you are interested in how a hull is actually planked there are videos, drawings and articles mentioned many times here at SoS that will help if planking the hull correctly is something that matters to you.
Allan
Even though I will probably paint the hull, I still find it important and fun to make the planking as realistic as possible.
There is plenty of documentation available, and you can find many instructional videos on YouTube.
The guide I am using is 'How to: Planking a ship's hull for the beginning builder' (Het beplanken van een scheepsromp voor de beginnende bouwer) by E. Baetens. The video that ties in perfectly with that is 'Bounty by Constructo Part 6 Steelers and Joggle Planks'.
 
I stagger my deck planking, using lengths that in real life were 10 - 12 feet in length. In my Montanes build I believe that the deck planking was from 60mm to 80mm averaging about 70mm each, using the 1:70 scale that model is, (I used the 5 stagger or 4 stagger depening on how it looks on the particular project I am working on).
Thank you Charles. I am guessing you are referring to Spanish ships like Montanes. This was a surprise that they were so different than English ships. that used a three butt or four butt shift and planking as long as 30 to 36 feet wherever possible.. (The Construction and Fitting of the English Man of War, pages 58-59)

I cannot find any good information based on contemporary sources for Spanish ships so hope you can help. I am curious how they planked the orlop and platforms. On the orlop the English did not shift the planks nor did they nail them in place when they ended in rebates but rather, they left them loose. How did the Spanish construct the orlop decking?

Thanks for any sources that you have that you can share.

Allan
 
Spent some time on the Beagle yesterday fitting one of the bulwarks. I must say that i am not overly pleased with it.
It was difficult to bend even after soaking and using a hot iron, the wood still cracked slightly in some of the narrow areas.
It also required some modifications at the rear portion for a proper fit.
The instructions indicate to use white glue and nails, i opted for thin CA and that seemed to work fine.

hms bulwark 1.jpg
 
The second side is added, soaking longer and using higher heat definitely improved the workability.
I am pleased with the results.
The next step is to add the side wall strips. Occre indicates to use contact cement for this task which seems like a good approach. If there is a better method, please chime in.
However, the contact cement i have and used on the flooring is thick and messy to work with.
Two questions for you experienced ship builders.
1) Is there a better brand of contact cement that is thinner in viscosity and not so messy to work with?
This Upgraded brand is just something found on Amazon.
2) What type of finish would you apply to the side walls? The same as the flooring?
Thank you!
hms bulwark 2.jpg is just
 
The second side is added, soaking longer and using higher heat definitely improved the workability.
I am pleased with the results.
The next step is to add the side wall strips. Occre indicates to use contact cement for this task which seems like a good approach. If there is a better method, please chime in.
However, the contact cement i have and used on the flooring is thick and messy to work with.
Two questions for you experienced ship builders.
1) Is there a better brand of contact cement that is thinner in viscosity and not so messy to work with?
This Upgraded brand is just something found on Amazon.
2) What type of finish would you apply to the side walls? The same as the flooring?
Thank you!
View attachment 636267 is just
Hello Steve,
Although I am certainly no expert, I was very satisfied with the white PVA glue that I used.
I am still working on planking the hull, but I plan to paint the inside of the bulwark red, just like on the Santisima Trinidad by Artesania Latina.
 
Thank you Peter! I am definitely going to use PVA, it will take longer waiting for the glue to dry clamped in place with every strip but this project is not on any schedule. I need to do some more research on the full-scale Beagle to try to determine how the side walls were finished.
 
I am definitely going to use PVA, ,
VERY wise decision.
it will take longer waiting for the glue to dry clamped in place with every strip
If the planks are tapered in breadth then pre shaped in the broad and edge direction they will hold with PVA in about a minute without clamping. The four part video posted above on August 29th is really a great tutorial on planking.
 
Thank you Allan. Fortunately, these side wall planks are not tapered on edge.

I did just find some pictures, i am not 100% sure of their accuracy but at least it is something to work with.

HMS Beagle bark (6) (1).jpg
 
Fortunately, these side wall planks are not tapered on edge.
My apologies in advance but which planks are you speaking about? Not sure what a side wall is. :( See last drawing below.

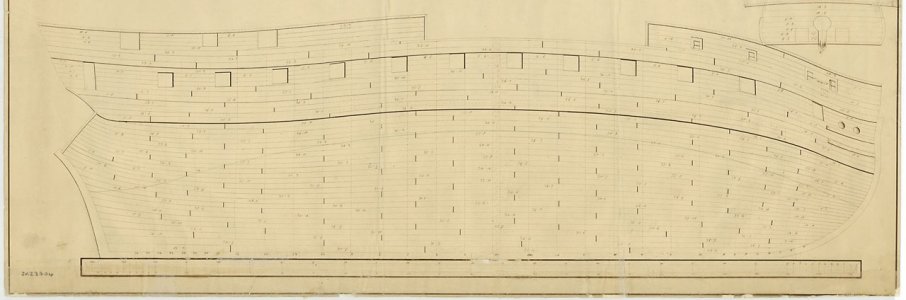
I was referring to the outboard hull planking which is dynamic in breadth from the dead flat forward and aft. Below is a planking expansion plan that shows how the breadth varies and the edge shape is not a straight piece.

1789582656876.jpeg
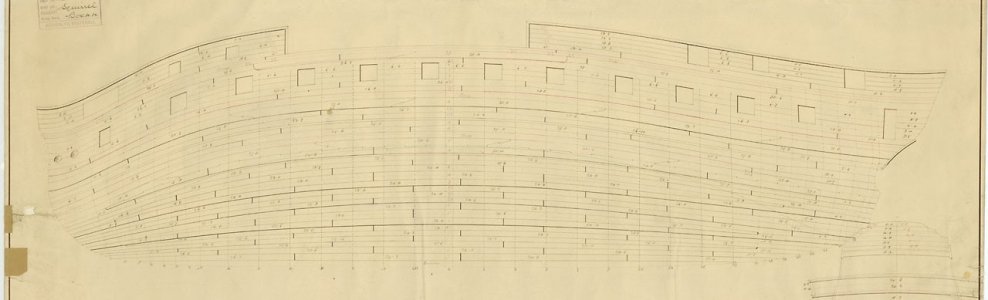
If you were referring to the bulwark planking inboard, you get an idea of the shape of each plank from the plan below. The pieces are relatively short so are not difficult to shape right on the ship by soaking them, clamping in place until dry, then removing and gluing in place.
1789582830760.jpeg
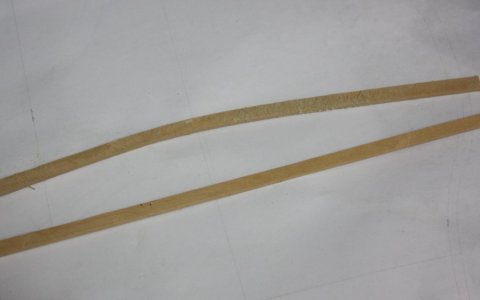
The below shows two pieces lying flat, one straight piece that is ready to be shaped and another that has been edge bent. It will also be broad bent before being glued on the hull.
1789583023275.jpeg
1789584013284.png
Allan
 
Allan, please forgive me for not using the proper terminology, i still have a lot to learn.
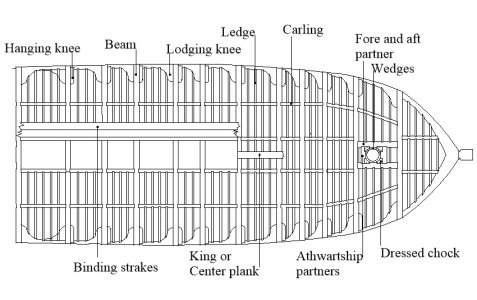
In this case, yes, i am referring to the "bulwark planking inboard"
Yesterday i painted the planking, black and white prior to gluing, picture coming soon.
Thank you!
 
please forgive me for not using the proper terminology, i still have a lot to learn.
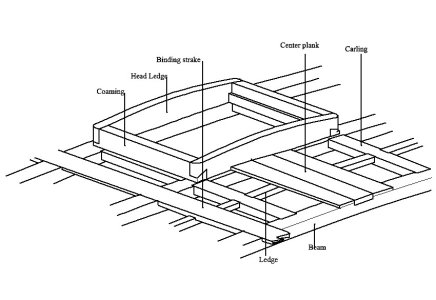
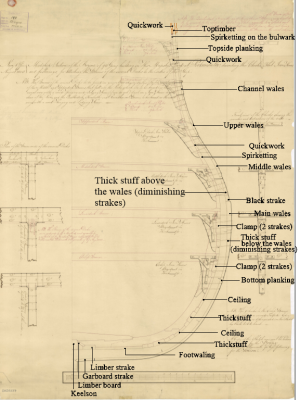
No apologies, please. We are all learning. After 50 plus years of building wooden ship models I still treasure the days I learn something new, especially from our members, and thankfully those days come often. As to terminology it is easier to communicate with the most common terms, but it gets crazy here as we have the entire world of languages. I merely asked to be sure what your query was about. I have been playing with a series of drawings identifying various parts of a ship. Do you think a series of drawings like the one above would be worthwhile? Maybe someone could use them and make a set in other languages as well. If these are posted, any help in fixing any mistakes would be most welcome!
Allan

Other examples:
1789641173257.jpeg

1789661172737.jpeg
 
Last edited:
Back
Top