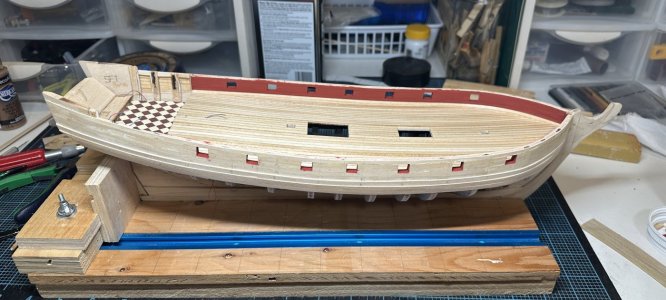
Very nice decking! Will the treenail counters be counting treenails on this deck - or will you go for a cleaner look?

 |
The beloved Ships in Scale Magazine is back and charting a new course for 2026! Discover new skills, new techniques, and new inspirations in every issue. NOTE THAT OUR NEXT ISSUE WILL BE July/August 2026 |
|
 |
As a way to introduce our brass coins to the community, we will raffle off a free coin during the month of August. Follow link ABOVE for instructions for entering. |
|

She's looking beautiful Nama! I know what you mean with the pastels, I tried it on my first ship and its horrible, spreads everywhere.Got the deck laid finally and rough-sanded.
View attachment 630324
View attachment 630325
A couple of joints are not as tight as I would have liked, but overall I’m rather pleased. In order to get the gun ports looking right, I needed to lower the guns, which I accomplished by sanding the deck planks to about half their original thickness on my homemade thickness sander. It didn’t do a perfect job, but worked better than I had expected.
For caullking I used artist’s pastels. Although I like how it turned out, the pastels are pretty messy to work with, so not sure I’d recommend it.
For the rivet-counters (are they treenail counters here?), yes, the planks are longer than any tree could ever hope to grow, but doing them as full-length planks added some simplicity and I think the deck will be busy enough when complete that the length of the planks will not really be noticable.
Need to experiment with finishes, but that will have to wait until we get back from the States.
If you’re wondering about the clamps on the bulwarks, those are holding a small strip of hull planking I needed to add in order to raise the top of the bulwark about 1mm to ensure the gun ports came out right.
I’m still not quite happy with the consistency of the waterways so I need to come up with a way to sand the bevel down some. Custom sanding block should do the trick.
That’s all for now. Hopefully, it doesn’t take me so long for the next update.



Thanks, Doc. No, I’m going to keep it clean. Apart from the fact that the look of it appeals to me, the kit-supplied wood is so soft and so light in color I think convincing treenails would be exceedingly difficult to pull off. For me anyway; you would make it look easyVery nice decking! Will the treenail counters be counting treenails on this deck - or will you go for a cleaner look?

Thank you, Daniel! Your sexy Xebec puts her to shame, but I’m doing my best.She's looking beautiful Nama! I know what you mean with the pastels, I tried it on my first ship and its horrible, spreads everywhere.
Thank you! Not so far along, really. You can’t see the unplanked sides in the photos…It's looking great. You're further along than I remember.



Thank you, Günther. I’m curious too!Hey Namabiiru,
That really looks great... I'm curious to see how it turns out. Great photos at twilight...

Good on you, mate. I've had that jet lag (Boston to Seoul and back) I was completely useless during those waking hours.IF it can be said there is an up-side to jet lag, then I suppose it would be the bonus bench time you get when you find yourself wide awake at 2am with no prospect of getting back to sleep.
This has allowed me to make a good start on framing in the gunports. The whole interior structure of the bulwarks is too hideous to display, so photos will have to wait until bulwark ceilings are done.
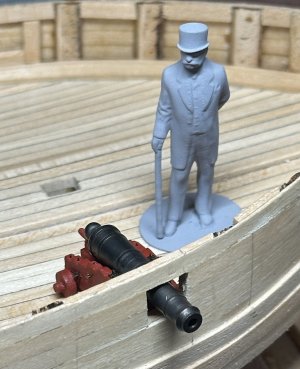

This is a milestone. Using one of the carriaged guns as a measuring tool demonstrates that you have the correct measurements for the heights of the upper and lower sills of the gun port. Copying those measurements relative to the deck to the other gun ports is easy now. All of the other gunports will be properly and consistently positioned.The first of the gunports has been cut in, inspected here by Mr Basswood with a carriage in place.
View attachment 637334
This is perhaps not a major construction milestone, but it is a significant psychological milestone for me, as I have been agonizing over these gun ports for over a year. Now that I’ve crossed the Rubicon, I feel like I can really start progressing.
The barrel still sits higher in the port than I would have liked, but it’s been a challenge to get it even this close.
Thanks, Kurt. I actually cheated on that a bit. The upper and lower sills run parallel to the slope of the deck so my framing timbers were simply aligned with the bulwark planks. I might be cast out into the abyss if I said I used the TLAR method, but…This is a milestone. Using one of the carriaged guns as a measuring tool demonstrates that you have the correct measurements for the heights of the upper and lower sills of the gun port. Copying those measurements relative to the deck to the other gun ports is easy now. All of the other gunports will be properly and consistently positioned.
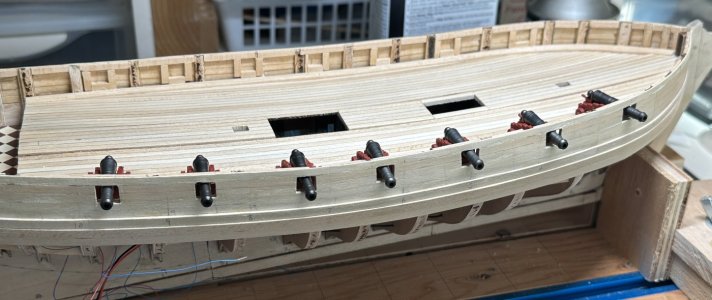 Seven gunports for seven brothers. No, wait. That’s not how that goes.
Having the planks align with the gundeck and gun port sills is how planking in many Corel kits is made for the first layer of planking. It's a good simplification for beginning builders that makes planking a little easier. Of course, the second layer of planking should follow different lines; the sheer lines. You would trim and fit those planks around the gun ports, which do they do not line up with neatly.View attachment 637462Seven gunports for seven brothers. No, wait. That’s not how that goes.
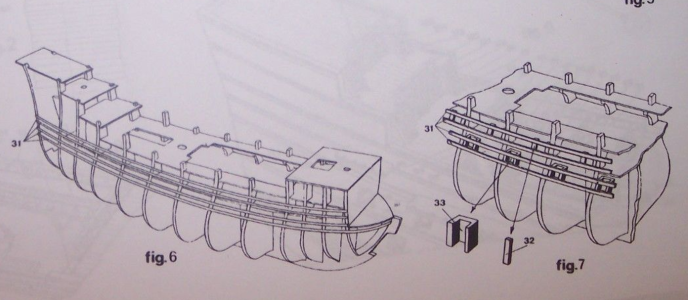
Luckily, with this ship all guns are on the weather deck, so everything pretty much has to follow the sheer of the deck. When I go for something with more guns, I’ll definitely have to keep what you said in mind.Having the planks align with the gundeck and gun port sills is how planking in many Corel kits is made for the first layer of planking. It's a good simplification for beginning builders that makes planking a little easier. Of course, the second layer of planking should follow different lines; the sheer lines. You would trim and fit those planks around the gun ports, which do they do not line up with neatly.
Example: Gun barrels are mounted on part 33. Planks are applied at the level of the upper and lower sills of the rows of gun ports.
View attachment 637463
That makes things much easier than a triple decker.Luckily, with this ship all guns are on the weather deck, so everything pretty much has to follow the sheer of the deck. When I go for something with more guns, I’ll definitely have to keep what you said in mind.