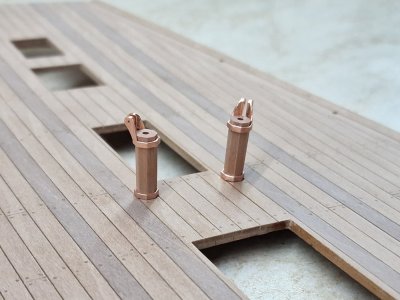
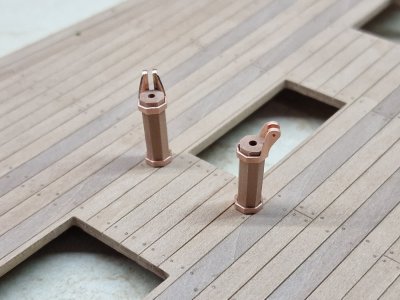
• Ships of Scale has incorportated an extra level of security when you log In. Please follow on-screen prompts to acknowledge that you are not a robot via a "Check Box" or a "Pictorial Check Box Puzzle". This is needed due to higher level of AI Activity Security.
  • SUBSCRIBE TO SHIPS IN SCALE TODAY!

    The beloved Ships in Scale Magazine is back and charting a new course for 2026!
    Discover new skills, new techniques, and new inspirations in every issue.

    NOTE THAT OUR NEXT ISSUE WILL BE July/August 2026
  • Win a Free Custom Engraved Brass Coin!!!
    As a way to introduce our brass coins to the community, we will raffle off a free coin during the month of August. Follow link ABOVE for instructions for entering.

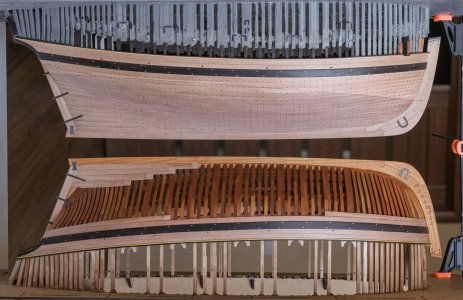
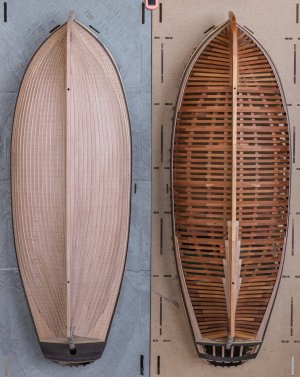
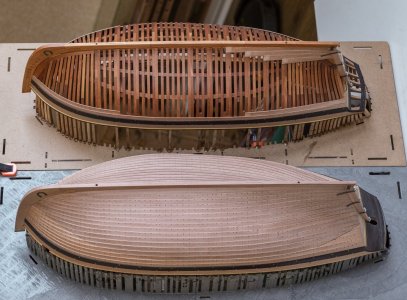
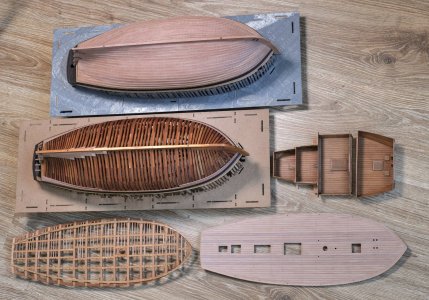
HMS Alert [1777] 1:48 POF by serikoff. (Two hulls: skeleton and fully rigged)

Good morning Sergey. Wow your craft is brilliant. Every detail is made to perfection - the work is so fine it almost looks like the pics are AI generated. Come on ........there must be a flaw somewhere...... ROTF. I hope you and your family are staying safe my friend. Cheers Grant.
Thanks Grant! There are still flaws, unfortunately, without them it would be impossible. A lot of what I do is criticized very strongly. I would be happy to do everything perfectly, but unfortunately small moments confuse me. My wife constantly scolds me that I am too self-critical and no one notices what I consider a mistake or flaw, but it upsets me. But as a rule, I immediately review the works of those who are my idols and see that they also have many flaws and mistakes and understand that it is impossible without them. (probably the only exception is Dr. Michael - Mikhail Bezverkhny, like a machine he does everything so perfectly that it seems unrealistic. But in terms of style, I like his work less than, for example, Dmitry Shevelev, who does not bother too much with minor flaws). In a word, I in no way belittle your words or my work, but like all of us, I always want to do better than I just did, that’s my nature, hahaha
 
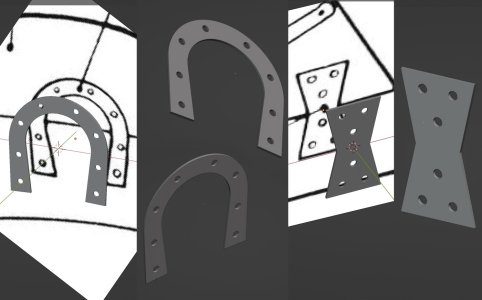
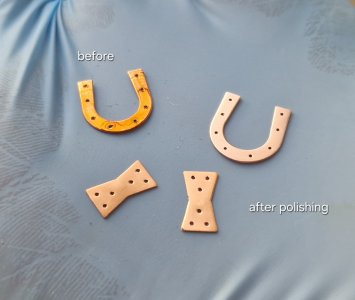
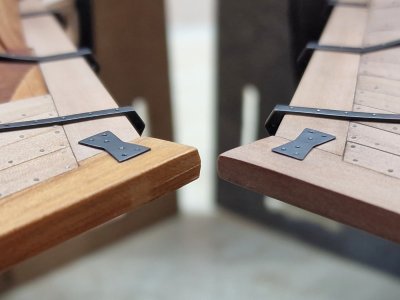
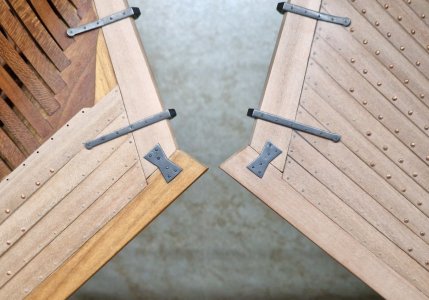
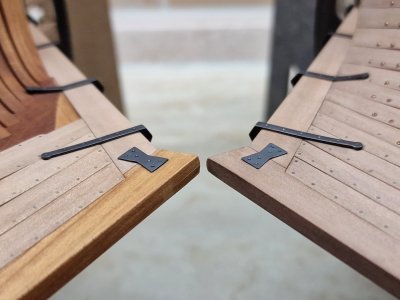
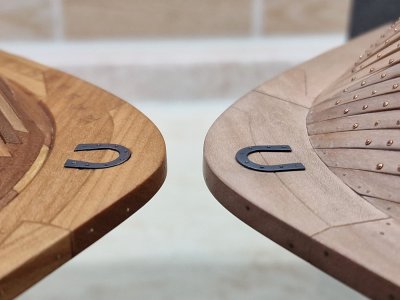
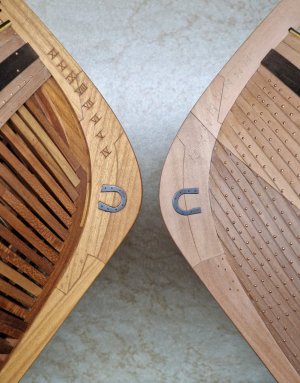
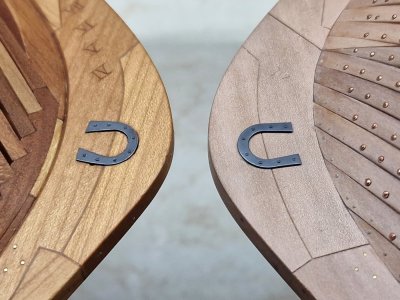
Horseshoe and Fish plates.

Alert 2862.jpg

Alert 2863.jpg


Let's talk...

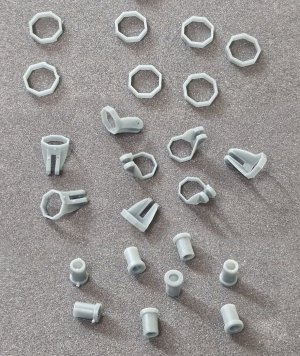
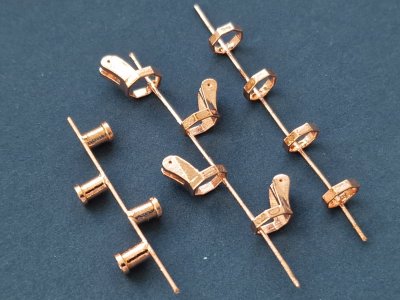
Like the steering wheel hinges, I also modeled these parts in a 3D program, then printed them on a 3D printer, copper-plated them, and blackened them. Yes, in theory, this could have been done with a sheet of copper or brass and a regular file, but I was too lazy to do that much work, and it was important to me that everything looked identical. The printer allowed me to print parts 0.2 mm thick, and after copper-plating and polishing, they were no thicker than 0.3 mm. The exception was the horseshoe on the first hull. Since the keel already had a groove for the horseshoe that came with it, I simply copper-plated it and installed it in that groove.

Originally, these parts were recessed into the wood and flush-mounted, but that's difficult to achieve without a CNC milling machine, so I made them overlays, and I like the look as is.

The question remains about the material. Before the days when underbody parts weren't copper-plated, all the brackets (plates) were made of forged iron and connected with through bolts that held them in place. But after the ship's bottom was covered with copper sheets, everyone noticed one thing: the wrought iron next to the copper was disintegrating within months, and the wood around it was rotting. It was later discovered that a galvanic process occurred in the salt water, and iron ions were transferred to the copper, causing the iron to disintegrate. So, all the joints between the copper and iron were insulated, but this didn't really help. Only later did they begin replacing the iron bolts and plates with copper ones.

So here's the question... I'm making a model that originally didn't have a copper bottom, and it was only updated a year later. They replaced the cannons with 5-piece ones and covered the bottom with copper sheets... And it's unclear whether they replaced the plates with copper ones or not. Goodwin indicates in the anatomy that these parts are made of copper, but given the numerous errors in the anatomy, I can't blindly trust this, but still...

In short, I haven't decided what to do yet. I'm not planning on covering the bottom with copper sheets; I've only simulated the waterline with a different pear-colored finish (this simply shows that the wood darkened more underwater). But I want to install 6-pound cannons on the model, which date back to 1778, so there's a mismatch between the copper bottom and the cannons...

In short, I haven't decided yet, but I have a backup plan. I could, of course, leave the brackets (plates) as I did in black... But I could carefully polish the top layer of blackening with 0000 steel wool, and underneath will be heavily oxidized copper (at least that's the color it will be). I want to make some samples and see how it all looks in real life, not just in words... but for now, here's the result in black:

Alert 2864.jpg

Alert 2865.jpg

Alert 2866.jpg

Alert 2867.jpg

Alert 2868.jpg

Alert 2869.jpg

Well, here's a general view of the two models. And at this point, just above the wave, everything is practically ready, and I'll move on to working on the decks...

Alert 2870.jpg

Alert 2871.jpg

Alert 2872.jpg

Ship-1​
 
Last edited:
Woo
Hufeisen- und Fischteller.

View attachment 630547

View attachment 630548


Lass uns reden...

Wie die Lenkradscharniere habe ich auch diese Teile in einem 3D-Programm modelliert, anschließend mit einem 3D-Drucker gedruckt, verkupfert und geschwärzt. Theoretisch hätte man das natürlich auch mit einem Kupfer- oder Messingblech und einer normalen Feile machen können, aber ich war zu faul für so viel Arbeit und mir war wichtig, dass alles identisch aussah. Der Drucker ermöglichte mir, Teile mit einer Dicke von 0,2 mm zu drucken, und nach dem Verkupfern und Polieren waren sie nicht dicker als 0,3 mm. Die Ausnahme bildete das Hufeisen am ersten Rumpf. Da der Kiel bereits eine Nut für das dazugehörige Hufeisen hatte, habe ich es einfach verkupfert und in diese Nut eingesetzt.

Ursprünglich waren diese Teile in das Holz eingelassen und bündig montiert, aber das ist ohne eine CNC-Fräsmaschine schwer zu erreichen, also habe ich sie als Überzüge gefertigt, und mir gefällt der Look so, wie er ist.

Die Frage nach dem Material bleibt bestehen. Bevor die Unterwasserteile verkupfert wurden, bestanden alle Halterungen (Platten) aus Schmiedeeisen und waren mit Bolzen befestigt. Nachdem der Schiffsrumpf mit Kupferblechen verkleidet war, fiel allen auf: Das Schmiedeeisen neben dem Kupfer zerfiel innerhalb weniger Monate, und das umliegende Holz verrottete. Später entdeckte man, dass im Salzwasser ein galvanischer Prozess stattfand, bei dem Eisenionen auf das Kupfer übertragen wurden und so dessen Zersetzung verursachten. Daher wurden alle Verbindungen zwischen Kupfer und Eisen isoliert, was jedoch keine wirkliche Abhilfe schaffte. Erst später begann man, die Eisenbolzen und -platten durch Kupferbolzen und -platten zu ersetzen.

Also, hier ist meine Frage: Ich baue ein Modell, das ursprünglich keinen Kupferboden hatte und erst ein Jahr später überarbeitet wurde. Dabei wurden die Kanonen durch fünfteilige ersetzt und der Boden mit Kupferplatten verkleidet. Ob die Platten ebenfalls durch Kupferplatten ersetzt wurden, ist unklar. Goodwin gibt in der Anatomiezeichnung an, dass diese Teile aus Kupfer bestehen, aber angesichts der zahlreichen Fehler in der Zeichnung kann ich mich nicht blind darauf verlassen. Trotzdem...

Kurz gesagt, ich bin mir noch nicht sicher, was ich genau machen soll. Ich plane nicht, den Boden mit Kupferblechen zu verkleiden; ich habe lediglich die Wasserlinie mit einer anderen, birnenfarbenen Oberfläche simuliert (das zeigt einfach, dass das Holz unter Wasser dunkler geworden ist). Ich möchte aber 6-Pfünder-Kanonen aus dem Jahr 1778 an dem Modell anbringen, wodurch ein Kontrast zwischen dem Kupferboden und den Kanonen entsteht.

Kurz gesagt, ich habe mich noch nicht entschieden, aber ich habe einen Plan B. Ich könnte die Halterungen (Platten) natürlich so lassen, wie ich sie schwarz lackiert habe… Ich könnte aber auch die oberste Schicht der Schwärzung vorsichtig mit Stahlwolle der Körnung 0000 polieren, und darunter käme stark oxidiertes Kupfer zum Vorschein (zumindest hätte es diese Farbe). Ich möchte ein paar Muster anfertigen und sehen, wie das Ganze in echt aussieht, nicht nur in Worten… aber vorerst hier das Ergebnis in Schwarz:

View attachment 630549

View attachment 630550

View attachment 630551

View attachment 630553

View attachment 630554

View attachment 630555

Hier ist eine Gesamtansicht der beiden Modelle. Und an diesem Punkt, direkt über der Welle, ist praktisch alles fertig, und ich werde mich nun den Decks widmen…

View attachment 630557

View attachment 630558

View attachment 630559

Schiff-1​
wooow, was für ein fantastischer Anblick. Sensationell.
 
Horseshoe and Fish plates.

View attachment 630547

View attachment 630548


Let's talk...

Like the steering wheel hinges, I also modeled these parts in a 3D program, then printed them on a 3D printer, copper-plated them, and blackened them. Yes, in theory, this could have been done with a sheet of copper or brass and a regular file, but I was too lazy to do that much work, and it was important to me that everything looked identical. The printer allowed me to print parts 0.2 mm thick, and after copper-plating and polishing, they were no thicker than 0.3 mm. The exception was the horseshoe on the first hull. Since the keel already had a groove for the horseshoe that came with it, I simply copper-plated it and installed it in that groove.

Originally, these parts were recessed into the wood and flush-mounted, but that's difficult to achieve without a CNC milling machine, so I made them overlays, and I like the look as is.

The question remains about the material. Before the days when underbody parts weren't copper-plated, all the brackets (plates) were made of forged iron and connected with through bolts that held them in place. But after the ship's bottom was covered with copper sheets, everyone noticed one thing: the wrought iron next to the copper was disintegrating within months, and the wood around it was rotting. It was later discovered that a galvanic process occurred in the salt water, and iron ions were transferred to the copper, causing the iron to disintegrate. So, all the joints between the copper and iron were insulated, but this didn't really help. Only later did they begin replacing the iron bolts and plates with copper ones.

So here's the question... I'm making a model that originally didn't have a copper bottom, and it was only updated a year later. They replaced the cannons with 5-piece ones and covered the bottom with copper sheets... And it's unclear whether they replaced the plates with copper ones or not. Goodwin indicates in the anatomy that these parts are made of copper, but given the numerous errors in the anatomy, I can't blindly trust this, but still...

In short, I haven't decided what to do yet. I'm not planning on covering the bottom with copper sheets; I've only simulated the waterline with a different pear-colored finish (this simply shows that the wood darkened more underwater). But I want to install 6-pound cannons on the model, which date back to 1778, so there's a mismatch between the copper bottom and the cannons...

In short, I haven't decided yet, but I have a backup plan. I could, of course, leave the brackets (plates) as I did in black... But I could carefully polish the top layer of blackening with 0000 steel wool, and underneath will be heavily oxidized copper (at least that's the color it will be). I want to make some samples and see how it all looks in real life, not just in words... but for now, here's the result in black:

View attachment 630549

View attachment 630550

View attachment 630551

View attachment 630553

View attachment 630554

View attachment 630555

Well, here's a general view of the two models. And at this point, just above the wave, everything is practically ready, and I'll move on to working on the decks...

View attachment 630557

View attachment 630558

View attachment 630559

Ship-1​
The beautiful piece of artwork continues ! :)
 
It's been a while since I've spoiled you with useless statistics. ROTFROTF

Don't ask me why I calculate this, but it's not difficult for me and I find it interesting, so let's begin...

As of today, since the project's launch on March 10, 2025 (almost a year and a half ago), I've been creating two models in parallel for exactly 350 days. And considering that I spent at least 5-6 hours on my hobby during each of those 350 days, that's at least 2,000 hours of work. And I haven't included the days I spent calculating rigging and other organizational work.

Not counting all the elements placed on the deck: gratings, ladders, bits, and other things that I haven't yet added to the statistics, here's the current count:

1st hull:

~1,217 parts,

+800 wooden nails,

+200 copper clinker planking bolts.

2nd hull:

~686 parts,

+2,328 wooden nails,

+1,914 copper clinker planking bolts.

Well, you'll have to live with that information now. ROTF ROTF ROTF

Alert 2873.jpg
 
Woo

wooow, was für ein fantastischer Anblick. Sensationell.
….und 1 Palette „ Nerven „
Vielen Dank! Ja, leider läuft nicht immer alles glatt und ich bin manchmal nervös, aber insgesamt bereitet mir mein Hobby nur positive Gefühle. Es ist für mich wie ein Lichtblick, der mich vor dem Wahnsinn bewahrt, obwohl im Land Krieg herrscht und kein Ende in Sicht ist. Der Modellbau lenkt mich von all meinen Gedanken ab und lässt keine Zeit für Verzweiflung und Angst. Dieses Hobby ist mittlerweile mein Leben! Danke für eure Unterstützung!

Thank you! Yes, unfortunately, things don't always work out and I get nervous, but overall, my hobby brings me only positive emotions. For me, this hobby is the ray of light that keeps me from going crazy even though there's a war going on in the country, and it seems to have no end in sight. Building models takes all my thoughts away, leaving no time for despondency and anxiety. So, for me, this hobby is my whole life now! Thank you for always supporting me!

The beautiful piece of artwork continues ! :)
Thank you for your regular comments. It encourages me to write detailed descriptions here, rather than just posting dry photos.

Бімба Палець вгору
Ахаахах, дяка!!!! Це навіть скажу - вагінь! Explosion

:D:cool:Thumbsup


Thank you, friends, to everyone who writes comments, follows my progress (and mistakes), and for your likes and support!

I can officially declare that the ship hulls are ready, and I'm leaving the metal brackets (horseshoe and hourglass-shaped) as is, in black.

I did a test today (I didn't take a photo), but I'll explain it in words. I've written many times that I don't recommend using pure BB blackening, but rather diluting it, and today, for the sake of experimentation, I tried everything that shouldn't be done.

So (this shouldn't be done), I did this specifically for the experiment.

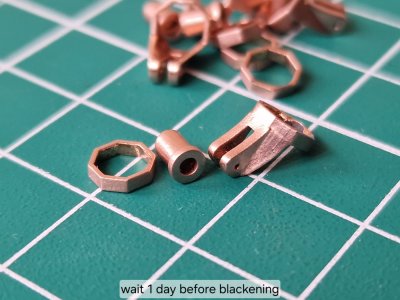
1. I polished the copper part and blackened it immediately. (I always let the oxide film form on pure copper for at least a day.)
2. I diluted the BB blackening with water slightly, 1:1 (I never use pure BB blackening and dilute it 1:5 the first time, and then 1:3 again if needed).
3. I placed the washed part in direct sunlight to dry (I dry the part naturally without heating it, meaning I dry it in the shade).

The end result... The blackening layer had crusted over, and when I tried to carefully scrape it off, the flakes peeled off, revealing patches of copper. It didn't look like it had been polished, but like it had been oxidized for a long time, but it was copper-colored, not black. I tried to eliminate all the negative factors to achieve this result. And why, you ask? It was to quickly create a heavily oxidized surface to test how the color would look on the model. And I didn't like that look. Black looked much more interesting. I knew that simply polishing the blackening layer wouldn't work, since that would polish the copper and make it shine, and I wanted to see how it would look after years of oxidation. I realized I liked the black color, so I left these parts as is. So, that's how it is. It's a pity that I didn't take a photo of the process, but I think everyone has seen old copper, but I wanted to see it directly in the required part and on the body itself, not imagining it but in real time.
 
* I'll continue the review using the sample from my website, with reference to the current engraving...

Chapter 26. On the Decks (Part 4)​

1/
Gratings.


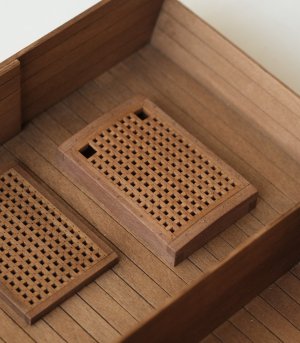
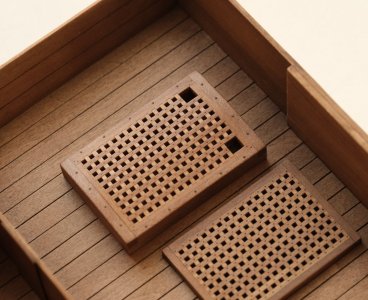
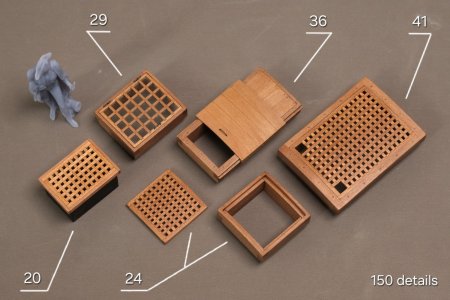
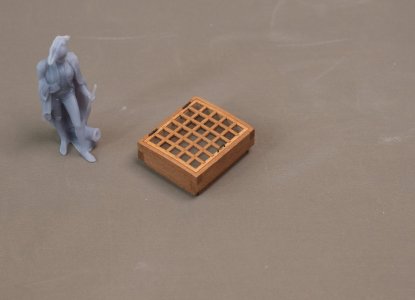
So, a huge milestone has been achieved; the hulls and decks are almost complete, and now I'm returning to the deck rigging and will begin with finishing the gratings.

Alert 2874.jpg

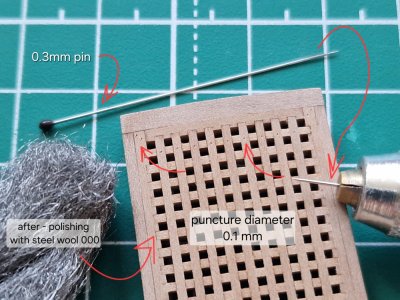
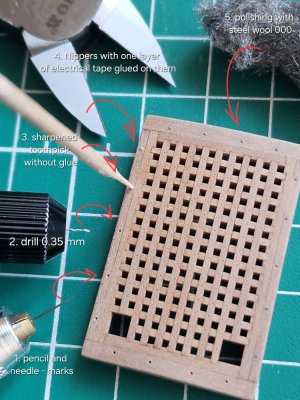
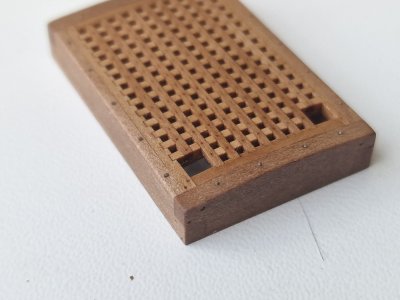
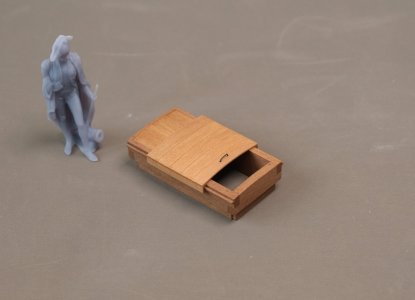
This time I made an imitation of the nails that connected the gratings themselves and the nails that fastened the frames...

Alert 2875.jpg

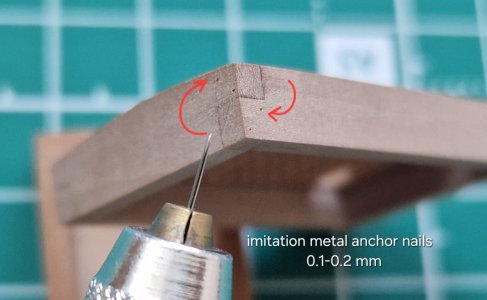
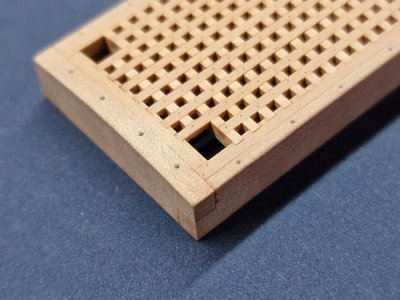
...and I thought long and hard, and finally decided to make imitation plugs over the bolts that secured the frames to the beams and carlings. I haven't yet decided whether I'll do this where the frames are thin, but where the thickness allows, I will.

Alert 2876.jpg

I'm still thinking about doing the same on the first body kit, but to protect the oil coating, I'll cover it with masking tape.

I wanted to create a sense of presence... that is, so that the small details wouldn't overwhelm the main part from a distance, so that they wouldn't look like contrasting dots, but so that all the fine detailing would only be visible up close and just enough to be distinguishable from the main body.

Alert 2877.jpg

And now, the most important and most interesting part... and for me, it's also the most challenging and the most terrifying!!! This is the oil coating. What's the big deal? But I'm making a museum-style model, and after the coating, it initially becomes much darker than before. And then there's the bitumen... And it's important to have a sense of proportion. If it's too light, the antique, museum-like effect will be lost, and if it's too dark, everything could blur into one black spot...

Alert 2878.jpg

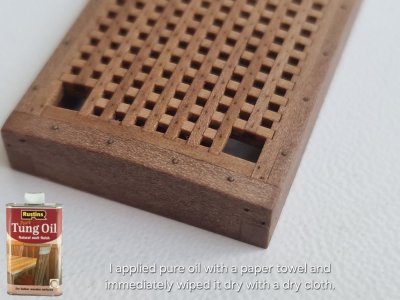
As planned, to make the deck details stand out and contrast, I coated them with pure tung oil. I did this with a regular paper towel and immediately wiped it dry with another one.

Alert 2879.jpg

Unfortunately, I couldn't achieve accurate color reproduction quickly, and the color in the photo isn't quite as accurate as in real life, although it's quite close. I'll try to make every effort to capture the color in the photo as realistically as possible.

The photos below were taken with a Fujifilm X-T4 and an XF-16-55mm f2.8 lens.

Alert 2880.JPG

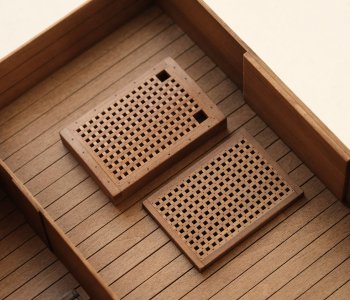
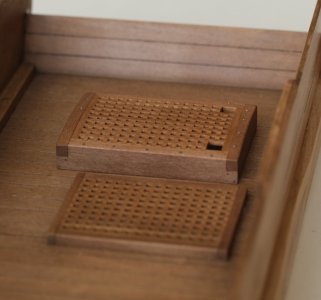
The deck in the background (if you remember) is the lower deck of the second hull, which I coated with oil and bitumen long ago. And as you can see, the grating matches the color and is almost identical to the one already coated with bitumen. And that's good, because now I don't need to heavily shade it with bitumen, but only create contour accents and aging spots.

Alert 2881.JPG

Alert 2882.JPG

Alert 2883.JPG

I understand that not everyone will appreciate this style and not everyone likes the museum-like look... but I really like these style. They capture the spirit of the time, the antique, the vintage... and they don't look like pretty toys at all, but rather like works of art, which is what I strive for. And although I'm very self-critical and don't consider my models as such, I am pleased to see these colors, this look, and this atmosphere that these wooden figures emanate.
 
Last edited:
* I'll continue the review using the sample from my website, with reference to the current engraving...

Chapter 26. On the Decks (Part 4)​

Gratings.

So, a huge milestone has been achieved; the hulls and decks are almost complete, and now I'm returning to the deck rigging and will begin with finishing the gratings.

View attachment 631198

This time I made an imitation of the nails that connected the gratings themselves and the nails that fastened the frames...

View attachment 631203

...and I thought long and hard, and finally decided to make imitation plugs over the bolts that secured the frames to the beams and carlings. I haven't yet decided whether I'll do this where the frames are thin, but where the thickness allows, I will.

View attachment 631204

I'm still thinking about doing the same on the first body kit, but to protect the oil coating, I'll cover it with masking tape.

I wanted to create a sense of presence... that is, so that the small details wouldn't overwhelm the main part from a distance, so that they wouldn't look like contrasting dots, but so that all the fine detailing would only be visible up close and just enough to be distinguishable from the main body.

View attachment 631205

And now, the most important and most interesting part... and for me, it's also the most challenging and the most terrifying!!! This is the oil coating. What's the big deal? But I'm making a museum-style model, and after the coating, it initially becomes much darker than before. And then there's the bitumen... And it's important to have a sense of proportion. If it's too light, the antique, museum-like effect will be lost, and if it's too dark, everything could blur into one black spot...

View attachment 631212

As planned, to make the deck details stand out and contrast, I coated them with pure tung oil. I did this with a regular paper towel and immediately wiped it dry with another one.

View attachment 631213

Unfortunately, I couldn't achieve accurate color reproduction quickly, and the color in the photo isn't quite as accurate as in real life, although it's quite close. I'll try to make every effort to capture the color in the photo as realistically as possible.

The photos below were taken with a Fujifilm X-T4 and an XF-16-55mm f2.8 lens.

View attachment 631214

The deck in the background (if you remember) is the lower deck of the second hull, which I coated with oil and bitumen long ago. And as you can see, the grating matches the color and is almost identical to the one already coated with bitumen. And that's good, because now I don't need to heavily shade it with bitumen, but only create contour accents and aging spots.

View attachment 631215

View attachment 631216

View attachment 631218

Ich verstehe, dass nicht jeder diesen Stil schätzt und nicht jeder den museumsartigen Look mag… aber ich mag diesen Stil wirklich sehr. Er fängt den Zeitgeist ein, das Antike, das Vintage… und sie sehen überhaupt nicht wie hübsches Spielzeug aus, sondern eher wie Kunstwerke, genau das, was ich anstrebe. Und obwohl ich sehr selbstkritisch bin und meine Modelle nicht als solche betrachte, freue ich mich über diese Farben, diesen Look und diese Atmosphäre, die diese Holzfiguren ausstrahlen.

Sehr schön der warme „Kastanienfarbton“. Ich finder der paßt absolut zum Gesamteindruck des wunderbaren Modells. Sehr schön geworden.
 
Serikoff, używasz oleju Tung do całego modelu? Kadłub, pokład, maszty , drobnica pokładowa. ? Kadłub , pokład mojego modelu prawie na ukończeniu i pora na konserwację..
Pozdrawiam
Dzięki...
 
Serikoff, używasz oleju Tung do całego modelu? Kadłub, pokład, maszty , drobnica pokładowa. ? Kadłub , pokład mojego modelu prawie na ukończeniu i pora na konserwację..
Pozdrawiam
Dzięki...
No, I use Tung and Danish oils depending on the color scheme. Everything on the deck (gratings, pins...) will be coated with Tung oil, as it darkens the surface more. I plan to coat the deck with Danish oil to make it a little lighter so that details aren't lost. I plan to coat the first hull with Danish oil (but haven't decided yet, as part of it is already coated with Tung oil), and I plan to coat the second hull with Tung oil, but I haven't made a final decision yet. Initially, the planks were coated with it before they were fixed, and I liked the color. Now that the hull has been polished, it's lighter again, so I haven't decided. But I'm thinking of using Tung oil. As you can imagine, this is a very difficult decision, and a lot depends on it, so I'm in no rush.

Sehr schön der warme „Kastanienfarbton“. Ich finder der paßt absolut zum Gesamteindruck des wunderbaren Modells. Sehr schön geworden.
Vielen Dank. Ja... die Farbwahl ist hier sehr wichtig und verantwortungsvoll.
 
Last edited:
Chapter 26. On the Decks (Part 4)

2/
Gratings and ladders.

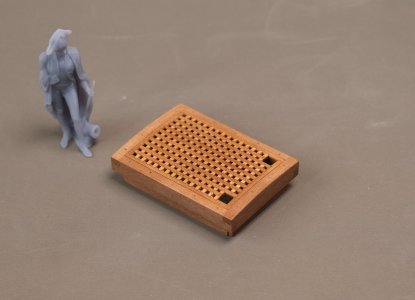
A couple of days ago, I coated all the gratings and drains with pure Rutrins Tung Oil.

I applied the oil once with a piece of paper towel, spread it evenly, and immediately wiped it dry with another towel.

I also attached the handles and curtains to the skylight and drain. The handles are made of blackened 0.25mm brass wire. The curtains are soft copper wire, also blackened. Beforehand, I rolled the edges and cut them (to create flares at the ends, as I did for the bolts). I also rolled the center with a knife, but without cutting, to create a circular groove imitating the joint between the two curtain parts.

I tried to capture the color as close to life as possible. I almost got it right, but when I tried to lighten the exposure, the color shifted—so now this is what I can see in person, at least a little bit.

I hope to get a macro lens someday so I can take closer photos with maximum clarity and color rendition. The color still isn't quite right, and the photo doesn't have the full sharpness necessary to convey what I want.
Alert 2884.jpg

Alert 2885.jpg

Alert 2886.jpg

Alert 2887.jpg

Alert 2888.jpg

Alert 2889.jpg

Alert 2890.JPG

Next up are the rest of the deck elements...
 
Kapitel 26. An Deck (Teil 4)

2/
Gitterroste und Leitern.

Vor ein paar Tagen habe ich alle Gitterroste und Abflüsse mit reinem Rutrins Tungöl bestrichen.

Ich habe das Öl einmal mit einem Stück Papiertuch aufgetragen, gleichmäßig verteilt und es sofort mit einem anderen Tuch trocken gewischt.
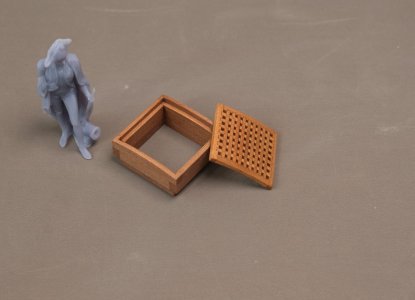
Ich habe auch die Griffe und Vorhänge am Dachfenster und am Abfluss befestigt. Die Griffe sind aus geschwärztem 0,25 mm Messingdraht. Die Vorhänge bestehen aus weichem, ebenfalls geschwärztem Kupferdraht. Zuvor habe ich die Kanten umgebördelt und eingeschnitten (um an den Enden Ausbuchtungen zu erzeugen, wie ich es auch bei den Bolzen gemacht habe). Außerdem habe ich die Mitte mit einem Messer umgebördelt, aber nicht eingeschnitten, um eine kreisförmige Nut zu bilden, die die Verbindungsstelle zwischen den beiden Vorhangteilen nachahmt.
Ich habe versucht, die Farben so naturgetreu wie möglich einzufangen. Fast wäre es mir gelungen, aber als ich die Belichtung reduzierte, veränderte sich die Farben – so sehe ich sie jetzt in natura, zumindest ein bisschen.

Ich hoffe, mir irgendwann ein Makroobjektiv zuzulegen, um Nahaufnahmen mit maximaler Schärfe und Farbwiedergabe machen zu können. Die Farben sind noch nicht ganz optimal, und das Foto hat noch nicht die nötige Schärfe, um das auszudrücken, was ich möchte.

View attachment 631686

View attachment 631687

View attachment 631688

View attachment 631689

View attachment 631690

View attachment 631694

View attachment 631695

Als Nächstes folgen die restlichen Deck-Elemente...
Der Farbton ist sensationell. Wie lange hast Du die Teile trocknen lassen? Ein wunderbarer warmer Farbton. Absolut stimmig zum Modell. Auch die Griffe sind einfach wunderbar. Sehr schön ausgeführt
 
Last edited:
Der Farbton ist sensationell. Wie lange hast Du die Teile trocknen lassen? Ein wunderbarer wärmerer Farbton. Absolut stimmig zum Modell. Auch die Griffe sind einfach wunderbar. Sehr schön ausgeführt
Vielen Dank. Es ist schon ein paar Tage her. Aber es braucht einen Monat, besser länger, um vollständig zu trocknen. Ein paar Tage reichen zwar, um die Teile zu verkleben, aber für eine zuverlässige Verbindung sollte man warten, bis es komplett durchgetrocknet ist. Tungöl haftet gut auf Klebstoff, aber erst, nachdem dieser getrocknet ist. Manchmal kann es Probleme mit dänischem Öl und Teaköl geben. Ja, mir gefällt die Farbe auch. Sie eignet sich hervorragend für meine Aufgabe, Modelle in Museumsqualität herzustellen.
 
Chapter 26. On the Decks (Part 4)

3/
Pumps.


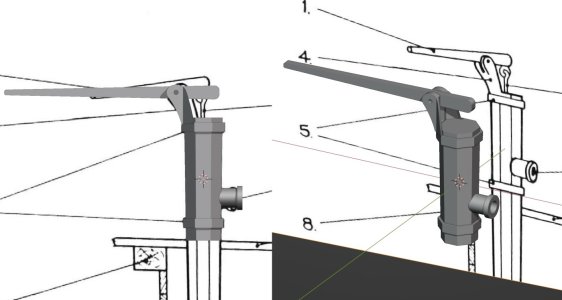
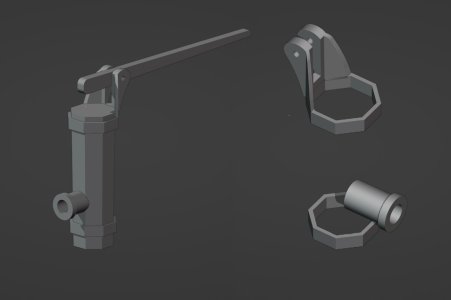
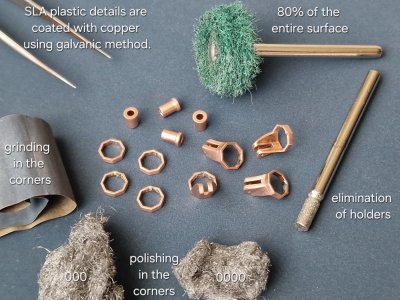
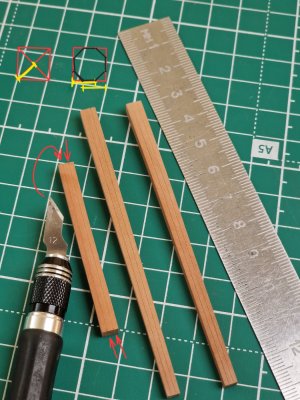
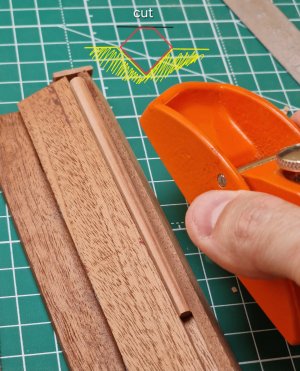
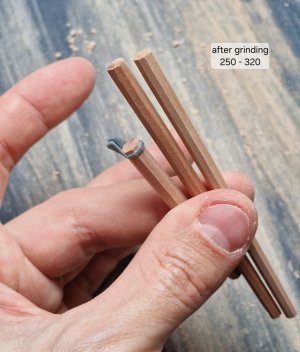
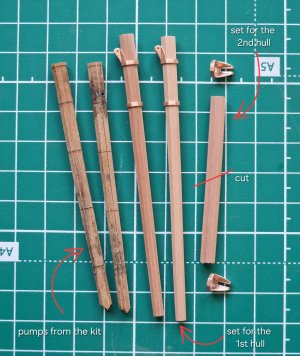
I've previously demonstrated the process of making all metal parts by electroplating 3D-printed plastic parts with copper.
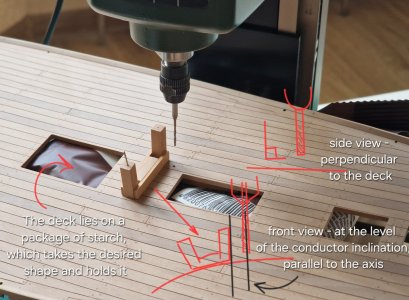
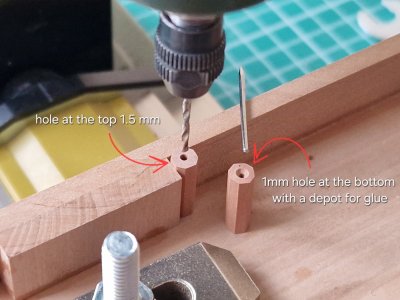
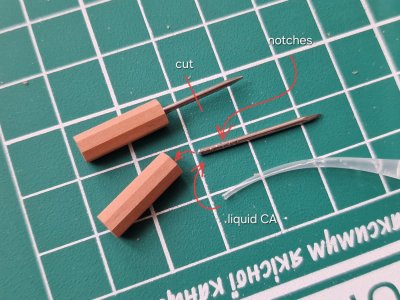
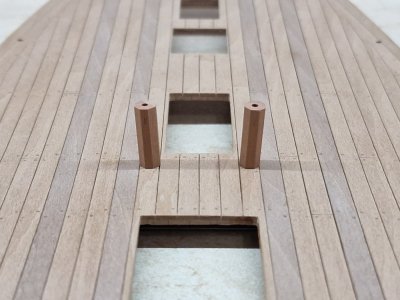
Now I'm processing, polishing, blackening, and making wooden components for them. All the work with the wooden blanks is described in the illustrations. I've emphasized all the key points.

Alert 2891.jpg

Alert 2892.jpg

Alert 2893.jpg

Alert 2894.jpg

Alert 2895.jpg

Alert 2896.jpg

Alert 2897.jpg

Alert 2898.jpg

Alert 2899.jpg

Alert 2900.jpg

Alert 2901.jpg

Alert 2902.jpg

Alert 2903.jpg

Alert 2904.jpg

Alert 2905.jpg

Alert 2906.jpg

Alert 2907.jpg

Alert 2908.jpg

Alert 2909.jpg

Alert 2910.jpg
To be continued...
 
Kapitel 26. An Deck (Teil 4)

3/
Pumps.


Ich habe bereits zuvor das Verfahren zur Herstellung aller Metallteile durch Galvanisieren von 3D-gedruckten Kunststoffteilen mit Kupfer demonstriert.
Jetzt bearbeite, poliere und schwärze ich die Holzrohlinge und fertige die Holzkomponenten dafür an. Alle Arbeitsschritte mit den Holzrohlingen sind in den Abbildungen dargestellt. Ich habe alle wichtigen Punkte hervorgehoben.

View attachment 631980

View attachment 631983

View attachment 631984

View attachment 631985

View attachment 631986

View attachment 631988

View attachment 631989

View attachment 631990

View attachment 631991

View attachment 631992

View attachment 631994

View attachment 631995

View attachment 631996

View attachment 631997

View attachment 631998

View attachment 631999

View attachment 632000

View attachment 632001

View attachment 632002

View attachment 632003
Fortgesetzt werden...
Wunderbare Arbeit. Fantastische Darstellung der einzelnen Schritte. Anschaulich, Präzise und sehr verständlich. Beeindruckend ist die konstante und konsequente Detailliebe - und Umsetzung. Danke, dass Sie uns daran teilhaben lassen.
 
Last edited:
Back
Top