• Ships of Scale has incorportated an extra level of security when you log In. Please follow on-screen prompts to acknowledge that you are not a robot via a "Check Box" or a "Pictorial Check Box Puzzle". This is needed due to higher level of AI Activity Security.
  • SUBSCRIBE TO SHIPS IN SCALE TODAY!

    The beloved Ships in Scale Magazine is back and charting a new course for 2026!
    Discover new skills, new techniques, and new inspirations in every issue.

    NOTE THAT OUR NEXT ISSUE WILL BE July/August 2026
  • Win a Free Custom Engraved Brass Coin!!!
    As a way to introduce our brass coins to the community, we will raffle off a free coin during the month of August. Follow link ABOVE for instructions for entering.

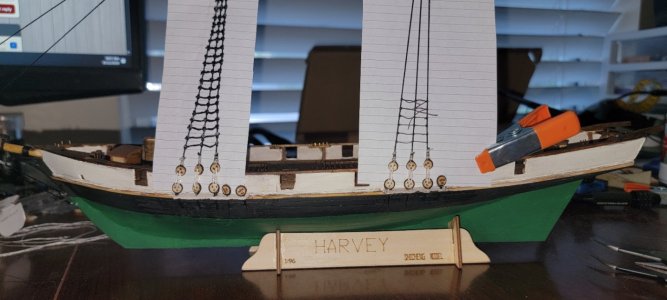
Rat lines first time

Have you glued your rattlin clove hitches?
I unfortunately have already and not sure i can safely cut them off. But its alright, im trying varying techniques with this build to see what i like.
Ill have to try that secondary knot you showed for the end and see if i like that better but also ive switched to a more brown ratline and thinner thread which already looks far better in my opinion.
I appreciate the tips!
 
I completely agree with the answer AndyA gave right after your post.
Yeah i hadnt even considered using outside materials as i was just using what came with my kit. His comment kind of opened my eyes! Ill read through your linked thread too to see what other information i can get. Thanks!
 
Interestingly, I just purchased Zinsser Bullseye shellac for my next project. I intend to mix it 4:1 (Alcohol to shellac) for early coats and to help strengthen very fragile parts before sanding/shaping. Not sure what final coat I'll be using, probably wipe-on poly. I'll have to try it on ropes as you suggest. Lots of good information, Popeye!

Xinsser Bullseye in the can is a 'three-pound cut." Shellac dilutions are classified by "pound cuts." A one-pound cut is one pound of shellac flakes diluted in one gallon of alcohol. For the purposes you've mentioned, I've always found using it straight out of the can (three-pound cut) is perfect. Be sure to stir it in the can before use.
 
Popeye, my Bullseye Shellac just arrived this pm. Looking forward to trying the technique you posted on the ratlines for my Harriet Lane. I am hoping for a better outcome than using super glue.
 
I bought some thread to repair a fishing pole from a repair site for such. It is very fine (Color Black) and does not fuzz. It's cheap but seems to be perfect.
 
Quick update, ive been slow to work on this lately due to other priorities but been changingnup the knots and threads so far and yalls advice is helping this look a ton better!
Still tinkering with getting them pulled tight correctly to give the slight sway but thats what this is for, to practice on.
I appreciate everyones advice!

20260912_090743.jpg
 
A trip to OfficeMax and buying a bottle of red and bottle of black stamp pad ink - putting some red in another container and adding drops of black until it is a brown that you like - a little black goes a looong way - sneak the ink into the deadeye lashing and see if brown does not look better than the white.
 
why not just get the right color thread?
I'm guessing his suggestion is to make my white threads dyed since I did them with white. I'm not gonna worry about the white thread there on this one as it was just something I had on hand that fit in the holes. Next build I'll do some research for a better color lol
 
Still tinkering with getting them pulled tight correctly to give the slight sway but thats what this is for, to practice on.

Congratulations! Huge improvement on those ratlines. In order to get the ratlines to have the proper catenary shapes, apply a drop or two of shellac to each section of ratline and it should wick readily into the ratline thread. While still wet, use a piece of dowel the diameter of the distance between the shrouds wrapped in some plastic wrap or the curved tip of a spoon bowl to hold each length of ratline between the shrouds to the proper concave curve shape and blow on the shellacked thread to evaporate the alcohol solvent until the shellac hardens enough to hold the curve shape, then let dry completely. The ratline thread will then be stiff and holding the natural curve you want.

As for the white lanyards and light-colored wooden deadeyes, coloring them black is so easy that there's no reason not to do so. Just take some permanent India ink on a small paintbrush and apply the ink. It will wick into the thread easily and dry quickly. (India ink is a combination of shellac, alcohol, and lamp black or similar pigment.) Do the same with the deadeyes. The ink will soak into the bare wood and dye it black. When dry, the finish should be matte black.

There's always a lot of argument about the "realistic" color of standing rigging (including deadeyes and lanyards.) For a scale model, the fact is that at most any scale viewing distance, it's going to appear black even if in real life when viewed up close it may have a bit of a brown color.
 
Yeah i hadnt even considered using outside materials as i was just using what came with my kit. His comment kind of opened my eyes! Ill read through your linked thread too to see what other information i can get. Thanks!
The moment you figure out that you can replace kit materials with superior and more accurate materials yourself is where you begin being a scratch builder. You realize that YOUR research is making your model better and better, not the kit instructions. Welcome to the Kit Bashers Coalition!
 
Back
Top