• Ships of Scale has incorportated an extra level of security when you log In. Please follow on-screen prompts to acknowledge that you are not a robot via a "Check Box" or a "Pictorial Check Box Puzzle". This is needed due to higher level of AI Activity Security.
  • SUBSCRIBE TO SHIPS IN SCALE TODAY!

    The beloved Ships in Scale Magazine is back and charting a new course for 2026!
    Discover new skills, new techniques, and new inspirations in every issue.

    NOTE THAT OUR NEXT ISSUE WILL BE July/August 2026
  • Win a Free Custom Engraved Brass Coin!!!
    As a way to introduce our brass coins to the community, we will raffle off a free coin during the month of August. Follow link ABOVE for instructions for entering.

Endurance - Occre First Build

Joined
Sep 17, 2026
Messages
19
Points
48

Hi all,

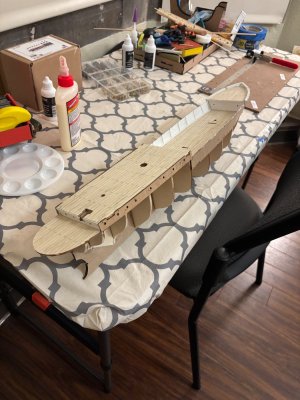
In case it's helpful for others or of interest (and just as a way to document), I thought I'd share my first build log here as I enter this new hobby. I am completing this in my dorm room at University, so excuse the tight space and messy work area (hard enough to fit a folding table in here, let alone all the tools). I do have some experience with modeling and woodworking, but this is the first model ship I've ever tackled.

At first, I wanted to reference other exceptional threads here on SoS and the many photos available online to fix all the inaccuracies in the kit, but, as a student, time is too limited (and I want to finish the kit before I have to move out of the dorm). I am implementing easy changes (such as not including penciled dots on the deck, to reflect Endurance's lack of visual deck nails), but otherwise following the instructions. This is going to be a gift for my father, and he seems to prefer more of a stylized model as opposed to pure accuracy anyway (we actually traveled to Grytviken together years ago as kind of the ultimate father-son adventure, and I hope to include with the model a photo album from our journey (thus why this kit was chosen)).

Anyway, I've learned a lot already, and I hope to keep progressing.

Some lessons I've learned so far:
  • Bending small particle-board and lime wood strips can be difficult without a mold. I'm used to using a traditional wood bending iron for larger pieces, and the smaller pieces are more delicate.
  • Pin angle is, at times, important. One pin accidentally pierced the ship's stern wall because I hammered it in at a slightly incorrect angle. It should be easily fixable, but it was avoidable.
  • Conjecture, but it may be better to plank the deck after securing the underlying template to the frame (as opposed to planking the deck prior to fitting it to the frame, as in the instructions). I notice that the planks, being thin, take more effort and care to work to fit the frame after they've been glued (to avoid damaging the decking). My gut is that fitting them individually to the deck once the deck is secured to the model's frame will produce slightly cleaner results.
  • Make templates when scratch building smaller pieces (e.g. the small piece at the front of Endurance's bow). It was hard to get everything just right without this.
Anyway, more to come.

I am aiming to get this all completed in time for the holidays to give as a gift, but I may have to push it off to be a birthday present, depending on how busy my academic schedule is and how long this takes.

Any tips, support, thoughts, or ideas are appreciated.
IMG_4603.jpg

IMG_4602.jpg
 
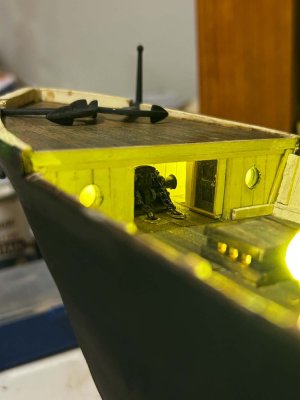
So not that this does you much good now but when I built mine I made the effort to be as accurate as I could and I discovered there was a windlass room under the forecastle of the ship.
As it seems like it's a little too late to add this to yours I might consider placing a wooden panel over where this room would be so as to indicate there being something there, you could even add a little trim on either side to indicate depth.


windlass.jpg
 
So not that this does you much good now but when I built mine I made the effort to be as accurate as I could and I discovered there was a windlass room under the forecastle of the ship.
As it seems like it's a little too late to add this to yours I might consider placing a wooden panel over where this room would be so as to indicate there being something there, you could even add a little trim on either side to indicate depth.


View attachment 642298
I was thinking about doing this, but my main issue became time. If I go down the realism route, I think I would fall down a rabbit hole and not get this built in time for either the holidays or my dad's birthday (or before I move out of my dorm).

Another factor actually is the fact that I know my dad likes stylized "toy" wooden boats. He used to love the small boats made by the Toy Boat (https://thetoyboat.com/), and the unmodified style of the Occre kit somewhat reminded me of this. In the end. I think it just made sense to keep the front, deck, etc. close to stock to fit the more cartoony look he liked, since I am making the kit for him and not for me (where I would prefer realism personally).

If I make my own Endurance, I am likely to follow your modifications quite closely though!
 
After doing this for a small number of years, I’ve come to the conclusion that the plans that come with these kits are really designed as a system. The frames, bulkheads, and planking are all supposed to work together, so I generally stick pretty close to the plans when it comes to that part of the build.

I think it’s once you get above the deck that you have more room to make changes and really bring the model to life. The layout, fittings, rigging, paint schemes, and all the little details are where you can start looking at what the kit gives you and decide what you might want to do differently. That’s where I think you can add a lot more realism to the finished model.

I see it this way: the people who design these kits have to make them buildable. They have to come up with a set of plans that will allow the average model builder to put the ship together. I’ve always liked the idea that the more you deviate from those plans, the more you move from being a builder to being a designer yourself. There’s a lot of satisfaction in that, although it can also mean having to figure things out and solve problems along the way.

One of my own shortcomings is that I don’t always do enough research into what the actual ship looked like historically. Most of the time, I work from the plans that came with the kit. Some kits have better plans than others, and sometimes you find things that just don’t look right. Rigging is one area where I’m more likely to go back and do some research to see how the real ship was rigged and whether I should make changes.

I look forward to see what you do with this. Keep building.
 
I was thinking about doing this, but my main issue became time. If I go down the realism route, I think I would fall down a rabbit hole and not get this built in time for either the holidays or my dad's birthday (or before I move out of my dorm).

Another factor actually is the fact that I know my dad likes stylized "toy" wooden boats. He used to love the small boats made by the Toy Boat (https://thetoyboat.com/), and the unmodified style of the Occre kit somewhat reminded me of this. In the end. I think it just made sense to keep the front, deck, etc. close to stock to fit the more cartoony look he liked, since I am making the kit for him and not for me (where I would prefer realism personally).

If I make my own Endurance, I am likely to follow your modifications quite closely though!
I think it's wonderful that you're doing this for your dad, and that you are taking his tastes into account.
 
Welcome Smarks to the forums and greetings from Texas! Which school are you at? I just took my granddaughter to college in Savannah, Ga. Magic Mike
 
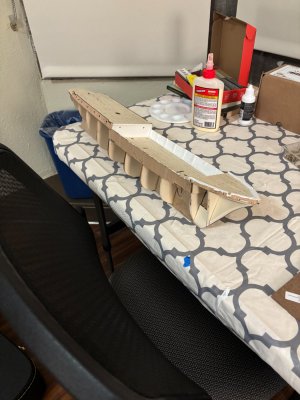
Quick update.

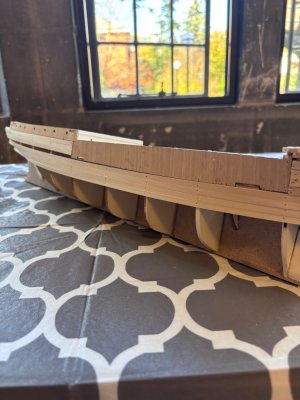
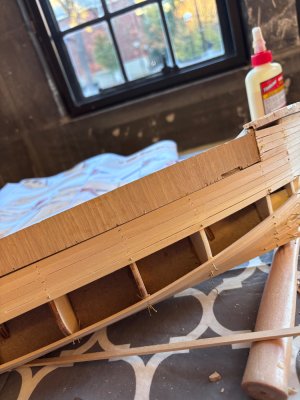
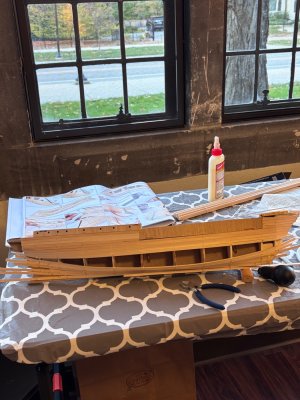
Between midterms and fall break, I haven’t had as much time to make progress on planking. I’m hoping to put the final planks on in the next couple of days and then move on to sanding and second planking.

This is the first step where I am really questioning the kits instructions and material quality. These brass pins are very finicky and a few of the planks have split at the grain when I pushed the pins in (you can see one of these at the stern that I left in place to be covered by second planking). Additionally, at least at a few points, the actual frame of the kit had some splitting when a pin was pushed into it to secure the plank. Nothing that couldn’t be fixed or can’t be hidden with the second planking, but it has definitely been a frustration.

I think next time, I should try a different method from the brass pins and maybe a different planking pattern. Ideally, I’d measure and taper each plank to fit but having the second layer there makes everything seem a bit more forgiving; I’ll have to see if that turns out to be true in practice.

Anyway, I am having a lot of fun and already am seeing lots of areas for improvement for the next build. More to come soon.

IMG_4680.jpeg

IMG_4681.jpegIMG_4682.jpegIMG_4683.jpeg
 
I'll follow along. Have some fun along the way. When do you finish school.
I graduate in May of next year. I’m hoping to get pretty far along in this kit before winter break, then put the finishing touches on it in time for the holidays.

We’ll see if that’s over ambitious, in which case, this will be a birthday present.
 
Welcome Smarks to the forums and greetings from Texas! Which school are you at? I just took my granddaughter to college in Savannah, Ga. Magic Mike
I’m at a University in the Midwest. It’s a bit far from home, so bringing the model home is a big question.

I’m thinking I’ll try to get it shipped home before the masts, rigging, etc and other small free-standing parts are added.
 
I’m at a University in the Midwest. It’s a bit far from home, so bringing the model home is a big question.

I’m thinking I’ll try to get it shipped home before the masts, rigging, etc and other small free-standing parts are added.
That would probably be a good idea. This is one of those situations where the journey mihht be is as important, if not more so, than the trip. I found that the time spent modeling is a stress remover.
I'm sure you have those days at college.
So enjoy yourself along the way. Any questions or problems.can be sorted out
By fellow site.members. They carried me through my first build.
 
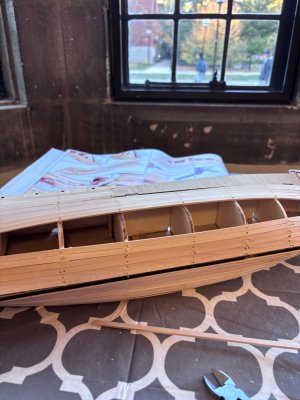
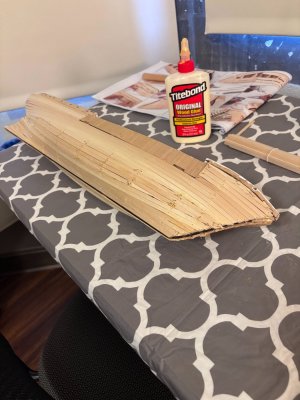
Well, she's now closed up!

A couple of tiny gaps exist that may need patching (I imagine that the second planking will cover them, but, if not, I can easily shape a scrap from planking to fill the gaps). Otherwise, this was a great learning experience, and I can already see how my planking is improving. Lots of changes to make for next time to make it a bit cleaner. I definitely want to read more about planking techniques and appropriate tools for next time around, as I want to improve.

I am happy with this being my first planking attempt, but I definitely have much to learn.

Once the glue sets, it's on to sanding and second planking.

IMG_4701.jpg
 
Well, she's now closed up!

A couple of tiny gaps exist that may need patching (I imagine that the second planking will cover them, but, if not, I can easily shape a scrap from planking to fill the gaps). Otherwise, this was a great learning experience, and I can already see how my planking is improving. Lots of changes to make for next time to make it a bit cleaner. I definitely want to read more about planking techniques and appropriate tools for next time around, as I want to improve.

I am happy with this being my first planking attempt, but I definitely have much to learn.

Once the glue sets, it's on to sanding and second planking.

View attachment 645680
@Ola Batcherov on YouTube gives we excellent instruction on planking. Check out the gun boat Philladelphia series
HNice model, keep up the good work
 
Quick update.

Between midterms and fall break, I haven’t had as much time to make progress on planking. I’m hoping to put the final planks on in the next couple of days and then move on to sanding and second planking.

This is the first step where I am really questioning the kits instructions and material quality. These brass pins are very finicky and a few of the planks have split at the grain when I pushed the pins in (you can see one of these at the stern that I left in place to be covered by second planking). Additionally, at least at a few points, the actual frame of the kit had some splitting when a pin was pushed into it to secure the plank. Nothing that couldn’t be fixed or can’t be hidden with the second planking, but it has definitely been a frustration.

I think next time, I should try a different method from the brass pins and maybe a different planking pattern. Ideally, I’d measure and taper each plank to fit but having the second layer there makes everything seem a bit more forgiving; I’ll have to see if that turns out to be true in practice.

Anyway, I am having a lot of fun and already am seeing lots of areas for improvement for the next build. More to come soon.

View attachment 645258

View attachment 645259View attachment 645260View attachment 645261
On the nails splitting the bulkhead. Pre drill.the hole.with a slightly smaller drill bit
 
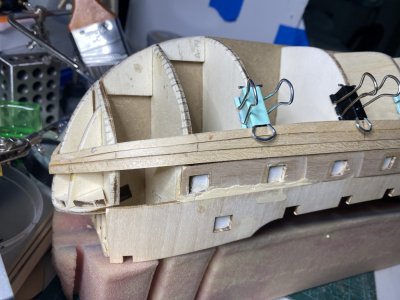
Congratulations on your first planking! I have just found this build log and will follow along. A good shaping of the hull will make for a better second planking. In the future you should consider using modified binder clamps as opposed to nails to help with the planks.
IMG_2143.jpeg

I think it will make you build easier. There are many build guides here of similar ships to help you along as well as you tube videos covering almost every (if not every) aspect of this great hobby. I found that a small plane is great to help shape the hull before sanding and using wood filler.

IMG_2181 2.jpeg


With your work at school, don't go crazy trying to finish this ship. No matter when it is done I know your Dad will appreciate it!

Rob
 
Back
Top