There aren't any customs fees in the US when you order from ZHL and you can use a credit card through paypal. ZHL has an ebay store. The shipping is pretty expensive but fast.

-

SUBSCRIBE TO SHIPS IN SCALE TODAY!
The beloved Ships in Scale Magazine is back and charting a new course for 2026!
Discover new skills, new techniques, and new inspirations in every issue.
NOTE THAT OUR NEXT ISSUE WILL BE MARCH/APRIL 2026 -

Win a Free Custom Engraved Brass Coin!!!
As a way to introduce our brass coins to the community, we will raffle off a free coin during the month of August. Follow link ABOVE for instructions for entering.
You are using an out of date browser. It may not display this or other websites correctly.
You should upgrade or use an alternative browser.
You should upgrade or use an alternative browser.

Ok guys after a break away from the build I'm back in the swing, first planking coming along all be it slowly have ran into a possible problem namely the planks in the kit both first and second material appears be too short to plank the hull with full length planks the instruction material list says they are 60 at 450mm Paulownia and Black Walnut 150 at 400mm while all planks measure 500mm they are still too short when you measure around the curvature of the hull length, anyway I have written to Max and I await his reply. See photos of plank lengths. Not concerned too much about having to join first planking although this will leave me short with small off cuts that cant be used, I do not want joins where a full length plank can be used on the final walnut planking.
Here is my progress thus far. Excuse the upside down pics but you should get the jist of too short plank problem.


Here is my progress thus far. Excuse the upside down pics but you should get the jist of too short plank problem.

Once you master planking techniques, you will feel much better. I would recommend one of the brochures ( thin book) from Jim Roberts. He explained the planking technique, I found it really helpful.Foot note: Planking is not my favourite step of the build.


Hallo Matus,I found this document on internet. I already read it 2 times and probably will be again few times.
I am still miles from planking my build, but planning ahead.
a preparation like reading is very important, but definitely you will get the experience with the strips by itself.
And at the end you have to find your own way you will do it, especially with which kind of equipment and method (bending, installing, which glue etc.)


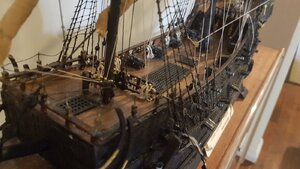
Hey guys been a bit slack with my update on the build some stage pictures not shown as I didn't take pics of the progress of the second planking, had some issues with the planks not able to traverse the full length of the hull but to continue and join planks together and given I decided to paint (INK) the hull it was not a issue after all. So now as I type I have advanced a little further to what the last pics show have installed carved figurines around cabin,installed rear lanterns rope fencing around some decks and hatch grates also installed rudder and hardware installed deadeye and hardware to all masts some preliminary shaping of some of the yards will post update pics to reflect this.
just starting to install shrouds
just starting to install shrouds
Gidday mateys ahhhhrrr more progress from my last post things are slowing down now being at the fiddly bits with deadeyes,shrouds serving them and making served ropes for stays. All guns and doors are now inplace with their recoil ropes just have to arrange the slack part of the rope so they look right some stick up in the air. The plans are a little vaig on where single blocks for running rigging be placed on masts but I will nut that one out later on. anyway I'm happy with the progress and the look of the ship thus far, cheers all stay well.


looking good!
- Joined
- Dec 27, 2019
- Messages
- 551
- Points
- 308

View attachment 137721View attachment 137722View attachment 137723View attachment 137724View attachment 137725View attachment 137726View attachment 137727View attachment 137728View attachment 137729
[/QUOTE
I’m looking forward but not looking forward to doing the bottom rigging if you know what I mean. I am enjoying your build.

Hey all thank you for all your Birthday Wishes I had a great day all be it quiet, the minister for finance gave me the go to order my next project which I had a hard time narrowing down what I wanted to tackle something different and something I had on my bucket list to build it came down to the Saturn V Apollo 11 Rocket 1/72 from Dragon it stands a 1500mm high so finding room to display it is


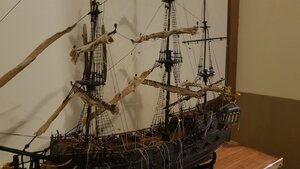
 not an issue, I will post some pics in the relevant area of it. Still pugging away at the Pearl finally got my sister to sew my sails and after a little ageing and I furled the on the yards and some on the fore stays, completed the all shrouds and rat lines on Port side still doing the starboard side rat lines see pictures hopefully this time a lot clearer than last
not an issue, I will post some pics in the relevant area of it. Still pugging away at the Pearl finally got my sister to sew my sails and after a little ageing and I furled the on the yards and some on the fore stays, completed the all shrouds and rat lines on Port side still doing the starboard side rat lines see pictures hopefully this time a lot clearer than last
Its looking like the real ship. Well done.
- Joined
- Apr 20, 2020
- Messages
- 313
- Points
- 278

Hey all thank you for all your Birthday Wishes I had a great day all be it quiet, the minister for finance gave me the go to order my next project which I had a hard time narrowing down what I wanted to tackle something different and something I had on my bucket list to build it came down to the Saturn V Apollo 11 Rocket 1/72 from Dragon it stands a 1500mm high so finding room to display it is
Great job @Hoffy...you are really making quick progress... May I ask what you used to color the deck please? Also, you mentioned that you used ink to color the black portions.... Are there advantages to using ink versus, say, black acrylic paint? Newbie here and am just trying to understand paints and stains... Thanks for your build log.
Gidday WarrLight it was the first time I had used ink I found it easier to cover than paint, paint tends to be gluggy where the ink is thin and a lot easier to apply, I used ink that was watered down probably 50/50 the deck was lacquered with a natural varnish then later aged with smudges of watered down ink to give the deck that dirty pirate ship look. One thing to be careful using the ink keep to applying it in small areas and don't saturate your brush with ink the same principal is used when applying stains wiping access off with clean clothe/paper towel, be patient take your time.
- Joined
- Apr 20, 2020
- Messages
- 313
- Points
- 278
Thanks @Hoffy.... I was inspired by your build and ordered the BPearl kit from ZHL... now eagerly awaiting its arrival... Although I'm a newbie, I decided to dive right in with this model knowing that I can refer back to your build if I get in trouble. Have also been reading some of the other builds and am picking up lots of learnings... Bless you all.Gidday WarrLight it was the first time I had used ink I found it easier to cover than paint, paint tends to be gluggy where the ink is thin and a lot easier to apply, I used ink that was watered down probably 50/50 the deck was lacquered with a natural varnish then later aged with smudges of watered down ink to give the deck that dirty pirate ship look. One thing to be careful using the ink keep to applying it in small areas and don't saturate your brush with ink the same principal is used when applying stains wiping access off with clean clothe/paper towel, be patient take your time.
 Gidday all this will conclude my Build Log of The Black Pearl Golden Edition 2019, I am calling it done, the rigging was ok but plans were hard to fathom ie. the belaying pin layout of plates positioning contravened how they appear on the photos in the manual, some of the origin of some the ropes were puzzling so I referred to my previous ship for reference and on other ship logs here they helped a lot, the rigging may not be correct but hey its a pirate ship and they weren't ones for uniformity and as Black Pearl is a fictitious ship allowed for a free reign my part so here we go final piccys. Enjoy!!