- Joined
- Sep 9, 2019
- Messages
- 14
- Points
- 58

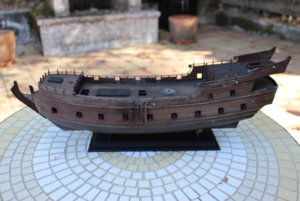
It's a lot of years since I built a ship model, but thanks to so much help from forums and YouTube videos, I'm basically really happy with this. Learned so much!


Last edited:

 |
The beloved Ships in Scale Magazine is back and charting a new course for 2026! Discover new skills, new techniques, and new inspirations in every issue. NOTE THAT OUR NEXT ISSUE WILL BE July/August 2026 |
|
 |
As a way to introduce our brass coins to the community, we will raffle off a free coin during the month of August. Follow link ABOVE for instructions for entering. |
|
Thanks!Excellent paint job and weathering!!!!!!!

I agree. Looks great.Beautiful work. Would really like to hear a description of how the weathering was done, in particular the figurehead. Was it painted white and then powdered or washed etc. Fantastic job of making it really stand out, without looking out of place.
Thanks much for the kind comment and question! Pretty much all the painting here was done in washes of various dilutes. Everything that was wood began with a coat of primer in "deck tan" or something similar (actually a can of paint+primer from Ace in a beige). Then everything that was made of wood then had India ink washes that I learned how to work from another member--I'll try to find his work and cite. India inks mixed to make a loose, watery brown (I think Van Dyke brown, sepia, and a bit of red). One or two coats of that (dries in a jiff). From there, it was on to the final washes, which for most parts included a dark grey / black in acrylic (It is the Black Pearl after all), and then a wash of dilute light grey to make the dusty / musty / dingy overall effect.Beautiful work. Would really like to hear a description of how the weathering was done, in particular the figurehead. Was it painted white and then powdered or washed etc. Fantastic job of making it really stand out, without looking out of place.
It's a lot of years since I built a ship model, but thanks to so much help from forums and YouTube videos, I'm basically really happy with this. Learned so much!
View attachment 134815View attachment 134816View attachment 134817View attachment 134818View attachment 134819View attachment 134820View attachment 134822View attachment 134823View attachment 134824View attachment 134825View attachment 134826View attachment 134829View attachment 134830View attachment 134831View attachment 134832View attachment 134833View attachment 134834View attachment 134835View attachment 134836View attachment 134837View attachment 134839View attachment 134840View attachment 134841View attachment 134842View attachment 134843
Hi, and thank you so much for the kind words. This is only the second model I've lighted up, and really it's mostly very simple. The LEDs are widely available, but the easiest to work with come from https://evandesigns.com. They basically come wired up and ready to plug in. For the BP I used, I think, 2 or 3 1.3 mm LEDs in the under decking and three pico chip LEDs in the lanterns. Rigging the lanterns was the trickiest part, but really it's just a matter of filing channels for the wires and opening up the lanterns to hold the LEDs (glued in). My biggest challenge was due to my own stupidity and slowness of uptake, and that was that I decided pretty late that I couldn't bear not to light the ship (the lanterns especially) until after it was really smart or safe to start drilling holes in decks. There was some touch and go with drilling and then threading wires in a basically completed hull. Below decks is not pretty on this model.Ahoy There!! Your model of the Pearl is a real beauty! I'm building the same revell set and I had some questions for ya. How did you go about lighting her up. I've always wanted to put lights in one of my models but I have absolutley no clue how to even start. Secondly what paint did you use for her stern gallery? I love the weathered and oxidixed copper on the statuetes and was wonding how you did that. Any advice would be great! Thank youuuuu!
")
Thank you so much. That is so kind. ScottAbsolutely stunning. Your paint and weathering is exceptional. Doesn't look at all like a plastic kit. My hat is off to you.
Thank you so much! Alas, I didn't do enough WIP photography, but here are a few snaps.Turned out terrific! Would have loved to see her as a WIP


PS, The biggest single piece of advice I have about building the 1:72 Revell Black Pearl is actually about the fitting and gluing. It's a very well engineered kit, and the parts WILL go together correctly. The biggest challenges I had involved having to rip apart and redo various assemblies, especially the big ones: hull and deck sections. Do as much test-fitting as you can and get the theory, at least, for how the parts are supposed to go together so that you know what's right before you head to final gluing. Good luck! It's a lovely kit. Cheers, ScottAhoy There!! Your model of the Pearl is a real beauty! I'm building the same revell set and I had some questions for ya. How did you go about lighting her up. I've always wanted to put lights in one of my models but I have absolutley no clue how to even start. Secondly what paint did you use for her stern gallery? I love the weathered and oxidixed copper on the statuetes and was wonding how you did that. Any advice would be great! Thank youuuuu!
Hallo,It's a lot of years since I built a ship model, but thanks to so much help from forums and YouTube videos, I'm basically really happy with this. Learned so much!
View attachment 134815View attachment 134816View attachment 134817View attachment 134818View attachment 134819View attachment 134820View attachment 134822View attachment 134823View attachment 134824View attachment 134825View attachment 134826View attachment 134829View attachment 134830View attachment 134831View attachment 134832View attachment 134833View attachment 134834View attachment 134835View attachment 134836View attachment 134837View attachment 134839View attachment 134840View attachment 134841View attachment 134842View attachment 134843