My dear friend Paul
your work is truly perfection
Thank you, gentlemen!what Shota said
 |
As a way to introduce our brass coins to the community, we will raffle off a free coin during the month of August. Follow link ABOVE for instructions for entering. |
 |
My dear friend Paul
your work is truly perfection
Thank you, gentlemen!what Shota said
Hi Paul,Thanks, Chris. I feel better about my future with this model than I did a month ago. I have a pretty low level of confidence that I have everything right - but I'm in the ballpark.
Apart from the two POF models built in conjunction with the development of the monograph (and for which there are no sequential build reports) what you are looking at might be the only SP stern section in existence (apart from an abandoned model on the French Arsenal website). I find this extraordinarily odd. Any thoughts?
…now we know why Paul chose this to build…..thats pretty much the most difficult ship to attempt. And this particular author's monographs can be very challenging to decipher.
Good morning Paul. Whew…..whew….even with the counters and support beams she looks like something I would demolish in 10 secs. Beautiful wood work and finish……starting to look very impressive. Cheers GrantHello Friends,
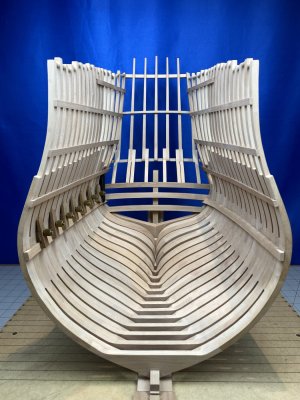
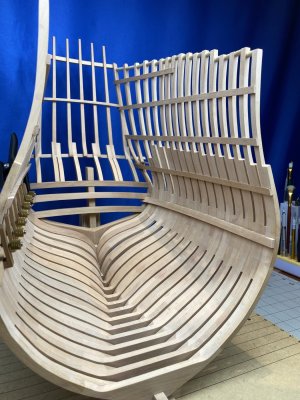
Once you start fabricating and fitting the counter timbers you can't really stop. The whole stern facade is little more than a house of cards so there is no other option than to press on to final fitting and glueing up. I spent a full day doing that very thing - and then another full day fairing (is it faring?) the counter timbers and the new top timbers.
Oh, and I also roughed out three of the aft deck beams and installed one of them to provide some lateral support for the upper counter timbers:
View attachment 538034
View attachment 538035
And here is the current state of affairs (the horizontal piece across the top of the counter timbers is temporary support):
View attachment 538036
View attachment 538037
View attachment 538039
View attachment 538040View attachment 538041
View attachment 538042
View attachment 538038
View attachment 538043
View attachment 538044
The entire assembly is still pretty fragile so I think I'll figure out where a few deck clamps go and install them. I'll also install a few of the other aft deck beams. The combination of those two elements should add some much-needed structural integrity.
You are kind to take time away from your own work to see what I have been up to!
Thanks, Grant. Since that post I have added some additional supports so I believe she would outlast even a ricochet rabbit...Good morning Paul. Whew…..whew….even with the counters and support beams she looks like something I would demolish in 10 secs. Beautiful wood work and finish……starting to look very impressive. Cheers Grant


I think the rest of already know the answer to that.Adding the deck clamps is a fairly serious matter and required careful measuring. I guess only time will tell if I got everything in the right place.
Yes, please!I do wish @Donnie would restore the Image Editor function. It's kind of a bother to post images without it (love you, Donnie!).


Nice and tidy as usual, Paul. And to make what you don’t see on a finished model ……. You know it is there ….. if you made them. It would be good to maintain or improve your skills.Just a little update to wrap up our weekend here in the US.
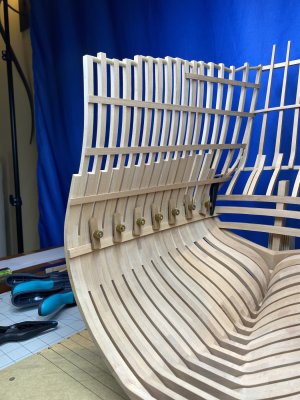
In order to provide some additional strength to the stern assembly I have now added the deck clamps. There are five formal decks on the aft portion of the Saint Philippe. From top down: a poop deck, a quarterdeck, and the 3rd, 2nd, and 1st decks. There are also some deck structures below the first deck, but they don't have deck clamps.
Each deck clamp is dimensionally different - and the clamp for the 1st deck is quite substantial (indeed, it had to be fabricated as a curved piece - bending it to the shape of the hull would have been impossible)..
Students of period French Naval Architecture know that the deck beams are joined with their respective deck clamps via blind dovetail joints. As you will notice in the images below, I have chosen to omit that detail. Once the beams have been installed the dovetail joint is invisible - and while I am not averse to including details that will ultimately be hard to appreciate (see my Kingfisher build) - the additional complication just didn't seem worth it.
Adding the deck clamps is a fairly serious matter and required careful measuring. I guess only time will tell if I got everything in the right place.
View attachment 538488
View attachment 538489
View attachment 538490
I do wish @Donnie would restore the Image Editor function. It's kind of a bother to post images without it (love you, Donnie!).
Hi PaulJust a little update to wrap up our weekend here in the US.
In order to provide some additional strength to the stern assembly I have now added the deck clamps. There are five formal decks on the aft portion of the Saint Philippe. From top down: a poop deck, a quarterdeck, and the 3rd, 2nd, and 1st decks. There are also some deck structures below the first deck, but they don't have deck clamps.
Each deck clamp is dimensionally different - and the clamp for the 1st deck is quite substantial (indeed, it had to be fabricated as a curved piece - bending it to the shape of the hull would have been impossible)..
Students of period French Naval Architecture know that the deck beams are joined with their respective deck clamps via blind dovetail joints. As you will notice in the images below, I have chosen to omit that detail. Once the beams have been installed the dovetail joint is invisible - and while I am not averse to including details that will ultimately be hard to appreciate (see my Kingfisher build) - the additional complication just didn't seem worth it.
Adding the deck clamps is a fairly serious matter and required careful measuring. I guess only time will tell if I got everything in the right place.
View attachment 538488
View attachment 538489
View attachment 538490
I do wish @Donnie would restore the Image Editor function. It's kind of a bother to post images without it (love you, Donnie!).

I think the rest of already know the answer to that.
Yes, please!
Some lovely joinery, Paul. A treat to see at this stage where all the joinery is visible in the natural unfinished wood, save the refinement of the wood surface itself.
I, too, anticipate with pleasure the return of the right side up post.

Hi Paul
Splendid work
Just spent a little time this morning catching up (again) and I totally agree with all the continued compliments you have received and add one of my own - “friggin’ amazing work”.
Gentlemen, my sincere thanks for your kind review of my work.Impeccable workmanship Paul! Makes me wish our kids could have had you do their orthodontics.
Lovely work Paul.
But we all know about the fact that you omit the blind dove tails.... We know what you did not this summer.We will not forget.

Nice and tidy as usual, Paul. And to make what you don’t see on a finished model ……. You know it is there ….. if you made them. It would be good to maintain or improve your skills.
Regards, Peter
Oooh! Dissention in the ranksAnyone wanting to carve blind dovetails at that scale that aren't necessary and will remain unseen is, of course, perfectly welcome to do so.
 !
!
Well Paul, I have my own thoughts on it.Oooh! Dissention in the ranks


How did you know we give out a free blender with every new set of braces?Well Paul, I have my own thoughts on it.
Omitting those dovetail joints is like someone arriving at your practice for a new dental prosthesis and you sending them home with a blender.
Why chewing?

How did you know we give out a free blender with every new set of braces?

How did you know we give out a free blender with every new set of braces?
