18th century Privateer - POF - 1:48 (1/4-inch) scale

Joined
Feb 18, 2019
Messages
684
Points
353

Hello,
Very soon, I will be embarking in the construction of a planked on frame model ship, hull design based on the Oliver Cromwell – the 1777 Philadelphia Privateer following the set of plans by Harold Hahn.

By the term “based on”, I mean to say that the ship itself will have most of the framing built as per the plan. I understand that this may sound weird to most, but I would like to include my personal touch in the decor, and a few other elements (just personal taste) so I plan of altering the visual aspect by adapting my own vision of this type of ship: I already have some ideas which I think will work well, while keeping the decor quite simple, as after all, this is a small, simple ship.
This said and because of these alterations, the ship will not be presented as the Oliver Cromwell but will remain unnamed.

Now, the model will be built at the scale of 1/72 (scale was changed to 1:48 or 1/4 inch). Hull only – Traditional dockyard style: the hull will be un-planked with framing visible on both sides from slightly below the wale (3 planks below) so the upper works will be completely finished.

The model will be built up right and birch will be the only wood used. I will not be using the Hahn method to build frames: but the more traditional way.
I do not own much in the fancy power tools department, so this build will be done in a more traditional, less sophisticated way: no milling machine here.

I hope some of you will find this build interesting.

Thank you.

G.
 
Last edited:
It is good news, Gilles! I am taking the first row and best possible seat (I guess I am the first one, so why not?) :) Will watch with big interest. Is there any reason you choose a 1:72 scale?
 
Is there any reason you choose a 1:72 scale?

Hi Jim and thank you for your interest.
Silly... but I chose this particular scale because of available future display space. I could have decided to work on a smaller ship built at a larger scale but I promised myself long ago that I would one day build this one.
G.
 
Last edited:
Not pretending of being able to teach anyone how to build a scale model ship, I will try to make this as detailed, simple and comprehensive as possible with images but also lots of explanations on the process.
I will appreciate members’ construction input, and of course criticism.
So, here we go…….

The set of plans used is compose of 6 sheets: 3.5 of them being frame patterns. The framing of this ship includes 40 frames: 13 of them being angled frames, some fore, some aft.
My first step in building this ship is to “draft” the composition of the frames to suit my purpose. The plans from H. Hahn include the breakdown of parts according to his, let say, “simplified” technique for building up the frames.
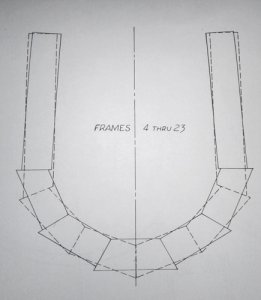
Floor-timbers and futtocks are butted together end to end in 2 layers for each frame. The image below shows the breakdown in patterns for a frame layout sequence: there are 5 different templates / pattern layouts to cover all 40 frames: this is one of them and this patterns is good for frame 4 thru 23 as is mentioned in the image. Depending on the location of the frame on the hull, these patterns change although the number of parts is constant on the vast majority of frames.
Image 001

001 privateer-2019 copy.jpg

The reason why this technique is somewhat simpler to use is that, by cutting and assembling these large templates / patterns together in 2 layers, the overall shape of the frame is built prior to tracing and cutting the exact final frame as one piece.

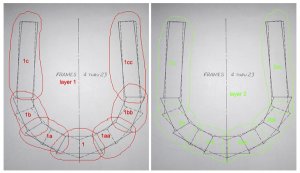
Building frames the more traditional way is a bit trickier as each piece to be assembled is much smaller: The frame still has to be broken down into parts (floor-timbers and futtocks) and by layers. Using the image above as reference, I have added numbers to identify parts and layers: everything marked as 1 corresponds to the first layer – 2 is the second layer. I am also adding letter coding to place each part working up the frame. But more on that when tracing, cutting and assembling each frame…..
Image 001 c

001c privateer-2019 copy.jpg

The image above shows the breakdown of a frame using the Hahn method of building. On the original drawing, the parts in a layer are identified by being either solid line or dotted line. As a result layer 1 shows parts drawn with the solid line and layer 2 with dotted lines. For this particular frame we note that 13 timbers will make a complete frame: layer 1 x 7 parts / timbers and layer 2 x 6 parts / timbers.


Although I will be building the frames in the more traditional method, I will still be using the same basic breakdown and layering, as the edge of each identified part will constitute the joint between them (parts / timbers).
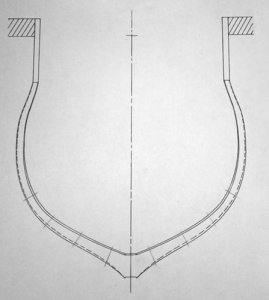
Once these layers and parts have been identified, one must report that information to the actual frame drawn in the plans. This is done using a drafting compass and a couple of predetermined reference points on the drawing from Image 001 (for example). The result is Image 002 below and the secret is, although it does not have to be perfect science, to be consistent with the reference points, whatever they are: keeping in mind that the joints should be close to forming a 90 degree angle with the edges of the final frame.
The cross lines in 002 correspond to the edge of each part in 001 or 001c.
Image002

002 privateer-2019 copy.jpg

Looking at image 002, taking a count of the number of parts on this frame, you will notice that instead of 13 parts, I ended up with only 11. The reason is quite simple: this is due to the fact that the hull of my model will be planked to a level slightly above the point where the last joint (up the frame) will be located.


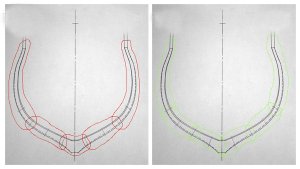
The image below shows the breakdown of frame parts: but I omitted the layer and part numbers: although it is the same as above in 001c. You will note that because the hull will be built up, something is missing in the image. For the members who are not aware of how the Hahn method of framing works, let me just say that the plans are design for the building of the hull up side down. The missing elements in the image are part of the frame extensions that are supposed to be fitted in the building base: referenced in the upper horizontal rectangles at the top of the frame. Building them with his method the frames shown in the plan would be up side down. Hope this makes sense.
Image 002c

002c privateer-2019 copy.jpg


Anyways. That is it for today and I will just add that I normally work at a fairly slow pace.

Thank you.
 
Last edited:
Hello Gilles
This looks like a very interesting build that you are about to start, I will surely pull up a chair for this one. Are you planning to add a bit of detail to your build, just wondering that's all? As the smaller scale will surely make it much harder to do so. I did find this a bit of a problem in my 1:60 Golden Hind Build. Wishing you all of the joys of building this fine little ship, ENJOY.
Regards Lawrence
 
Hello Gilles
Are you planning to add a bit of detail to your build, just wondering that's all? As the smaller scale will surely make it much harder to do so. I did find this a bit of a problem in my 1:60 Golden Hind Build.
Regards Lawrence

Hello Lawrence,
Thank you for your interest.
The plan is to include as much detail as possible. Although, not as much as you are doing: I will skip detailing below deck (stores and such).
I just built a test frame and it is small .....! everything I have done in the past has been either 1:48 or 1/36. So, small is a bit of a challenge.
Best regards.
GK
 
Hi Gilles

I posted this in my Oliver thread but it seems not many people have read it.

A few questions regarding masting / rigging of Oliver. As the plans of Oliver did not have any rigging plan, I am using Rattlesnake's rigging plan - I built this ship previously but without masts /yards/rigging.

What about belaying pins? The drawings of other Hahn models do not show any trace of them. They were surely in use that time but were they used on Oliver? If yes, where were were the racks for them?

Mast woolding. The drawings and Hahn'reports are somewhat misleading and they are in contradiction with each other. Did the mast have wouldings and/or timber rings?

Thx in advance

Janos
 
Hi Gilles

I posted this in my Oliver thread but it seems not many people have read it.

A few questions regarding masting / rigging of Oliver. As the plans of Oliver did not have any rigging plan, I am using Rattlesnake's rigging plan - I built this ship previously but without masts /yards/rigging.

What about belaying pins? The drawings of other Hahn models do not show any trace of them. They were surely in use that time but were they used on Oliver? If yes, where were were the racks for them?

Mast woolding. The drawings and Hahn'reports are somewhat misleading and they are in contradiction with each other. Did the mast have wouldings and/or timber rings?

Janos

Sorry for the delay.
I was told a long time ago that rigging plan for OC could be a adaptation of the Rattlesnake's but as never planned on rigging the OC, I must say that I never looked into this.
As far as belaying pins, I would imagine that there were some. The only thing I would say is that having them on the rails seems not very likely as the rails are quite skimpy. My logic would be that some would be incorporated in racks at the bottoms of masts and maybe into the bits ....... but what do I know. As a result I would keep them as few as possible.
As for the masting, may be best to check the Rattlesnake's info.
Kindest regards.
GK
 
Hello,
Well, a year after starting this page, I am finally able to show progress on what will be an unnamed ship.
I have edited the original post to reflect some changes in this "project".
The working scale has been changed: I am now working at 1/4" (equivalent to 1:48)
The wood used is birch.
But, possibly, more on that and a few other details... later...!

For now,
The woodwork really began in the past 2 months.
All 40 frames have been built.
- 27 x full-frames - square to the keel, full double-layer frames.
- 4 x aft half-frame - square to the keel.
- 3 x aft cant (angled) half-frames.
- 6 x forward cant half-frames.


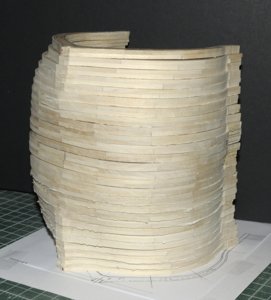
Shown below are the 27 full-frames.

01 Privateer frames a.jpg

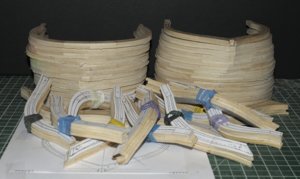
All 40 frames: including half-frames are shown below.

03 Privateer frames a.jpg

The edges of half-frames still need to be squared on the inside and outside face.
The outside edge of the full-frames have been squared, the inside still need to be done.

Thank you for your interest.
Regards.
G.
 
Back
Top