Naval/Maritime History 15th of April - Today in Naval History - Naval / Maritime Events in History

Today in Naval History - Naval / Maritime Events in History
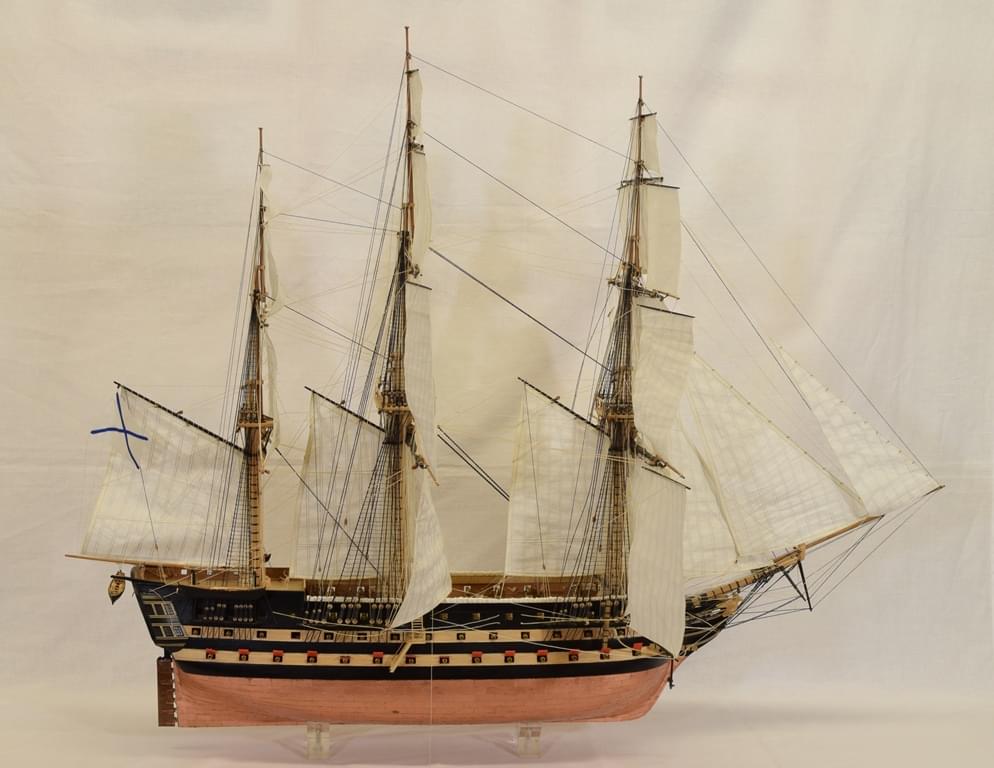
24 May 1781 – Launch of HMS Quebec, a 32-gun fifth rate frigate launched in 1781 and broken up in 1816


HMS Quebec was a 32-gun fifth rate frigate launched in 1781 and broken up in 1816. She sailed under various captains, participating in the American War of Independence, the French Revolutionary Wars, and the Napoleonic Wars. During these wars she captured many enemy merchantmen and smaller privateers in northern or Caribbean waters. She was built by George Parsons at Bursledon, Hampshire.

1.JPG 2.JPG

American War of Independence
1782
Capture_of_the_South_Carolina.jpg
Capture of the American Frigate South Carolina by the British frigates Diomede, Quebec and Astrea

Throughout 1782, Christopher Mason commanding, HMS Quebec operated in North American waters in the final year of the War of American Independence. On 22 February that year she captured the schooner Betsy, and in April two ships laden with flour, oil, bale goods, salt and wine. On 20 December she was involved when Diomede and Astraea captured the American frigate South Carolina, for which she shared in prize money awarded eighteen months later.

French Revolutionary Wars
1793
Admiral John MacBride became commander-in-chief on the Downs station, commanding a frigate squadron with his flag in Cumberland, later transferring his flag to Quebec. He took possession of Ostend after the French retreat in early 1793, and in October transported reinforcements under General Sir Charles Grey to assist in the defence of Dunkirk. In late October 1793 much needed reinforcements and artillery supplies were landed by Quebec at Nieuport, which was then being besieged by French forces, a relief force from Ostend arrived, and the French withdrew.

1794
From March 1794 a taskforce under Vice-Admiral Sir John Jervis, with land forces under General Sir Charles Grey, operated against French possessions in the Leeward Islands of the Caribbean. Quebecwas an active participant, supplying some of the assault forces at Martinique (late March) where she lost one man killed.[6] St Lucia fell on 4 April, whereupon Quebec (under Captain Josias Rogers), Blanche, Ceres and Rose were ordered to seize the smaller islands, the Saints, which they did without loss on 5 April.

Parts of Guadeloupe fell to the British on 23 April 1794 with Quebec playing her part, and many enemy ships were captured as they attempted to leave the anchorage. Details of prize monies awarded for the capture of engineering and ordnance stores on Martinique, St Lucia and Guadeloupe named Quebec and thirty other warships, plus six gunboats.

On 12 August 1794 a French ship, Adelle, was captured, for which prize money was awarded a year later.

1795
Actions against Grenada the following year did not go so well. Rogers reported on 9 April 1795 persistent heavy rain had caused delays in the military operations on Grenada. Seemingly in desperation, an assault was made on the last stronghold of the French in the mountains, but the French repulsed the attack, causing heavy British casualties.

1796
In 1796, Quebec – now under the command of Captain John Cooke, Rogers having died of yellow fever in April 1795 - was in home waters, reporting from Spithead the capture of a French national cutter Aspic, off the Scilly Isles. Aspic had a crew of 57 men and carried 10 guns. She was 10 days out of Saint-Malo and had captured the sloop John, of and from Galway, sailing to Oporto.

Quebec was soon back in the Caribbean on the Jamaica station. On 3 December 1796 she captured the French corvette ’Affricaine, of 18 guns, near St Domingo.

1797
On 18 April Vice-Admiral Sir Hyde Parker, who commanded the Jamaica station, ordered Captain Hugh Pigot to take his frigate Hermione, as well as the frigates Quebec and Mermaid, the brig Drake and the Hired armed cutter Penelope to cut out 14 vessels at the Battle of Jean-Rabel, Haiti. The squadron rendezvoused the next day and then the boats went in on the night of the 20th. They succeeded in bringing out nine merchant vessels that French privateers had taken as prizes. In the same series of operations the 74-gun ships Thunderer and Valiant destroyed the escorting French frigate, Harmonie.

1799 and 1800
While he commanded at Jamaica, Hyde Parker sent regular reports of warships and merchant vessels captured or destroyed by the ships under his command. At various times from October 1799 to February 1800, Quebec seized American, French or Danish merchant ships bound for ports in the Americas or Caribbean with cargoes as diverse as cocoa, lumber, wine, soap & sundries, flour, sugar, cotton, honey and hides. A Spanish vessel, Nostra Senora del Carmen “laden with fustie and brazil” was captured in March or April. Between May and August 1800, Quebec took captive an armed rowing boat with a crew of 19 men, a small schooner (name unknown) and six small merchant vessels cut out at different times.

1802
When the Treaty of Amiens brought what would turn out to be a temporary peace, the Admiralty took Quebec out of commission. She did not return to active service until 1805.

Napoleonic Wars
1806-7
On 28 May 1806 Quebec and Paulina were in company and shared in the capture of the Frau Geziner.

In April 1807 the vessel Providentia fell to Quebec, and between 16 August and 2 September 1807, Quebec and her consorts took nineteen Danish merchant ships. Quebec’s station during this time was in the Downs and North Sea.

1808
On 22 March, while Danish harbours were still largely frozen in, Quebec was operating in the Great Belt and Kattegat as the British navy gathered. The last operating Danish ship-of-the-line was under orders to clear the Great Belt of enemy (British) warships but was closely watched that morning by Quebec, with the sloop Lynx in company. In the early afternoon Falcon joined them in Sejerø Bay, as the Danish ship sailed north and east around Zealand Point. Two hours later the British ships-of-the-line Nassau and Stately were sighted and Quebec and the two sloops observed the ensuing battle without putting themselves in harm's way.

Further information: Battle of Zealand Point
A few days later off Nyborg, a late winter storm dismasted Quebec. Falcon then helped her to erect a new mast and rigging.

1810
In 1810, Quebec was stationed in the North Sea primarily off the Frisian Islands of Texel and Vlie to help enforce the naval blockade of that coast. In March she retook the Susannah Margaretta, and boats from the hired armed cutters Idas and King George, under Quebec’s command, captured a French privateer schyut of four guns, while subject to heavy small arms fire. On 21 March Quebec captured another French privateer, the lugger Imperatrice of 14 guns and 42 men off the Dogger Bank. On 23 May, when Desiree captured Financier, Quebec (under Charles Hawtayne) and Active were in company and shared the prize money.

Also on 23 May, Quebec captured the James Cook. Six days later a cutting out expedition at Vlie with boats from Desireee, Quebec, Britomart and Bold) yielded a French lugger (12), a French privateer (4), a Dutch gunboat and a small rowboat. The British had no casualties; the French lost one man killed and three wounded. On the last day of May, Quebec took three more ships: St Jean Baptiste, Comtessa, and Forben. One more ship was taken on 17 September (Bienenstock) and two ships were recaptured during October 1810 (Jonge Edward and Perle).

On 8 November Quebec cut out a "fine French privateer schooner, La Jeune Louise (14)" from the Vlie Stroom, an area of difficult and shallow navigation.

The year finished with the capture on 2 December of the French privateer cutter Renard, of six guns. Quebec shared the prize money with Kite.

1811
Quebec was still under the command of Captain Hawtayne and on the same station when she recaptured Aquator on 26 May.

In August 1811 in company with 5 lesser warships. Quebec captured a Vaisseau de Guerre of the Imperial Customs Service, later named as a privateer Christine Charlotte, with her crew of one officer and twelve men, as she was leaving Nordeney (East Frisian Islands) with a merchant vessel in tow. Boats from Quebec and her consorts then attacked and after a hard fight captured four French gunboats (numbers 22, 28, 31, 71) in the harbour at Nordeney. Two months later, on 30 October, Quebec was off the Flemish Banks when she captured the privateer Olympia, of ten 18-pounder guns and 78 men, after a long chase. This was the former schooner HMS Olympia.

Fate
At the end of the Napoleonic Wars, the Royal Navy laid up many of its ships, Quebec among them. She was advertised for sale in April 1816 for breaking up within twelve months: "Lying at Sheerness, Quebec of 32 guns and 700 tons". she was broken up in July.


Today in Naval History - Naval / Maritime Events in History
24 May 1792 - Death of George Brydges Rodney, 1st Baron Rodney, English admiral and politician, 16th Governor of Newfoundland (b. 1718)


George Brydges Rodney, 1st Baron Rodney, KB (bap. 13 February 1718 – 24 May 1792), was a British naval officer. He is best known for his commands in the American War of Independence, particularly his victory over the French at the Battle of the Saintes in 1782. It is often claimed that he was the commander to have pioneered the tactic of "breaking the line".

1.JPG 2.JPG 3.JPG

330px-Admiral_of_the_White_by_Thomas_Gainsborough.jpg

Rodney came from a distinguished but poor background, and went to sea at the age of fourteen. His first major action was the Second Battle of Cape Finisterre in 1747. He made a large amount of prize money during the 1740s, allowing him to purchase a large country estate and a seat in the House of Commons of Great Britain. During the Seven Years' War, Rodney was involved in a number of amphibious operations such as the raids on Rochefort and Le Havre and the Siege of Louisbourg. He became well known for his role in the capture of Martinique in 1762. Following the Peace of Paris, Rodney's financial situation stagnated. He spent large sums of money pursuing his political ambitions. By 1774 he had run up large debts and was forced to flee Britain to avoid his creditors. He was in a French jail when war was declared in 1778. Thanks to a benefactor, Rodney was able to secure his release and return to Britain where he was appointed to a new command.

Rodney successfully relieved Gibraltar during the Great Siege and defeated a Spanish fleet during the 1780 Battle of Cape St. Vincent, known as the "Moonlight Battle" because it took place at night. He then was posted to the Jamaica Station, where he became involved in the controversial 1781 capture of Sint Eustatius. Later that year he briefly returned home suffering from ill health. During his absence the British lost the crucial Battle of the Chesapeakeleading to the surrender at Yorktown.

To some Rodney was a controversial figure, accused of an obsession with prize money and nepotism. This was brought to a head in the wake of his taking of Saint Eustatius for which he was heavily criticised in Britain. Orders for his recall had been sent when Rodney won a decisive victory at the Battle of the Saintes in April 1782, ending the French threat to Jamaica. On his return to Britain, Rodney was made a peer and was awarded an annual pension of £2,000. He lived in retirement until his death in 1792.


https://en.wikipedia.org/wiki/George_Brydges_Rodney,_1st_Baron_Rodney
 
Today in Naval History - Naval / Maritime Events in History
24 May 1796 – Launch of HMS Hound, a brig-sloop of the Royal Navy.


HMS Hound
was a brig-sloop of the Royal Navy. She had a short history. After her launch in 1796 she captured two privateers and destroyed a third before she was lost in 1800.

1.JPG 2.JPG

Career
She was commissioned in April 1796 under Commander John Wood for the North Sea.

In 1797 Hound was at Spithead and was caught up in the Spithead and Nore mutinies. A former member of her crew, Richard Parker, was the "President of the Delegates of the Fleet", i.e., the leaders of the mutiny, and Wood testified at Parker's trial.

On 26 March 1798, Hound detained the Danish brig Charlotte Juliana.

Hound and the hired armed lugger Black Joke captured the Minerva on 16 May.

On 14 June 1798 Hound encountered and captured the Dutch privateer lugger Seahound (or Zeehound) some 10 leagues off the Skaw. Seahound was pierced for 14 guns but only had five mounted. She also had four swivel guns, and a crew of 30 men. She was six weeks out of Holland.

On 23 June 1799 Hound encountered and captured the French privateer lugger Hirondelle, off the Skaw. Hirondelle was armed with five guns and two swivel guns, and had a crew of 26 men. She was three weeks from Dunkirk but had captured nothing.

Two days later, acting on information he had received of a large privateer cruising in the Bite or off the Skaw, Wood fell in with a large lugger that mounted 16 guns. After a chase of 14 hours, Hound succeeded in shooting away the lugger's main mast and driving her ashore between Robsnout and Hartshall. The wind was driving a heavy sea on the beach with the result that it soon dashed the lugger to pieces, and probably cost many of the lugger's crew their lives. Wood was pleased to have destroyed his quarry however, as she was one of the largest and fastest vessels on the coast and when he encountered her was trailing a British convoy from the Baltic.

In the late summer-early autumn, Hound took part in the Helder expedition, a joint Anglo-Russian invasion of Holland under the command of Vice-Admiral Andrew Mitchell. At the Neiuw Diep the British captured seven warships and 13 Indiamen and transports. Then Mitchell obtained the surrender of a squadron of the navy of the Batavian Republic in the Vlieter Incident. The Dutch surrendered twelve vessels ranging down in size from the 74-gunWashington to the 16-gun brig Galathea.

Commander William Turquand replaced Wood in April 1800.

Hound and Jaloue captured the cutter Rover on 10 May. That month Hound also captured the dogger Zeelust.

Loss
Hound disappeared during a storm in the Shetlands on 26 September 1800, and was presumed to have foundered with all hands. Wreckage identified as coming from Hound drifted ashore on the islands of Unst and Balta

1280px-thumbnail.png
Diligence (1795); Seagull (1795); Curlew (1795); Harpy (1796); Hound (1796); Chamelion (1795) [alternative spelling: Cameleon]; Racoon (1795); Kangaroo (1795)
Scale: 1:48. Plan showing the inboard profile, upper deck, lower deck with hold and platform for the oak-built Diligence (1795), Harpy (1796) and Hound (1796) and for the fir-built Seagull (1795), Curlew (1795), Chameleon[Cameleon] (1795), Racoon (1795) and Kangaroo (1795), all 16 (later 18) gun Brig Sloops.

The plan includes alterations in green ink to the position of the masts on board Harpy (1796) as a result of a request to the Board from Captain John Bazeley (captain seniority: 11 November 1794) in January 1799. His report stated that she sailed much better.

HARPY 1796

The Diligence class were built as a class of eight 18-gun brig-sloops for the Royal Navy. They were originally to have carried sixteen 6-pounder carriage guns, but on 22 April, 1795 it was instructed that they should be armed with sixteen 32-pounder carronades, although two of the 6-pounders were retained as chase guns in the bows. Consequently they were classed as 18-gun sloops. However, in service it was found that this armament proved too heavy for these vessels, and so in most vessels the 32-pounder carronades were replaced by 24-pounder ones.

Of the eight vessels in the class, three foundered at sea with the loss of their crews, and one was wrecked. The others continued in service until withdrawn.

One of the Surveyors of the Navy - John Henslow - designed the class. The Admiralty approved the design on 22 April 1795, and ordered five vessels on 4 March 1795; their names were assigned and registered on 20 June. The Admiralty ordered three more in July 1795; these were named and registered on 28 August.

Unbenannt1.JPG

Construction
In early 1795 the Admiralty identified the need for additional brig-sloops to meet the urgent need for convoy duties, and - as per their usual practice - commissioned two different designs, one from each Surveyor. Five vessels to each design were ordered in March 1795, with a further three to each design following in July.

Two of the first orders (Curlew and Seagull) were constructed of "fir" (actually, pine), while the other three were of the normal oak construction. The three ordered in July were all also of fir construction. Fir-built vessels could be constructed more rapidly; hence all five of these were launched by the end of October 1795, when the three built of the conventional oak were still all on the stocks. However, it was recognised that fir hulls deteriorated faster; the use of fir was seen as a stop-gap measure to get them faster into service, but with the knowledge that they would not last as long.

Unbenannt.JPG


https://en.wikipedia.org/wiki/HMS_Hound_(1796)

https://en.wikipedia.org/wiki/Diligence-class_brig-sloop
 
Today in Naval History - Naval / Maritime Events in History
24 May 1797 - Spanish brig Nuestra Senora Del Rosario was captured by British Navy off Cadiz


HMS Rosario
, previously the Spanish ship Nuestra Senora Del Rosario, was a brig the British Royal Navy captured off Cadiz in 1797 and took her into service. The British converted her to a fireship and expended her in 1800 in an attack at Dunkirk Roads.

1.JPG 2.JPG

3.JPG

Capture
Admiral John Jervis's squadron was off the coast of Portugal on 24 May 1797 when a brig-corvette flying Spanish colours, was seen approaching. St Vincent made a signal for Romulus and Mahonesa to fly Spanish colours too, and to run alongside her. Their quarry did not realize her mistake until they raised English colours, by which time it was too late. The Spanish brig, outnumbered and outgunned, struck her colours without firing a shot. She was Nuestra Senora del Rosario, armed with 20 guns and carrying a crew of 100 men under the command of Don Juan Antonio de Carega.

Royal Navy service
Rosario was paid off in October 1797, but in November she came under the command of C. Hubert.

From May 1798 to August 1799 Rosario was at Sheerness, fitting as a "temporary" fireship. During this time, in June, Commander James Carhew commissioned her as a fireship.

Rosario participated in the Anglo-Russian invasion of Holland in August-October 1799. On 28 August 1799, she was with the British fleet that captured the Dutch hulks Drotchterland and Brooderschap, and the ships Helder, Venus, Minerva, and Hector, in the New Diep, in Holland. A partial pay-out of prize money resulted in a payment of 6s 8d to each seaman that had been in the fleet that day. She is also among the vessels listed as participating in the proceeds of the Vlieter Incident on 30 August when a large part of the navy of the Batavian Republic, commanded by Rear-Admiral Samuel Story, surrendered to the British navy on a sandbank near the Channel known as De Vlieter, near Wieringen.

Between 27 June and 8 July 1800, Rosario participated in the Raid on Dunkirk. This was an operation to capture the French frigate Désirée from Dunkerque harbour and burn other vessels. Contrary winds and a succession of unfavourable tides afforded no opportunity of making the attack until 7 July.

Captain Inman, of Andromeda was in charge of the operation. He sent HMS Dart, under Patrick Campbell, against the easternmost vessel, and loosed his four fireships, Rosario, Falcon, Comet, and Wasp against the westernmost vessels. Dart captured Désirée on 8 July. Even though their captains remained on the fireships until the four were engulfed in flames, the three frigates that were their targets cut their cables and escaped down the Inner Channel within the Braak Sand. Désirée was subsequently purchased into the Service. The officers and crews of many British vessels, Rosario among them, shared in the proceeds of the capture. In 1847 the Admiralty awarded the Naval General Service Medal with clasp "Capture of the Desiree" to all surviving claimants from the action.


Today in Naval History - Naval / Maritime Events in History
24 May 1808 - Action of Bornhelm
Hired armed cutter HMS Swan (10), Lt. Mark Robinson Lucas, destroyed Danish cutter (8) at Bornhohn.


Action of Bornhelm

On the 24th of May 1808, at noon, the British hired cutter Swan, of ten 12-pounder carronades, and 40 men and boys, Lieutenant Mark Robinson Lucas, being off the island of Bornholm, on her way to Rear-admiral Sir Samuel Hood, with despatches from the commander-in-chief, observed a cutter-rigged vessel standing from the land towards her. The Swan immediately hove to, and hoisted a Dutch jack for a pilot. This decoyed the strange cutter so far from the shore, that, at 2 p.m., the Swan found herself in a situation to chase with a prospect of overtaking the vessel before she could get back.

At 4 p.m. the Swan got within gun-shot; when the strange cutter opened her fire. The battery of Bornholm also commenced firing at the Swan, then about a mile from the beach. Attempting now to get a long gun in her stern to bear upon her pursuer, the strange cutter was caught in the wind. This accident enabled the Swan to get within musket-shot; and, after an action of 20 minutes, her antagonist blew up. As the Swan now lay nearly becalmed under the land, and as the batteries were still firing, and several boats approaching from the shore, Lieutenant Lucas was under the necessity of quitting the wreck without saving the life of a single individual of the crew. The Danish cutter appeared to be a vessel of about 120 tons, mounted eight or 10 guns, and was apparently full of men. Neither the Swan nor a man on board of her sustained the slightest injury.


Unbenannt.JPG

Swan
During the French Revolutionary and Napoleonic Wars the Admiralty also made use of hired armed vessels, one of which was His Majesty's Hired armed cutter Swan. Actually there were two such cutters, but the descriptions of these vessels and the dates of their service are such that they may well represent one vessel under successive contracts. The vessel or vessels cruised, blockaded, carried despatches and performed reconnaissance.

Second hired armed cutter Swan
The second Swan was a cutter of ten 12-pounder carronades and 119 27⁄94 tons burthen (bm) that served the Royal Navy from 6 August 1803 to 21 October 1803 and again from 3 August 1807 until the Danes captured her on 24 April 1811 during the Gunboat War.

On 26 October 1803 Swan sailed in company with four transports from Portsmouth to Plymouth. There they were to pick up troops for Cork. An agent for the Royal Navy, Captain Watson, accompanied them.

Under the command of Lieutenant William Richard Wallace she recaptured Jane on 25 January 1805. The next day she captured Fly (or Vlieg), a Danish privateer of 18 men that had captured Jane.[Note 2] On 19 March salvage arising from the recapture of Jane was due to be paid at Yarmouth, and on 28 May prize monies resulting from the capture of Fly were due to be paid on board.

On 10 May 1805 Swan was part of a squadron under Rear-Admiral Thomas McNamara Russell when the squadron captured the Dorothea Elizabeth.[18] On 24 August 1807, Swan captured the Haabet, Joost, Master.

During Swan's second contract she was under the command of Lieutenant Mark Robinson Lucas. On 24 May 1808 she found herself in action off the island of Bornholm with a Danish cutter-rigged vessel. Swan had been carrying despatches when she had spotted the Danish vessel and lured her out. After a chase of about two hours, Swan was in a position to open fire. Twenty minutes into the engagement the Danish cutter exploded. Swan suffered no casualties despite coming under fire both from the Danish vessel and the batteries on Bornholm. The fire from the batteries and the sighting of Danish boats approaching forced Wallace to withdraw without being able to make efforts to rescue survivors. The Danish cutter appeared to be of about 120 tons, to have mounted eight or ten guns, and apparently was full of men. The Danish cutter turned out to be the privateer Habet.

Four days later Swan captured the Danish brigs Emanuel and Aall. On 15 November 1808 Swan captured the Anna Dorothea.

Then Swan captured Constantine Pawlowitz on 4 August 1809.

Later in 1809 Lucas removed from Swan. In December 1809 Swan captured Friendschaff (5 December), Neptunus, and St. Johanna (10 December).

On 4 August 1810, Swan was under the command of Edward Mourilyan when she captured the Juliana Carolina. On 25 August Swan brought in to Hano Bay, Sweden, where Vice-Admiral Sir James Saumarez and his flagship Victory then were, a Danish privateer rowboat with 11 men, one of whom had been killed and another wounded in attempting to make their escape. Swan also brought in a galiot that she had recaptured.

On 6 January 1811 Swan was in Yarmouth for repairs, having had to cut away masts during a gale. On 19 April 1811, Swan captured Baron Rhanizen Lhen and Bellona. That same day she captured Lykkern Prove, Peterson, Master.

On 24 April 1811, Swan and hired armed cutter Hero anchored off Kungsholm;[30] at 3am the next morning they saw three Danish gunboats in The Sleeve (Sunningesund), approaching them. The two British cutters cut their cables and attempted to escape. Shots from one of the gunboats damaged Swan and one shot resulted in the wetting of her powder magazine. As the wind died off, the gunboats concentrated on Swan, forcing her surrender. The Danes boarded her but were able to retrieve little before Swan sank off Uddevalla, on the Swedish coast north of Gothenburg. The fight cost Swan two men killed and one wounded. The same battle apparently also resulted in damage to Hero.


https://en.wikipedia.org/wiki/Hired_armed_cutter_Swan#The_second_Swan
 
Today in Naval History - Naval / Maritime Events in History
24 May 1813 – Launch of USS Lawrence, one of two 493-ton Niagara-class brigs (more correctly: snows) built at Erie, Pennsylvania, by Adam and Noah Brown under the supervision of Sailing Master Daniel Dobbins and Master Commandant Oliver Hazard Perry, for United States Navy service on the Great Lakes during the War of 1812.


USS
Lawrence
was one of two 493-ton Niagara-class brigs (more correctly: snows) built at Erie, Pennsylvania, by Adam and Noah Brown under the supervision of Sailing Master Daniel Dobbins and Master Commandant Oliver Hazard Perry, for United States Navy service on the Great Lakes during the War of 1812.

1.JPG 2.JPG

aa.jpg

She was commissioned in early August 1813 and quickly began operations with a voyage to Detroit, Michigan in search of the opposing British squadron. During the 10 September 1813 Battle of Lake Erie, Lawrence served as flagship for Commodore Oliver Hazard Perry until she was disabled by enemy fire. Perry then transferred to her sister ship, Niagara, from which he fought the battle to a successful conclusion. Perry then recaptured the Lawrence at the end of the battle when the British surrendered.

In mid-1815, following the end of hostilities, Lawrence was sunk in Misery Bay on Presque Isle, Pennsylvania in order to preserve her hull. Her submerged hulk was sold in 1825 and, except for a brief examination in 1836, remained underwater for five more decades.

In September 1875, her remains were raised, cut into sections and transported by rail to Philadelphia, Pennsylvania where she was exhibited during The U.S. Centennial International Exhibition of 1876. Her remains were destroyed by a fire during that exhibition.

USS_Lawrence_1875_NH51253_crop.jpg
Raised hulk of Lawrence, Misery Bay, Erie, Pennsylvania, 1875


https://en.wikipedia.org/wiki/USS_Lawrence_(1813)
 
Today in Naval History - Naval / Maritime Events in History
24 May 1842 – Launch of Ingermanland (Russian: Ингерманланд), a 74-gun Iezekiil‘-class ship of the line, built in Arkhangelsk


Ingermanland
(Russian: Ингерманланд) was a three-masted, fully-rigged Iezekiil‘-class ship, built in Arkhangelsk in 1842. The third-rate ship-of-the-line belonged to the Russian Baltic Fleet, but was built by the White Sea. Ships of this type were characterized by good seaworthiness, practical location of artillery and rational interior planning. The ship was armed with 74 pcs. of 24- and 36-pound cannons.

1.JPG 2.JPG

Krugovihin_KrushKorIngerCV.jpg
The wreck of the Ingermanland off the coast of Norway (Painting by KV Krugovilin, 1843)

0576155c-fab8-44b2-b507-5d90a0d5c7cf.jpg

Fatal first trip
On August 8, 1842, the ship left Arkhangelsk on her first trip. Until the destination Kronstadt in the Gulf of Finland, there was a rough voyage in the Barents Sea, Norwegian Sea, Skagerrak and the Baltic Sea ahead. On board were just under 900 people (the sources vary in their numbers), mainly male crew with food and supplies for the sea voyage.

The ship met its destiny along the south coast of Norway. Off Lindesnes, the ship encountered a severe storm. Off Kristiansand, the Ingermanland sailed with Oksøy Lighthouse on the port side in the conviction that the light off the lighthouse was the lantern on another ship. The crew thought they were far from shore, but shortly after, the ship collided on the islet of Grønningen about 10 o'clock in the evening on September 12. This led to the loss of the navigation ability, and a state of emergency. After the grounding, the ship was lifted by high waves off the ground and drifted to the west with the wind. The crew fired the cannons to alert. The alarm was perceived. However, the rescue vessels had to give up because they did not keep up with the ship in the strong wind. Next contact was off Mandal, where pilot vessels and other local vessels managed to rescue a total of 15 people. The ship continued, heading west, while local vessels followed. The ship was reached again, so that 183, later another 120 people were rescued. A lifeboat with 19 people was picked up off Lista, among them Captain Treskin. A fleet of 15 people on board was picked up by a ship in the Skagerrak and taken to Copenhagen. Another lifeboat with 10 people on board drove ashore on Eigerøy and one officer was picked up by pilots from Stavanger.


The memorial in Varhaug

Altogether, 503 people were rescued from the ship and 389 were reported dead. Other sources reported 505 rescued and 387 killed. Among the fatalities were 21 women (7 survivors) and 7 children (1 survivor).

The shipwreck finally sank off Varhaug. At the old cemetery in Varhaug, a memorial stone has been erected for the casualties of the ship's disaster.

Ingermanland03.jpg

bb.jpg


Attachments

  • Ingermanland.pdf
    8.1 MB · Views: 3
Today in Naval History - Naval / Maritime Events in History
24 May 1842 – Launch of The first USS Cumberland, a 50-gun sailing frigate of the United States Navy. She was the first ship sunk by the ironclad CSS Virginia.


The first USS Cumberland was a 50-gun sailing frigate of the United States Navy. She was the first ship sunk by the ironclad CSS Virginia.

1.JPG 2.JPG 3.JPG


1280px-Cumberland-frigate-Currier-Ives.jpeg

Cumberland began in the pages of a Congressional Act. Congress passed in 1816 "An act for the gradual increase of the Navy of the United States." The act called for the U.S. to build several ships-of-the-line and several new frigates, of which Cumberland was to be one. Money issues, however, prevented Cumberland from being finished in a timely manner. It was not until Secretary of the Navy Abel Parker Upshur came to office that the ship was finished. A war scare with Britain led Upshur to order the completion of several wooden sailing ships and for the construction of new steam powered ships.


Conversion
USSCumberland1842.jpg
Depiction of Cumberland after her conversion from a frigate to a sloop of war.

From 1855–1857, Cumberland was razeed at the Charlestown Navy Yard in Boston. From his office in Washington, D.C., John Lenthall, the Chief of the Bureau of Construction and Repair, directed the changes to the ship. The Navy gave her new weapons in the form of 24 Dahlgren smoothbore cannons (22 x IX-inch and 2 x X-inch). By razeeing the ship, Cumberland got an extension of life. The Navy made her a lighter ship and thus slightly faster. Specifically, the shipyard workers removed the spar deck guns and lowered the bulwarks, decreasing the weight of the ship and reducing the crew and supply needs heavily.

This move was assisted by the revolution in naval weapons that provided more powerful guns (and thus needing fewer guns). While steam powered ships were entering the fleet, there was still a need for all the sail ships. As late as 1860, Secretary of the Navy Isaac Toucey suggested that all Potomac-class frigates be razeed.


Frigate_wiki.jpg
Drawing of hull plan of USS Cumberland as a frigate

Sloop_of_war_wiki.jpg
Drawing of USS Cumberland after being razeed


Designed by famed American designer William Doughty, Cumberland was one a series of frigates in a class called the Raritan-class. The design borrowed heavily from older American frigate designs such as Constitution and Chesapeake. Specifically, Doughty liked the idea of giving a frigate more guns than European designs called for. As a result, he called for Cumberland and her sister ships to have a fully armed spar deck, along with guns on the gun deck. The result was a heavily armed, 50-gun warship.


Portsmouth_wiki.jpg
USS Cumberland at the Portsmouth Navy Yard, 1859


https://en.wikipedia.org/wiki/USS_Cumberland_(1842)
 
Today in Naval History - Naval / Maritime Events in History
24 May 1865 – Launch of French Bouvet, a sail and steam aviso of the French Navy, lead ship of her class.


Bouvet was a sail and steam aviso of the French Navy, lead ship of her class. She is remembered as the opponent of the German gunboat SMS Meteor during the Battle of Havana in 1870, at the outbreak of the Franco-Prussian War.

1.JPG 2.JPG

Bouvet-IMG_8732.jpg
1/25th scale model of the steam aviso Bouvet, on display at the Musée national de la Marine in Paris.

Career
Commissioned on 18 June 1866, Bouvet served in Mexico, in the Caribbean and off Terre-Neuve.

At the outbreak of the Franco-Prussian War, she was sent to the Caribbean, where she intervened to rescue the liner SS Nouveau Monde. Under Commander Franquet, she fought against SMS Meteor during the Battle of Havana, managing to ram her opponent and knocking out two of her masts, but suffering herself a shot in a steam pipe which forced her to return into Cuban waters and avoid capture.

Bouvet was wrecked on 17 September 1871 off Île-à-Vache, when a gust of wind sent her onto a reef. The crew managed to safely abandon ship.

cc.jpg
Aviso "Bouvet" (1865-1871) and "Jérôme-Napoléon" (1865-1895)


The Bouvet-class was a type of sail and steam avisos of the French Navy. Design by Vésigné and La Celle, the ships had a clipper hull, barque rigging and a steam engine with one propeller. They were armed with on 160mm gun and two 120mm guns. Bruat (1867) is sometimes counted among this class.

A model of Bouvet, lead ship of the class, is now on display at Paris naval museum.
Launched: 1865
Launched: 1867


https://en.wikipedia.org/wiki/French_aviso_Bouvet_(1865)
https://en.wikipedia.org/wiki/Bouvet-class_aviso
 
Today in Naval History - Naval / Maritime Events in History
24 May 1865 – Launch of SMS Erzherzog Ferdinand Max, the lead ship of the Erzherzog Ferdinand Max class of broadside ironclads built for the Austrian Navy in the 1860s.


SMS Erzherzog Ferdinand Max was the lead ship of the Erzherzog Ferdinand Max class of broadside ironclads built for the Austrian Navy in the 1860s. She was built by the Stabilimento Tecnico Triestino, with her keellaying in October 1863, launching in May 1865, and commissioning in June 1866 at the outbreak of the Third Italian War of Independence and the Austro-Prussian War, fought concurrently. The ship was armed with a main battery of sixteen 48-pounder guns, though the rifled guns originally intended, which had been ordered from Prussia, had to be replaced with old smoothbore guns until after the conflicts ended.

1920px-SMS_Erzherzog_Ferdinand_Max_after_1880.jpg

Stationed in the Adriatic Sea, Erzherzog Ferdinand Max served as the flagship of the Austrian fleet under Rear Admiral Wilhelm von Tegetthoff. She saw action at the Battle of Lissa in July 1866, where she rammed and sank the Italian ironclad Re d'Italia. Slightly damaged in the collision, Erzherzog Ferdinand Max had her bow repaired in Malta after the war. She remained in the Austro-Hungarian fleet for the next twenty years, but severely reduced naval budgets owing to Hungarian disinterest in naval matters led to an uneventful career. She was rearmed with newer guns in 1874 and again in 1882. Stricken from the naval register in May 1886, Erzherzog Ferdinand Max was employed as a tender to the gunnery training school from 1889 to 1908. She remained in the inventory until 1916 when she was broken up for scrap.


Design
SMS_Erzherzog_Ferdinand_Max_line-drawing.png
Line-drawing of Erzherzog Ferdinand Max
Main article: Erzherzog Ferdinand Max-class ironclad

Erzherzog Ferdinand Max was 83.75 meters (274.8 ft) long overall; she had a beam of 15.96 m (52.4 ft) and an average draft of 7.14 m (23.4 ft). She displaced 5,130 long tons (5,210 t). She had a crew of 511. Her propulsion system consisted of one single-expansion steam engine, manufactured by the Stabilimento Tecnico shipyard in Fiume, that drove a single screw propeller. The number and type of her coal-fired boilers have not survived. Her engine produced a top speed of 12.54 knots (23.22 km/h; 14.43 mph) from 2,925 indicated horsepower (2,181 kW).

Erzherzog Ferdinand Max was a broadside ironclad, and she was armed with a main battery of sixteen 48-pounder muzzle-loading guns. She also carried several smaller guns, including four 8-pounder guns and two 3-pounders. The ship's hull was sheathed with wrought iron armor that was 123 mm (5 in) thick on the battery and reduced to 87 mm (3.4 in) at the bow and stern.

Service history
Erzherzog Ferdinand Max was laid down at the Stabilimento Tecnico Triestino shipyard in Trieste on 6 May 1863. She was launched on 24 May 1865; the builders were forced to complete fitting-out work quickly, as tensions with neighboring Prussia and Italy erupted into the concurrent Austro-Prussian War and the Third Italian War of Independence in June 1866. Erzherzog Ferdinand Max's rifled heavy guns were still on order from Krupp, and they could not be delivered due to the conflict with Prussia. Instead, the ship was armed with old smooth-bore guns. Rear Admiral Wilhelm von Tegetthoff, the commander of the Austrian Fleet, immediately began to mobilize his fleet. As the ships became fully manned, they began to conduct training exercises in Fasana. With his flag aboard Erzherzog Ferdinand Max, Tegetthoff brought the Austrian fleet to Ancona on 26 June in an attempt to draw out the Italians, but the Italian commander, Admiral Carlo Pellion di Persano, refused to engage Tegetthoff. Tegetthoff made another sortie on 6 July, but again could not bring the Italian fleet to battle.

Battle of Lissa
Main article: Battle of Lissa (1866)
On 16 July, Persano took the Italian fleet, with twelve ironclads, out of Ancona, bound for the island of Lissa, where they arrived on the 18th. With them, they brought troop transports carrying 3,000 soldiers. Persano then spent the next two days bombarding the Austrian defenses of the island and unsuccessfully attempting to force a landing. Tegetthoff received a series of telegrams between the 17 and 19 July notifying him of the Italian attack, which he initially believed to be a feint to draw the Austrian fleet away from its main bases at Pola and Venice. By the morning of the 19th, however, he was convinced that Lissa was in fact the Italian objective, and so he requested permission to attack. As Tegetthoff's fleet arrived off Lissa on the morning of 20 July, Persano's fleet was arrayed for another landing attempt. The latter's ships were divided into three groups, with only the first two able to concentrate in time to meet the Austrians. Tegetthoff had arranged his ironclad ships into a wedge-shaped formation, leading with Erzherzog Ferdinand Max at the center; the wooden warships of the second and third divisions followed behind in the same formation.

Sinking_of_the_italian_ironclad_Re_d'Italia.jpg
An illustration of Re d'Italia rolling over after having been rammed by Erzherzog Ferdinand Max

While he was forming up his ships, Persano transferred from his flagship, Re d'Italia to the turret ship Affondatore. This created a gap in the Italian line, and Tegetthoff seized the opportunity to divide the Italian fleet and create a melee. He made a pass through the gap, but failed to ram any of the Italian ships, forcing him to turn around and make another attempt. During the second attempt, Austrian gunfire had disabled Re d'Italia's rudder, leaving her incapable of maneuvering. Tegetthoff seized the opportunity to ram the Italian vessel, and ordered his ship to maximum speed. After two collisions that occurred at angles too oblique to inflict serious damage, Erzherzog Ferdinand Max struck the ship more directly. The Austrian ship's ram tore a gaping hole in Re d'Italia's hull on the port side, though Erzherzog Ferdinand Max sustained no significant damage herself. Tegetthoff reversed course, allowing the Italian ironclad to lurch back to port and quickly sink. Tegetthoff initially ordered his crew to lower boats to pick up the Italians struggling in the water, but the Italian ironclad San Martino was approaching, and he could not allow his ship to become a stationary target. Instead, he ordered the aviso Kaiserin Elizabeth to remain behind and pick up the survivors while Erzherzog Ferdinand Max engaged San Martino. The other Italian ships, however, did not realize Kaiserin Elizabeth was attempting to pick up the Italian survivors, and so opened fire on her, driving her away from the men in the water.

By this time, the coastal defense ship Palestro was burning badly, soon to be destroyed by a magazine explosion. Persano broke off the engagement, having lost two ships, and though his squadron still outnumbered the Austrians, he refused to counter-attack with his badly demoralized forces. In addition, the fleet was low on coal and ammunition. The Italian fleet began to withdraw, followed by the Austrians; Tegetthoff, having gotten the better of the action, kept his distance so as not to risk his success. Additionally, the Austrian ships were slower than their Italian counterparts, and so they could not force a second engagement. As night began to fall, the opposing fleets disengaged completely, heading for Ancona and Pola, respectively. Erzherzog Ferdinand Max had fired 156 shells in the course of the battle. She had kept boarding parties on her deck, ready to attack Italian vessels, but the opportunity had not presented itself in the engagement; steam powered ships could simply reverse course and disengage before a boarding party could cross over. Erzherzog Ferdinand Max was not significantly damaged by Italian fire or the ramming attempts. A few armor plates were slightly dislodged, the paint had been stripped from the hull where she had collided with Re d'Italia, and she had a minor leak from the concussion, but she was otherwise unscathed.

Later career
After returning to Pola, Tegetthoff kept his fleet in the northern Adriatic, where it patrolled against a possible Italian attack. The Italian ships never came, and on 12 August, the two countries signed the Armistice of Cormons; this ended the fighting and led to the Treaty of Vienna. Though Austria had defeated Italy at Lissa and on land at the Battle of Custoza, the Austrian army was decisively defeated by Prussia at the Battle of Königgrätz. With the war over, Erzherzog Ferdinand Max went into the British Royal Navy shipyard in Malta to have her bow repaired. As a result of Austria's defeat, Kaiser Franz Joseph was forced to accede to Hungarian demands for greater autonomy, and the country became Austria-Hungary in the Ausgleich of 1867. The two halves of the Dual Monarchy held veto power over the other, and Hungarian disinterest in naval expansion led to severely reduced budgets for the fleet. In the immediate aftermath of the war, the bulk of the Austrian fleet was decommissioned and disarmed.

In 1869, Kaiser Franz Joseph took a tour of the Mediterranean Sea in his imperial yacht Greif; Erzherzog Ferdinand Max, her sister ship Habsburg, and a pair of paddle steamers escorted the Kaiser for the trip to Port Said at the mouth of the Suez Canal. The two ironclads remained in the Mediterranean while the other vessels passed through the Canal into the Red Sea in company with Empress Eugenie of France aboard her own yacht. The Austro-Hungarian ships eventually returned to Trieste in December. In 1874 she was rearmed with a battery of fourteen 7 in (180 mm) muzzle-loading Armstrong guns and four light guns. Her battery was revised again in 1882, with the addition of four 9 cm (3.5 in) breech-loader guns, two 7 cm (2.8 in) breech-loaders, a pair of 47 mm (1.9 in) quick-firingrevolver guns, and three 25 mm (0.98 in) auto-cannons. Erzherzog Ferdinand Max was stricken from the naval register on 19 May 1886 and her armament was reduced to eight 10 cm (3.9 in) guns. The following year, these were removed and a single 26 cm (10 in) gun and a 24 cm (9.4 in) gun were installed. From 1889 to 1908, she served as a tender to the gunnery training school. The ship was ultimately broken up for scrap in 1916 during World War I.


The Erzherzog Ferdinand Max class consisted of a pair of ironclad warshipsErzherzog Ferdinand Max and Habsburg—built for the Austrian Navy in the 1860s. They were the last broadside armored frigates to be built for the Austrian Empire, and the last vessels completed to see action against the Italians at the Battle of Lissa in 1866. Intended to have been armed with new breech-loading Krupp guns, the outbreak of the Seven Weeks' War prevented the delivery of the guns, forcing the Austrian Navy to arm the ships with a battery of sixteen older 48-pounder muzzle-loading guns.

Unbenannt1.JPG

Unbenannt.JPG

Hastily finished after the war started, both ships saw action at the Battle of Lissa in July. There, Erzherzog Ferdinand Max served as the flagship of Rear Admiral Wilhelm von Tegetthoff; in the course of the melee, the ship rammed and sank the Italian ironclad Re d'Italia, which proved to be the decisive action in the battle. After the war, both ships were laid up and did not see much significant activity for the remainder of their careers owing to reduced naval funding in what had become the Austro-Hungarian Empire. The ships were converted for secondary duties in 1886, Erzherzog Ferdinand Max and Habsburg became a tender and a guard ship, respectively. Habsburg was sold for scrap in 1898, but Erzherzog Ferdinand Max lingered on until 1916, when she joined her sister in the breaker's yard.

1920px-SMS_Habsburg_after_1877.jpg
Habsburg after her modernization in the 1880s


https://en.wikipedia.org/wiki/SMS_Erzherzog_Ferdinand_Max_(1865)
 
Today in Naval History - Naval / Maritime Events in History
24 May 1868 - First German North Polar Expedition

The first expedition took place in the summer of 1868 and was led by Carl Koldewey on the vessel Grönland. The expedition explored some hitherto unknown coastal tracts of northeastern Spitsbergen, but did otherwise not lead to any new scientific knowledge. However, it served as preparation for the second expedition

800px-Route_der_ersten_deutsche_Arktisexpedition.png

1868 polar explorer Carl Koldewey, heading Germany's first Arctic expedition, set off on the GRÖNLAND sailing vessel for the east coast of Greenland. However, he never arrived at his destination – sailing instead to Spitsbergen.

His original goal was to advance northwards as far as possible along Greenland’s east coast or to travel around Spitsbergen to reach “Gillis Land”. The ice along the way prevented his achieving either of these goals. He sailed instead to Spitsbergen, reaching the northmost latitude of 81°5'. This pioneering expedition placed Koldewey – after whom the first permanent German research station in Spitsbergen is named – in the ranks of international research expeditions starting in the mid-19th century.
These expeditions enabled polar researchers to collect new data on meteorological and geomagnetic conditions in the Arctic. In addition to other European countries such as England and Austria-Hungary, the USA also undertook Arctic expeditions.

Grönland_(1867)‘’.jpg
The Grönland

Gains in knowledge about the polar regions
The geographer August Petermann, who initiated the first German expedition to the Arctic in 1868, had hoped to confirm his theory that the Arctic Ocean was completely ice-free and therefore navigable. Although the explorers’ did not reach their original destination – the east coast of Greenland – they collected data on current velocity, temperatures and elevations in the deep sea, and magnetism which were explored further during the second German expedition to the Arctic in the following year. In 1869, Petermann and his crew successfully reached the east coast of Greenland where they then spent the winter.

These two Arctic expeditions sparked many further expeditions from Germany to the polar regions, including Antarctica. Each journey delivered new knowledge about ice cover in the Arctic, local ecosystems, Arctic flora and fauna, mineral deposits, and the relevance of the Arctic to our climate – something which also ensured that the expeditions became safer.


Grönland_Bbord-FHB1737T3.JPG
The original Grönland today still active, a part of the Deutschen Schifffahrtsmuseums in Bremerhaven.

800px-Grönland_Heck-FHB1737T3.jpg

Grönland_Top-FHB1737T3.jpg
Die Grönland an der Kaje vorm Deutschen Auswandererhaus in Bremerhaven


https://en.wikipedia.org/wiki/German_North_Polar_Expedition
https://ww2.dsm.museum/groenland/index.html
https://de.wikipedia.org/wiki/Erste_Deutsche_Arktisexpedition
https://de.wikipedia.org/wiki/Grönland_(Schiff)
 

Attachments

  • Arctic43-1-83.pdf
    404.6 KB · Views: 2
Today in Naval History - Naval / Maritime Events in History
24 May 1876 - HMS Challenger returned to Spithead, Hampshire, having spent 713 days out of the intervening 1,250 at sea.


The Challenger expedition of 1872–1876 was a scientific exercise that made many discoveries to lay the foundation of oceanography. The expedition was named after the mother vessel, HMS Challenger.

Prompted by Charles Wyville Thomson—of the University of Edinburgh and Merchiston Castle School—the Royal Society of London obtained the use of Challenger from the Royal Navy and in 1872 modified the ship for scientific tasks, equipping her with separate laboratories for natural history and chemistry. The expedition, led by Captain George Nares, sailed from Portsmouth, England, on 21 December 1872. Other naval officers included Commander John Maclear.

Under the scientific supervision of Thomson himself, she travelled nearly 70,000 nautical miles (130,000 km; 81,000 mi) surveying and exploring. The result was the Report Of The Scientific Results of the Exploring Voyage of H.M.S. Challenger during the years 1873–76 which, among many other discoveries, catalogued over 4,000 previously unknown species. John Murray, who supervised the publication, described the report as "the greatest advance in the knowledge of our planet since the celebrated discoveries of the fifteenth and sixteenth centuries". Challenger sailed close to Antarctica, but not within sight of it.

challenger_3117b.jpg

Preparations
To enable her to probe the depths, 15 of Challenger's 17 guns were removed and her spars reduced to make more space available. Laboratories, extra cabins and a special dredging platform were installed. Challenger used mainly sail power during the expedition; the steam engine was used only for powering the dredge. She was loaded with specimen jars, filled with alcohol for preservation of samples, microscopes and chemical apparatus, trawls and dredges, thermometers, barometers, water sampling bottles, sounding leads, devices to collect sediment from the sea bed and great lengths of rope with which to suspend the equipment into the ocean depths.

Because of the novelty of the expedition, some of the equipment was invented or specially modified for the occasion. In all, she was supplied with 181 miles (291 km) of Italian hemp for sounding.

j9171.jpg
Scale: 1:48. Plan showing the profile illustrating the inboard details for Challenger (1858), a 20-gun corvette, as fitted as survey ship for the scientific circumnavigation between 1872-1876. The plan was examined by J B Huddy. Signed by Alfred B Sturdee [Master Shipwright, Sheerness Dockyard, 1866-?] Signed and forwarded by Charles M Aynsley [Captain Superintendent, Sheerness Dockyard, 1870-?] Signed by T.W. Taylor, Exd W. Muddy

j9172.jpg


Expedition
On her 68,890-nautical-mile (79,280 mi; 127,580 km) journey circumnavigating the globe, 492 deep sea soundings, 133 bottom dredges, 151 open water trawls and 263 serial water temperature observations were taken. About 4,700 new species of marine life were discovered.

The scientific work was conducted by Wyville Thomson, John Murray, John Young Buchanan, Henry Nottidge Moseley, Alphonse François Renard and Rudolf von Willemoes-Suhm. Frank Evers Bed was appointed prosector. The official expedition artist was John James Wild. As well as Nares and Maclear, others that were part of the naval crew included Pelham Aldrich, George Granville Campbell, and Andrew Francis Balfour (one of the sons of Scottish botanist John Hutton Balfour). Also among the officers was Thomas Henry Tizard, who had carried out important hydrographic observations on previous voyages. Though he was not among the civilian scientific staff, Tizard would later help write the official account of the expedition, and also become a Fellow of the Royal Society.

The original ship's complement included 21 officers and around 216 crew members. By the end of the voyage, this had been reduced to 144 due to deaths, desertions, personnel being left ashore due to illness, and planned departures.

Challenger reached Hong Kong in December 1874, at which point Nares and Aldrich left the ship to take part in the British Arctic Expedition. The new captain was Frank Tourle Thomson. The second-in-command, and the most senior officer present throughout the entire expedition, was Commander John Maclear. Willemoes-Suhm died and was buried at sea on the voyage to Tahiti. Lords Campbell and Balfour left the ship in Valparaiso, Chile, after being promoted.

Track_of_H.M.S._Challenger_Dec.r_1872_to_May_1876_-_UvA-BC_OTM_HB-KZL_62_04_07.jpg
Track of HMS Challenger from December 1872 till May 1876. The color contours represent ocean surface density.

challengerroute.gif


The first leg of the expedition took the ship from Portsmouth (December 1872) south to Lisbon (January 1873) and then on to Gibraltar. The next stops were Madeira and the Canary Islands (both February 1873). The period from February to July 1873 was spent crossing the Atlantic westwards from the Canary Islands to the Virgin Islands, then heading north to Bermuda, east to the Azores, back to Madeira, and then south to the Cape Verde Islands. During this period, there was a detour in April and May 1873, sailing from Bermuda north to Halifax and back, crossing the Gulf Stream twice with the reverse journey crossing further to the east.

After leaving the Cape Verde Islands in August 1873, the expedition initially sailed south-east and then headed west to reach St Paul's Rocks. From here, the route went south across the equator to Fernando de Noronha during September 1873, and onwards that same month to Bahia (now called Salvador) in Brazil. The period from September to October 1873 was spent crossing the Atlantic from Bahia to the Cape of Good Hope, touching at Tristan da Cunha on the way.

December 1873 to February 1874 was spent sailing on a roughly south-eastern track from the Cape of Good Hope to the parallel of 60 degrees south. The islands visited during this period were the Prince Edward Islands, the Crozet Islands, the Kerguelen Islands, and Heard Island. February 1874 was spent travelling south and then generally eastwards in the vicinity of the Antarctic Circle, with sightings of icebergs, pack ice and whales. The route then took the ship north-eastward and away from the ice regions in March 1874, with the expedition reaching Melbourne in Australia later that month. The journey eastward along the coast from Melbourne to Sydney took place in April 1874, passing by Wilsons Promontory and Cape Howe.

Challenger_expedition.jpg
Expedition crew in 1874

When the voyage resumed in June 1874, the route went east from Sydney to Wellington in New Zealand, followed by a large loop north into the Pacific calling at Tonga and Fiji, and then back westward to Cape York in Australia by the end of August. The ship arrived in New Zealand in late June and left in early July. Before reaching Wellington (on New Zealand's North Island), brief stops were made at Port Hardy (on d'Urville Island) and Queen Charlotte Sound and Challenger passed through the Cook Strait to reach Wellington.

The route from Wellington to Tonga went along the east coast of New Zealand's North Island, and then north and east into the open Pacific, passing by the Kermadec Islands en route to Tongatabu, the main island of the Tonga archipelago (then known as the Friendly Islands). The waters around the Fijian islands, a short distance to the north-west of Tonga, were surveyed during late July and early August 1874. The ship's course was then set westward, reaching Raine Island—on the outer edge of the Great Barrier Reef— at the end of August and thence arriving at Cape York, at the tip of Australia's Cape York Peninsula.

Over the following three months, from September to November 1874, the expedition visited several islands and island groups while sailing from Cape York to China and Hong Kong (then a British colony). The first part of the route passed north and west over the Arafura Sea, with New Guinea to the north-east and the Australian mainland to the south-west. The first islands visited were the Aru Islands, followed by the nearby Kai Islands. The ship then crossed the Banda Sea touching at the Banda Islands, to reach Amboina (Ambon Island) in October 1874, and then continuing to Ternate Island.

All these islands are now part of Indonesia. From Ternate, the route went north-westward towards the Philippines, passing east of Celebes (Sulawesi) into the Celebes Sea. The expedition called at Samboangan (Zamboanga) on Mindanao, and then Iloilo on the island of Panay, before navigating within the interior of the archipelago en route to the bay and harbour of Manila on the island of Luzon. The crossing north-westward from Manila to Hong Kong took place in November 1874.

After several weeks in Hong Kong, the expedition departed in early January 1875 to retrace their route south-east towards New Guinea. The first stop on this outward leg of the journey was Manila. From there, they continued on to Samboangan, but took a different route through the interior of the Philippines, this time touching at the island of Zebu. From Samboangan the ship diverged from the inward route, this time passing south of Mindanao—in early-February 1875.

Challenger then headed east into the open sea, before turning to the south-east and making landfall at Humboldt Bay (now Yos Sudarso Bay) on the north coast of New Guinea. By March 1875, the expedition had reached the Admiralty Islands north-east of New Guinea. The final stage of the voyage on this side of the Pacific was a long journey across the open ocean to the north, passing mostly west of the Carolina Islands and the Mariana Islands, reaching port in Yokohama, Japan, in April 1875.

1280px-The_Challenger_at_Juan_Fernandez.jpg
Challenger at Juan Fernandez

Challenger departed Japan in mid-June 1875, heading east across the Pacific to a point due north of the Sandwich Islands (Hawaii), and then turning south, making landfall at the end of July at Honolulu on the Hawaiian island of Oahu. A couple of weeks later, in mid-August, the ship departed south-eastward, anchoring at Hilo Bay off Hawaii's Big Island, before continuing to the south and reaching Tahiti in mid-September.

The expedition left Tahiti in early October, swinging to the west and south of the Tubuai Islands and then heading to the south-east before turning east towards the South American coast. The route touched at the Juan Fernández Islands in mid-November 1875, with Challenger reaching the port of Valparaiso in Chile a few days later. The next stage of the journey commenced the following month, with the route taking the ship south-westward back out into the Pacific, past the Juan Fernández Islands, before turning to the south-east and back towards South America, reaching Port Otway in the Gulf of Penas on 31 December 1875.

Most of January 1876 was spent navigating around the southern tip of South America, surveying and touching at many of the bays and islands of the Patagonian archipelago, the Strait of Magellan, and Tierra del Fuego. Locations visited here include Hale Cove, Gray Harbour, Port Grappler, Tom Bay, all in the vicinity of Wellington Island; Puerta Bueno, near Hanover Island; Isthmus Bay, near the Queen Adelaide Archipelago; and Port Churruca, near Santa Ines Island.

The final stops, before heading out into the Atlantic, were Port Famine, Sandy Point, and Elizabeth Island. Challenger reached the Falkland Islands towards the end of January, calling at Port Stanley and then continuing northward, reaching Montevideo in Uruguay in mid-February 1876. The ship left Montevideo at the end of February, heading first due east and then due north, arriving at Ascension Island at the end of March 1876.

The period from early- to mid-April was spent sailing from Ascension Island to the Cape Verde Islands. From here, the route taken in late April and early May 1876 was a westward loop to the north out into the mid-Atlantic, eventually turning due east towards Europe to touch land at Vigo in Spain towards the end of May. The final stage of the voyage took the ship and its crew north-eastward from Vigo, skirting the Bay of Biscay to make landfall in England. Challenger returned to Spithead, Hampshire, on 24 May 1876, having spent 713 days out of the intervening 1,250 at sea.


Last edited:
Today in Naval History - Naval / Maritime Events in History
24 May 1887 – Launch of French Marceau, an ironclad turret ship built for the French Navy during the 1880s, the lead ship of her class.


Marceau was an ironclad turret ship built for the French Navy during the 1880s, the lead ship of her class. She served in the Mediterranean Squadron until 1900, when she was rebuilt and subsequently placed in reserve. She returned to service in 1906 as a torpedo training ship. During World War I, she served in Malta and Corfu as a submarine tender. The old ironclad was sold for scrapping in 1920, and while being towed to Toulon, she ran aground in a gale off Bizerte and became stranded. The wreck remained visible there until the 1930s.

Marceau_Marius_Bar_2.jpg


Design
Marceau_line_drawing.png
Line-drawing of Marceau in 1908

Marceau had an overall length of 101.6 meters (333 ft 4 in) and was 98.6 meters (323 ft 6 in) long between perpendiculars. She had a beam of 20.23 m (66 ft 4 in) and a draft up to 8.3 m (27 ft 3 in). She displaced 10,850 tonnes (10,680 long tons). The ship was powered by a pair of vertical triple-expansion steam engines, each driving one shaft, using steam provided by eight coal-fired cylindrical boilers that were trunked into a single large funnel. The engines were designed to reach 12,000 metric horsepower (8,800 kW) and propel the ship at a top speed of 16.5 knots (30.6 km/h; 19.0 mph), but they only managed 11,169 metric horsepower (8,215 kW) and 16.194 knots (29.991 km/h; 18.636 mph) on the ship's sea trials. Marceau had a range of 4,000 nautical miles (7,400 km; 4,600 mi) at a speed of 10 knots (19 km/h; 12 mph). She had a crew of 643–651 officers and enlisted men.

The ship was armed with a main battery of two 340-millimeter (13.4 in) M1881 28-caliber guns and two slightly newer M1884 guns of the same caliber. These weapons were mounted in individual barbettes in a "lozenge" arrangement, with one gun forward, one aft, and two amidships.[3] The secondary battery consisted of sixteen 138.6 mm (5.46 in) M1884 quick-firing (QF) guns, all firing through unarmored embrasures in the hull.[4] Marceau's light armament varies widely between sources: Chesneau & Kolesnik give a range of three to six 65 mm (2.6 in) 65 mm (2.6 in) guns, nine to eighteen 47 mm (1.9 in) 3-pounder guns, eight to twelve 37 mm (1.5 in) 1-pounder five-barrel Hotchkiss revolving cannon, and three to five 450 mm (18 in) torpedo tubes in deck-mounted launchers; naval historian Eric Gille gives four to seven 65 mm (2.6 in) guns, nine to twelve 47 mm guns, eight 37 mm guns and five to six torpedo tubes, all above water; naval historian Paul Silverstone says six 65 mm guns, twelve 47 mm guns and five torpedo tubes. The ship's compound armor belt was 450 mm (17.7 in) thick amidships and reduced to 300 mm (11.8 in) at the stern and 230 mm (9.1 in). The barbettes were also 450 mm thick. The conning tower was protected by 120 mm (4.7 in) of armor plating and the deck was 80 mm (3.1 in) thick.

Service history
Marceau_Marius_Bar_1.jpg
Marceau as originally built

Marceau was ordered in October 1880, but was not laid down until 27 January 1882 at the Société Nouvelle des Forges et Chantiers de la Méditerranée shipyard in La Seyne-sur-Mer. Work proceeded slowly, and she was not launched until April 1890. This was a result of the influence of Admiral Théophile Aube, who was the Minister of Marine in 1886–87; Aube was a staunch advocate of the so-called Jeune École and opposed new battleship construction. Fitting out work was completed much more quickly, however, and she was commissioned into the French fleet on 14 March 1891. After her commissioning, she joined a French fleet that visited Kronstadt and was inspected by Czar Alexander III of Russia. On the return voyage, the fleet stopped in Spithead, where Queen Victoria reviewed the ships. This turned out to be the only time Marceau operated in the Atlantic; after returning to France, she was assigned to the Mediterranean Squadron, where she remained for the duration of her career.

In 1895, Marceau and the ironclads Courbet, Amiral Baudin, and Formidable all nearly ran aground off Hyères; Marceau and three tugs used to tow Amiral Baudin back to port. During the 1897 fleet gunnery trials, which saw the first use of a new system of centralized fire control in the French fleet, Marceau, her sister Neptune, and the new battleship Brennus all achieved more than 25 percent hits at ranges of between 3,000 yd (2,700 m) and 4,000 yd (3,700 m). On 30 August 1900, Marceau returned to La Seyne for a major reconstruction. Her heavy military masts were cut down, her engines were modernized and her boilers were replaced with 16 Niclausse boilers. Another 138.6 mm gun was installed in the bow under the forecastle. The work was completed in May 1902, and Marceau underwent a series of sea trials for the remainder of the year. She did not return to active service with the fleet, however, and was placed in reserve at Toulon. In 1906, she was converted into a training ship for torpedo operators in Toulon.

After the outbreak of World War I in August 1914, Marceau was converted into a floating workshop to support torpedo boats and submarines. She was initially based in Malta, but was later moved to Corfu and then to Bizerte in 1918. She was stricken from the naval register on 1 October 1920, and sold to a shipbreaking firm based in Toulon in 1921. While she was being towed to Toulon, a storm caused her to run aground off Bizerte. She remained visible there until the 1930s.


Magenta_Marius_Bar_1.jpg
Magenta in her early configuration

The Marceau class was class of ironclad battleships of the French Navy. They were the last barbette ships built in France.

Ships in class
  • Marceau
Builder: La Seyne-sur-Mer
Ordered: 27 December 1880
Launched: 24 May 1887
Fate: Broken up in 1922
  • Magenta
Builder: Toulon
Ordered: 7 October 1880
Launched:19 April 1890
Fate: Broken up in 1911
  • Neptune
Builder: Brest
Ordered: 7 October 1880
Launched: 7 May 1887
Fate: Sunk as target ship in 1913


https://en.wikipedia.org/wiki/French_ironclad_Marceau
 
Today in Naval History - Naval / Maritime Events in History
24 May 1941 - Battle of the Denmark Strait - Part I
Bismarck and Prinz Eugen sink HMS Hood


The Battle of the Denmark Strait was a naval engagement on 24 May 1941 in the Second World War, between ships of the Royal Navy and the German Kriegsmarine. The British battleship HMS Prince of Wales and the battlecruiser HMS Hood fought the German battleship Bismarck and the heavy cruiser Prinz Eugen, which were attempting to break out into the North Atlantic to attack Allied merchant shipping (Operation Rheinübung).

1.JPG 2.JPG

Less than 10 minutes after the British opened fire, a shell from Bismarck struck Hood near her aft ammunition magazines. Soon afterwards, Hood exploded and sank within three minutes, with the loss of all but three of her crew. Prince of Wales continued to exchange fire with Bismarck but suffered serious malfunctions in her main armament. The British battleship had only just been completed in late March 1941, and used new quadruple gun turrets that were unreliable. Therefore, the Prince of Wales soon broke off the engagement.

Bundesarchiv_Bild_146-1984-055-13,_Schlachtschiff_Bismarck,_Seegefecht.jpg
Bismarck firing at HMS Prince of Wales on 24 May 1941

The battle was considered a tactical victory for the Germans but its impact was short-lived. The damage done to Bismarck's forward fuel tanks forced the abandonment of the breakout and an attempt to escape to dry dock facilities in occupied France, producing an operational victory for the British. Incensed by the loss of Hood, a large British force pursued and sank Bismarck three days later.


Background
Map_Rheinuebung.svg.png
The setting of the battle, at top centre. German movements are in red, British in black, modern boundaries are shown.

The two German ships were expected to sail westward and break through the Greenland-Iceland-UK (GIUK) gap. While passing neutral Sweden in the Baltic Sea, the ships were spotted and reported by the Swedish cruiser Gotland and patrol planes;[2] these reports were intercepted by the British embassy, allowing Royal Navy ships to watch their probable route. Due to cloud and rain, aircraft scheduled to assist in the search could not do so when the German ships attempted their breakout.

On the evening of 23 May, despite the advantage of inclement weather to cloak the German's presence, the two ships were spotted steaming at 27 kn (31 mph; 50 km/h), by the British heavy cruisers HMS Norfolk and Suffolk. These cruisers—each carrying eight 8-inch guns—were patrolling the Denmark Strait under the command of Rear-Admiral Frederic Wake-Walker. With the help of Suffolk's newly installed radar the cruisers shadowed the German ships, reporting on their movements throughout the night.

The next morning, at the exit to the Strait between Iceland and Greenland a force of eight British ships was in place, to intercept the Germans. The British fleet included the battleship Prince of Wales, the battlecruiser HMS Hood and a screen of six destroyers, under the command of Vice-Admiral Lancelot Holland in Hood.

Prince of Wales was a newly commissioned King George V-class battleship, similar to Bismarck in size and power. Prince of Wales had not yet been properly "shaken down", and her crew was inexperienced. She still had mechanical problems, especially with her main armament. The ship had sailed with shipyard workers still aboard working on her.

For 20 years after her commissioning in 1920, Hood was the largest and heaviest warship in the world. Combining eight massive BL 15 inch Mk I naval guns with a top speed greater than any battleshipon the sea, Hood was the pride of Great Britain's navy, and embodied the world dominance of British naval power. Despite this, Hood had one conspicuous flaw as compared to the super-dreadnought battleships she served alongside: as a battlecruiser, much of her bulk was dedicated to extra engine power instead of comprehensive armour coverage. This was in accordance with the prevailing theory originally propounded by First Sea Lord Jackie Fisher that "speed is armour".

While her 12-inch belt armour was considered sufficient against most capital ships she was likely to encounter, her 3 inches of deck armour was only rated against shell splinters, leaving her badly unprotected against plunging fire at long range. At the time of her commissioning in World War I, naval gunnery was severely inaccurate at the ranges necessary to produce plunging fire, and Hood'sgreater speed and maneuverability were seen as an acceptable trade-off. However, as the accuracy of naval gunfire increased in the inter-war period, Hood was eventually scheduled to receive an upgrade in 1939 that would have doubled her deck armour to 6 inches, but the outbreak of World War II meant the upgrade never took place. She thus sortied to war at a marked disadvantage against the new capital ships of the Axis.

Aware of Hood's inadequate protective armour, distant to the southeast of where the battle took place, Vice-Admiral Holland's superior (Admiral Sir John Tovey) deliberated on ordering Vice-Admiral Holland to have Prince of Wales sail ahead of Hood. With the ships in this position, Admiral Tovey concluded the better-protected Prince of Wales could draw the German battleships' large-shell gunfire. Ultimately, Admiral Tovey did not give the order, later saying "I did not feel such interference with such a senior officer justified."

Prelude
Plan gone awry

HOOD023.jpg
The last picture of Hood as a fighting unit. The four guns in the foreground are those of Prince of Wales 'A' turret.

800px-090101_PoW_track_chart.jpg
The original track chart of HMS Prince of Wales for the battle of the Denmark Strait (click to enlarge). Note the manuscript additions

Vice-Admiral Holland's battle plan was to have Hood and Prince of Wales engage Bismarck while Suffolk and Norfolk engaged Prinz Eugen (which, Holland assumed, still steamed behind Bismarck and not ahead of her). He signalled this to Captain John C. Leach of Prince of Wales but did not radio Rear Admiral Wake-Walker, who as Commander of the 1st Cruiser Squadron directed Suffolk and Norfolk, for fear of disclosing his location. Instead, he observed radio silence. Holland hoped to meet the enemy at approximately 02:00. Sunset in this latitude was at 01:51 (ship's clocks were four hours ahead of local time). Bismarck and Prinz Eugen would be silhouetted against the sun's afterglow while Hood and Prince of Wales could approach rapidly, unseen in the darkness, to a range close enough not to endanger Hood with plunging fire from Bismarck. The Germans would not expect an attack from this quarter, giving the British the advantage of surprise.

The plan's success depended on Suffolk's continually unbroken contact with the German ships. However, Suffolk lost contact from 00:28. For 90 minutes, Holland neither sighted the German ships nor received any further news from Norfolk or Suffolk. Reluctantly, Holland ordered Hood and Prince of Wales to turn south-southwest but he detached his destroyers which continued searching to the north.

Before contact was re-established, the two squadrons missed each other narrowly. Had the German ships not altered course to the west at 01:41 to follow the line of the Greenland icepack, the British would have intercepted them much earlier than they did. The British destroyers were just 10 mi (8.7 nmi; 16 km) to the southeast when the Germans made this course change. If the visibility had not been reduced to 3–5 mi (2.6–4.3 nmi; 4.8–8.0 km), the German vessels would probably have been spotted (since generally on a calm, clear day ship lookouts can observe large objects and ships about 12 miles (19 km) distant on the horizon. And if the ship's lookouts are in a crow's nest, the observable distance is even farther).

Just before 03:00, Suffolk regained contact with Bismarck. Hood and Prince of Wales were 35 mi (30 nmi; 56 km) away, slightly ahead of the Germans. Holland signalled to steer toward the Germans and increased speed to 28 kn (32 mph; 52 km/h). Suffolk's loss of contact had placed the British at a disadvantage. Instead of the swiftly closing head-on approach Holland had envisioned, he would have to converge at a wider angle, much more slowly. This would leave Hood vulnerable to Bismarck's plunging shells for a much longer period. The situation worsened further when, at 03:20, Suffolk reported that the Germans had made a further course alteration to the west, placing the German and British squadrons almost abeam of each other.

At 05:35, lookouts on Prince of Wales spotted the German ships 17 mi (15 nmi; 27 km) away. The Germans, already alerted to the British presence through their hydrophonic equipment, picked up the smoke and masts of the British ships 10 minutes later. At this point, Holland had the option of joining Suffolk in shadowing Bismarck and waiting for Tovey to arrive with King George V and other ships to attack or to order his squadron into action. He chose the latter at 05:37. The rough seas in the Strait kept the destroyers' role to a minimum and the cruisers Norfolk and Suffolk would be too far behind the German force to reach the battle.

Battle
Opening moves

Hood opened fire at 05:52 at a distance of approximately 26,500 yd (24,200 m). Holland had ordered firing to begin on the leading ship, Prinz Eugen, believing from her position that she was Bismarck. Holland soon amended his order and directed both ships to engage the rear ship, Bismarck. Prince of Wales had already identified and engaged Bismarck, whereas Hood is believed to have continued to fire at Prinz Eugen for some time.

Holland was a gunnery expert; he was well aware of the danger posed by Hood's weak horizontal protection and wanted to reduce the range as quickly as possible. At a shorter range, the trajectory of Bismarck's shells would be flatter and they would be more likely to hit the sides of the ship rather than the deck or to glance off the top deck. Holland closed the range at an angle that placed the German ships too far forward of the beam, which meant that only 10 of the 18 British heavy guns could train and presented the Germans with a bigger target than necessary. One of Prince of Wales' forward guns became unserviceable after the first salvo, leaving only 9 still firing. Suffolkand Norfolk tried to engage Bismarck during the action but both were out of range and an insufficient speed advantage over Bismarck rapidly to close the range.

The Germans also had the weather gauge, meaning that the British ships were steaming into the wind, spray drenching the lenses of Prince of Wales "A" turret's 42 ft (13 m) Barr and Stroud coincidence rangefinder and both British ships' "B" turret 30 ft (9.1 m) rangefinders. The shorter based (15 ft (4.6 m)) ones in the director towers had to be used instead. Holland had Prince of Wales stay close to Hood, conforming to Hood's movements instead of varying course and speed, which made it easier for the Germans to find the range to both British ships. It would have aided Holland's gunners if they had both fired upon Bismarck as originally planned, since they could time precisely each other's salvos to avoid mistaking one ship's fire for the other. The British could also use Concentration Fire, where both ships' main armament salvos would be controlled by one ship's fire control computer—probably Prince of Wales' modern Admiralty Fire Control Table.

Prince of Wales struck her target first. She would ultimately hit Bismarck three times. One shell struck the commander's boat and put the seaplane catapult amidships out of action (the latter damage not being discovered until much later, during an attempt to fly off the ship's War Diary on the eve of her final battle). The second shell passed through the bow from one side to the other without exploding. The third struck the hull underwater and burst inside the ship, flooding a generator room and damaging the bulkhead to an adjoining boiler room, partially flooding it. The last two hits caused damage to Bismarck's machinery and medium flooding. The hit also severed a steam line and wounded five of Bismarck's crew by scalding. The damage to the bow cut access to 1,000 long tons (1,000 t) of fuel oil in the forward fuel tanks, caused Bismarck to leave an oil slick and reduced her speed by 2 kn (2.3 mph; 3.7 km/h). Bismarck was soon listing 9° to port and lost 2 m (6.6 ft) of freeboard at her bow.

Bismarck_hit.png
A modern reconstruction showing a 14-inch shell from HMS Prince of Wales penetrating Bismarck's bow.

The Germans held their fire until 05:55, when both German ships fired on Hood. Admiral Lütjens, the German fleet chief and task force commander, did not immediately give the order to begin firing. Not until he had made multiple inquiries did Bismarck's first gunnery officer Korvettenkapitän Adalbert Schneider, "Frage Feuererlaubnis"? (Permission to open fire?); the captain of Bismarck, Kapitän zur See Ernst Lindemann, impatiently responded: "Ich lasse mir doch nicht mein Schiff unter dem Arsch wegschießen. Feuererlaubnis!" (I'm not letting my ship get shot out from under my arse. Open fire!)

A shell hit Hood's boat deck, starting a sizable fire in the ready-use 4 in (100 mm) ammunition store but this fire did not spread to other areas of the ship or cause the later explosion. It is possible that Hood was struck again at the base of her bridge and in her foretop radar director. There has been contention over which German vessel struck Hood; Prinz Eugen (Kapitän zur See Helmuth Brinkmann), was firing Prince of Wales, following an order from the fleet commander. The Gunnery Officer of Prinz Eugen, Paul Schmalenbach is quoted as saying that Prinz Eugen's target was Hood.


https://en.wikipedia.org/wiki/Battle_of_the_Denmark_Strait
 
Today in Naval History - Naval / Maritime Events in History
24 May 1941 - Battle of the Denmark Strait - Part II
Bismarck and Prinz Eugen sink HMS Hood


Sinking of Hood
060529_Hood_explosion_sketch.jpg
A sketch prepared by Captain JC Leach (commanding HMS Prince of Wales) for the 2nd Board of Enquiry, 1941. The sketch represents the column of smoke or flame that erupted from the vicinity of the mainmast immediately before a huge detonation which obliterated the after part of the ship from view. This phenomenon is believed to have been the result of a cordite fire venting through the engine-room ventilators (see article).

At 06:00, Holland ordered his force to turn once again to port to ensure that the aft main guns on both Hood and Prince of Wales could bear on the German ships. During the turn, a salvo from Bismarck, fired from about 9 mi (7.8 nmi; 14 km), was seen by men aboard Prince of Wales to straddle Hood abreast her mainmast. It is likely that one 38 cm (15 in) shell struck somewhere between Hood's mainmast and "X" turret aft of the mast. A huge pillar of flame that shot upward 'like a giant blowtorch,' in the vicinity of the mainmast.

This was followed by an explosion that destroyed a large portion of the ship from amidships clear to the rear of "Y" turret, blowing both after turrets into the sea. The ship broke in two and the stern fell away and sank. Ted Briggs, one of the survivors, claimed Hood heeled to 30 degrees at which point 'we knew she just wasn't coming back'. The bow rose clear of the water, pointed upward, pivoted about and sank shortly after the stern. "A" turret fired a salvo while in this upright position, possibly from the doomed gun crew, just before the bow section sank.

Splinters rained down on Prince of Wales .5 mi (0.43 nmi; 0.80 km) away. Hood sank in about three minutes with 1,415 members of the crew. Only Ted Briggs, Bob Tilburn and Bill Dundas survived to be rescued two hours later by the destroyer HMS Electra.

The Admiralty later concluded that the most likely explanation for the loss of Hood was a penetration of her magazines by a 38 cm (15 in) shell from Bismarck, causing the explosion. Recent research with submersible craft suggests that the initial explosion was in the aft 4 in (100 mm) magazine and that it spread to the 15 in (380 mm) magazines via the ammunition trunks. It has been suggested from examination of the wreckage, found in 2001, that the magazine explosion in the 4 in (100 mm) armament near the mainmast caused the vertical blast of flame seen there, and this in turn ignited the magazines of the aft 15 in (380 mm) guns that caused the explosion that wrecked the stern. This explosion might have travelled through the starboard fuel tanks, igniting the fuel oil there, setting off the forward magazines and completing the destruction of the ship.

Bundesarchiv_Bild_146-1998-035-05,_Schlachtschiff_Bismarck,_Seegefecht.jpg
A photo probably taken from the Prinz Eugen shows the Hood exploding in the far distance with the Prince of Wales nearby

The wreck of Hood revealed the bow section bereft of any structure. A huge section of her side is missing, from the 'A' barbette to the foredeck. The midship section had its plates curled outward. Moreover, the main parts of the forward structure, including the 600 long tons (610 t) conning tower, were found about 1.1 km (0.59 nmi; 0.68 mi) away from the main wreckage. This has sparked theories that the 15 in (380 mm) forward magazines exploded as a result of the force, flames and pressure, caused by the detonation of the aft magazines. However, a team of marine forensic scientists has found that implosion damage to the forward hull due to the rapid sinking of the Hood, is the most likely cause of the state of the forward hull, and they do not support any theory that the forward magazines exploded.


Add-On The Ship:
HMS Hood
(pennant number 51) was the last battlecruiser built for the Royal Navy. Commissioned in 1920, she was named after the 18th-century Admiral Samuel Hood. One of four Admiral-class battlecruisers ordered in mid-1916, Hood had design limitations, though her design was revised after the Battle of Jutland and improved while she was under construction. For this reason, she was the only ship of her class to be completed. Despite the appearance of new and more modern ship designs over time, Hood remained the largest and most powerful warship in the world for 20 years after her commissioning, and her prestige was reflected in her nickname, "The Mighty Hood".

1280px-HMS_Hood_(51)_-_March_17,_1924.jpg

Hood was involved in several showing-the-flag exercises between her commissioning in 1920 and the outbreak of war in 1939, including training exercises in the Mediterranean Sea and a circumnavigation of the globe with the Special Service Squadron in 1923 and 1924. She was attached to the Mediterranean Fleet following the outbreak of the Second Italo-Abyssinian War. When the Spanish Civil War broke out, Hood was officially assigned to the Mediterranean Fleet until she had to return to Britain in 1939 for an overhaul. By this time, advances in naval gunnery had reduced Hood's usefulness. She was scheduled to undergo a major rebuild in 1941 to correct these issues, but the outbreak of World War II in September 1939 forced the ship into service without the upgrades.

When war with Germany was declared, Hood was operating in the area around Iceland, and she spent the next several months hunting for German commerce raiders and blockade runners between Iceland and the Norwegian Sea. After a brief overhaul of her propulsion system, she sailed as the flagship of Force H, and participated in the destruction of the French fleet at Mers-el-Kebir. Relieved as flagship of Force H, Hood was dispatched to Scapa Flow, and operated in the area as a convoy escort and later as a defence against a potential German invasion fleet. In May 1941, the battleship Prince of Wales and she were ordered to intercept the German battleship Bismarck and the heavy cruiser Prinz Eugen, which were en route to the Atlantic, where they were to attack convoys. On 24 May 1941, early in the Battle of the Denmark Strait, Hood was struck by several German shells, exploded, and sank within 3 minutes, with the loss of all but three of her crew. Due to her perceived invincibility, the loss affected British morale.

The Royal Navy conducted two inquiries into the reasons for the ship's quick demise. The first, held soon after the ship's loss, concluded that Hood's aft magazine had exploded after one of Bismarck's shells penetrated the ship's armour. A second inquiry was held after complaints that the first board had failed to consider alternative explanations, such as an explosion of the ship's torpedoes. It was more thorough than the first board and concurred with the first board's conclusion. Despite the official explanation, some historians continued to believe that the torpedoes caused the ship's loss, while others proposed an accidental explosion inside one of the ship's gun turrets that reached down into the magazine. Other historians have concentrated on the cause of the magazine explosion. The discovery of the ship's wreck in 2001 confirmed the conclusion of both boards, although the exact reason the magazines detonated is likely to remain unknown since that area of the ship was destroyed in the explosion.


Design and description
Main article: Admiral-class battlecruiser
HMS_Hood_(1921)_profile_drawing.png
Profile drawing of Hood as she was in 1921, in Atlantic Fleet dark grey

The Admiral-class battlecruisers were designed in response to the German Mackensen-class battlecruisers, which were reported to be more heavily armed and armoured than the latest British battlecruisers of the Renown and the Courageous classes. The design was revised after the Battle of Jutland to incorporate heavier armour and all four ships were laid down. Only Hood was completed, because the ships were very expensive and required labour and material that could be put to better use building merchant ships needed to replace those lost to the German U-boat campaign.

Hood was significantly larger than her predecessors of the Renown class. As completed, she had an overall length of 860 feet 7 inches (262.3 m), a maximum beam of 104 feet 2 inches (31.8 m), and a draught of 32 feet (9.8 m) at deep load. This was 110 feet (33.5 m) longer and 14 feet (4.3 m) wider than the older ships. She displaced 42,670 long tons (43,350 t) at load and 46,680 long tons (47,430 t) at deep load, over 13,000 long tons (13,210 t) more than the older ships. The ship had a complete double bottom. Hood had a metacentric height of 4.2 feet (1.3 m) at deep load, which minimised her roll and made her a steady gun platform.

The additional armour added during construction increased her draught by about 4 feet (1.2 m) at deep load, which reduced her freeboard and made her very wet. At full speed, or in heavy seas, water would flow over the ship's quarterdeck and often entered the messdecks and living quarters through ventilation shafts. This characteristic earned her the nickname of "the largest submarine in the Navy". The persistent dampness, coupled with the ship's poor ventilation, was blamed for the high incidence of tuberculosis aboard. The ship's complement varied widely over her career; in 1919, she was authorised 1433 men as a squadron flagship; in 1934, she had 81 officers and 1244 men aboard.

The propulsion system consisted of 24 Yarrow boilers, connected to Brown-Curtis geared steam turbines driving four propellers. The battlecruiser's turbines were designed to produce 144,000 shaft horsepower(107,000 kW), which would propel the ship at 31 knots (57 km/h; 36 mph), but during sea trials in 1920, Hood's turbines provided 151,280 shp (112,810 kW), which allowed her to reach 32.07 knots (59.39 km/h; 36.91 mph). She carried about 3,895 long tons (3,958 t) of fuel oil, which gave an estimated range of 7,500 nautical miles (13,900 km; 8,600 mi) at 14 knots (26 km/h; 16 mph).

Armament
HMS_Hood_Aft_guns_1926_USNHC_57184.jpg
A close-up of Hood's aft 15-inch Mark I guns in 1926.

Hood carried eight 42-calibre BL 15-inch Mk I guns in hydraulically powered twin gun turrets. The guns could depress to −5° and elevate to +30°. At maximum elevation, they fired a 1,920-pound (870 kg) shell to a maximum range of 30,180 yards (27,600 m). The turrets were designated 'A', 'B', 'X', and 'Y' from front to rear, and 120 shells were carried for each gun.

Hood's secondary armament was a dozen 50-calibre BL 5.5-inch Mk I guns, each with 200 rounds. They were shipped on shielded single-pivot mounts fitted along the upper deck and the forward shelter deck. This high position allowed them to be worked during heavy weather, as they were less affected by waves and spray compared with the casemate mounts of earlier British capital ships. Two of these guns on the shelter deck were temporarily replaced by QF 4-inch Mk V antiaircraft (AA) guns between 1938 and 1939. All the 5.5-inch guns were removed during another refit in 1940. The gun fired a 82-pound (37 kg) shell to a maximum range of 17,770 yards (16,250 m).

The original antiaircraft armament consisted of four QF 4-inch Mk V guns on single mounts. These were joined in early 1939 by four twin mounts for the 45-calibre QF 4-inch Mark XVI dual-purpose gun. The single guns were removed in mid-1939 and a further three twin Mark XIX mounts were added in early 1940. This mounting could elevate from −10 to +80°. The Mk XVI gun fired about twelve 35-pound (16 kg) high-explosive shells per minute at a muzzle velocity of 2,660 ft/s (810 m/s). Against surface targets, it had a range of 19,850 yards (18,150 m) and a maximum ceiling of 39,000 ft (12,000 m), but an effective anti-aircraft range of much less.

In 1931, a pair of octuple mountings for the 40-millimetre (1.6 in) QF 2-pounder Mk VIII gun were added on the shelter deck, abreast of the funnels, and a third mount was added in 1937. These gun mounts could depress to −10° and elevate to a maximum of +80°. The Mk VIII 2-pounder gun fired a 40-millimetre (1.6 in) 0.91-pound (0.41 kg) shell at a muzzle velocity of 1,920 ft/s (590 m/s) to a distance of 3,800 yards (3,500 m). The gun's rate of fire was around 96–98 rounds per minute.

Two quadruple mountings for the 0.5-inch Vickers Mk III machine gun were added in 1933 with two more mountings added in 1937. These mounts could depress to −10° and elevate to a maximum of +70°. The machine guns fired a 1.326-ounce (37.6 g) bullet at a muzzle velocity of 2,520 ft/s (770 m/s). This gave the gun a maximum range around 5,000 yd (4,600 m), although its effective range was only 800 yd (730 m). To these were added five unrotated projectile launchers in 1940, each launcher carrying 20 7-inch (180 mm) rockets. When they detonated, the rockets shot out lengths of cable that were kept aloft by parachutes; the cable was intended to snag aircraft and draw up the small aerial mine that would destroy the aircraft.

Six fixed 21-inch (530 mm) torpedo tubes were mounted on Hood, three on each broadside. Two of these were submerged forward of 'A' turret's magazine and the other four were above water, abaft the rear funnel. The Mk IV torpedoes had a warhead of 515 pounds (234 kg) of TNT. They had two speed and range settings - 25 knots (46 km/h; 29 mph) with a maximum range of 13,500 yards (12,300 m) or 40 knots (74 km/h; 46 mph) to 5,000 yards (4,600 m). About 28 torpedoes were carried.

Fire control
HMS_Hood_h60450.jpg
An aerial view of Hood in 1924: The two forward gun turrets are visible with their prominent rangefinders projecting from the rear of the turret. Behind the turret is the conning tower surmounted by the main fire-control director with its own rangefinder. The secondary director is mounted on top of the spotting top on the tripod foremast.


Battlecruiser or fast battleship
Although the Royal Navy always designated Hood as a battlecruiser, some modern writers such as Anthony Preston have classified her as a fast battleship, since Hood appeared to have improvements over the fast Queen Elizabeth-class battleships. On paper, Hood retained the same armament and level of protection, while being significantly faster.

Around 1918, American commanders, including Vice Admiral William Sims, commander of US naval forces in Europe, and Admiral Henry T. Mayo, commander of the Atlantic Fleet, became extremely impressed by Hood, which they described as a "fast battleship", and they advocated that the US Navy develop a fast battleship of its own. However, the US continued with their established design direction, the slower, but well-protected South Dakota-class battleship and the fast and lightly armoured Lexington-class battlecruiser, both of which were later cancelled in accordance with the terms of the Washington Naval Treaty of 1922.

Influences from Hood showed on subsequent Lexington designs, with the reduction of the main armour belt, the change to "sloped armour", and the addition of four above-water torpedo tubes to the four underwater tubes of the original design. To add to the confusion, Royal Navy documents of the period often describe any battleship with a maximum speed over 24 knots (44 km/h; 28 mph) as a battlecruiser, regardless of the amount of protective armour. For instance, the never-built G3 battlecruiser was classified as such, although it would have been more of a fast battleship than Hood.

The scale of Hood's protection, though adequate for the Jutland era, was at best marginal against the new generation of 16-inch (406 mm) gunned capital ships that emerged soon after her completion in 1920, typified by the American Colorado-class and the Japanese Nagato-class battleships. The Royal Navy were fully aware that the ship's protection flaws still remained, even in her revised design, so Hood was intended for the duties of a battlecruiser and she served in the battlecruiser squadrons through most of her career. Late in her career, Hood was outclassed by the armour and protective arrangement of World War II-era fast battleships, but few available "big gun" vessels could match Bismarck's speed, and in 1941, the Admiralty included Hood among the ships sent to engage the German battleship Bismarck.

Construction
Construction of Hood began at the John Brown & Company shipyards in Clydebank, Scotland, on 1 September 1916. Following the loss of three British battlecruisers at the Battle of Jutland, 5,000 tons of extra armour and bracing were added to Hood's design. Most seriously, the deck protection was flawed—spread over three decks, it was designed to detonate an incoming shell on impact with the top deck, with much of the energy being absorbed as the exploding shell had to penetrate the armour of the next two decks. The development of effective time-delay shells at the end of World War I made this scheme much less effective, as the intact shell would penetrate layers of weak armour and explode deep inside the ship. In addition, she was grossly overweight compared to her original design, making her a wet ship with a highly stressed structure.

She was launched on 22 August 1918 by the widow of Rear Admiral Sir Horace Hood, a great-great-grandson of Admiral Samuel Hood, after whom the ship was named. Sir Horace Hood had been killed while commanding the 3rd Battlecruiser Squadron and flying his flag on Invincible—one of the three battlecruisers which blew up at the Battle of Jutland. To make room in John Brown's shipyard for merchant construction, Hood sailed for Rosyth to complete her fitting-out on 9 January 1920. After sea trials, she was commissioned on 15 May 1920, under Captain Wilfred Tompkinson. She had cost £6,025,000 to build (roughly equivalent to £237 million today).

With her conspicuous twin funnels and lean profile, Hood was widely regarded one of the finest-looking warships ever built. She was also the largest warship afloat when she was commissioned, and retained that distinction for the next 20 years. Her size and powerful armament earned her the nickname of "Mighty Hood" and she came to symbolise the might of the British Empire itself.


https://en.wikipedia.org/wiki/Battle_of_the_Denmark_Strait
 
Today in Naval History - Naval / Maritime Events in History
24 May 1941 - Battle of the Denmark Strait - Part III
Bismarck and Prinz Eugen sink HMS Hood


Prince of Wales alone
Prince of Wales found herself steering towards the sinking Hood. Her commanding officer, Captain Leach, ordered an emergency avoidance turn away from Hood's wreckage. This violent change of course disrupted her aim and put her in a position that made it easier for the Germans to target her. She resumed her previous course, but was now under the concentrated fire of both German ships. Prince of Wales was struck four times by Bismarck and three times by Prinz Eugen. One shell passed through her upper superstructure, killing or wounding several crewmen in the Compass Platform and Air Defence Platform. Pieces of another shell struck her radar office aft, killing the crewmen within.

A 20.3 cm (8.0 in) shell from Prinz Eugen found its way to the propelling charge/round manipulation chamber below the aft 5.25 in (133 mm) gun turrets, and a 38 cm (15 in) shell from Bismarck hit underwater below the armour belt, penetrating about 13 ft (4.0 m) into the ship's hull, about 25 ft (7.6 m) below the waterline, but was stopped by the anti-torpedo bulkhead. Fortunately for Prince of Wales, neither shell exploded, but she still suffered minor flooding and the loss of some fuel oil. Contrary to some mistaken opinion, the 38 cm (15 in) shell that struck Prince of Wales below the waterline did not endanger her magazines, as it came to rest abreast an auxiliary machinery room.

090102_PoW_gunnery_plot.png
The original gunnery plot of HMS Prince of Wales for the battle of the Denmark Strait (click to enlarge). This shows the ranges and bearings of the 18 salvos fired by Prince of Walesunder director fire control between 05:53 and 06:02. Three salvos fired by "Y" turret under local control are not shown. The track of Bismarck (in red) is a post-battle estimate.

By this time, serious gunnery malfunctions had caused intermittent problems with the main armament, leading to a 26% reduction in output. According to Captain Leach, he decided that continuing the action would risk losing Prince of Wales without inflicting further damage on the enemy. He therefore ordered the ship to make smoke and withdraw, 'pending a more favourable opportunity'. Prince of Wales turned away just after 06:04, firing from her rear turret under local control until the turret suffered a jammed shell ring, cutting off the ammunition supply and making the guns inoperable.

Despite efforts by crew members and civilian technicians to repair the shell ring, all four guns were not back in service until 08:25, although two of the four guns were serviceable by 07:20. This temporarily left only five 14 in (360 mm) guns operational, but nine of the ten were operational in five hours. The final salvos fired were ragged and are believed to have fallen short. The ship retired from the battle around 06:10. Thirteen of her crew had been killed, nine were wounded. The timing of Prince of Wales' withdrawal was fortunate for her, as she had come into torpedo range of Prinz Eugen and turned away as the German cruiser was about to fire.

Breaking off the action
On Bismarck there was tremendous elation at the sinking of Hood. There was also a keen expectation that they would close on Prince of Wales and possibly finish her off. Bismarck's captain, Ernst Lindemann, requested that Admiral Lütjens allow Bismarck to do just that. Even if British Admiral John Tovey's squadron had left Scapa Flow the previous day, he would still be more than 300 nmi (350 mi; 560 km) away from Bismarck — even if Bismarck diverted to sink Prince of Wales (a chase Lindemann calculated would take only two or three hours).

Lütjens refused to allow Lindemann to give chase, giving no explanation. Lindemann repeated his request, this time more assertively. Lütjens held firm orders from the German Naval Commander, Groß Admiral Erich Raeder, to avoid unnecessary combat with the Royal Navy, especially when it could lead to further damage that could hasten delivering Bismarck toward the waiting hands of the British. He broke off combat instead of pursuing Prince of Wales and ordered a course of 270°, due west. Bismarck had fired 93 of her 353 base-fused Armour Piercing (AP) shells during the engagement.

This clash between the two senior German officers reflected their disparate and distinct command functions. As captain of Bismarck, Lindemann operated first and foremost as a tactician. As such, he had no doubt that his ship's immediate objective was to destroy Prince of Wales, and he had pressed his case as far and hard as he should. Lütjens, as fleet chief and task force commander, operated at the strategic and operational levels. To some degree, his orders were clear – attacking convoys was his priority, not risking "a major engagement for limited, and perhaps uncertain, goals". Nevertheless, Raeder had also ordered Lütjens to be bold and imaginative, to accept battle if unavoidable and conduct it vigorously to the finish.

The reality was that Lütjens' orders did not cover a spectacular success like the one just achieved. His priority therefore was to stick to his instructions - to concentrate on sinking merchant shipping and avoid encounters with enemy warships whenever possible. Moreover, before leaving Germany, Lütjens had told Admirals Conrad Patzig and Wilhelm Marschall, that he would adhere to Raeder's directives. This meant he did not intend to become the third fleet chief to be relieved for contradicting Raeder's orders; Marschall, one of his two predecessors, had been relieved of command for not following his orders to the letter despite the fact that Marschall's analysis of the changes in the tactical situation since the orders were issued resulted in the sinking of the British aircraft carrier HMS Glorious and its two escorting destroyers. Nor was he predisposed to discuss his command decisions with a subordinate officer.

Even if he had known it was the untried Prince of Wales he was fighting and not King George V, Lütjens would probably have stuck to his decision. Following her would have meant exposing the squadron to further gunfire as well as to torpedo attacks from Norfolk and Suffolk. He would have risked his ships and crews on an expressly forbidden opportunity.

Between 06:19 and 06:25, Suffolk fired six salvoes in the direction of Bismarck, having mistaken a radar contact with an aircraft for Bismarck. Suffolk was actually out of gun range of both Bismarck and Prinz Eugen at the time.

Aftermath
HMS_Suffolk_Captain.jpg
Captain Robert Meyric Ellis of Suffolk remains on the bridge for lunch whilst shadowing Bismarck.

Vice-Admiral Holland's death led to responsibility for Prince of Wales falling to Rear-Admiral Wake-Walker in Norfolk. With this command came the responsibility of coping with Bismarck until enough British warships could concentrate and destroy her. His choice was either to renew the action with the Bismarck, or ensure that she be intercepted and brought to action by other heavy units. Wake-Walker chose the latter course, continuing to shadow the German ships. Further offensive action, he concluded, would cause more damage to Prince of Wales than to Bismarck and endanger his cruisers, plus he knew Admiral Tovey was on his way. He ordered Prince of Wales to follow Norfolk at her best speed, so that Norfolk and Suffolk could fall back on her if attacked. At 07:57 Suffolk reported that the Bismarck had reduced speed and appeared damaged.

Since Bismarck's receiving the first hit in the forecastle, all six of the ship's 26-man damage control teams had worked ceaselessly to repair the damage. When it was reported that the tips of the starboard propeller could be seen above water, Lindemann had ordered counterflooding two compartments aft to restore the ship's trim. He then sent divers into the forecastle to connect the forward fuel tanks, containing a much-needed 1,000 long tons (1,000 t) of fuel, first to the tanks near the forward boiler then to the rear fuel tank by way of a provisional line running over the upper deck.

Both these manoeuvres failed. Lindemann then requested permission to slow Bismarck and heel the ship first to one side then the other to weld patches from the inside to the holes in the forward hull. Lütjens refused, again without comment. Eventually, the admiral had to agree to slow the ship to 22 kn (25 mph; 41 km/h) to allow hammocks and collision matting to be stuffed in the holes of the No. 2 boiler room and the auxiliary boiler room to stop the growing ingress of seawater. This attempt also failed. Boiler Room No. 2 was shut down, with a loss of speed to 28 kn (32 mph; 52 km/h).

As well as taking on seawater, Bismarck was leaking fuel oil. Lütjens ordered Prinz Eugen to drop back and see how much of a trail she was leaving astern. The carpet of oil was broad enough to cover both sides of the ship's wake, was all colours of the rainbow and gave off a strong smell – all of which helped disclose Bismarck's location.

The damage to Bismarck's forward fuel tanks, combined with a missed opportunity to refuel at Bergen earlier in the voyage, left less than 3,000 long tons (3,000 t) of fuel remaining, not enough to operate effectively against the Atlantic convoys. The element of surprise – which was considered essential for the operation's success – had most definitely been lost; the German ships continued to be shadowed by Rear-Admiral Wake-Walker's squadron. Lütjens concluded that he needed to abort Bismarck's mission and head toward a convenient dockyard for repairs.

The question was which dockyard to head for. The nearest friendly ports were Bergen and Trondheim in Norway, a little over 1,000 mi (870 nmi; 1,600 km) away. Steaming in that direction meant a return passage north or south of Iceland, with the enemy's air forces now fully alerted to their presence and the possibility of other heavy units between them and Scapa Flow. Lütjens knew his intelligence was unreliable. Hood had been reported by Group North to be off West Africa and there had been no reports of a King George V-class battleship in the vicinity.

Disregarding Lindemann's recommendation to return to Bergen, Lütjens ordered Bismarck to head for the French port of Saint-Nazaire. Although the French coast was 600 mi (520 nmi; 970 km) further away than Bergen, Saint-Nazaire held the potential of longer nights and wider seas in which to shake off Bismarck's shadowers, plus the possibility of luring them across a line of U-boats. It would leave Bismarck poised on the edge of the British trade routes once the damage were repaired; it also meant the potential support of the battleships Scharnhorst and Gneisenau. Both ships had been stationed at Brest in France, since the end of Operation Berlin earlier that year but had been kept in port for repairs and overhaul. While Brest was closer than Saint-Nazaire, it was within range of Royal Air Force bombers.

Lütjens detached the undamaged Prinz Eugen to continue raiding on her own. The cruiser went further south into the Atlantic, where she refuelled from a tanker at sea. She suffered engine trouble, abandoned her commerce raiding mission without having sunk any merchant ships, and made it to Brest.

Reaction
German

News of Lütjens' decision was received with shock in Berlin, Wilhelmshaven and Paris. A blizzard of urgent telephone calls raced across German-occupied Europe. While the Berlin Admiralty was satisfied with Lütjens' success, it was tempered by news of Bismarck's damage and the decision to head for France. Grand Admiral Raeder was not clear whether Lütjens intended to steam for St. Nazaire immediately or after shaking off his pursuers and oiling in mid-Atlantic. Raeder immediately conferred with his chief of staff, Admiral Otto Schniewind, who in turn telephoned Admiral Rolf Carls, who commanded Group North in Wilhelmshaven.

Carls had already drafted a message recalling Lütjens to Germany, but had not yet sent it. Schniewind pointed out that at noon Lütjens had crossed the demarcation line between the Northern Hebrides and Southern Greenland, thus passing from Group North's operational control to Group West; therefore, the decision to recall Lütjens was no longer Carls' to make. A subsequent call to Group West's commander, Admiral Alfred Saalwächter, revealed that he did not plan to recall Lütjens and that he felt such a decision should be discussed between Schniewind and Raeder.

Raeder was against issuing a recall himself, telling Schniewind they did not know enough about the situation at hand and that the person who would best know would be Lütjens. He then telephoned Adolf Hitler, who was at the Obersalzberg in the Bavarian Alps. Hitler received the news of Hood's sinking stoically, exhibiting neither joy nor any other triumphant behavior. After hearing Raeder's report, he turned to those who were with him and expressed his personal thoughts:

If now these British cruisers are maintaining contact and Lütjens has sunk the Hood and nearly crippled the other, which was brand new and having trouble with her guns during the action, why didn't he sink her too? Why hasn't he tried to get out of there or why hasn't he turned around?
News of Hood's destruction was seized upon more enthusiastically by Dr. Joseph Goebbels' Propaganda Ministry. That evening it was broadcast to the nation, accompanied by "We march against England" and other martial airs. The German public, already enjoying the news of Luftwaffe victories over the Royal Navy off Crete, received the news of Hood's sinking euphorically.

British
The British public were shocked that their most emblematic warship and more than 1,400 of her crew had been destroyed so suddenly. The Admiralty mobilised every available warship in the Atlantic to hunt down and destroy Bismarck. The Royal Navy forces pursued and brought Bismarck to battle. The German battleship was sunk on the morning of 27 May.

Moves were subsequently made to court-martial Wake-Walker and Captain John Leach of Prince of Wales. The view was taken that they were wrong not to have continued the battle with Bismarck after Hood had been sunk. John Tovey, Commander-in-Chief of the Home Fleet, was appalled at this criticism. A row ensued between Tovey and his superior, Admiral Sir Dudley Pound. Tovey stated that the two officers had acted correctly, ensuring that the German ships were tracked and not endangering their ships needlessly. Furthermore, Prince of Wales's main guns had repeatedly malfunctioned and she could not have matched Bismarck. Tovey threatened to resign his position and appear at any court-martial as 'defendant's friend' and defence witness. No more was heard of the proposal.

A British board of enquiry quickly investigated the cause of Hood's explosion and produced a report. After criticism that the initial enquiry did not record all the available evidence, a second board of enquiry more extensively investigated Hood's loss, and examined the vulnerabilities of other large British warships still in service in light of the probable causes of the explosion. It, like the first enquiry, concluded that a 15 in (380 mm) shell from Bismarck caused the explosion of Hood's aft ammunition magazines. This led to refitting some older British warships with increased protection for their ammunition magazines and some other related improvements.

Many naval historians and writers have analyzed the Bismarck engagement and weighed the participants' decisions. One of the most debated is Admiral Lütjens' decision to proceed into the Atlantic rather than continue the battle.

Order of battle
Note: The British escorting destroyers were ordered to the battle coordinates as part of the overall forces sent to intercept the German ships; they were detached the evening before the battle

Axis
  • German battleship Bismarck
  • German heavy cruiser Prinz Eugen
Allied
  • The British battleship Prince of Wales.
  • The British battlecruiser HMS Hood
  • The British heavy cruisers HMS Suffolk, Norfolk
  • The British destroyers HMS Achates, Antelope, Anthony, Echo, Electra, Icarus


https://en.wikipedia.org/wiki/Battle_of_the_Denmark_Strait
 
Today in Naval History - Naval / Maritime Events in History
24 May 1982 - HMS Antelope, a Type 21 frigate of the Royal Navy that participated in the Falklands War. was sunk by Argentine aircraft


HMS
Antelope
was a Type 21 frigate of the Royal Navy that participated in the Falklands War and was sunk by Argentine aircraft. Her keel was laid down 23 March 1971 by Vosper Thornycroft in Woolston, Southampton, England.

Initial budget costs for this class were £3.5 million, with final costs exceeding £14 million. She was commissioned on 17 July 1975, and was the only unit of the class never to be fitted with Exocet launchers.

HMS_Antelope_1982.jpg

Royal Navy Service
In 1977, she attended the Silver Jubilee Fleet Review. At this time she was part of the 7th Frigate Squadron.

Falklands War
Antelope took part in the Falklands War arriving in the area of operations on 21 May 1982.

On 23 May 1982, while on air defence duty at the entrance to San Carlos Water, protecting the beachhead established two days before, she came under attack by four Argentine A-4B Skyhawks of Grupo 5. The first pair attacked from astern, with the flight leader breaking off his attack after one of Antelope's Sea Cat SAMs exploded under the port wing of his aircraft.

The pilot, Capitán Pablo Carballo, managed to nurse his aircraft back to Rio Gallegos. The second aircraft on this flight pressed home his bomb run and put a 1,000-pound bomb in Antelope's starboard side, killing one crewman, Steward Mark R. Stephens. The bomb did not explode and the Argentine aircraft was damaged by small arms fire.

HMS_Antelope_(F170)_MOD_45140138.jpg

The second pair of Skyhawks attacked minutes later from the starboard quarter. During this attack, one of the Argentine jets, piloted by First Lieutenant Luciano Guadagnini, was hit by the ship's 20mm cannon before hitting Antelope's main mast, but some sources says that the A-4 'striker' was the one flown by ten. Philippi, who returned safely. Guadagnini was not so lucky, but shot down and killed by anti-aircraft weapons (it may have been Sea Wolf missiles fired by HMS Broadsword, but also Rapiers, Sea Cats and Blowpipes were involved in the shooting so who actually shot him down is still unknown), while his bomb pierced the frigate's hull, also without exploding. Antelope also fired a Sea Cat at what was believed to be a fifth attacker, but this was Capitán Carballo, who was still trying to establish if his aircraft was fit to fly. This missile missed, but passed less than 10 metres from Carballo's cockpit.

After initial damage control efforts, Antelope proceeded to more sheltered waters so that two bomb disposal technicians from the Royal Engineers could come aboard and attempt to defuse the two unexploded bombs. One of the bombs was inaccessible because of wreckage; the other had been damaged and was thought to be in a particularly dangerous condition. Three attempts by the bomb disposal team to withdraw the fuse of this bomb by remote means failed.

A fourth attempt using a small explosive charge detonated the bomb, killing Staff Sergeant James Prescott instantly and severely injuring Warrant Officer Phillips, the other member of the bomb disposal team.[6] The ship was torn open from waterline to funnel, with the blast starting major fires in both engine rooms, which spread very quickly. The starboard fire main was fractured, the ship lost all electrical power, and the commanding officer, Commander Nick Tobin, gave the order to abandon ship. Tobin was the last person to leave the ship; about five minutes after his departure, the missile magazines began exploding.

Royal Marine Coxswain Corporal Alan White received a commendation from the Task Force Commander, Admiral Sir John Fieldhouse, for his part in rescuing 41 crew from Antelope using a Mark 2 LCVP, one of four carried by the assault ship Fearless. The landing craft, Foxtrot 7, is now located in the Royal Marines Museum in Portsmouth, with detailed accounts from Corporal Alan White of the missions he took part in, including the landings at San Carlos.

HMS_Antelope_(F170).png
Antelope's magazines exploding on 24 May 1982.

Explosions continued throughout the night. The following day Antelope was still afloat, but her keel had broken and her superstructure melted into a heap of twisted metal. Antelope broke in half and sank that day. TV and still pictures of Antelope's demise became one of the iconic images of the Falklands War and appear repeatedly in histories of the event.

On 27 January 2002 a diving team from the frigate Montrose replaced the Naval Ensign on Antelope. The wreck is designated as a prohibited area under the Falkland Islands Protection of Wrecks Act.


Today in Naval History - Naval / Maritime Events in History
Other Events on 24 May


1572 - Drake left Plymouth on 24 May 1572, with a crew of 73 men in two small vessels, the Pascha (70 tons) and the Swan (25 tons), to capture Nombre de Dios.

In 1572, he embarked on his first major independent enterprise. He planned an attack on the Isthmus of Panama, known to the Spanish as Tierra Firme and the English as the Spanish Main. This was the point at which the silver and gold treasure of Peru had to be landed and sent overland to the Caribbean Sea, where galleons from Spain would pick it up at the town of Nombre de Dios. Drake left Plymouth on 24 May 1572, with a crew of 73 men in two small vessels, the Pascha (70 tons) and the Swan (25 tons), to capture Nombre de Dios.

His first raid was late in July 1572. Drake and his men captured the town and its treasure. When his men noticed that Drake was bleeding profusely from a wound, they insisted on withdrawing to save his life and left the treasure. Drake stayed in the area for almost a year, raiding Spanish shipping and attempting to capture a treasure shipment.

The people of quality dislike him for having risen so high from such a lowly family; the rest say he is the main cause of wars.
— Gonzalo González del Castillo, letter to King Philip II, 1592
The most celebrated of Drake's adventures along the Spanish Main was his capture of the Spanish Silver Train at Nombre de Dios in March 1573. He raided the waters around Darien (in modern Panama) with a crew including many French privateers including Guillaume Le Testu, a French buccaneer, and African slaves (Maroons) who had escaped the Spanish. Drake tracked the Silver Train to the nearby port of Nombre de Dios. After their attack on the richly laden mule train, Drake and his party found that they had captured around 20 tons of silver and gold. They buried much of the treasure, as it was too much for their party to carry, and made off with a fortune in gold. (An account of this may have given rise to subsequent stories of pirates and buried treasure.) Wounded, Le Testu was captured and later beheaded. The small band of adventurers dragged as much gold and silver as they could carry back across some 18 miles of jungle-covered mountains to where they had left the raiding boats. When they got to the coast, the boats were gone. Drake and his men, downhearted, exhausted and hungry, had nowhere to go and the Spanish were not far behind.

At this point, Drake rallied his men, buried the treasure on the beach, and built a raft to sail with two volunteers ten miles along the surf-lashed coast to where they had left the flagship. When Drake finally reached its deck, his men were alarmed at his bedraggled appearance. Fearing the worst, they asked him how the raid had gone. Drake could not resist a joke and teased them by looking downhearted. Then he laughed, pulled a necklace of Spanish gold from around his neck and said "Our voyage is made, lads!" By 9 August 1573, he had returned to Plymouth.

https://en.wikipedia.org/wiki/Francis_Drake


1690 – Launch of French Saint Esprit 90 guns (designed and built by Blaise Pangalo, launched 24 May 1690 at Brest) – renamed Monarque in June 1690, and broken up 1717


1758 - Capture of Fort Louis, 9th March 1758 - 24th May 1758

A British expedition of two ships of the line with 13 supporting vessels and transports attacked and took Fort Louis in Sénégal which surrendered on 1st May but failed in their attempt to also capture Gorée.

https://threedecks.org/index.php?display_type=show_battle&id=1115


1758 – Launch of HMS Aquilon was a 28-gun Coventry-class sixth-rate frigate of the Royal Navy

HMS Aquilon
was a 28-gun Coventry-class sixth-rate frigate of the Royal Navy. Launched in 1758, she saw active service against the French during the Seven Years' War, capturing seven enemy vessels in the first eight months of 1761. She was declared surplus to Navy requirements and sold into private hands in 1776.

https://en.wikipedia.org/wiki/HMS_Aquilon_(1758)


1779 - Black Prince, owned by Irish and French smugglers, is commissed as an American privateer through the efforts of Benjamin Franklin.


1796 - Capture of St Lucia, 26th April 1796 - 24th May 1796


Christian's first object was the reinforcement of St. Lucia. On April 26th, with a squadron, in which was a large body of troops under Lieutenant-General Sir Ralph Abercromby, he made for that island, off which he arrived on the following morning. A landing was at once effected in Longueville Bay, under the guns of the Ganges, 74, Captain Robert M'Douall, and the Pelican, 18, Commander John Clarke Searle. On the 28th another landing was made in Choc Bay, and, on the 29th, a third, in Anse La Baye. Eight hundred seamen, under Captain Richard Lane, of the Astrcea, 32, and Commander George Frederick Eyves, of the Bulldog, bomb, were then set ashore to co-operate in the projected military operations. Morne Chabot was carried on April 28th; but, on May 3rd, an attack on some batteries, and, on May 17th, an assault on Vigie, were repulsed with heavy loss. The French, however, finally retired to Morne Fortunee; and, on May 24th, the whole island capitulated, 2000 men surrendering. From St. Lucia the expedition went to St. Vincent, which capitulated, after an obstinate resistance, on June llth, and to Grenada, which surrendered a few days later. In June, Christian was relieved in the command of the Leeward Islands' station by Rear-Admiral Henry Harvey, and returned to England in the Beaulieu.

https://threedecks.org/index.php?display_type=show_battle&id=816


1804 - Action off Cape Cepet, 24th May 1804

On May 24th there occurred an affair which, at one moment, seemed inclined to develop into a serious action. The main body of the British fleet was out of sight in the offing; and the Canopus, 80, Rear-Admiral George Campbell, Captain John Conn, Donegal, 74, Captain Sir Richard John Strachan, and Amazon, 38, Captain William Parker, with a very slight S.W. breeze, were standing on the port tack, eastward of Cape Cepet, in order to reconnoitre the outer road, when, just before noon, a French ship of the line and frigate were seen under sail close off the entrance to the harbour. At 12.30 P.M. the British ships tacked in succession, being then about three miles from the shore. No sooner had they begun to put about than a number of gunboats swept out from under Cape Cepet, and began a long-range fire at the Amazon. The Canopus, tiring a few of her lower-deck guns, stood on to the S.E. by E. with a strengthening breeze which by that time blew from the W.N.W. As soon as the heavy guns made themselves heard in Toulon, two French ships of the line and two frigates, followed at 2.30 P.M. by two more of the line, slipped and made sail to assist their consorts outside. The leading French ship, a frigate, being upon the weather quarter of the Canopus, presently opened upon that vessel and the Donegal, which, of course, returned the compliment; but, having so superior a force in chase, Rear- Admiral Campbell did not feel justified in encouraging an attack, and ordered his division to make sail. The pursuit was relinquished at 3.30 P.M., and at 9.30 P.M. the detachment rejoined the Comrnander-in-Chief .

https://en.wikipedia.org/wiki/HMS_Canopus_(1798)
https://en.wikipedia.org/wiki/HMS_Donegal_(1798)
https://threedecks.org/index.php?display_type=show_battle&id=650


1806 - The French schooner Impériale was a 3-gun mercantile schooner-aviso of the French Navy commissioned at Guadeloupe on 23 September 1805. The Royal Navy captured her on 24 May 1806 and named her HMS Vigilant

The French schooner Impériale was a 3-gun mercantile schooner-aviso of the French Navy commissioned at Guadeloupe on 23 September 1805. The Royal Navy captured her on 24 May 1806 and named her HMS Vigilant. The Navy renamed her HMS Subtle on 20 November 1806. She wrecked at Bermuda on 20 October 1807.


1806 - HMS Dominica was a schooner that the British purchased in 1805 in the Leeward Islands. Her crew mutinied in 1806, turning her over to the French, who immediately sent her out as the privateer Napoléon.
The British recaptured her four days after the mutiny and returned her to their service.


HMS Dominica
was a schooner that the British purchased in 1805 in the Leeward Islands. Her crew mutinied in 1806, turning her over to the French, who immediately sent her out as the privateer Napoléon. The British recaptured her four days after the mutiny and returned her to their service. In British service she captured some six small privateers. She was broken up in 1808.


1810 HMS Fleche Sloop (16), George Hewson, wrecked on the Shaarhorn Sand, off Newark, Elbe.

HMS Fleche
(1798) was the French privateer Caroline, which HMS Phoenix captured on 31 May 1798. The British took her into the navy as an 18-gun sloop. She was wrecked at the mouth of the Elbe on 24 May 1810 due to the errors of her pilots. All her crew were saved


1830 – Launch of HMS Wizard was a 10-gun Cherokee-class brig-sloop built for the Royal Navy during the 1820s. She was wrecked in 1859.

https://en.wikipedia.org/wiki/HMS_Wizard_(1830)
https://en.wikipedia.org/wiki/Cherokee-class_brig-sloop


1872 – Launch of Haian (Chinese: 海安; pinyin: Haian; Wade–Giles: Hai-an); originally named Chen-an), was a wooden steam powered frigate built for the Imperial Chinese Navy. She was the lead ship of the Haian class, which consisted of her and her sister Yuyuen.

Haian (Chinese: 海安; pinyin: Haian; Wade–Giles: Hai-an); originally named Chen-an), was a wooden steam powered frigate built for the Imperial Chinese Navy. She was the lead ship of the Haian class, which consisted of her and her sister Yuyuen. They were the largest vessels built in China until the 1930s; they each ran over budget and used sub-standard building materials which limited their use. Haian was initially used as a training ship, and later saw action in the Sino-French War as a potential blockship, being scrapped as a hulk following the war.

Yangwu.jpg
A Haian-class frigate, either Haian or Yuyuen


1881 - Victoria – A double-decked sternwheeler capsized and sank in the Thames River, Ontario on 24 May 1881, 182 people drowned.

https://en.wikipedia.org/wiki/Thames_River_(Ontario)


1917 - The first U.S. convoy left Hampton Roads, Va. to cross the North Atlantic after entering World War I. During the 18 months of war while American vessels escort convoys through the war zone, 183 attacks are made by submarines, 24 submarines are damaged and two are destroyed.


1918 - USS Olympia (C 6) is anchored at Kola Inlet, Murmansk, Russia, to protect refugees during the Russian Revolution.


1937 – Launch of HNLMS Tromp was the lead ship of the Tromp-class light cruisers built for the Royal Netherlands Navy.


HNLMS Tromp
was the lead ship of the Tromp-class light cruisers built for the Royal Netherlands Navy. Built just prior to World War II, the cruiser served mainly in the Pacific and Indian Oceans against the Japanese, being based out of Sydney, Fremantle and Trincomalee where she served alongside British, Australian and US warships. After the war, the she returned to the Netherlands and after 1949 Tromp was used as a training and accommodation ship, before being decommissioned in 1955, and scrapped in 1969.

Tromp.jpg

https://en.wikipedia.org/wiki/HNLMS_Tromp_(1937)


1939 - Vice Adm. Allan McCann's Rescue Chamber is first used to rescue 33 men from the sunken USS Squalus (SS 192). Four Navy divers receive the Medal of Honor for their heroic actions on May 24-25 to rescue the trapped men.


1941 – Death of Lancelot Holland, English admiral (b. 1887)

Vice Admiral Lancelot Ernest Holland, CB (13 September 1887 – 24 May 1941) commanded the British force in the Battle of the Denmark Strait in May 1941 against the German battleship Bismarck. Holland was killed during the battle.

At about 05:35, the German forces were sighted by the Hood and, shortly afterwards, the Germans sighted the British ships. In the ensuing Battle of the Denmark Strait the Hood suffered a catastrophic magazine explosion at 06:01 that broke the ship in half; the admiral and all but three of the crew of 1,418 were lost. One of the survivors, Ted Briggs, later stated he last saw Holland sitting in his admiral's chair, making no attempt to escape from the sinking wreck.

Amm.Lancelot_Holland.jpg

https://en.wikipedia.org/wiki/Lancelot_Holland


1941 - May 24 Hunt for the German battleship Bismarck begins

https://en.wikipedia.org/wiki/Last_battle_of_the_battleship_Bismarck


1943: Großadmiral Karl Dönitz lässt aufgrund der hohen eigenen Verluste den U-Boot-Krieg im Nordatlantik vorläufig abbrechen.


1945 - Patrol bomber PBM aircraft sink Japanese Special Coast Defense Ship No.21 off the China coast, Task Force 58 attacks airfields on southern Kyushu. In return, the Japanese attack U.S. positions and ships at Okinawa and kamikazes strike USS William C. Cole (DE 641), USS Sims (APD 50), LCS (L) 121.
 
Today in Naval History - Naval / Maritime Events in History
25 May 1622 - Tryall (or Trial), a British East India Company-owned East Indiaman launched in 1621, wrecked.
She was under the command of John Brooke when she was wrecked on the Tryal Rocks off the north-west coast of Western Australia
Her crew were the first Englishmen to sight or land on Australia. The wreck is Australia's oldest known shipwreck.


Tryall (or Trial) was a British East India Company-owned East Indiaman launched in 1621. She was under the command of John Brooke when she was wrecked on the Tryal Rocks off the north-west coast of Western Australia in 1622. Her crew were the first Englishmen to sight or land on Australia. The wreck is Australia's oldest known shipwreck.

Unbenannt.JPG

Maiden voyage
Tryall departed Plymouth on her maiden voyage for Bantam on 4 September 1621, carrying a cargo that included silver for trade in the East Indies as well as a gift for the King of Siam. She stopped at Cape Town for supplies on 19 March 1622.

The East India Company had only recently issued orders requiring that its ships sail south of 35°S when en route to the East Indies, as this course (the Brouwer Route) made use of the Roaring Forties and could save up to six months' travel time off the more traditional northern route. Neither Brooke nor any of his crew had sailed via the new southern route previously, or even to Batavia, and they asked in Cape Town for experienced sailors willing to join their crew. Attempts to recruit a master's mate from the East Indiaman Charles were unsuccessful.

The vessel departed on 19 March and sighted the Australian coast on 1 May, apparently mistaking Point Cloates approximately 100 kilometres (62 mi) south-south-west of North West Cape on the mainland, for an island that Captain Lenaert Jacobszoon and Supercargo Willem Janszoon in the Dutch East India Company ship Mauritius had encountered in 1618 and which is now known as Barrow Island. This navigation error was caused by having sailed too far east, a common problem of the time before an accurate means of fixing a ship's longitude existed.

Wreck
Caert_van't_Landt_van_d'Eendracht_(detail_showing_Tryal_Rocks).jpg
"Here the English ship Trial was wrecked in June 1622"

Turning north, they then encountered several weeks of fresh north to north-westerly winds which impeded progress. Finally, the winds turned to favourable south-westerlies and they started to make good progress to their destination of Batavia. On 25 May 1622 at between 10 and 11 p.m. she struck uncharted submerged rocks about 32 kilometres (20 mi) north-west of the outer edge of the Montebello Islands group, the southern boundary of which is about 8 kilometres (5.0 mi) north of the northern tip of Barrow Island.

The reef was named Tryal Rocks after the ship and is located at 20°16′18″S 115°23′18″E.

Captain Brooke, his son John and nine men scrambled into a skiff and the ship's factor Thomas Bright and 35 others managed to save a longboat. Brooke sailed separately to Java. Bright and his crew spent seven days ashore on the Monte Bello Islands, before sailing the longboat to Bantam in Java. This was the first recorded shipwreck in Australian waters and first extended stay in Australia by Europeans.

In all 44 survivors reached Bantam on 21 June. The skiff arrived at Batavia on 5 July 1622 and the longboat three days later — a voyage of over 1,800 kilometres (1,100 mi). Of the 143 men who had left England, 93 had perished at the wreck site, and one person died in the skiff.

Investigation
On his arrival in Batavia, Brooke wrote to his masters in London blaming Captain Fitzherbert, who had been the first British captain to pioneer the southern route across the Indian Ocean after Dutch captain Hendrik Brouwer. Brooke declared that he had followed the route specified by Fitzherbert and had struck rocks where Fitzherbert had said there were none. He said Fitzherbert's incorrect mapping had been the cause for the disaster and denied any responsibility. Brooke claimed that the reef site was well west of the actual site in an attempt to hide his easterly course. He also claimed that all the cargo, including the silver and the ship's papers, had gone down with the ship when it broke up and sank at about 2 a.m.

Thomas Bright secretly and separately wrote to London. He directly blamed Brooke for the loss of the ship and her crew, blaming Brooke's poor navigation and his failure to post a lookout. He said that after striking the reef, Brooke had hurriedly abandoned the ship and fled into the skiff. According to Bright, Brooke had departed the site immediately, leaving many men in the water to drown though the skiff had room for additional men. Bright's longboat was full to capacity and stood about a quarter mile off the wreck due to the danger of capsizing if any of the men in the water attempted to climb on board. He further contradicted Brooke by stating the ship had not sunk until mid-morning the following day.

Subsequent analysis of these reports and other documents, as well as searches of the wreck site, raised suspicions that Brooke had secretly removed at least part of the silver into the skiff before the ship sank, and had managed to get it to Batavia without telling anyone.

Discovery

Montebello_Islands.jpg
Montebello Islands and the Tryal Rocks

Due to Captain Brooke's actions, for well over three centuries there was great confusion as to the exact position of the Tryal Rocks. William Dampier, for example was one mariner who searched for them. After examining the records and Thomas Bright's letter in 1934 historian Ida Lee proved that what was then known as Ritchie's Reef was the site. The Australia Pilot was subsequently amended and the reef renamed.

It was not until 1969 with the advent of recreational scuba diving on the Western Australian coast that the wreck was located after researchers John MacPherson and Eric Christiansen of the Fremantle-based Underwater Explorer's Club determined the position after examining Lee's research and the contemporary records.[8] When an exploration team went to the south western side of the reef which Christiansen had predicted as being the likely location, diver Naoom Haimson almost immediately found the wreck. Members of the dive team were Christiansen, Haimson, Dave Nelley and Ellis Alfred (Alan) Robinson. Chris Muhlmann was skipper of the boat.

Shortly after the discovery, Robinson attempted an illegal salvage operation where his use of explosives badly damaged the wreck site. He had been involved in an earlier operation involving the wrecks Vergulde Draeck north of Perth and Zuytdorp north of Kalbarri. After he had illegally removed objects, including a bronze swivel gun and other artefacts, Robinson was apprehended in Shark Bay. Though he was later acquitted of using explosives on the Tryall, his actions in challenging the state Shipwrecks Acts when prosecuted for his actions, his salvage attempts, and his continual fights with the bureaucracy led to considerable press and his becoming dubbed in the media and in a subsequent film by Prospero Productions as the "Gelignite Buccaneer".

His challenge to the State Maritime Archaeology Act eventually led to enactment of Commonwealth legislation protecting wrecks around Australia.[10] In 1983 Alan Robinson hanged himself in a Sydney prison while on trial on a charge of conspiring to murder his ex-wife.

Led by maritime archaeologist Jeremy Green, divers from the Western Australian Maritime Museum followed up on an earlier Museum expedition under Harry Bingham and conducted a detailed examination of the wreck site in 1971. This was effected subsequent to the receipt of substantial sponsorship from Michael Kailis of Gulf Fisheries. The wreck was found divided into two main sections separated by a sand gully. Heavy swell made conditions very difficult and they precluded a detailed inspection of the easternmost section of the site.

While six cannon, and up to eight anchors of a type expected from the period and some small objects were recorded, no artefacts were found that allowed a positive identification of the site. While the number of anchors suggested a larger ship, the number of cannons pointed to a small vessel like Tryall; in the absence of definitive objects, to Green the evidence remained "equivocal" but he did conclude that the wreck was most likely Tryall. The consensus amongst maritime investigators is that it almost certainly is Tryall. The Museum's display in the Shipwreck Galleries at Fremantle houses a small number of recovered items, including a large iron cannon that was recovered on a later Museum expedition.


Today in Naval History - Naval / Maritime Events in History
25 May 1676 – Battle of Bornholm
May 25 and 26 - Dutch/Danish fleet under Niels Juel defeat Swedes under Baron Creutz between Bornholm and Rugen in the Baltic Sea


The battle of Bornholm was a naval battle between a superior Swedish and a smaller Danish-Dutch fleet that was fought 25–26 May 1676 as a part of the Scanian War. The objective for both sides was naval supremacy in the southern Baltic Sea. The Swedish commander Lorentz Creutz sought to destroy the allied fleet and then land reinforcements in Swedish Pomerania to relieve the Swedish forces in northern Germany. The aim of the Danish fleet under Niels Juel was to prevent this reinforcement without being destroyed by the superior numbers of the Swedish forces.

Niels_juel.jpg
Niels Juel

The Danish navy managed to put to sea by March and conquered the Swedish island of Gotland before the Swedish fleet even managed to get out of its base in Stockholm. The two fleets sighted each other on the morning of 25 May and by night came within firing range of one another, near the JasmundPeninsula off the northeast corner of Rügen. Darkness put an end to the battle after both forces had turned north. Fighting was resumed on the morning of the 26th and went on with both fleets formed in lines of battle, without any attempts at forcing boarding actions. In the afternoon Juel broke off for Øresund (the strait between Sweden and Denmark), where the allied fleet anchored in the shoals of Falsterborev (Falsterbo reef), off the Scanian coast. Creutz did not dare pursue and anchored off Trelleborg to receive instructions from Swedish King Charles XI.

The Swedish force lost three small vessels, an insignificant loss tactically, but the allied fleet still won a strategic victory. Juel's force, though somewhat battered, was nevertheless intact and was reinforced two days later with an additional nine ships along with the experienced Dutch admiral Cornelis Tromp, who took over the command. The inability to force a decisive action against the allied fleet sparked a row between Creutz and his officers, severely crippling Swedish discipline and cohesion. Only a few days after the battle of Bornholm, on June 1, the Swedish fleet suffered a serious defeat at the battle of Öland and lost control of the Baltic for the rest of the year.

1.JPG 2.JPG

Background
Main article: Scanian War
In the summer of 1675, Sweden had attacked Brandenburg at the request of its ally, France, at the time the dominant great power in Europe. This sparked a declaration of war by the Dutch Republic which was at war with France since 1672 in the Franco-Dutch War. After a minor defeat against Brandenburg forces at the battle of Fehrbellin on 18 June 1675, several North German states and the Holy Roman Emperor joined the war against Sweden. Denmark saw in this an opportunity to regain the provinces of Scania, Blekinge and Halland, lost to Sweden under humiliating circumstances in 1660, and declared war on 2 September. The southern Baltic Sea now became a strategically vital area to both sides; Denmark needed the sea lanes to invade the Swedish mainland while Sweden needed them to reinforce their hard-pressed armies in Pomerania; both needed to secure their maritime trade routes.

During 1675 the Swedish fleet under Gustaf Otto Stenbock put to sea, but only got as far as Stora Karslö off Gotland before it had turn back to Stockholm beset by cold and stormy weather, disease and loss of vital equipment. Stenbock was held personally responsible for the failure by King Charles XI and was forced to reimburse the cost of the campaign out of his own pocket. The winter of 1675-76, the Swedish fleet was placed under the command of Lorentz Creutz, but was iced in by an exceptionally harsh winter.

Slaget_vid_Öland_Claus_Møinichen_1676.jpg
A painting by Claus Møinichen ca. 1686 of the Battle of Öland. Svärdet is the rightmost Swedish ship, with two Danish ships on either side of her.

Prelude
Early in April 1676 a Danish fleet of 13 vessels set sail and was reinforced by an increasing number of ships, including the Swedish Caritas that was captured on April 22. Danish forces landed on Gotland and quickly seized the important port of Klintehamn and the fortification of Visborg in Visby.

The Swedish fleet was ordered out on May 4, but was held back by adverse wind conditions and was delayed until May 19. Juel had by then already left Visby and sailed for Bornholm to combine with a smaller Danish-Dutch force. The Swedish fleet consisted of 17 large and 15 medium ships, 8 armed merchants, 11 minor vessels and 8 fireships divided into four squadrons: the first squadron was under the Admiral of the Realm Lorentz Creutz on Kronan with the other squadrons divided among his three admirals Claes Uggla on Svärdet, Johan Bär on Nyckeln and Johan Bergenstjerna on Victoria. Bergenstjerna, however, died after a brief illness on May 20 and the ships of his squadron were divided among the other commanders. According to official records, the fleet had close to 2,200 guns and about 11,400 men, 8,300 sailors and 3,100 soldiers.

Juel had moved his fleet between Scania and the island of Rügen to prevent the Swedish navy from landing troops on the North German coast. He had also been reinforced with Dutch and Danish ships along with the able commanders Philip van Almonde and Jens Rodsten. The two forces sighted each other on May 24 and came in contact the day after.

Stora_Kronan.jpeg.jpeg
Swedish ship of the line HMS Stora Kronan 1668.

Battle
Around six o'clock in the morning on May 25, the two fleets were in sight of each other and Creutz, knowing that he had a numerically superior force, attacked. Juel first sailed towards the northwest in the direction of Öresund, but then turned south towards Jasmund, the north-eastern part of Rügen. The weather was calm throughout the day and the two fleets made little progress. At nightfall, the distance between them had closed and Juel decided to accept battle. The Swedish fleet had difficulties in keeping its formation, and during a maneuver the Danish line managed to cut the Swedish line of battle, capturing the fireship Didric while the fireship Leoparden was driven into a Brandenburg squadron heading for Copenhagen and taken.

Around midnight little had been achieved and the fleets disengaged, but stayed within sight of one another. Around 7 o'clock on May 26 the Swedish force attacked with Uggla's second squadron in the lead, the two fleet sailing side by side while exchanging gunfire. According to the master gunner on Kronan Anders Gyllenspak one of the allied admirals, the Dutch Philip van Allemonde, sailed too close in his flagship Delft and received "a few tough shots with bar shot" by the heavy artillery on Kronan "so that the beakhead went completely asunder, and then the entire ship's side, and finally the stern, so that one could drive a horse and carriage through it".[8] The heavy damage forced Allemonde to move his flag to Gideon and disengage himself from the fighting.

Despite the superiority in numbers, the Swedish side was not able to take advantage of the situation to engage the allied ships at close range to board and capture them. Rather, the battle turned into a ranged artillery duel. When Juel disengaged around four o'clock in the afternoon, the only ships to pursue him were Kronan, Solen and Draken and Uggla's squadron, while the rest stayed behind. With less than half of his forces behind him, Creutz was unable to press the chase for the allied fleet, which was able to run into the reefs at Falsterborev off the Scanian coast. Even though the Swedish fleet was the more powerful force, it was unable to sink or disable any enemy ships and lost the boyer Kung David.

Aftermath
After the unsuccessful action, the Swedish fleet anchored off Trelleborg where King Charles was waiting with new orders to recapture Gotland. The fleet was to refuse combat with the allies at least until they reached the northern tip of Öland, where they could fight in friendly waters. When the Swedish fleet left Trelleborg on May 30, the allied fleet soon came in contact with it and began pursuing the Swedes. The following day the battle of Öland was fought, where the allied fleet defeated the superior Swedish fleet and secured a Danish naval superiority for the rest of the year.

After the fiasco at Öland, Charles XI ordered a commission to investigate whether anyone was to blame for the failure. The committee worked was active for over a year by gathering testimonies from various officers who had been present at the two battles. From the hearings it was evident that the Swedish forces had been poorly coordinated and that the relations between Creutz and his subordinates had hit rock bottom. Creutz was of the opinion that his subordinates had disobeyed his orders and gather all the officers for on Kronan for a meeting. Afterwards, those present testified that they had been "scolded like boys" for not following Creutz in his attempt to pursue the retreating allies. Lieutenant Admiral Christer Boije of Äpplet lost his command and his pay and was replaced by Gustav Horn while Johan Bär of Nyckeln and several other were accused of negligence and cowardice, including Creutz' son Johan on Merkurius. Many of the accused officers defended themselves by pointing out that the official orders were diffuse and imprecise, and that Creutz had not been clear in his orders. It was also claimed that he at one point had backed the sails on Kronan when he saw that his son's ship was under attack by a fireship, thereby holding up the entire Swedish line.

On the allied side, the Dutch admiral Philip van Almonde accused his Danish colleagues for shying away from battle and filed a formal complaint against Admiral Jens Rodsten for willingly avoiding battle. In his report to the Danish King Christian V and Admiral of the Realm Henrik Bielke, Juel himself noted that it far greater damage could have been inflicted on the Swedes if it hadn't been for all the confusion. According to Swedish maritime historian Gunnar Grandin, Juel was eager to push for a decisive action since he knew that the famous Dutch admiral Cornelis Tromp was going to arrive only a few days later to assume command of the allied fleet. Danish historian Jørgen Barfod has also concluded that Juel wanted to test his forces against the Swedes before he was relieved of his position as fleet commander

Forces
The numbers in parentheses indicates the number of guns for each ship.

Allied fleet
Danish ships
  • Churprindsen (68), flagship, Niels Juel
  • Fridericus III (64)
  • Tre Løver (64)
  • Christianus IV (58)
  • Nellebladet (54)
  • Gyldenløve (56)
  • Christiania (54)
  • Lindormen (46)
  • Svenske Falk (46)
  • Delmenhorst (44)
  • Havmanden (36)
  • København (36)
  • Caritas (33)
  • Hommeren (32)
  • Hvide Falk (26)
  • Havfruen (26)
  • Spraglede Falk (18)
Dutch ships
  • Delft (62), admiral's ship, Philip van Almonde
  • Waesdorp (68)
  • Gideon (60)
  • Oostergoo (60)
  • Noortholland (44)
  • Ackerboom (60)
  • Dordrecht (46)
  • Campen (44)
  • Wapen van Utrecht (38)
  • Frisia (36)
Supporting vessels
  • Fire Kronede Lilier (snow)
  • Oranienbaum, Bon Adventure and two unnamed Dutch galiots
  • S:t Jakob
  • S:t Joris
Swedish fleet
First squadron
flaggskepp: Kronan (124), Lorentz Creutz
  • Solen (74)
  • Wrangel (60)
  • Draken (66)
  • Herkules (56)
  • Neptunus (44)
  • Maria (44)
  • Fenix (36)
  • Sundsvall (32)
  • Enhorn (16)
  • Pärlan (28, armed merchant)
  • Tre Bröder (12)
  • Mjöhund (10)
  • Sjöhästen (8)
  • Jakob, Svan (fireships)
Second squadron
flaggskepp: Svärdet (94), Claes Uggla
  • Mars (72)
  • Merkurius (64)
  • Hieronymus (64)
  • Svenska Lejonet (48)
  • Göteborg (48)
  • Fredrika Amalia (34)
  • Uttern (24)
  • Flygande Vargen (44, armed merchant)
  • Järnvågen (24, armed merchant)
  • Ekorren (8)
  • Posthornet (8)
  • Råbocken (8)
  • Rödkritan, Duvan (fireships)
Third squadron
flaggskepp: Nyckeln (84), Johan Bär
  • Äpplet (86)
  • Saturnus (64)
  • Caesar (60)
  • Wismar (54)
  • Riga (54)
  • Hjorten (36)
  • Solen (54, kofferdiskepp)
  • Salvator (30)
  • Gripen (8)
  • Sjöman (8)
  • Leoparden, Postiljon (fireships)
fourth squadron (divided between the other squadrons)
  • Victoria (80)
  • Venus (64)
  • Jupiter (70)
  • Carolus (60)
  • Spes (48)
  • Abraham (44)
  • Nordstjärnan (28)
  • Trumslagaren (34, armed merchant)
  • Konung David (32, armed merchant)
  • Elisabeth (12, armed merchant)
  • Fortuna (12)
  • Konung David (10)
  • Måsen (8)
  • Jägaren, Didrik (fireships)


Niels Juel (8 May 1629 – 8 April 1697) was a Danish-Norwegian admiral and a Danish naval hero. He served as supreme command of the Royal Danish Navy during the late 17th century and oversaw development of the Danish Navy


Last edited:
Back
Top