
Thats a good ideaHi JL,
I am at the beginning also. If you post a build log, we can build together. I did this with another model and we helped each other out along the way. Since there are no other builds of this kit, it would be very beneficial to have 2 going at the same time. What do you think?
Vince

-

SUBSCRIBE TO SHIPS IN SCALE TODAY!
The beloved Ships in Scale Magazine is back and charting a new course for 2026!
Discover new skills, new techniques, and new inspirations in every issue.
NOTE THAT OUR NEXT ISSUE WILL BE July/August 2026 -

Win a Free Custom Engraved Brass Coin!!!
As a way to introduce our brass coins to the community, we will raffle off a free coin during the month of August. Follow link ABOVE for instructions for entering.
You are using an out of date browser. It may not display this or other websites correctly.
You should upgrade or use an alternative browser.
You should upgrade or use an alternative browser.
Hello Vince
I already started a build log of my building, you can see it here:
I haven't updated it for a long time, I have been busy with another builds but recently I came back to that building and I am about to update my post.
I am happy with your idea, I think it can help both. What do you suggest?
We'd better exchange ideas in my thread and not kidnap Yas' one
Best regards
JL
I already started a build log of my building, you can see it here:
Constructo Prince de Neufchâtel - My first POB ship
I bought this kit a long time ago on a sale at ToysRus. At that time I built mainly gliders and Radio Control sail boats. I think it was so cheap that I couldn't resist it I had only a vague and platonic interest in model ships, so the box remained unopend for a long long time. I must say that...
shipsofscale.com
I haven't updated it for a long time, I have been busy with another builds but recently I came back to that building and I am about to update my post.
I am happy with your idea, I think it can help both. What do you suggest?
We'd better exchange ideas in my thread and not kidnap Yas' one
Best regards
JL
- Joined
- Nov 26, 2018
- Messages
- 546
- Points
- 343

I just realized we are building different ships. You are building the Prince De Neufchal and I am building the HMS Prince.Hello Vince
I already started a build log of my building, you can see it here:
Constructo Prince de Neufchâtel - My first POB ship
I bought this kit a long time ago on a sale at ToysRus. At that time I built mainly gliders and Radio Control sail boats. I think it was so cheap that I couldn't resist it I had only a vague and platonic interest in model ships, so the box remained unopend for a long long time. I must say that...shipsofscale.com
I haven't updated it for a long time, I have been busy with another builds but recently I came back to that building and I am about to update my post.
I am happy with your idea, I think it can help both. What do you suggest?
We'd better exchange ideas in my thread and not kidnap Yas' one
Best regards
JL
Vince
I just realized we are building different ships. You are building the Prince De Neufchal and I am building the HMS Prince.
Vince
Well it is an understandable confusion. I'm sorry we are not building the same model, two heads always think better than one and it could be a positive experience.
Maybe next time, or next model.
I wish you a happy building and I intend to follow it.
By the way, HMS Prince was a much more glamorous ship than Prince of Neuchatel, a simple privateer.
Best regards
JL
- Joined
- Feb 17, 2021
- Messages
- 63
- Points
- 68

I also have an older Constructo Prince De Neufchâtel. My concern is the rigging plans don’t seem right. Numbered lined for yards come down but no corresponding point to tie them off. Duplicate of numbers on formast and boom. Lines come down along mast to a set of double block and shows line coming off last block but not to anything to tie off to.


I have not yet arrived to the rigging. My project is at halt due to health problems, but I hope to restart soon
JL
JL

Yes, the rigging plans are hard to follow. I’m not too far into the rigging but hope to figure things out as I go and with additional help from research, reference and my Historic Ship Models book. Can’t tell you how many times I got to the model inspired to work, took a look at the plans and my ship, turned and walked right back out of my work space. Ha! Hang in there. Your model is looking great. Here’s where my build stands.


- Joined
- Sep 28, 2020
- Messages
- 287
- Points
- 168

It looks good and will be a nice memory of your father!
- Joined
- Feb 17, 2021
- Messages
- 63
- Points
- 68
Thanks for the photos you sent. They do help clarify some of the issues. I’ve not got to any rigging yet but am looking ahead to plan Incase I need to adjust the plans. What gets me is on my other models the lines from the yards come down to a belay pin. Here they come down to two blocks at base of mast and that’s ok, but where does the line from the two blocks at base of mast tie off to? I can only think it’s tied off to the top block at base of line.Yes, the rigging plans are hard to follow. I’m not too far into the rigging but hope to figure things out as I go and with additional help from research, reference and my Historic Ship Models book. Can’t tell you how many times I got to the model inspired to work, took a look at the plans and my ship, turned and walked right back out of my work space. Ha! Hang in there. Your model is looking great. Here’s where my build stands.
View attachment 214174View attachment 214175View attachment 214176View attachment 214177View attachment 214178View attachment 214179View attachment 214180

It looks like you know what you are doing despite your not familiar with period ships.
Frustration is like a bat that sucks out our enthusiasm for building model ship.
It happen to me when I started building my first wooden model, but after a few years I picked up the enthusiasm again, built three models and now I’m on my fourth and can’t wait to start my fifth. LOL
Frustration is like a bat that sucks out our enthusiasm for building model ship.
It happen to me when I started building my first wooden model, but after a few years I picked up the enthusiasm again, built three models and now I’m on my fourth and can’t wait to start my fifth. LOL
Hey Bluebeard... yeah, the desire to work hits me at the strangest times. I’ve been picking at this project for many years (like your first build) I love it when I do something and I have a hard time stopping once started, but getting started isn’t always easy. Rigging is turning out to be pretty fun and it’s dramatically changed the look of my ship which has been giving me good energy to continue.It looks like you know what you are doing despite your not familiar with period ships.
Frustration is like a bat that sucks out our enthusiasm for building model ship.
It happen to me when I started building my first wooden model, but after a few years I picked up the enthusiasm again, built three models and now I’m on my fourth and can’t wait to start my fifth. LOL
Kurt Konrath
Kurt Konrath
From what I have seen and read, for most ships the yard ropes came down the mast and attached at base of mast.
Exactly how varied by nation and period. Some had belaying pins, bigger yards had set of pullies at base to make lifting easier on men on deck.
Exactly how varied by nation and period. Some had belaying pins, bigger yards had set of pullies at base to make lifting easier on men on deck.
- Joined
- Feb 17, 2021
- Messages
- 63
- Points
- 68
How do you coil your gun ropes so tight?Yes, the rigging plans are hard to follow. I’m not too far into the rigging but hope to figure things out as I go and with additional help from research, reference and my Historic Ship Models book. Can’t tell you how many times I got to the model inspired to work, took a look at the plans and my ship, turned and walked right back out of my work space. Ha! Hang in there. Your model is looking great. Here’s where my build stands.
View attachment 214174View attachment 214175View attachment 214176View attachment 214177View attachment 214178View attachment 214179View attachment 214180
I used 2-sided tape on a piece of wood. Put a nail through it. Wrapped the line around the nail. The tape has enough tackiness to hold it in place. Then while still around the nail and stuck with the tape I brushed the coil with diluted white glue (half water, half glue) to retain my coil shape on deck.How do you coil your gun ropes so tight?
Attachments

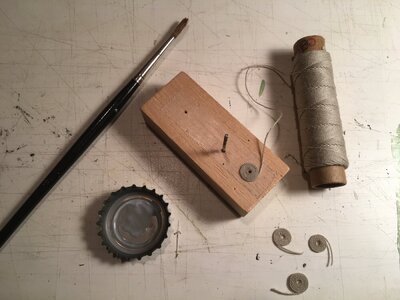
Remembering back a little better Fritz, I think I loosened and removed the nail before painting with glue.
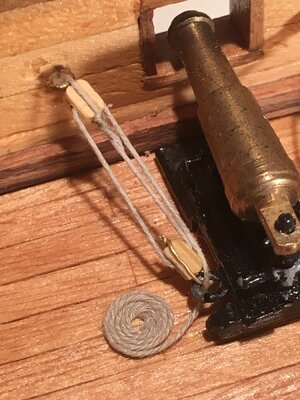
Well Fritz, it’s a cheat. My first cannon rigging attempt was a total disaster. Completely wrong and poorly done. My cannons may still not be historically accurate or period correct but it’s way better than the look I had. Since I didn’t want to completely redo all 18 of my guns, I kept everything up to the cannon’s metal ring, glued it there, then cut the line out of sight just under the ring. Then very carefully with a drop of super glue, attached the end of my coil under the ring where the cut line ended. From every angle (honestly) the rope appears to be passing through the ring and into a nice neat coil. It works for me. Hope it is of some help to you.
- Joined
- Feb 17, 2021
- Messages
- 63
- Points
- 68
Great idea. And they do look more period than most and better than the instructions show. I’ve been coiling mine but they tend to look more like coiled hose, but better than the straight rope off the block. Some models show no tie downs and I put them in anyway. Another trick I started using was gun blue you can get at Walmart gun area. Used to reblue guns and give a nice age look to the brass. I blue the cannons, cannon balls and some of the eye loops. Some I left shiny as it might be areas a captain would have crew polish. Painting the cannons black was ok but if they chipped putting things together I found myself always doing touch ups.Well Fritz, it’s a cheat. My first cannon rigging attempt was a total disaster. Completely wrong and poorly done. My cannons may still not be historically accurate or period correct but it’s way better than the look I had. Since I didn’t want to completely redo all 18 of my guns, I kept everything up to the cannon’s metal ring, glued it there, then cut the line out of sight just under the ring. Then very carefully with a drop of super glue, attached the end of my coil under the ring where the cut line ended. From every angle (honestly) the rope appears to be passing through the ring and into a nice neat coil. It works for me. Hope it is of some help to you.


Your build is looking awesome. The gun blue sounds great and looks even better for giving the metal bits some authenticity. My model is getting old enough that it seems like a used and vintage appearance is happening naturally. Ha! Keep up the great work over there. Look forward to any updates.