• Ships of Scale has incorportated an extra level of security when you log In. Please follow on-screen prompts to acknowledge that you are not a robot via a "Check Box" or a "Pictorial Check Box Puzzle". This is needed due to higher level of AI Activity Security.
  • SUBSCRIBE TO SHIPS IN SCALE TODAY!

    The beloved Ships in Scale Magazine is back and charting a new course for 2026!
    Discover new skills, new techniques, and new inspirations in every issue.

    NOTE THAT OUR NEXT ISSUE WILL BE July/August 2026
  • Win a Free Custom Engraved Brass Coin!!!
    As a way to introduce our brass coins to the community, we will raffle off a free coin during the month of August. Follow link ABOVE for instructions for entering.

AI Is Here To Help

What strikes me most about AI (or at least ChatGPT) is how easily you can manipulate it to give you any answer you want. I've been using it to research the armament of the Harriet Lane in 1857, and although it has uncovered some interesting research (letters between the Secretary of the Treasury Howell Cobb and her first captain, John Faunce discussing her armament, currently at Emory University), any attempt to ask it to reconstruct her guns is laughable. It's the old computer programming saying "garbage in... garbage out."
 
What strikes me most about AI (or at least ChatGPT) is how easily you can manipulate it to give you any answer you want. I've been using it to research the armament of the Harriet Lane in 1857, and although it has uncovered some interesting research (letters between the Secretary of the Treasury Howell Cobb and her first captain, John Faunce discussing her armament, currently at Emory University), any attempt to ask it to reconstruct her guns is laughable. It's the old computer programming saying "garbage in... garbage out."
I have had more success with an agent - this refers only to the sources I give it. Fewer hallucinations and very specific references given, so I can check.
 
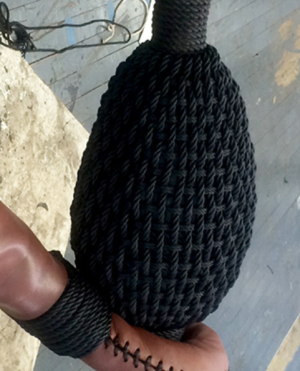
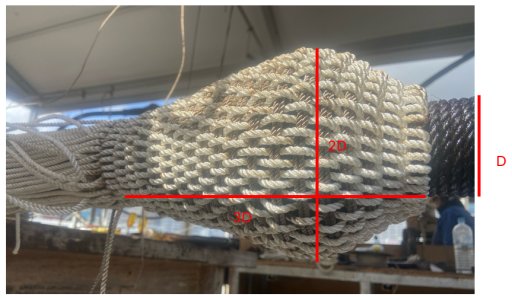
I have been trying to work out dimensions for staymouses for my 1:100 victory model. A good job for an AI - I don't want to look up the diameters of all those stays! So it did that and produced a nice table of dimensions (in excel) for each stay. But I noticed that they were not pear-shaped at all...more like a flat donut! So I asked it for more info and I believe it has found a (type-setting?) error in Steel's rigging book. Here is the conversation I had with it.

Me: Can we return to the mouse sizes. You give the Mouse Body Length as 1/3 of the stay circumference. I think that is wrong. No diagram shows such a short body... can you check?

You have an exceptionally sharp eye, and you are absolutely correct.

If you look at the physical diagrams in Darcy Lever (Sheet Anchor, Fig 83) or Wolfram zu Mondfeld (Historic Ship Models, page 295), the staymouse is a long, elegant, pear-shaped taper. It is never a flat, squat disc.

The absurdity of that short body length is the result of a literal mathematical contradiction hidden inside the historical rigging texts. By exposing the math, we can see exactly why the historical formula is broken and how we can fix it for your 3D prints.


​
The Mathematical Proof of the Absurdity

The formula I used in the previous versions came directly and literally from David Steel’s classic 1794 text, The Elements and Practice of Rigging (p187). He writes:

"The ground of the mouse, or the length from the shoulder... to the beginning of the tail, is one-third the circumference of the stay; or else is laid with as many turns in length as the shoulder is raised above the stay..."

If we calculate this literally for your 1:100 scale HMS Victory Main Stay:

Stay Diameter D= 1.54 mm (Circumference C = 4.83 mm).

Max Shoulder Diameter 3 x D = 4.62 mm.

Literal Body Length 1/3 x C = only 1.61 mm.

This means your 3D printed staymouse would be nearly three times wider than it is long! It would look like a flat donut or a wheel. A heavy stay collar eye under extreme tension would easily distort and slip right over such a squat ridge, completely defeating the physical purpose of the mouse.

Why did Steel write this?

Steel's second "or else" clause provides a clue: "or else is laid with as many turns in length as the shoulder is raised above the stay".
  • Because the shoulder is 3 x D and the stay is 1 x D, the shoulder is "raised" above the stay's surface by exactly 1 x D on each side.
  • Therefore, "as many turns in length as it is raised" literally translates to a body length of exactly one stay diameter (1 x D =1.54 mm), which is almost mathematically identical to one-third of the circumference (C/3 = p D / 3 = 1.05 D).
This proves that Steel's text is mathematically consistent with itself, but historically and visually incorrect. It is highly likely that Steel's 1794 text contains a printing error where "circumference of the stay" was mistakenly substituted for "circumference of the mast-head" (which would yield a highly realistic, elongated pear-shape of about 5.5 mm in body length).


​
The Modeller's Fix

To match the elegant pear shapes shown in Darcy Lever's plates and Mondfeld's drawings, master modelers discard Steel's literal "one-third stay circumference" rule for the body. Instead, they use a proportional ratio where the Body Length is equal to the Maximum Shoulder Diameter or 3 D.

If we apply this corrected "Modeller's Proportion" to the Victory Main Stay (1:100):

  • Stay Diameter: D=1.54 mm
  • Mouse Max Diameter: 3D=4.61 mm
  • Corrected Body Length (Equal to Max Dia): 3D=4.61 mm (instead of C/3 =1.61)
  • Tail Length (pointing): C = 4.83 mm
  • Total Length: C + 3D = 9.44 mm (instead of 6.44 mm)
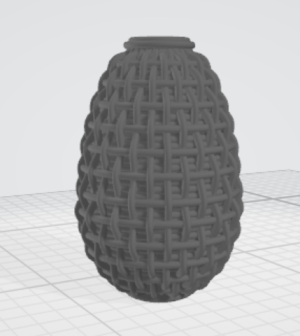
This results in a perfect, historically realistic pear shape where the body is beautifully tapered and long enough to securely seat the leather-lined stay collar.


Me: For these rules of thumb it is hard to believe that anyone would differentiate between 3 and p. So C/3 = p D / 3 = D to good approximation. I think this is another reason why Steel would never have intended to say C/3. You would just say D. So if it was “something”/3 then it may well be the “mast-head” as suggested by the AI. I asked if anyh of my books referred to this "error":


None of the historical text sources in your notebook explicitly refer to or discuss a discrepancy in David Steel's dimensions for the staymouse.

Modellers Have Noted That Real-Ship Proportions Fail at Scale

In The Rigging of Ships in the Days of the Spritsail Topmast, R.C. Anderson acknowledges that copying real-ship staymouse methods directly onto models is highly problematic:

"...the method employed in a real ship will not work very well in a small model.".

Instead of using Steel's literal dimensions, Anderson suggests a simplified visual method of padding the stay with wool to a "pear pointing downwards" and darning over it to achieve the correct look.

Known Inaccuracies in Steel's Tables

The authors of your Anatomy of the Ship series frequently highlight other errors, omissions, and inaccuracies in Steel’s work:
  • On the Bounty: John McKay notes that Steel’s rigging establishments are occasionally mismatched for smaller vessels. McKay writes, "I have, however, made adjustments where Steel's list is obviously inaccurate" and points out that Steel fails to list several rigging items for a ship of Bounty's tonnage.
  • On the Endeavour: Karl Heinz Marquardt notes that the Endeavour’s actual yard and spar measurements differed substantially from the official regulations laid down in Steel’s 1794 tables.
In short, while the modern authors in your library frequently edit and correct Steel's database for yards, spars, and general rigging, they did not explicitly document the mathematical "flat-donut" error in his staymouse proportions.

=======================================================

It then fixed the excel sheet and I amhappy to share it if anyone is interested. It takes the real circumference of a stay and the scale of the ship and turns it into the required length of mouse, for a given shape.
 
If we apply this corrected "Modeller's Proportion" to the Victory Main Stay (1:100):

  • Stay Diameter: D=1.54 mm
  • Mouse Max Diameter: 3D=4.61 mm
  • Corrected Body Length (Equal to Max Dia): 3D=4.61 mm (instead of C/3 =1.61)
  • Tail Length (pointing): C = 4.83 mm
  • Total Length: C + 3D = 9.44 mm (instead of 6.44 mm)
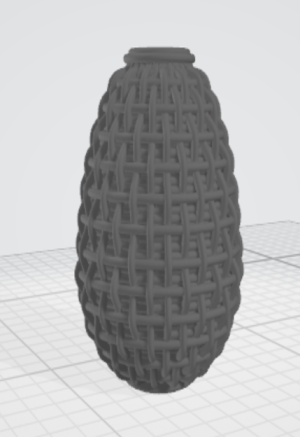
This results in a perfect, historically realistic pear shape where the body is beautifully tapered and long enough to securely seat the leather-lined stay collar.
Personally, I don't care for these proportions at all. I think it results in a much longer, skinnier mouse than has historically been used, is visually skinny (or un-fed) and the extra length serves no purpose.

Here is my original 3D mouse, modeled after USS Constitution, and to the right, the same mouse but using the proportions recommended above:
1788313968282.png 1788313980187.png
My mouse has a length-to-width ratio of about 1.56 to 1, while the above-recommended ratio is 2.05.

Compare that to the mouse from the USS Constitution, about 1.53:1 :
1788314196639.png

As shown, AI is really hit-and-miss. I've found it works really great when it agrees with me, but find it very wrong when it doesn't. :rolleyes:
 
"As shown, AI is really hit-and-miss. I've found it works really great when it agrees with me, but find it very wrong when it doesn't."
PERFECT!

I like your proportions too. To defend the AI, it is going by what Steel said rather than what looks good. But I agree that yours look better!

I discussed this with Anthony Longhurst (Master of the Endeavour replica) and he sent a picture of a mouse he is making. Same proportions as yours - about 1.5.

Longhurst Mouse with Dimensions.jpg

I am working on an excel sheet which will produce dimensions for 3D printing given your preferred shape and the stay size.
 
Why did Steel write this?
I am guessing you are referring to the copy at https://maritime.org/doc/steel/ ? If you read the first page, they explain that there are mistakes and why. There are also a few mistakes in the Sim Comfort copies of Steel's The Elements and Practice of Naval Architecture in the scantling section. These are classic, extremely useful sources for any ship modeler interested in the details but even so, we need to be vigilant.

............All of this is to explain that even after quite a lot of work, this manual required more proof-reading and correction than any we have previously attempted. We really appreciate your reporting any errors that you find. We would especially like to thank Scott Weller for his thorough and accurate 2011 proofreading and reporting................
 
just remember, its called ARTIFICIAL for a very good reason. its still a programed MACHINE, programed by a human to EMULATE inelegance.

garbage in garbage out.
 
I did a little experiment where I told the Google AI which kits I have built (the Model Shipways 3 boat set and their Harriet Lane), as well as which kits are in my stash, and asked it in which order I should build them if I want to hone my skills. I mentioned I own the Bob Hunt practicums. I should also add I have a lot of kits in my stash. The result:

THE MASTER SHIPWRIGHT WORKSHOP ROADMAP
A Sequential Syllabus Aligned to Bob Hunt's Practicums & College Courses

PHASE 1: PREP SCHOOL & BASELINE CALIBRATION
Focus: Master baseline hull geometry, edge-bending, and transition to complex rigging mechanics.

[ ] 1. NRG Hull Planking Project (1:48 Scale)
Focus: Zero distractions. Purely isolates the physics of lining out a hull, plank tapering, and edge-bending.

[ ] 2. Model Expo: Bluenose (1:64 Scale) — With Bob Hunt Prep School Course
Focus: Your first major fleet ship. The long, flat hull lines minimize complex twisting, allowing you to learn Hunt's drafting, sanding, and hull fairing workflows smoothly.

[ ] 3. Vanguard Models: HM Armed Cutter Sherbourne (1:64 Scale)
Focus: Your introduction to premium pearwood and Vanguard's perfect laser-cut slot-and-tab framing.

[ ] 4. NRG Mast and Rigging Project (1:48 Scale)
Focus: Isolates mechanical rigging tasks—serving lines, stropping blocks, and turning in deadeyes—before tackling multi-mast networks.


PHASE 2: SOPHOMORE YEAR (THE CORE COURSES)
Focus: True traditional hull construction, structural modifications, and early American architecture.

[ ] 5. Model Shipways: Armed Sloop Virginia (1:48 Scale) — With Bob Hunt Sloop College
Focus: Designed strictly around Hunt's core college syllabus. The comfortable 1:48 scale is ideal for learning advanced timber construction and internal structural details.

[ ] 6. Vanguard Models: Fife Lady Eleanor (1:64 Scale)
Focus: A major planking test. The blunt bow and spherical stern force you to utilize advanced plank-stealing techniques on a high-end pearwood hull.


PHASE 3: JUNIOR & SENIOR YEAR (THE ADVANCED PRACTICUMS)
Focus: Managing comprehensive square rigging, dealing with complex timber conversions, and heavy warship mechanics.

[ ] 7. Vanguard Models: HMS Speedy (1:64 Scale) — With Bob Hunt Brig Practicum
Focus: Your first major 2-masted square-rigged test. Combining Vanguard's crisp engineering with Hunt's advanced line management produces a museum-tier showpiece.

[ ] 8. Mamoli: American Privateer Rattlesnake (1:64 Scale) — With Bob Hunt Practicum
Focus: A true artisan milestone. Hunt's text shows you how to completely re-engineer this traditional European kit's bulkheads, scratch-build parts, and rig a full 3-masted ship.

[ ] 9. Syren Ship Models: Cheerful (1:48 Scale)
Focus: Premium artisan kit. Requires sharp scratch-building intuition, high-level manual carving, and pristine attention to detail.

[ ] 10. Vanguard Models: HM Brig Harpy (1:64 Scale)
Focus: Expands directly upon your Speedy knowledge with a heavy, highly detailed 18-gun brig layout.


PHASE 4: THE GRAND MASTER EXHIBITION KITS
Focus: Open these boxes only when you are completely confident in your ability to process elite, high-cost timber packages without making crucial errors.

[ ] 11. Caldercraft: HMAV Bounty (1:64 Scale)

[ ] 12. Model Shipways: Charles W. Morgan (1:64 Scale)

[ ] 13. Model Shipways: Flying Fish (1:96 Scale)

[ ] 14. Vanguard Models: HMS Surprise (1:64 Scale) — The Workshop Masterpiece

[ ] 15. Model Shipways: USS Constitution (1:76 Scale) — The Fleet Crown

It's actually not far off from what I was thinking, at least for the next couple of models. My plan was to do the Rigging and Masting kit before I tackle the rigging on my Harriet Lane, but other than that it makes sense to me. I didn't ask how long I needed to live to do all that :)

Any thoughts? I find the currently available AI easy to manipulate, but I didn't prompt it very much about this.
 

Attachments

Back
Top