Amerigo Vespucci Panart 1:84 MA build log

Love the boats AND seeing what's on the bookshelf!
At 92 (or thereabouts) thanks for the reminder to never stop looking forward! :D

Pete
A couple of my books are highly regarded by me as they are signed by two Apollo astronauts, Al Worden who was the command pilot of Apollo 15, and Charley Duke who walked on the moon. Al died recently. What book(s) interested you?

Anyway, I just finished one of the four external stairways. Three to go..
Love the boats AND seeing what's on the bookshelf!
At 92 (or thereabouts) thanks for the reminder to never stop looking forward! :D

Pete
A couple of the books mean a lot to me that are signed by two Apollo astronauts. Al Worden who was the command pilot on Apollo 15 and Charley Duke who walked on the moon. Al recently died. What did you notice on my bookcase that interested you?

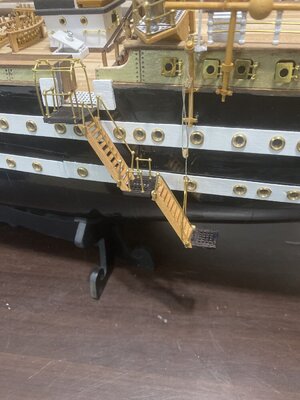
Anyway, I just finished installing the first of four external stairways. Notice that I did not use the method on the plans to put the railings on the side of the stairs. Mine is much easier. Instead of using round tubing that has to be sanded and then mounted with wire loops, I used square tubing that could be glued to the side without needing the wire hoops.

IMG_0451.JPG
 
A couple of my books are highly regarded by me as they are signed by two Apollo astronauts, Al Worden who was the command pilot of Apollo 15, and Charley Duke who walked on the moon. Al died recently. What book(s) interested you?

Anyway, I just finished one of the four external stairways. Three to go..

A couple of the books mean a lot to me that are signed by two Apollo astronauts. Al Worden who was the command pilot on Apollo 15 and Charley Duke who walked on the moon. Al recently died. What did you notice on my bookcase that interested you?

Anyway, I just finished installing the first of four external stairways. Notice that I did not use the method on the plans to put the railings on the side of the stairs. Mine is much easier. Instead of using round tubing that has to be sanded and then mounted with wire loops, I used square tubing that could be glued to the side without needing the wire hoops.

View attachment 407433
Hi Mantares
Stairway looks really nice.
As far as I am concerned, I'll mount them once I have progressed on the masts and yard as I believe these stairways may end up damaged.
 
Hi Mantares
Stairway looks really nice.
As far as I am concerned, I'll mount them once I have progressed on the masts and yard as I believe these stairways may end up damaged.
Yeah, I debated waiting (as I'm doing with mounting the boats) but decided to go ahead and risk making installing the rigging more difficult. I hope I don't regret it :(
 
A couple of my books are highly regarded by me as they are signed by two Apollo astronauts, Al Worden who was the command pilot of Apollo 15, and Charley Duke who walked on the moon. Al died recently. What book(s) interested you?

Anyway, I just finished one of the four external stairways. Three to go..

A couple of the books mean a lot to me that are signed by two Apollo astronauts. Al Worden who was the command pilot on Apollo 15 and Charley Duke who walked on the moon. Al recently died. What did you notice on my bookcase that interested you?

Anyway, I just finished installing the first of four external stairways. Notice that I did not use the method on the plans to put the railings on the side of the stairs. Mine is much easier. Instead of using round tubing that has to be sanded and then mounted with wire loops, I used square tubing that could be glued to the side without needing the wire hoops.

View attachment 407433
All the titles I can make out are intriguing, including "...Landscapes'' so art is in there as well. The books say a lot about the person who reads them. Thumbs-Up
Great solution for the stairway railings!
 
Just starting the final chapter of this kit. There is a minimum of instructions so it ain't going to be easy. I downloaded the Occre AV kit instructions (pdf) that will offer some help but not a lot. My one previous build was the Victory Models HMS Vanguard 1787 that certainly helps but not sure how the rigging of a 18th century ship compares to the AV.

I'll happily share my progress and any input will be appreciated.
Hello Mantares
I am also currently working on Chater 8 and as I mentioned in my build log, the documentation really sucks. I have read it at least a dozen times and have difficulty finding a flow on how to get going.
I decided to start with the foremast and I am almost there (no yards yet). I'll be updating my build log tomorrow,
Thanks to Uwe, I have found a wonderful build log that a German modelist (Joachim) has created. His Vespucci is absolutely wonderful and I believe the build log will be of great help.
It is available at https://www.segelschiffsmodellbau.com/t1284f477-Amerigo-Vespucci-Mantua-Modell.html
You need to register to the German forum in order to see the pictures that Joachim has posted. Go to https://www.segelschiffsmodellbau.com/ and register to the site.
All the logs are in German but Google translate does a great job here.
Let me know if this helps.
We should definitely synch up as we progress so that we can share out experience.
Enjoy the visit of the Vespucci next week in LA :p
Cheers
 
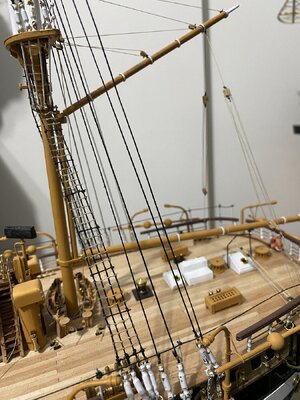
Just finished the mizzen mast (no spars yet) including shrouds, ratlines and aft stays. Lots of issues, a major one being the cast rings don't fit. I ended up slitting them and either squeezing or expanding them to fit the mast. My kit is missing some dowels for the masts and spars. Got them from ModelExpo. I also made the small rings from wrapping wire on a mandrel. The supplied rings often opened when I tried to tighten the line. The ones I made have a partial overlap that corrects that problem.

Now moving on to the main mast--also waiting to do the spars later.View attachment 420392
 
View attachment 420393

Ignore the thread pieces I neglected to remove :(.
Nice job Mantares
I am indeed interested to find out how you will attach the spars to the masts. Have you sorted this?
One question: why did you have some ratlines using black thread (1 on 5) while others using tan thread?

As far as I am concerned, I'll be back home next week and will resume the build.

By the way, how was the visit of the ship you made in LA?
Do you have pictures? I'd be interested in viewing them.
 
The trip is actually this coming July, sorry about the confusion :).

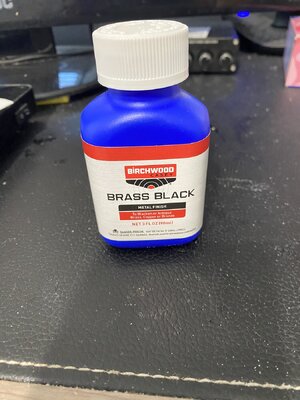
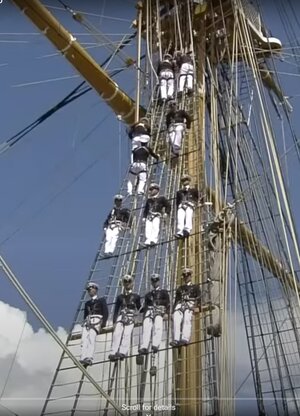
If you notice on the real ship, every fifth ratline is metal and is black. I think that is for events when multiple people are standing on the shroud at the same timeIMG_0481.JPG. In my case I used 0.5 mm brass rod treated with a blackening chemical I got from Amazon.

I have ignored figuring out how to attach the spars via the plans but have spent a huge amount of time looking at videos and photos of the ship but so far that hasn't helped. I will certainly share with you if I succeed and would appreciate if you will do the same with me if you're first:).
 
The trip is actually this coming July, sorry about the confusion :).

If you notice on the real ship, every fifth ratline is metal and is black. I think that is for events when multiple people are standing on the shroud at the same timeView attachment 420540. In my case I used 0.5 mm brass rod treated with a blackening chemical I got from Amazon.

I have ignored figuring out how to attach the spars via the plans but have spent a huge amount of time looking at videos and photos of the ship but so far that hasn't helped. I will certainly share with you if I succeed and would appreciate if you will do the same with me if you're first:).
Hi
Thanks for this detail regarding ratlines. I had not noticed that and will definitely take this into account.

Of course I'll share my experience with you as soon as I am back working on the ship.
Interesting to see that you started with the mizzen mast while I did with the foremast. Obviously we should be together when working on the main mast :)

Take care
 
I'm starting this log a bit late as I have completed chapter 5 but I can share some of my issues and successes getting this far.

Some background. I'm a 91 year old recently retired engineer. This is only the second plank on bulkhead model I have done--the first was an Amanti Vanguard 1:72, some rigging still required but mostly complete.

However I have been building models since I was 10 years old. In 1942, at the start of WWII I was able to buy a P. K. Guillows model for 10 cents. I would build a German or Japanese plane, light the tail, and throw it off of a second story balcony while making gun noises.

During the following decades I mostly built model airplanes. Free flight, U-control, gliders, and RC. In the 1980's a friend and I constructed a plans built 1:1 four-place airplane built from composite materials. My friend bought my share and it is still flying., I finally retired from flying the models to building high-end airplane kits, museum quality. That finally lead to building high-end ship models. I love the challenge of building a difficult model that looks really beautiful when completed.

OK, on to the Amerigo Vespucci. BTW, the real ship will be in LA next July 5th, my birthday. You can bet I'll be there!

This model is not for the faint hearted. Although the instructions are in 8 chapters, which leads you to believe that the instructions are complete and detailed, the truth is the instructions are in six languages and each language gets only a few sentences. In some instances, I have spent hours trying to figure out how to do some relatively minor task. In the end I always succeed. As a boy I lived for some years on a dairy farm with no running water or electricity. The uncle I lived with had a favorite saying: the difficult we do right away, the impossible takes a while longer. It's a guiding principle in my life and I really need it for this model.

I have dreamed of doing this model for years but could never afford it. Finally a store in London had it for an attractive price and I grabbed it. I'm not sure if the price reflects that my kit has many bags of parts but the bags are not labeled and I can spend a lot of time trying to make sure I have chosen the right part. I also am at a loss to know where I can purchase missing or replacement parts. Hopefully someone reading this will have the answer. Another issue is that most of the time there is an exact count of the needed part so if you lose or damage the part you are s... out of luck. In a couple of instances there were missing parts or the wrong number.

Finished first small boat, 10 to go! I'll be shifting to chap 7 for a while. The first one took some time but they should go faster as I gain more skill building them and know more what I'm doing.
Hallo @mantares
we wish you all the BEST and a HAPPY BIRTHDAY
Birthday-Cake
 
Back
Top