Amerigo Vespucci Panart 1:84 MA build log

Joined
Feb 24, 2023
Messages
38
Points
48

Location
Fort Collins CO USA
I'm starting this log a bit late as I have completed chapter 5 but I can share some of my issues and successes getting this far.

Some background. I'm a 91 year old recently retired engineer. This is only the second plank on bulkhead model I have done--the first was an Amanti Vanguard 1:72, some rigging still required but mostly complete.

However I have been building models since I was 10 years old. In 1942, at the start of WWII I was able to buy a P. K. Guillows model for 10 cents. I would build a German or Japanese plane, light the tail, and throw it off of a second story balcony while making gun noises.

During the following decades I mostly built model airplanes. Free flight, U-control, gliders, and RC. In the 1980's a friend and I constructed a plans built 1:1 four-place airplane built from composite materials. My friend bought my share and it is still flying., I finally retired from flying the models to building high-end airplane kits, museum quality. That finally lead to building high-end ship models. I love the challenge of building a difficult model that looks really beautiful when completed.

OK, on to the Amerigo Vespucci. BTW, the real ship will be in LA next July 5th, my birthday. You can bet I'll be there!

This model is not for the faint hearted. Although the instructions are in 8 chapters, which leads you to believe that the instructions are complete and detailed, the truth is the instructions are in six languages and each language gets only a few sentences. In some instances, I have spent hours trying to figure out how to do some relatively minor task. In the end I always succeed. As a boy I lived for some years on a dairy farm with no running water or electricity. The uncle I lived with had a favorite saying: the difficult we do right away, the impossible takes a while longer. It's a guiding principle in my life and I really need it for this model.

I have dreamed of doing this model for years but could never afford it. Finally a store in London had it for an attractive price and I grabbed it. I'm not sure if the price reflects that my kit has many bags of parts but the bags are not labeled and I can spend a lot of time trying to make sure I have chosen the right part. I also am at a loss to know where I can purchase missing or replacement parts. Hopefully someone reading this will have the answer. Another issue is that most of the time there is an exact count of the needed part so if you lose or damage the part you are s... out of luck. In a couple of instances there were missing parts or the wrong number.
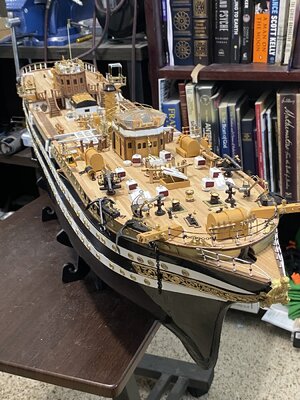
AV1.JPG


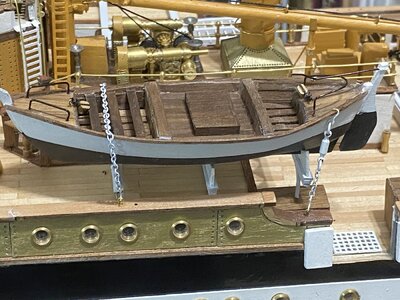
IMG_0435.JPG

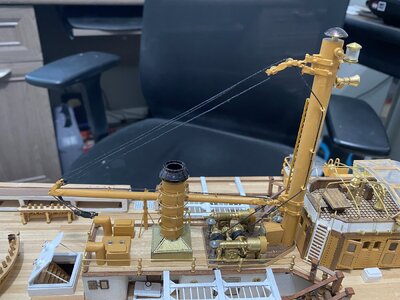
Finished first small boat, 10 to go! I'll be shifting to chap 7 for a while. The first one took some time but they should go faster as I gain more skill building them and know more what I'm doing.
 
Last edited:
I'm starting this log a bit late as I have completed chapter 5 but I can share some of my issues and successes getting this far.

Some background. I'm a 91 year old recently retired engineer. This is only the second plank on bulkhead model I have done--the first was an Amanti Vanguard 1:72, some rigging still required but mostly complete.

However I have been building models since I was 9 years old. In 1941, at the start of WWII I was able to buy a P. K. Guillows model for 10 cents. I would build a German or Japanese plane, light the tail, and throw it off of a second story balcony while making gun noises.

During the following decades I mostly built model airplanes. Free flight, U-control, gliders, and RC. In the 1980's a friend and I constructed a plans built 1:1 four-place airplane built from composite materials. My friend bought my share and it is still flying., I finally retired from flying the models to building high-end airplane kits, museum quality. That finally lead to building high-end ship models. I love the challenge of building a difficult model that looks really beautiful when completed.

OK, on to the Amerigo Vespucci. BTW, the real ship will be in LA next July 5th, my birthday. You can bet I'll be there!

This model is not for the faint hearted. Although the instructions are in 8 chapters, which leads you to believe that the instructions are complete and detailed, the truth is the instructions are in six languages and each language gets only a few sentences. In some instances, I have spent hours trying to figure out how to do some relatively minor task. In the end I always succeed. As a boy I lived for some years on a dairy farm with no running water or electricity. The uncle I lived with had a favorite saying: the difficult we do right away, the impossible takes a while longer. It's a guiding principle in my life and I really need it for this model.

I have dreamed of doing this model for years but could never afford it. Finally a store in London had it for an attractive price and I grabbed it. I'm not sure if the price reflects that my kit has many bags of parts but the bags are not labeled and I can spend a lot of time trying to make sure I have chosen the right part. I also am at a loss to know where I can purchase missing or replacement parts. Hopefully someone reading this will have the answer. Another issue is that most of the time there is an exact count of the needed part so if you lose or damage the part you are s... out of luck. In a couple of instances there were missing parts or the wrong number.


View attachment 394707
Hello
I am slso currently building the Panart Amerigo Vespucci an I am almost at the same stage as you are (I'll be posting an update to my build log during this week end)
I agree with you that having no reference on the multiple brass bags that are in the kit make things challenging, especially that the various parts are numbered in the booklets.
Now regarding missing pieces and lost pieces, I contact Mantua directly.
The email address I am using is ordinimantuamodel <ordinimantuamodel@virgilio.it>
I also order spare parts on the Mantua web site: https://www.mantuamodelshop.com/. They have a dedicate page for the Amerigo Vespucci. By the way if you order thru their website, they have a strange process. Once you are registered, you log in to their site, order the parts you want and then need to wait to receive an email with the price (including shipping) an payment instructions (they accept Paypal. Once they have received payment, they ship via UPS (at least for France).

Let's sync up on a regular basis with our build logs.
Cheers
 
I can relate to lighting fighter plane gliding models on fire and throwing them off high places at about ages 9-14. Sometimes we'd (a friend of 70 years now and my brother, deceased for 21) would build a firecracker into the fuselage and gleefully watch them blow to bits mid-flight!

Beautiful work, by the way! I can also relate to inadequately detailed, incomplete and poorly translated ship model instructions and having to recreate missing, or just plain unusably crappy parts. Oh well. That's model building from kits. ;)

I expect the balance of your model will be just as fantastic as it has been up to now. Quite an undertaking!
I know I'll be following along eagerly. :D
 
Last edited:
I'm starting this log a bit late as I have completed chapter 5 but I can share some of my issues and successes getting this far.

Some background. I'm a 91 year old recently retired engineer. This is only the second plank on bulkhead model I have done--the first was an Amanti Vanguard 1:72, some rigging still required but mostly complete.

However I have been building models since I was 10 years old. In 1942, at the start of WWII I was able to buy a P. K. Guillows model for 10 cents. I would build a German or Japanese plane, light the tail, and throw it off of a second story balcony while making gun noises.

During the following decades I mostly built model airplanes. Free flight, U-control, gliders, and RC. In the 1980's a friend and I constructed a plans built 1:1 four-place airplane built from composite materials. My friend bought my share and it is still flying., I finally retired from flying the models to building high-end airplane kits, museum quality. That finally lead to building high-end ship models. I love the challenge of building a difficult model that looks really beautiful when completed.

OK, on to the Amerigo Vespucci. BTW, the real ship will be in LA next July 5th, my birthday. You can bet I'll be there!

This model is not for the faint hearted. Although the instructions are in 8 chapters, which leads you to believe that the instructions are complete and detailed, the truth is the instructions are in six languages and each language gets only a few sentences. In some instances, I have spent hours trying to figure out how to do some relatively minor task. In the end I always succeed. As a boy I lived for some years on a dairy farm with no running water or electricity. The uncle I lived with had a favorite saying: the difficult we do right away, the impossible takes a while longer. It's a guiding principle in my life and I really need it for this model.

I have dreamed of doing this model for years but could never afford it. Finally a store in London had it for an attractive price and I grabbed it. I'm not sure if the price reflects that my kit has many bags of parts but the bags are not labeled and I can spend a lot of time trying to make sure I have chosen the right part. I also am at a loss to know where I can purchase missing or replacement parts. Hopefully someone reading this will have the answer. Another issue is that most of the time there is an exact count of the needed part so if you lose or damage the part you are s... out of luck. In a couple of instances there were missing parts or the wrong number.


View attachment 394707
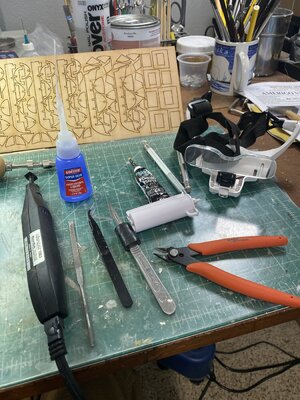
Here's a photo of some tools I find indispensable: Modeling tools.JPG

Micromark sander. I use it constantly. It has several different heads. Available at Micromark https://www.micromark.com/mini-powertool/sanders-grinders/files. Microlux Micro Sander.

CA glue. I have used this Loctite CA glue for decades, not just for model building. It dries almost instantly, is tough but not brittle . I just use a drop or two and this allows me to remove a part wrongly installed on the deck with a sharp rap from a hammer. Available from Amazon.

Miniature file. I sharpened the end of it and use it for removing parts using a small hammer. Far easier than using a knife.

Swan-Morton scalpel. The blades are much sharper and last longer than Exacto.

Sprue cutter. I originally bought this for use on plastic models but find it great for cutting small wood strips.

Magnifying glasses. You probably have your own favorite.

In the rear just barely visible is a can of shellac used as a sanding sealer. I coat all the wood pieces with it.
 
Here's a photo of some tools I find indispensable: View attachment 394945

Micromark sander. I use it constantly. It has several different heads. Available at Micromark https://www.micromark.com/mini-powertool/sanders-grinders/files. Microlux Micro Sander.

CA glue. I have used this Loctite CA glue for decades, not just for model building. It dries almost instantly, is tough but not brittle . I just use a drop or two and this allows me to remove a part wrongly installed on the deck with a sharp rap from a hammer. Available from Amazon.

Miniature file. I sharpened the end of it and use it for removing parts using a small hammer. Far easier than using a knife.

Swan-Morton scalpel. The blades are much sharper and last longer than Exacto.

Sprue cutter. I originally bought this for use on plastic models but find it great for cutting small wood strips.

Magnifying glasses. You probably have your own favorite.

In the rear just barely visible is a can of shellac used as a sanding sealer. I coat all the wood pieces with it.
 
Hello Mantares
I have also started the small boats yesterday and doing just like yourself: 2 at a time
However, in order not to get bored with this repetitive process, I am also starting booklet 7 in parallel.
Let's see how this works out
Yeah, I've thought about also starting chap 7--in fact I started reading it yesterday. Following your lead I believe I will also do that. It looks like chapter 6 is going to take a while and. as you said will get pretty boring! Not much thinking required just a ton of repetitive work.
 
Back
Top