-
LUCZORAMA SHIPWRECK SCAVENGER HUNT GIVEAWAY. 4 Weeks of Fun • 1 Legendary Prize ((OcCre’s Fram Ship)) • Global Crew Welcome!
**VIEW THREAD HERE**
You are using an out of date browser. It may not display this or other websites correctly.
You should upgrade or use an alternative browser.
You should upgrade or use an alternative browser.
Simple but effective. Great idea!
Kurt Konrath
Kurt Konrath
What is the old saying, "necessity is the mother of invention" and you invented a new method that seems to work.
How did you figure out how much to pull down on ends to get the bend needed.
How did you figure out how much to pull down on ends to get the bend needed.
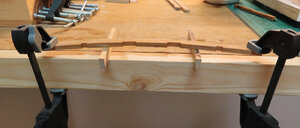
That method is fine for an even curve, but a tightening curve would need more support point, hence lots of tacks.
I principle a very good idea to get a curved beam, but also I have to agree with @jimmystratosI found an easier way to bend beams and not hammering a bunch of tacks into the bench. This way, you have more control of the bending and where it bends. I don't know why I did not think of this before.
That method is fine for an even curve, but a tightening curve would need more support point, hence lots of tacks.
The best in my opinion is really to cut out the curved beam...... or I used also in the past this method, but off course more work
For each beam you need a sandwhich of three strips (lower part in photo) - on the upper part is the final result
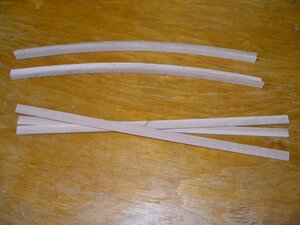
put white glue between the strips
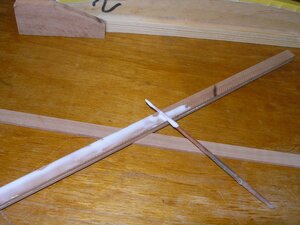
and put this sandwich between such a jig
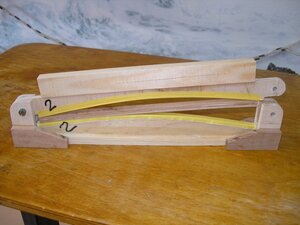
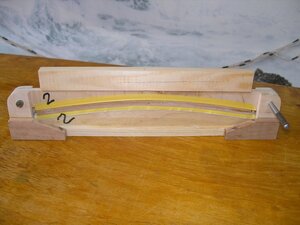
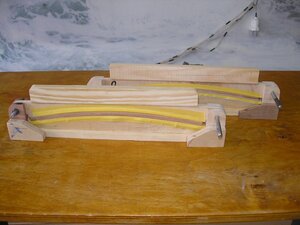
Due to the glue the "beams" are keeping the curve very well ......
- Joined
- Dec 3, 2018
- Messages
- 2,450
- Points
- 538

Donnie, the method you are showing, probably works well with birch, but not for harder woods, I would think, just my opinion,
BDW, nice on you have tested with the tree type birch, which is the most available wood for me, in Norway there is a lot of bich, thank you.
BDW, nice on you have tested with the tree type birch, which is the most available wood for me, in Norway there is a lot of bich, thank you.
You would need a lot of identical beams to be worth making such a fancy jig Uwe!
Count the beams of a ship along appr. 2/3 of the ship length with similar curve! Easily you get 20 to 30 beamsYou would need a lot of identical beams to be worth making such a fancy jig Uwe!
Hi Donnie
The big danger with this approach is that the last quarter on each end will remain nearly straight,i.e. you will not end up with a smooth radius.You can counter this by cutting the beams longer but personally feel lamination or cutting the curve into the timber is the only guarantee that the timber will retain it's shape if it is unsupported.
Kind Regards
Nigel
Uwe,I principle a very good idea to get a curved beam, but also I have to agree with @jimmystratos
The best in my opinion is really to cut out the curved beam...... or I used also in the past this method, but off course more work
For each beam you need a sandwhich of three strips (lower part in photo) - on the upper part is the final result
View attachment 153613
put white glue between the strips
View attachment 153609
and put this sandwich between such a jig
View attachment 153610
View attachment 153611
View attachment 153612
Due to the glue the "beams" are keeping the curve very well ......
Are the pieces “soaked” or is the moisture in the white glue enough to help with the “bending/curve” process to hold the shape?
Jan
Depending of the curve which is necessary - bending will get much easier if the planks are soakedUwe,
Are the pieces “soaked” or is the moisture in the white glue enough to help with the “bending/curve” process to hold the shape?
Jan
Additionally, there is another thing which has to be considered with this method. The timber will spring back after a short while up to a certain extent. The only way to avoid this effect is to over-bend up to a certain extent so that after the spring-back we end up with the proper curve. But this can only be a guesswork, depending on the timber, the cross-sectional area, moisture content, etc. etc. So, it is a very entertaining thing!
János
János
I think cutting out a the camber is the only sure way to guarantee the curve needed, without “spring back” or other problems. Just my two cents!
Kurt Konrath
Kurt Konrath
Cutting the curve may also be easiest and fastest way, no waiting or spending time building jigs.
This is the same method I use to make shields for medieval reenactment. You make a shield press with curved male and female forms and clamps to hold the assembly together. A thin shield made of slats glued together at right angles is historically correct.I principle a very good idea to get a curved beam, but also I have to agree with @jimmystratos
The best in my opinion is really to cut out the curved beam...... or I used also in the past this method, but off course more work
For each beam you need a sandwhich of three strips (lower part in photo) - on the upper part is the final result
View attachment 153613
put white glue between the strips
View attachment 153609
and put this sandwich between such a jig
View attachment 153610
View attachment 153611
View attachment 153612
Due to the glue the "beams" are keeping the curve very well ......
Fulcrum placement is essential for producing the amount of curvature in the right areas along the of the part. Since a solid piece of wood is composed of harder and softer volumes within it, and grain direction produces variations in its bending characteristic, some parts of the wood may hold a curve better than others. You make have to change the support points and bend a piece a second time to get the desired shape.I found an easier way to bend beams and not hammering a bunch of tacks into the bench. This way, you have more control of the bending and where it bends. I don't know why I did not think of this before.
Thank you Donnie for starting this interesting discussion ! It looks like you only meant to share a beam-bending technique, but it turned into an elaborate exchange of ideas. This is one of the things I really appreciate about S.O.S. So here I go with some more ideas on this topic.
Of course in any given ship's deck, the difference in elevation between the crown of a beam and the ends of the beam (at the waterways) will usually decrease toward the bow and stern of the ship. But that doesn't necessarily mean that the actual curvature of the beams is changing. The change can merely be due to the fact that the beams are becoming shorter. And another factor, as jimmy stratos has pointed out already, the curve may or may not be even throughout each individual beam. So I like to analyze the drawings to determine whether the beam curvature is a RADIUS, or an OVAL (uneven) shape. If it is a radius or so close to being a radius that I could ignore any irregularities as possible drafting errors, then I will go through my set of drawings to see whether the radius is the same in most of the deck beams, or possibly all of them within a particular deck on that ship. If enough of the beams have that same radius, I will figure out exactly what the length of that radius is. Maybe someone on this forum knows a simple way to calculate that, but I just tape my drawing down on a table top and work with a movable pivot point and a tape measure until I get it.
So why am I so interested in radii? Because then I was able to build this simple bandsaw fixture to rapidly cut identical beams.
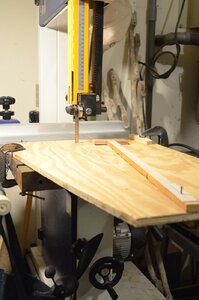
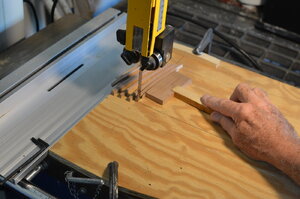
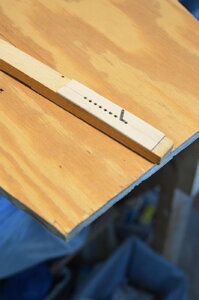
The fixture can be built out of relatively rough materials. The actual accuracy is entirely based upon 2 things. First the position of the pivot pin must be precise. The pin must be exactly at right angles to the teeth in the saw blade, and at exactly the distance from the blade as your deck beam radius. Note the pencil line in the first photo which is at right angles to the teeth. The other requirement is the distance between the pivot holes at the right end of the swinging arm. That distance must equal the thickness of the finished beam + the width of one saw kerf + an allowance for the sanding (both top and bottom of beam) needed to produce a smooth finished beam. I actually used a micrometer to measure the before-and-after-sanding thickness of a simple straight-cut piece of the same type of wood. Obviously you can get as accurate as you like with this.
I will go into more detail if anyone still has questions, but I think that once you get a basic understanding of this setup, any of you guys could certainly build a much nicer looking fixture than this one.
Of course in any given ship's deck, the difference in elevation between the crown of a beam and the ends of the beam (at the waterways) will usually decrease toward the bow and stern of the ship. But that doesn't necessarily mean that the actual curvature of the beams is changing. The change can merely be due to the fact that the beams are becoming shorter. And another factor, as jimmy stratos has pointed out already, the curve may or may not be even throughout each individual beam. So I like to analyze the drawings to determine whether the beam curvature is a RADIUS, or an OVAL (uneven) shape. If it is a radius or so close to being a radius that I could ignore any irregularities as possible drafting errors, then I will go through my set of drawings to see whether the radius is the same in most of the deck beams, or possibly all of them within a particular deck on that ship. If enough of the beams have that same radius, I will figure out exactly what the length of that radius is. Maybe someone on this forum knows a simple way to calculate that, but I just tape my drawing down on a table top and work with a movable pivot point and a tape measure until I get it.
So why am I so interested in radii? Because then I was able to build this simple bandsaw fixture to rapidly cut identical beams.


The fixture can be built out of relatively rough materials. The actual accuracy is entirely based upon 2 things. First the position of the pivot pin must be precise. The pin must be exactly at right angles to the teeth in the saw blade, and at exactly the distance from the blade as your deck beam radius. Note the pencil line in the first photo which is at right angles to the teeth. The other requirement is the distance between the pivot holes at the right end of the swinging arm. That distance must equal the thickness of the finished beam + the width of one saw kerf + an allowance for the sanding (both top and bottom of beam) needed to produce a smooth finished beam. I actually used a micrometer to measure the before-and-after-sanding thickness of a simple straight-cut piece of the same type of wood. Obviously you can get as accurate as you like with this.
I will go into more detail if anyone still has questions, but I think that once you get a basic understanding of this setup, any of you guys could certainly build a much nicer looking fixture than this one.
As much as it simple - it is brilliant. Great idea many thanks for sharing, Jimmy! I am wonder if all Jim's are clever (in general) 
Looks like a great Jig allthough I’m not sure that I totally understand it, do you have a shot of the actual cutting or mid cut ? I am confused by the pile of cut beams at the far side of the blade and the stock at the end of the beam being shorter than the cut beams, I suppose that if I changed my name to Jim all would become clear. Best Tony


