-

Win a Free Custom Engraved Brass Coin!!!
As a way to introduce our brass coins to the community, we will raffle off a free coin during the month of August. Follow link ABOVE for instructions for entering.
-

PRE-ORDER SHIPS IN SCALE TODAY!
The beloved Ships in Scale Magazine is back and charting a new course for 2026!
Discover new skills, new techniques, and new inspirations in every issue.
NOTE THAT OUR FIRST ISSUE WILL BE JAN/FEB 2026
You are using an out of date browser. It may not display this or other websites correctly.
You should upgrade or use an alternative browser.
You should upgrade or use an alternative browser.
Thank you for the lead. I had not Googled around enough to find that before. There are gems amongst the sand in a lot of places, we just have to stumble upon them.@PT-2
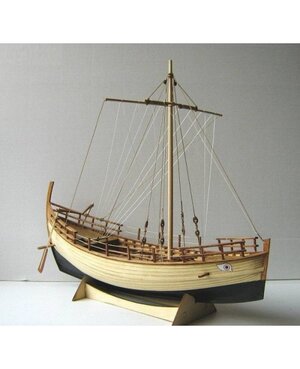
Rich, ZHL have a model of the Kyrenia that may interest you for plans etc. I was looking at this model a couple of months ago myself.
View attachment 254357
Rich (PT-2)
Now that I have settled upon a timewise more appropriate trade boat and ordered the model, it will be interesting to see how that kit compares with a model shown in the YouTube will a hopefully following video of the building of Kyrenia II as a sailing reproduction.Thank you for the lead. I had not Googled around enough to find that before. There are gems amongst the sand in a lot of places, we just have to stumble upon them.
Rich (PT-2)
Rich
I’m glad I was able to help. When I was looking at this ZHL kit some months back I was intrigued with the potential research. I‘m looking forward to following your build once you get the kit. Your review/opinion on the kit itself and quality of parts will be really welcome.
@PT-2
Rich, I just posted a book review I wrote in the Books and References thread called “Wooden Ship Building and the Interpretation of Shipwrecks” by J. Richard Steffy.
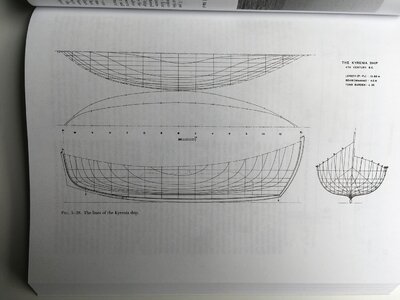
There is a section in the book dealing with the Kyrenia wreck including hull construction and repairs etc. There is some very useful information and in particular, diagrams, which may assist you. I have added a few specific photos to my book review post, one example of which is below.

New on your bookshelf ..... show it here
Chapelle in his early pages of The Search for Speed Under Sail, has a brief examination of the roles of hull form and sails in the points of sailing on different headings, pp 23 - 30, and the "calculations" related to projecting the driving forces of wind and sail shape in a non-mathematical...
shipsofscale.com
Last edited:
Thanks for the lead on this book. I have Chapelle's Search for Speed but have only read 1/3 - 1/2 of it so far. Began reading his smaller book on American Sailing Small Sailing Craft and am about the same way through. Not too much reading but spread out across different topics at the same time which is my nature I guess, as it also includes my reading of research papers on the Early through Late Bronze Ages in the Western Med.]@PT-2
Rich, I just posted a book review I wrote in the Books and References thread called “Wooden Ship Building and the Interpretation of Shipwrecks” by J. Richard Steffy.
There is a section in the book dealing with the Kyrenia wreck including hull construction and repairs etc. There is some very useful information and in particular, diagrams, which may assist you. I have added a few specific photos to my book review post, one example of which is below.
View attachment 254478
New on your bookshelf ..... show it here
Chapelle in his early pages of The Search for Speed Under Sail, has a brief examination of the roles of hull form and sails in the points of sailing on different headings, pp 23 - 30, and the "calculations" related to projecting the driving forces of wind and sail shape in a non-mathematical...shipsofscale.com
Now, this book also will be received and added to my reading starting with the pages you mention for the Kyrenia recovery. Rich (PT-2)
For some reason my link to the Books and References thread in my post above shows your Chapelle post. I don’t know why it links like that. However, clicking on it will take you directly to my review the Steffy book.Thanks for the lead on this book. I have Chapelle's Search for Speed but have only read 1/3 - 1/2 of it so far. Began reading his smaller book on American Sailing Small Sailing Craft and am about the same way through. Not too much reading but spread out across different topics at the same time which is my nature I guess, as it also includes my reading of research papers on the Early through Late Bronze Ages in the Western Med.]
Now, this book also will be received and added to my reading starting with the pages you mention for the Kyrenia recovery. Rich (PT-2)
These thread post jumps puzzle me also. I read your excellent review and commented upon that. RichFor some reason my link to the Books and References thread in my post above shows your Chapelle post. I don’t know why it links like that. However, clicking on it will take you directly to my review the Steffy book.
As a teaser here is a video showing the reconstruction of the boat from the recovered remains. You could say model building at a very advanced stage given what was recovered.A friend who studied underwater archaeology in the Eastern Med. sent the following image of one interpretation of a recovery model from Kryenia in the Aegean Sea which I will use in part to modify the plan model being my own best melded resources examples scratch build.
View attachment 254355
I will be likely not populating this thread as it as before I found out about the ZHL Kyrenia kit where my focus and build log will be proceeding. This thread does have some good general information about the Late Bronze Age Eastern Med and Agean Sea areas.As a teaser here is a video showing the reconstruction of the boat from the recovered remains. You could say model building at a very advanced stage given what was recovered.
Rich
Rich
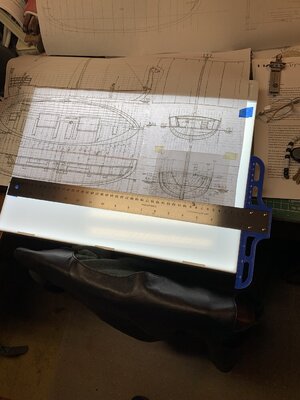
After weeks of idleness in the shipyard and several discarded starts of drawing the lines for bulkheads forming a mold, I set the smudging graphite aside and purchased a new set of technical drafting pens (my old ones were desicated and dried solid) along with an illuminated tracing box to draft a new set. My curves and triangles had to be elevated to eliminate ink smudging, not not always successfully.View attachment 254352
Starting to draft hull cut lines and transverse angle cuts to develop more transverse sections for a hull mold where the planks are set and connected edge to edge without frames.View attachment 254353
When the primary ones were completed I photocopied them to secure them on 1/4" stock for cutting out in preparation for mounting them on a strong-
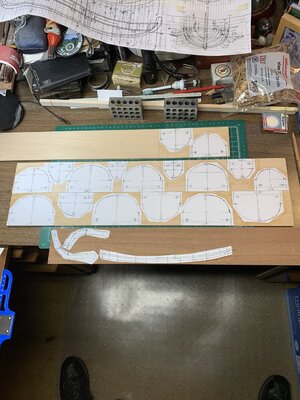
My plan is to sculpt them to proper fairing lines via filing and sanding to make up for errors created in projecting the curves/lines from the crude and incomplete plan set. I"ll follow up more frequently as I continue. Rich
back.
Continuig
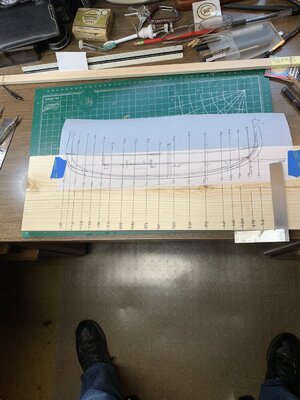
Next I went into the 44 degree F garage to use my scroll saw to rough cut the bulkheads, followed by squaring the sides on the table saw, and then on the disk/belt sander doing some refining sanding to the drawn lines before drilling two peg holes for rubber bands or lines to secure the planking. Then back inside for a hot mug of coffee and gluing some bottom edge supporting cross pieces I have loosely stood the bulkheads in place:
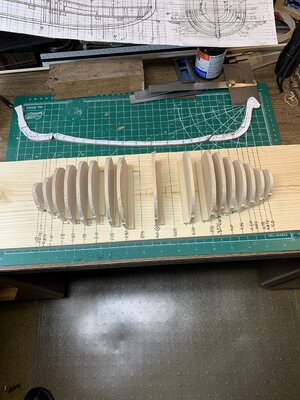
The difference of hull curves on each side of the middle No. 3 line were too small go draw and cut so they are presently omitted. The keel is in three parts above the board.
Here is more stern quarter view of the bulkheads before they are to be properly squared and glued in place for some initial sculpting fairing using test wales to see how things work out.
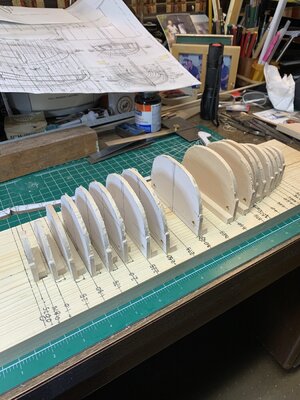
I will probably have to cut and install blocking/spacing pieces up toward the keel to stabilize these for fairing. The keel groove has not been cut at this point as I want to use a top line to square that alignment properly. Sawdust smelled good again and more to come. Rich
Continuing the work I transferred lines from the keel drawing onto a build board with proper spacing and squared to the centerlineAfter weeks of idleness in the shipyard and several discarded starts of drawing the lines for bulkheads forming a mold, I set the smudging graphite aside and purchased a new set of technical drafting pens (my old ones were desicated and dried solid) along with an illuminated tracing box to draft a new set. My curves and triangles had to be elevated to eliminate ink smudging, not not always successfully.
View attachment 288030
When the primary ones were completed I photocopied them to secure them on 1/4" stock for cutting out in preparation for mounting them on a strong-View attachment 288031
My plan is to sculpt them to proper fairing lines via filing and sanding to make up for errors created in projecting the curves/lines from the crude and incomplete plan set. I"ll follow up more frequently as I continue. Rich
back

Next I went into the 44 degree F garage to use my scroll saw to rough cut the bulkheads, followed by squaring the sides on the table saw, and then on the disk/belt sander doing some refining sanding to the drawn lines before drilling two peg holes for rubber bands or lines to secure the planking. Then back inside for a hot mug of coffee and gluing some bottom edge supporting cross pieces I have loosely stood the bulkheads in place:

The difference of hull curves on each side of the middle No. 3 line were too small go draw and cut so they are presently omitted. The keel is in three parts above the board.
Here is more stern quarter view of the bulkheads before they are to be properly squared and glued in place for some initial sculpting fairing using test wales to see how things work out.

I will probably have to cut and install blocking/spacing pieces up toward the keel to stabilize these for fairing. The keel groove has not been cut at this point as I want to use a top line to square that alignment properly. Sawdust smelled good again and more to come. Rich
"Have something tangible". . . That is a perspective that I had not recently thought about as an architect the drawings were a daily tangible work but actually a symbolic language that with the specifications together lead to the tangible building, at least for the client and public. I like new insights and thank you for this one.Good to see you building Rich and that you have something tangible to work with and look at. I agree - the smell of sawdust is good!
Rich
And forward I go securing the bulkheads to a base piece setting them plumb:"Have something tangible". . . That is a perspective that I had not recently thought about as an architect the drawings were a daily tangible work but actually a symbolic language that with the specifications together lead to the tangible building, at least for the client and public. I like new insights and thank you for this one.
Rich
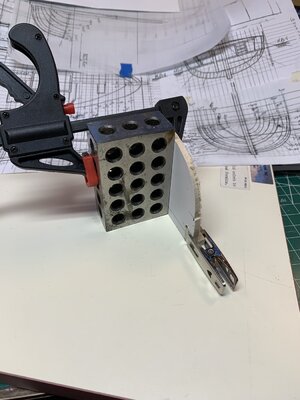
and then gluing them in place along the stations' lines square and plumb check again securing each one to set:
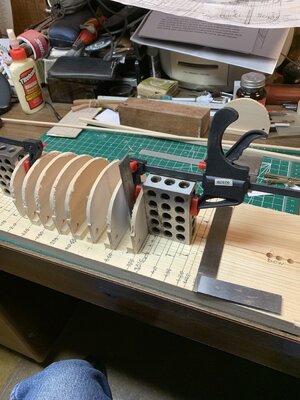
And then going back to insert upper bracing pieces and again checking plumb for each one again. Actually that will not be critical as there will be so much filing to fair all of these to true and smooth longitudinal curves using temporary wales to find the high and low areas for an agreeable hull mold/form.
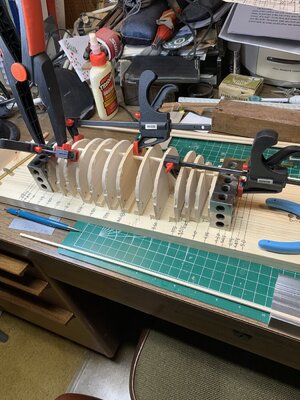
When I have the faring work substantially complete I will set a centerline string above to determine the trough for the keel which will be repetitive trial and adjustments for a proper embedment and engagement with each bulkhead. When that is satisfactory, I will plough out a rabbit on both sides of the keel for the ending and closing strakes of the hull. This will follow how the keel rabbit was done in my MS2130 Bluenose with that experience being carried forward. Care will be needed to only adhere the edges of the planks/strakes to each other and the keel as the completed hull must be lifted off of the bulkhead mold as our shipmates working on their Galilee boats have had to perform and have set the standard.
Rich
You are off to a great start, Rich.
This collection of bulkheads indicates how far off at several points I was in drawing my stations sections so there will be a lot of wood dust floating the the air!!!You are off to a great start, Rich.
After a few hours of sanding with 100 grit on a 14-inch paint stirring stick, with frequent fairing checks, I thought it prudent to check how the bulkheads were aligned to the centerline where the keel will be set. Flash idea to drill in some holes for a dowel at each end that can be raised and lowered to see both the bottom curve as well as the centerline alignment.This collection of bulkheads indicates how far off at several points I was in drawing my stations sections so there will be a lot of wood dust floating the the air!!!Rich

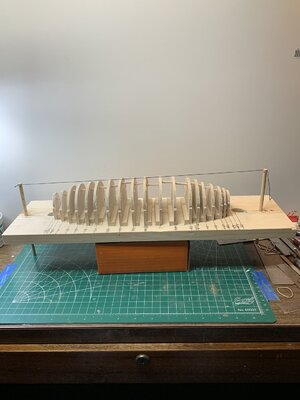
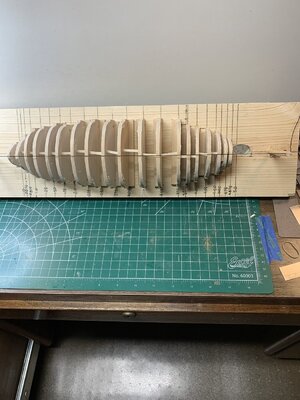
The stiffeners between the bulkheads were randomly placed for upper bracing so they wander which doesn't matter.
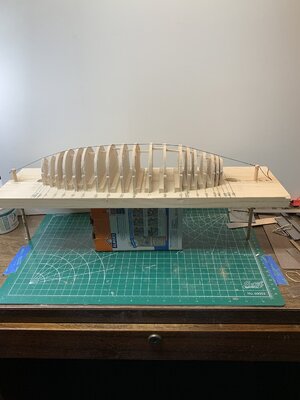
Here you can see the end dowels have been lowered bringing the string into contact with the bulkheads with the following observation of a few:
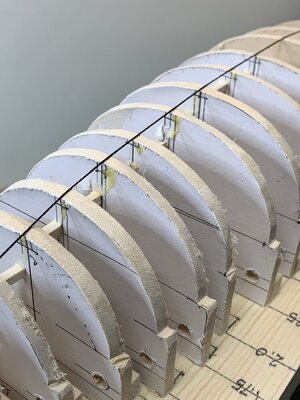
Although each bulkhead has the keel width marked, I will "challenge" those by rotating the dowel to each side for top side marking of the cutouts to be made in seating the keel. Still a lot of additional filing is needed on the bulkheads before that surgery. Rich
Surgery day cutting the sides of the keel bed into the bulkheads after marking each side of the centerline string with a 6-inch hand razor saw as my larger Japanese razor saws are too flexible.After a few hours of sanding with 100 grit on a 14-inch paint stirring stick, with frequent fairing checks, I thought it prudent to check how the bulkheads were aligned to the centerline where the keel will be set. Flash idea to drill in some holes for a dowel at each end that can be raised and lowered to see both the bottom curve as well as the centerline alignment.
View attachment 288627
View attachment 288628
The stiffeners between the bulkheads were randomly placed for upper bracing so they wander which doesn't matter.
View attachment 288629
Here you can see the end dowels have been lowered bringing the string into contact with the bulkheads with the following observation of a few:
View attachment 288630
Although each bulkhead has the keel width marked, I will "challenge" those by rotating the dowel to each side for top side marking of the cutouts to be made in seating the keel. Still a lot of additional filing is needed on the bulkheads before that surgery. Rich
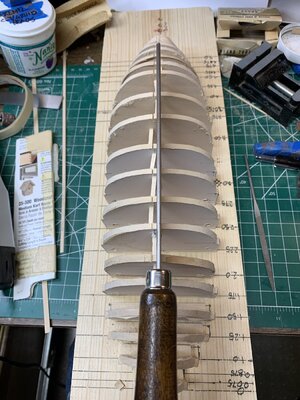
Then filing the bed to trial depth and check of sides' align
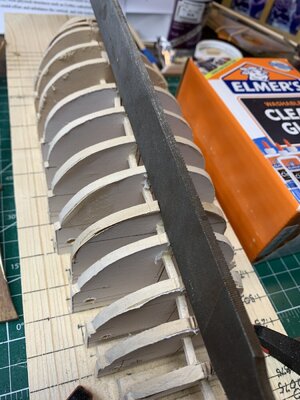 ments:
Next a trial setting where I discovered that the bow head figure and stern tail would not pass through my initial holes until both were enlarged as well as cutting out most of the bow bulkhead allowing the sharply upturned neck to pass through
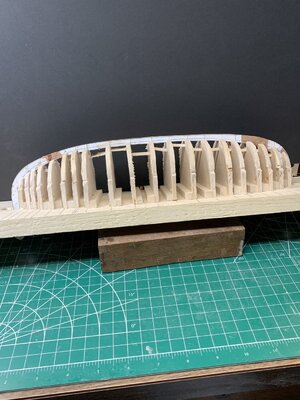
I managed to break the two scarf joints being too forceful in setting. Repaired both and then broke them a second time. In that repair I drilled some small holes for tiny nails and a longitudinal 1 mm brass rod to better secure the patched/repatched joints. If it broke again my last ditch would be to cut a section out for both and then have four scarf joints. It held along with much enlarged holes fore and aft and carved out bulkheads.
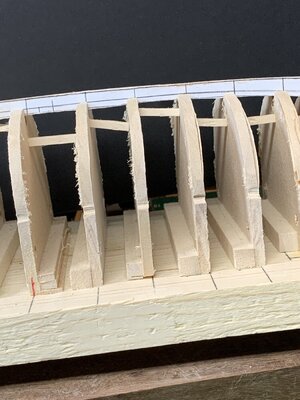
The bulkhead terminations were fairly good leaving some final touch-up filing and thin shims where needed (to be fared back down again when secure).
With the bow horse head figure and stern tail passing through the build board I will have to secure a second lifter to the bottom of the board to protect those protrusions.
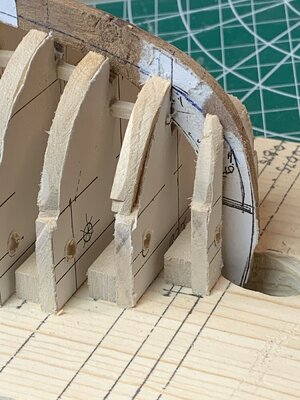
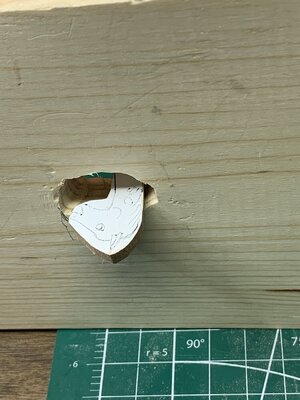
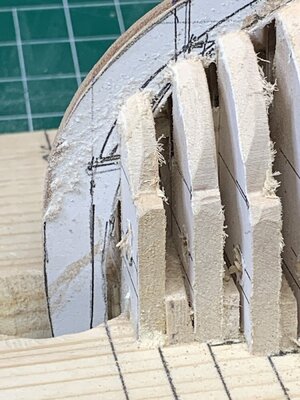
Final faring filing and adjustments next on the dock schedule. When all are set then I can address the tricky keel rabbit in the hard and brittle mahogany. Option is to not do that and carefully taper the edges of the closing starkes/garboard. I will do some experimenting on extra stock as that will also let me know what I am facing when trying to carve the head and tail when I can work on them flat before the keel is finally secured.


