• Ships of Scale has incorportated an extra level of security when you log In. Please follow on-screen prompts to acknowledge that you are not a robot via a "Check Box" or a "Pictorial Check Box Puzzle". This is needed due to higher level of AI Activity Security.
  • SUBSCRIBE TO SHIPS IN SCALE TODAY!

    The beloved Ships in Scale Magazine is back and charting a new course for 2026!
    Discover new skills, new techniques, and new inspirations in every issue.

    NOTE THAT OUR NEXT ISSUE WILL BE July/August 2026
  • Win a Free Custom Engraved Brass Coin!!!
    As a way to introduce our brass coins to the community, we will raffle off a free coin during the month of August. Follow link ABOVE for instructions for entering.

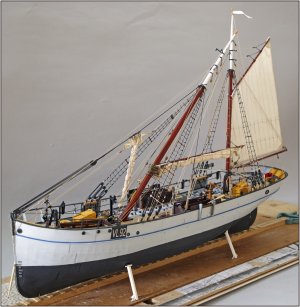
BALDER, Vlaardingen Herring Lugger from 1912, scratch build scale 1:50 Plate-On-Frame

@Peter Voogt @Maarten and @shota70

It was a pleasure to meet you in real guys :-)

[Image: 601aa3f53fb4674f0d17f05ffb23.jpg]

[Image: 2f311c856b8f9fbcdde46ecd8349.jpg]

[Image: db566c9e5bfbf767ea742e3a111b.jpg]

[Image: 6e35631255110652c27f135bc252.jpg]

[Image: 6b25930b3f3b73df258e20bef514.jpg]

[Image: 0b251d758e926f342abf0599062e.jpg]

[Image: 0caecc0c2fd256a0351572225056.jpg]

[Image: 77ee127006db6f9890f5db83324a.jpg]

[Image: 0c330a9153d319f56b031d7dd934.jpg]

[Image: 1e752bb086da7f0ea42146f27f6a.jpg]

[Image: 11beee30d9b47c6ba7c16c6c0ef4.jpg]

[Image: 22d8ca8cf87e14cd98f01b0022dd.jpg]

[Image: c81802bb0fad160b0163c3f0bb5c.jpg]
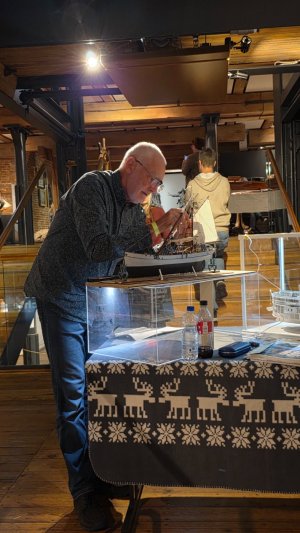
Thanks for your visit and detailed pictures, Dirk. That’s the great pleasure of this kind of meeting: to see the ‘the face’ behind to builds and posts on this SoS. But now it’s ‘the Person’ of the posts and the stories.
A ‘public personal’ PS to Dirk @Dubz Modelling World : Was you daughter enjoying her ice cream? And ice cream is now related to visit a museum?:)
Why ‘public’: This way we can our youngsters get interested in visiting museums.:):):)
Regards, Peter
 
Last edited:
Peter, I so wish I could have seen your model, and you, in person. I have been in awe of your craftsmanship since I joined this forum. Seeing photos of minute details you have replicated that are so close to full scale that one would have a hard time distinguishing one from the other from just photos. My jaw hit the floor, however, when I saw the photo above showing you leaning over your model working on her. Stated dimensions are one thing, but when you actually SEE how small this model really is in comparison to you, it sheds a whole new light on your remarkable capabilities. My hat's off to you! You truly have some works of art there!
 
Wonderful pictures of the different ships displayed at the museum!!!

It looks like SOS members may have stolen the show with their superb models, especially those two "crazy guys" who "cut their models in half"!!

I love the way you displayed the Luger, with the plans between the two halves.

Thanks for sharing the pictures of this superb event, especially the faces behind the remarkable works.
 
Peter, I so wish I could have seen your model, and you, in person. I have been in awe of your craftsmanship since I joined this forum. Seeing photos of minute details you have replicated that are so close to full scale that one would have a hard time distinguishing one from the other from just photos. My jaw hit the floor, however, when I saw the photo above showing you leaning over your model working on her. Stated dimensions are one thing, but when you actually SEE how small this model really is in comparison to you, it sheds a whole new light on your remarkable capabilities. My hat's off to you! You truly have some works of art there!
Wonderful pictures of the different ships displayed at the museum!!!

It looks like SOS members may have stolen the show with their superb models, especially those two "crazy guys" who "cut their models in half"!!

I love the way you displayed the Luger, with the plans between the two halves.

Thanks for sharing the pictures of this superb event, especially the faces behind the remarkable works.
Russ and Brad: I am writing this answer in a combination of both your posts; otherwise I would be guilty of a 'double post'. I write a heartfelt thank you to both of you for the kind words and compliments. Posts like these sometimes leave me a bit speechless.
Regards, Peter
 
Very cool Peter and lovely photos of the four guys from SOS. WOW those pics Dirk took of your Balder split in two showing all the details are fantastic. Cheers Grant
You also thanks, Grant. And yes, Dirk @Dubz Modelling World made a nice collection of pictures from details with are hidden somewhere in the 147 pages of mij log ...... ;):) Perhaps I will create later a table of contents to insert into post #001...
Regards, Peter
 
The next challenge was the jib:
1242 Fok.jpg
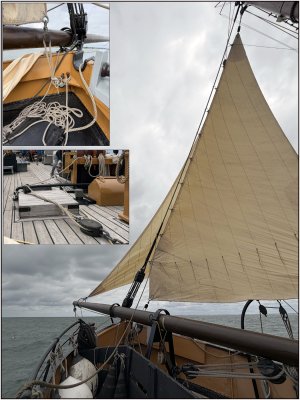
The eyelets along the luff are attached to rings on the forestay. The tack is secured on the Balder using tackle blocks hooked onto an eyelet on the 'klapmuts', the small 'deck' section in the bow. (Inset, top left) On the Balder, this is done using double-sheave blocks, although the specifications call for single-sheave blocks.
The sheet is secured to the horse (traveller) located on the deck, forward of the mainmast. (Inset, middle left)

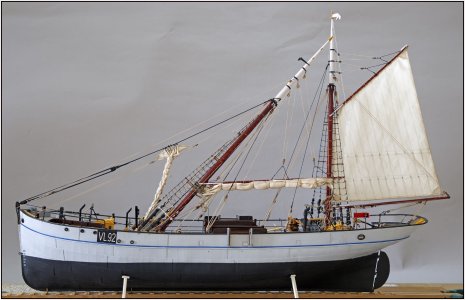
As previously mentioned, I will not be 'setting' the jib on my model. I will show it furled in its position 'behind the fleet' (the fishing gear). A quick reminder:
1243 Fok.jpg
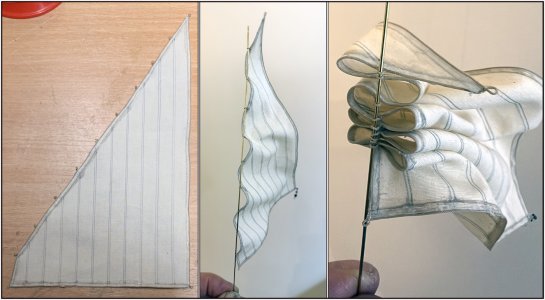
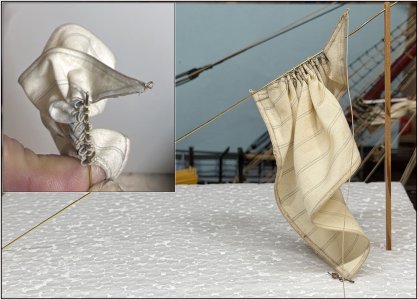
After cutting the sailcloth out of the Navarra, gluing the seams, drawing in the stitching lines, and attaching the bolt rope along the edges complete with all the eyelets:
1244 Fok.jpg
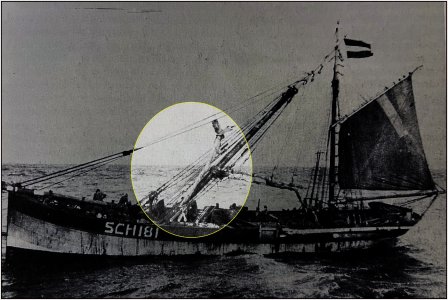
It is impossible to attach and furl the jib directly on the model, so I first mounted it onto a brass rod. I initially tried alternating the orientation of the eyelets flipping them by half a turn each, but this resulted in folds that were far too large when the sail was gathered. During fishing operations, the mainmast is lowered because it catches too much wind, which would otherwise prevent the vessel from lying straight behind its fishing nets. With such large folds, the furled jib would end up catching even more wind.

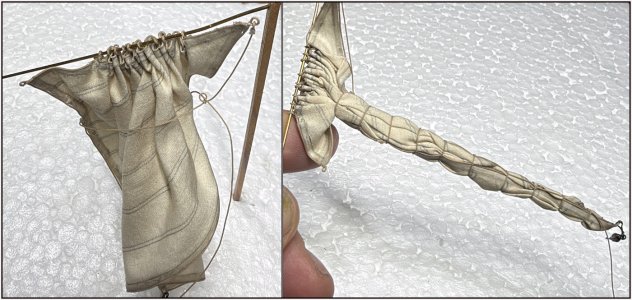
I started over, this time adding two smaller extra folds between every two eyelets:
1245 Fok.jpg
That looks much better. I then used the brass rod and a small wooden batten to create a jig, which helped determine the shape and positioning for the final lashing of the furled jib.
1246 Fok.jpg
I added a temporary loop to the downhaul and used that line along with a series of marling hitches to secure the sail in its furled position.

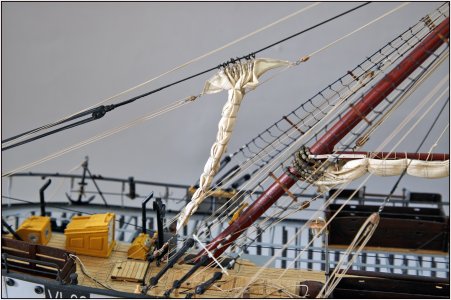
Next came the challenge of attaching the sail to the rings on the forestay:
1248 Fok.jpg
Then, the halyard, tack, and sheet were secured with their respective blocks and lines.

Resulting in this:
1247 Fok.jpg
1249 Fok.jpg
Another challenging chapter completed ......:)
Regards, Peter
 
Back
Top