Barque Stefano a MarisStella kit - by Don Robinson

......and is a great addition to the integrity of the model. I think once you have had the chance to use this method you would be with me wondering why all kits don't have this.

Greg Don
To be frank, I'm using a similar method on my RC BUILD if you look at my bulkheads photos which I posted a few weeks ago, you will notice that I have marked area to be cut away from BH2 to BH11. I'm planning to lay a rectangle slot of timber which will hold all the BH together.
That was my idea to use it, well I thought it was idea. But I'm glad to know, it will work, as I hoped it would.
Thanks Don and happymodeling
Greg
 
Greg: Thanks so much for dropping by, the dowels are used for stiffening the bulkheads for fairing, keeping the keel straight and they defiantly add strength. Once added the difference in the hull is incredible, there is absolutely no give to it whatsoever. I believe this is a MarisStella development, they use this method on several of their kits and is a great addition to the integrity of the model. I think once you have had the chance to use this method you would be with me wondering why all kits don't have this.

Uwe: No need for apologies, you are not hijacking my topic. It is all educational and interesting for others to read, probably something I should have added:). Feel free to add things in at anytime, I certainly do not mind at all. It is good to see you here and showing so much interest, I'll do my best to keep you entertained.

Dave: You have me at a loss here, maybe I need another coffee ;), are you asking about filler blocks? MarisStella does use the dowel system on several of their kits, however, with the Stefano being over a meter long the dowels really shine in keeping the keel straight. As I mentioned above, once these are installed there is literally no movement to the keel and bulkheads. Using dowels versus spacer blocks is much quicker and a lot more accurate. The use of spacer blocks can straighten out a crooked keel but can also work the other way if extreme caution is not taken. With the use of dowels this is not going to be a worry, filler blocks can still be added and again the worry of pushing the keel to one side is no longer going to be a concern. This truly is the best system I have come across and I give MarisStella a big thumbs up for coming up with this idea.
Not sure if I answered your question or not, if not let me know I should be fully awake in an hour or two!!:):)
Yes the strengthening rods are a great idea. I had to abandon Corel’s La Couronne when it developed a severe warp after completion of the hull. Very flimsy keel and bulkhead layout. Mamoli’ Victory which I completed also had these strengthening rods but only two. I added extra blocks just in case. Maris Stella’s rods look very strong and could be overkill but I woulda prefer the certainty that the hull will never warp.
 
Greg, it is well worth the effort to add these, you will be very happy with your decision to do so.
ADC, it may look like overkill but really in order to tie all bulkheads together the amount used is what is required. The dowels are quite large in diameter but there is no bending these and with the hull being over a meter long and the possibility of warping being even greater the "overkill" is a good thing.
Thanks for stopping in

G'day Don
Overkill or not, it's better to be sure and do something while you can, than to wait and be sorry when disaster strikes.
One thing that I have learnt over the years is to be wise before the event! If you can.
h
appymodeling
Greg
 
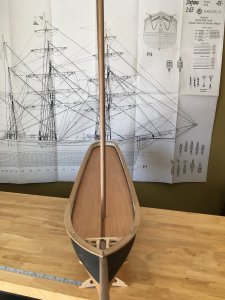
Good Morning everyone. A small update to show what has been done since my last post:IMG_3154.jpg
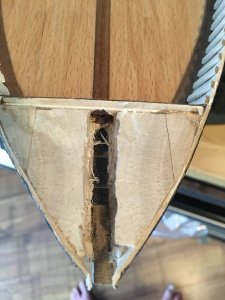
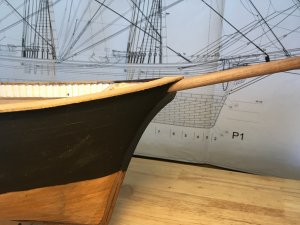
Carving out the bow filler block for the bowsprit

IMG_3157.jpg
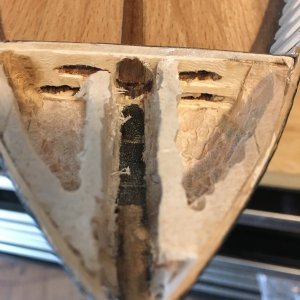
At the bow there is rigging and chains coming through then going through the oval openings you see on the bulkhead. To allow for this more of the filler block was carved out. There is a deck going on top of this section so that is why I left some of the filler block there for support of this deck.

IMG_3163.jpgIMG_3168.jpg
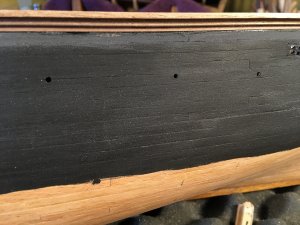
Rail installed. At this point the rail still needs to be narrowed by approximately 2 mm.

IMG_3160.jpgIMG_3162.jpgIMG_3167.jpg

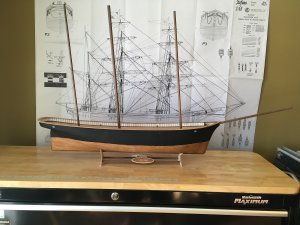
Holes were drilled in deck and masts, bowsprit were dry fitted.

That's all for now, I'll see you next time and Thanks for stopping by
 
G'day Don
Ditto what the Doc said. At first I thought, looking at the second last photo, you only had 1 mask in, until I done a super zoom in. Brilliant work on getting the mask so in-line and brilliant work with the camera.
Havagreatday and happymodeling
Greg
 
Excellent job Don. That's a pretty nice looking kit albeit a bit expensive for my pocket book. I look forward to seeing it finished.

Take care,

Bob
 
It is realy a beautifull vessel. I like her hull form very much. If I compare her with my Salamandre, it is like a Porsche next to an old bus.
One question: Are the masts already in the final position? It looks like, that the inclination of the Main- and Mizzen-mast is bigger, than shown on the drawing behind. But it can be also the perspective.......definitely it is very usefull, if you present the model in front of the drawing....we are able to imagine how she will look in future......looking forward to see much more, so I would have nothing against, if you would post more often :cool:
 
Very nice build - very neat and tidy. I really like this kind of ship, but they are very unpopular with most model shipbuilders (no cannons:(). Quite surprised that a kit is actually available for a vessel of this type.
Bob
 
Dave: Thanks so much Dave

Greg: Thanks. Drilling the holes for the masts was a little nerve racking as you only have one chance to do it right. It was several trips to the plans to measure and re-measure then measure again before I put the first small drill bit to the deck. Starting with small holes and gradually working bigger then finally finishing off with files. I was a very happy camper when I was finally done and fitted the masts to see them fit so good. Thanks again!

Bob H: Thanks for stopping in. It may seem a little pricey but when you compare it to other kits in the same price range it really is a good value. I paid about the same price for my Pegasus kit, however, the Stefano is almost twice the size. So looking at it this way the Stefano is an excellent bargain, I do agree it is a lot to lay out initially but it is a beautiful kit.

Uwek: Always good to hear from you. I like your comparison with the Porsche! The masts are set right. I myself when looking at the picture thought the same and was a little worried, the problem is the plan on the wall is not level. If you look real close at the top right hand corner of the plan you can see the plan is not hanging straight. It is out by approximately 1 cm, which, if hung properly would bring things to proper perspective.
As for more posts, I will do my best :),

Bob: I couldn't agree with you more, it is unfortunate that people shy away from a ship that does not have cannons and has fought in a battle. I am hoping to finish this ship in such a way to show others that there is still lots to look at and admire without the need for cannons and carriages. With any luck it will all turn out.
 
Don, many thanks for your detailed feedback......and I think that everybody will agree.
I would very happy to see more often your posts in your log (and elsewhere)
 
I quite like a ship with few or no cannons. Great to see a big model with sleek and clean lines. One reason why I chose La Salamandre to build. Only a few guns.
 
Hi Don,

Indeed a beautiful kit and I had never heard before from Maris Stella. Is it of Russian Origin?

Succes with the build, I will take the first seat in second row.:).
 
Back
Top