• Ships of Scale has incorportated an extra level of security when you log In. Please follow on-screen prompts to acknowledge that you are not a robot via a "Check Box" or a "Pictorial Check Box Puzzle". This is needed due to higher level of AI Activity Security.
  • SUBSCRIBE TO SHIPS IN SCALE TODAY!

    The beloved Ships in Scale Magazine is back and charting a new course for 2026!
    Discover new skills, new techniques, and new inspirations in every issue.

    NOTE THAT OUR NEXT ISSUE WILL BE July/August 2026
  • Win a Free Custom Engraved Brass Coin!!!
    As a way to introduce our brass coins to the community, we will raffle off a free coin during the month of August. Follow link ABOVE for instructions for entering.

Bending

  • Thread starter Thread starter KRB
  • Start date Start date
  • Watchers Watchers 11
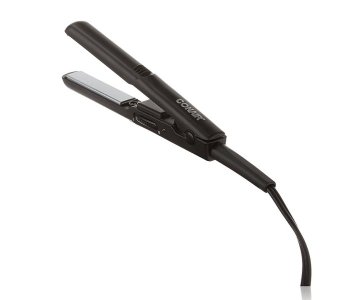
A few years ago I “borrowed” my wife’s hair straightening iron and it works perfectly! It’s the small travel size, dual voltage, heats up in seconds and has no exposed edges to burn yourself nor your workbench. It’s worked so well on easily curving wood that I’d soaked in water for 30 seconds, that I’ve kept her iron. They cost about CAD$25 and honestly wouldn’t try planking without one.

IMG_5660.jpeg
 
Thanks Guys! Great info. I’m just done with the initial planking on the Model Shipways Pilar and after soaking the basswood planking strips bend like crazy, much easier than when dry. I’m only worried about the wood being swollen from the soaking (I measured roughly a 10-20% increase in the plank widths compared to dry strips). It seems that after being thoroughly dry the basswood shrinks a little. Now that the hull is completely dry I notice that the seams are wider and I will have to use more wood filler than I thought. My efforts to get a nice tightly-planked hull without wood filler have been dashed to pieces
 
I’m thinking maybe I should wet then heat the strips to bend and form them and let them dry before glueing them on to avoid shrinkage after soaking.
Btw guys, what are the best woods for:
1) planking
2) building deck structures
3) anything else you can think of :)
 
anything else you can think of
Yes, keep an eye on the soak time, wet the wood, avoid saturation. I soak the planks 10-15 minutes or so.

I don’t use an electric plank heater in my shop, burned myself and takes too long hence bending along the template. And the template allows bending more than one at a time.

Soaked wood expands in water (“raises the grain”) and flashes to steam with the electric bender, thus changing the dimensions.

If the deck isn’t on, apply wood filler from inside the hull out, to get little strips of filler to knock off on the outside. Or, it’s work, mask along the seams on the outside, avoid getting filler across the face of the outside planks. If the hull is to be stained wood filler along the face fills the pores so after staining the filled in pores look different.

I go with the kit materials for the deck and planking. And make yards out of popular. It takes stain and paint well.

-RBF
 
Thanks RBF! The instructions say to leave the planks soaking all through the planking process but I noticed they only need 10-20 minutes to soften enough and I don’t need heat. I hate the damn electric plank bender, fire hazard and last week I burned my thumb and index finger pretty bad when I instinctively grabbed the shaft when I knocked it off the bench like a jerk. And like you say I also noticed that applying the wood glue from inside the hull is cleaner. I’m definitely gonna try applying the filler that way. Thanks for the great info!
 
Btw I watched Chuck Passaro’s YouTube videos on planking. I’m gonna try his technique of just wetting the planks and edge bending them on a jig then applying heat with an iron. I also like the bending jigs that are a quarter round block of wood. I’m gonna try both. I recently finished the Model Shipways Mayflower and used the bent plank jig that’s included in the kit (designed by Mr Passaro) and it worked beautifully.
 
Thanks Guys! Great info. I’m just done with the initial planking on the Model Shipways Pilar and after soaking the basswood planking strips bend like crazy, much easier than when dry. I’m only worried about the wood being swollen from the soaking (I measured roughly a 10-20% increase in the plank widths compared to dry strips). It seems that after being thoroughly dry the basswood shrinks a little. Now that the hull is completely dry I notice that the seams are wider and I will have to use more wood filler than I thought. My efforts to get a nice tightly-planked hull without wood filler have been dashed to pieces
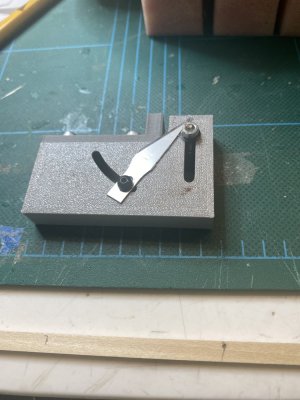
Two things, As you suggested, when I plank and need to bend wood I will clamp it into place and let it dry. I then secure them. This could help with "shrinkage" :rolleyes: :). The other thing is to bevel the side of the plank that is abutting the previous plank to make it fit tighter. I usually sand the edge a bit but you can also buy a device to help with that fairly cheaply.

IMG_2145.jpeg
 
Thanks Guys! Great info. I’m just done with the initial planking on the Model Shipways Pilar and after soaking the basswood planking strips bend like crazy, much easier than when dry. I’m only worried about the wood being swollen from the soaking (I measured roughly a 10-20% increase in the plank widths compared to dry strips). It seems that after being thoroughly dry the basswood shrinks a little. Now that the hull is completely dry I notice that the seams are wider and I will have to use more wood filler than I thought. My efforts to get a nice tightly-planked hull without wood filler have been dashed to pieces

I don't know where the idea came from that you affix wet, or damp, planks to a hull.

Treat it as a 2 stage process - a little like full size practice.
1 - bend and shape the plank to fit its own specific place on the hull. You may elect to cut out the plank from wider material to incorporate a curve, or you may want to dampen the timber to allow steaming it to plasticity and clamping it into place until it dries.
2 - When it is dry, and retaining the shape you need, then you can final fit it, so that it butts tight up and will be watertight. glue it and treenail it into place.

Continue for the rest of the hull. use a scraper or abrasives to bring it to a fine finish, and apply a couple of seal coats of something appropriate to the final finish. It's always shellac for me, but YMMV.

I realise that, especially for a first attempt at planking, it is very tempting to get the newly curved and sopping plank onto the ship. Don't do it. Either strap it there until it dries, or make up a curving jig you can use to hold the curve overnight or until dry.

Jim
 
Thanks guys. You are right on. I’m experimenting and will incorporate your advice. Btw, when I watched Passaro’s YouTube planking vids: he mentioned very briefly about beveling the plank edges. I almost blew it off because he kinda mentioned it in passing. Just like you said. That’s why my planks stick out at the edges and I have to sand my face off to get the hull smooth (and use a lot of wood filler). Live and learn (thanks to you guys). Dang I love this stuff. Thanks for taking your time to help me out
 
Thanks Guys! Great info. I’m just done with the initial planking on the Model Shipways Pilar and after soaking the basswood planking strips bend like crazy, much easier than when dry. I’m only worried about the wood being swollen from the soaking (I measured roughly a 10-20% increase in the plank widths compared to dry strips). It seems that after being thoroughly dry the basswood shrinks a little. Now that the hull is completely dry I notice that the seams are wider and I will have to use more wood filler than I thought. My efforts to get a nice tightly-planked hull without wood filler have been dashed to pieces

Yes, your experience is not unique. Wood, depending upon the species, and particularly softwood like bass, will swell across the grain as it takes up free water when soaked. It will shrink back some when the free water evaporates. That water will also raise the grain and require sanding smooth again when dry.
 
Thanks guys. You are right on. I’m experimenting and will incorporate your advice. Btw, when I watched Passaro’s YouTube planking vids: he mentioned very briefly about beveling the plank edges. I almost blew it off because he kinda mentioned it in passing. Just like you said. That’s why my planks stick out at the edges and I have to sand my face off to get the hull smooth (and use a lot of wood filler). Live and learn (thanks to you guys). Dang I love this stuff. Thanks for taking your time to help me out

If you want tight fitting planks, it is necessary to bevel the edges (or at least one edge of the two butting each other) to match the rolling bevel on the plank edges. If your plank edges are at a right angle to the plank face, when the planks are hung against the curve of the hull, the inner corners of the plank faces will butt against each other, but the outer corners of the plank faces will be separated to the extent there is a curve in the hull.
 
There seem to be many ways to broad bend successfully. I wish someone would invent a practical adjustable tool for edge bending which is as critical and much more difficult to do. Spiling is the best way to go, but most kits only supply straight sticks so it is not so easy to taper in breadth then edge bend so they do not lift.
Allan
I use around 4 jigs, Maybe one first then a different. Fit and fix by degree clamping any sign of buckling, fitting the curve as far as it will go then fix set and wait. . Keeping the plank moist with a watercolour brush. The outer edge of the curve is tapered thereby extending it slightly. If it's not working I have sheet stock so can spile. Hull planking is no longer gleuing bits to a cheap frame, everything has to be improved. It's my favourite part of the build!
Changing the subject, a spitfire has just flown over the house!, Rcocognised the Merlin engine, unmistakable!!!
 
I have sheet stock so can spile. Hull planking is no longer gleuing bits to a cheap frame, everything has to be improved.
I am going to be very bad and write: it would all go a whole lot easier if you just did it as a scratch build. You would start with quality materials. If you are doing your hull POB, a few hours on a drawing board or in a drawing program could gain you twice or more the number of molds - depending on your ambition and tolerance for the tedious.

you can also buy a device to help with that fairly cheaply.

IMG_2145.jpeg

This device is essentially a scraper. A scraper works by having a burr as its cutting edge being dragged over the wood's surface. When I scrape - the top edge of the scraper is leaning forward. It is not a knife cutting into the wood. A knife type cut would look for any opportunity to catch the grain change - dig in - and tear. This device is neither a scraper - the #11 has no burr - nor is it a knife - the edge is perpendicular to the wood's surface.
I think that wedging the #11 to be a knife: pushing the back edge higher so the edge is digging in - would be bad - especially for weak soft wood like Basswood - which is totally unsuited for this.
The #11 can be set so the the back edge is turned in to the support and a carbide rod burnisher can be used to turn a burr on the edge. then this thing would be an actual scraper. Then it would actually have a chance to do the job it is intended to do.

Long ago I had excellent result using the soft steel cutter from a empty box of lab Parafilm - Being soft steel - it was cut reasonably quickly by needle files and left a burr.

A way to get an actual feel for the joy of working with species of wood with characteristics that support rather than resist is to try scraping the same shape in a piece of seasoned Pyrus calleryana - Callery pear - the street ornamental species - now seen as a weed in most places.
It is brown rather than red - usually - but it does everything we want - and does it well.
 
This device is neither a scraper - the #11 has no burr - nor is it a knife

No, I say it is a scraper. Whilst cabinet scrapers are tnormally uned with a burr, they can also be used without, straight from the file, with the freshly made 90 degree angle doing the work of the burr,
Further, it has long been the case that broken glass is used as a scraper, and that has no burr, but merely a very sharp edge. Not much used nowadays unless showing off heritage fine craft work, as the edge is continually needing renewal.
As you mention, the skill in using a scraper is having a feel for the angle at the cutting edge suited to the job in hand.

I like your jig though, an ingenious way to produce a consistent angle. I can imagine something similar using abrasives would also enable consistency.

For myself, a straight (ish) plank is clamped on edge, and a sharp block plane run along its length. However, for my next planking foray I think I’ll try your jig technique.

Many thanks for the inspiration.

Jim

 
Rob, could you please tell us where we can buy such a device? Looks like a great tool for scraping and beveling planks etc. I looked online but didn’t see it although there are other types like AL’s “micro scrapers”. I could make a similar device but I’ll try to save time by buying one. I like that the blade angle apparently can be adjusted to different angles.
 
Back
Top