


All hands on deck!
How many times do we struggle to find a better\simplier way to make our own parts for our hobby? I don't know about you, but personally, often times I cannot come to an agreement with myself using one method over another. Sergey Trubchaninov, well known on the Russian ship model forums as Bibigon use to have his personal column "Bibigon's Trivia" where his showed photos (step-by-step) of how to make your own ship fightings using available tools and materials.
Some time back, he was banned from the forum and all his data was deleted. However, his friends were able to recover some of his data. Today, I have a chance, obviously with Sergey's permission, to publish some of his work. He believes those tips and tricks may greatly help someone to get one step further to become a scratch builder by making their own parts.
Here is one of his saved build log (sorry Russian language), but the photos are pretty much don't need explanations for the most part. If you have any question, I would more than glad to help translate: http://forum.modelsworld.ru/topic7752.html
All transcript is written in Russian, so it will take some time to translate. I will try to translate as close as the original document. Some of the pictures not good quality but most of them really good. Alright, enough intrigues... Let me show you the first one.
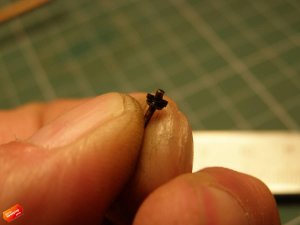
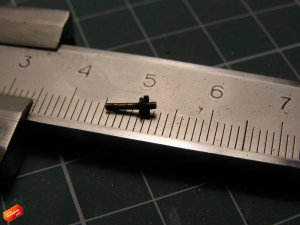
Making hooks with a ring
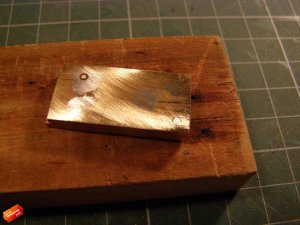
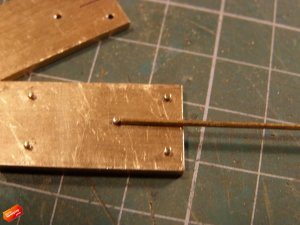
The task was to make so they look great, using a minimum of tools and materials available. Everything made using the rotary tool. I have brass, but an even more accessible material is a steel electrode (in Russia, comments by Jim) that I was using for manufacturing.
Materials, tools, and steps we will have to take.
.jpg")
.jpg")
.jpg")
.jpg")
.jpg")
.jpg")
.jpg")
.jpg")
.jpg")
.jpg")
.jpg")
.jpg")
.jpg")
.jpg")
.jpg")
.jpg")
.jpg")
.jpg")
.jpg")
.jpg")
.jpg")
.jpg")
.jpg")
.jpg")
to be continued...with part 2
-Jim for Bibigon
How many times do we struggle to find a better\simplier way to make our own parts for our hobby? I don't know about you, but personally, often times I cannot come to an agreement with myself using one method over another. Sergey Trubchaninov, well known on the Russian ship model forums as Bibigon use to have his personal column "Bibigon's Trivia" where his showed photos (step-by-step) of how to make your own ship fightings using available tools and materials.
Some time back, he was banned from the forum and all his data was deleted. However, his friends were able to recover some of his data. Today, I have a chance, obviously with Sergey's permission, to publish some of his work. He believes those tips and tricks may greatly help someone to get one step further to become a scratch builder by making their own parts.
Here is one of his saved build log (sorry Russian language), but the photos are pretty much don't need explanations for the most part. If you have any question, I would more than glad to help translate: http://forum.modelsworld.ru/topic7752.html
All transcript is written in Russian, so it will take some time to translate. I will try to translate as close as the original document. Some of the pictures not good quality but most of them really good. Alright, enough intrigues... Let me show you the first one.
Making hooks with a ring
The task was to make so they look great, using a minimum of tools and materials available. Everything made using the rotary tool. I have brass, but an even more accessible material is a steel electrode (in Russia, comments by Jim) that I was using for manufacturing.
Materials, tools, and steps we will have to take.
to be continued...with part 2
-Jim for Bibigon
Last edited by a moderator:
.jpg")
.jpg")
.jpg")
.jpg")
.jpg")
.jpg")
.jpg")
.jpg")
.jpg")
.jpg")
.jpg")
.jpg")
.jpg")
.jpg")
.jpg")
.jpg")
.jpg")
.jpg")
.jpg")
.jpg")
.jpg")
.jpg")
.jpg")
.jpg")
.jpg")
.jpg")
.jpg")
.jpg")


.jpg")
.jpg")
.jpg")
.jpg")
.jpg")
.jpg")
.jpg")
.jpg")
.jpg")
.jpg")
.jpg")
.jpg")
.jpg")
.jpg")
.jpg")
.jpg")
.jpg")
.jpg")
.jpg")
.jpg")
.jpg")
.jpg")
.jpg")
.jpg")
.jpg")
.jpg")
.jpg")
.jpg")
.jpg")
.jpg")
.jpg")
.jpg")
.jpg")
.jpg")
.jpg")
.jpg")
.jpg")
.jpg")
.jpg")
.jpg")
.jpg")
.jpg")
.jpg")
.jpg")
.jpg")
.jpg")
.jpg")
.jpg")
.jpg")
.jpg")
.jpg")
.jpg")

")
