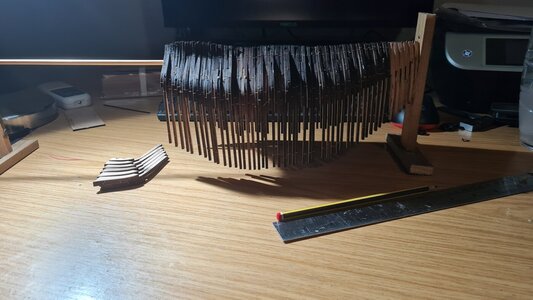
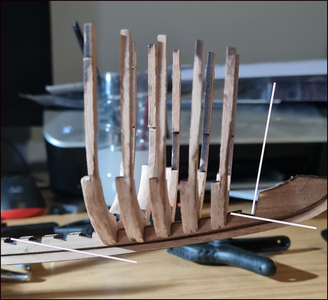
Always welcom to ask.Thanks Peter,just didn't want to try and force them in

PS: Beware of the 3rd en 6th frame from the left on the picture ……… hanging backwards.
Regards, Peter
 |
As a way to introduce our brass coins to the community, we will raffle off a free coin during the month of August. Follow link ABOVE for instructions for entering. |
 |
 |
The beloved Ships in Scale Magazine is back and charting a new course for 2026! Discover new skills, new techniques, and new inspirations in every issue. NOTE THAT OUR FIRST ISSUE WILL BE JAN/FEB 2026 |
 |
Always welcom to ask.Thanks Peter,just didn't want to try and force them in


When the parts 17+18 are mounted flush with the top of middle parts 8/9/10 of the keel, and the parts 20+21 flush with the bottom, then it’s just that size of the rabbet which arises. You influence the width yourself with how much char (and wood) you sand away from the respective bottom of 17+18 or top of 20+21. The lowest hull plank, the garboard strake, must later be placed in the rabbet.OK, Sorry to be a pain, another question, how wide should the rabbit be ? I haven't glued these yet, but it looks quite wide ?
View attachment 338072

It's worth the effort to create a chamfered rebate. Once you hit the planking of the hull, you'll reap the rewards.Much has been discussed and written about this rabbet. I'm not going to do that here. If interested: —> Rabbet <— Click : post 47 till 59. Other builders have just slide the hull plank into the square rabbet.

Thanks, I agree with the reasoning on this, I think my original question was around the actual gap ? I don't know how important this will be during the planking stage ? on my build, it looked a bit wide, however the edges on the boards ( I don't know the technical terms for them) we're lined up OK ?It's worth the effort to create a chamfered rebate. Once you hit the planking of the hull, you'll reap the rewards.


Same here, the gaps look a bit on the wide side, but that gave me little to no trouble when planking. Actual, I think having the gaps to be narrow will give you more issues; potentially giving you a lot of grief, because especially at the bow the angle between planks and keel are very small. If the gaps are too small, you won't get the planks to follow the intended contour nice and smoothl.Thanks, I agree with the reasoning on this, I think my original question was around the actual gap ? I don't know how important this will be during the planking stage ? on my build, it looked a bit wide, however the edges on the boards ( I don't know the technical terms for them) we're lined up OK ?

Great thank you, makes sence. have you completed your build ?Same here, the gaps look a bit on the wide side, but that gave me little to no trouble when planking. Actual, I think having the gaps to be narrow will give you more issues; potentially giving you a lot of grief, because especially at the bow the angle between planks and keel are very small. If the gaps are too small, you won't get the planks to follow the intended contour nice and smoothl.
You have to turn your keel a bit counter clockwise, so the bottom of all the slots are horizontal:These are not finished ( by any means) but this 'Rabbit/ Rebate ' is something I haven't came across before. Looking at some other posts it seems getting the frames to meet is a big thing! Do they all have to meet the top line ?
View attachment 338536


I used two methods to repair broken frames;Well, I knew it wouldn't be to long till I joined the BRC
Unfortunately I dropped it off the edge of my desk, and my legs instantly closed to try and save it ( from falling lightly onto a carpet )
Oh well fingers crossed this is the only one !! haha
View attachment 338496

sorry, fifths do not mount perpendicular to the keel? from the construction lineYou have to turn your keel a bit counter clockwise, so the bottom of all the slots are horizontal:
View attachment 338572
Then you can install your frames vertical, in a 90 dgr angle with the slot bottoms. Then you will see that the tops became in line (with the base of the jig).
Regards, Peter
Hi Jim. To see if the frames are correct in the keel, make a dry-fit of the keelson on the inside of the frames.OK Installed the frames and not all are reaching the Rabbit line ? Is thus a big problem?
View attachment 339972
I didn't write it like that, Frank. With my clarified lines. I suppose ‘fifths’=frames?sorry, fifths do not mount perpendicular to the keel? from the construction line

Sorry Pietro I can't understand (Translation) the Tuoscritto wellI didn't write it like that, Frank. With my clarified lines. I suppose ‘fifths’=frames?
The bottoms of the slots/recesses are horizontal and the frames are vertical on that bottoms.
And gosh…….. the ‘horizontal bottoms’ run parallel to the horizontal construction line = jig bottom. Then the frames are also vertical to the jig.
In the Netherlands we call this “square reasoning”.
Regards, Peter

No, my build is still in progress, https://shipsofscale.com/sosforums/threads/yq-bluenose-by-johan.8304/page-44have you completed your build ?

